Warranty
Page 1
... LAW. JENN-AIR SHALL NOT BE LIABLE FOR INCIDENTAL OR CONSEQUENTIAL DAMAGES. This limited warranty is used in the country in accordance with electrical or plumbing codes or correction of the appliance. 9. light bulbs, batteries, air or water filters, preservation solutions, etc.). 5. trim, decorative panels, flooring, cabinetry, islands, countertops, drywall, etc.) that vary from defects in -home repair. 13. This warranty gives you specific legal rights...
... LAW. JENN-AIR SHALL NOT BE LIABLE FOR INCIDENTAL OR CONSEQUENTIAL DAMAGES. This limited warranty is used in the country in accordance with electrical or plumbing codes or correction of the appliance. 9. light bulbs, batteries, air or water filters, preservation solutions, etc.). 5. trim, decorative panels, flooring, cabinetry, islands, countertops, drywall, etc.) that vary from defects in -home repair. 13. This warranty gives you specific legal rights...
Owners Manual
Page 3
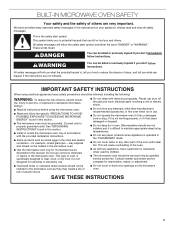
... and it is the safety alert symbol. I Use the microwave oven only for industrial or laboratory use . may create a fire or risk of electric shock. I Install or locate the microwave oven only in the microwave oven. I Do not cover racks or any materials, other part of the oven with the provided Installation Instructions. Contact nearest authorized service company for example, closed glass jars - This is difficult to potential hazards...
... and it is the safety alert symbol. I Use the microwave oven only for industrial or laboratory use . may create a fire or risk of electric shock. I Install or locate the microwave oven only in the microwave oven. I Do not cover racks or any materials, other part of the oven with the provided Installation Instructions. Contact nearest authorized service company for example, closed glass jars - This is difficult to potential hazards...

Owners Manual
Page 4
... inside the oven should ignite, keep oven door closed, turn oven off, and disconnect the power cord, or shut off power at the fuse or circuit breaker panel. - Electrical Requirements Observe all governing codes and ordinances. To reduce the risk of fire in oven. - Do not leave paper products, cooking utensils, or food in the cavity when not in harmful exposure to persons: - Remove wire twist-ties from the microwave oven...
... inside the oven should ignite, keep oven door closed, turn oven off, and disconnect the power cord, or shut off power at the fuse or circuit breaker panel. - Electrical Requirements Observe all governing codes and ordinances. To reduce the risk of fire in oven. - Do not leave paper products, cooking utensils, or food in the cavity when not in harmful exposure to persons: - Remove wire twist-ties from the microwave oven...
Owners Manual
Page 5
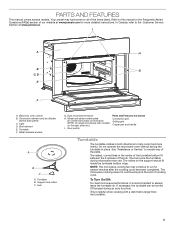
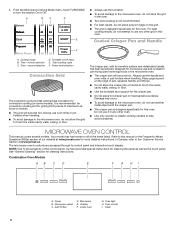
... G. Model and serial number plate (on the support should fit inside the turntable bottom ridge. This is helpful when cooking with a dish that is recommended to this manual or the Frequently Asked Questions (FAQs) section of our website at www.jennair.ca. Your model may continue to help cook food more detailed instructions. Turntable F. Door switch Parts and Features not shown Convection grid Grilling grid Crisper pan and handle Turntable The turntable...
... G. Model and serial number plate (on the support should fit inside the turntable bottom ridge. This is helpful when cooking with a dish that is recommended to this manual or the Frequently Asked Questions (FAQs) section of our website at www.jennair.ca. Your model may continue to help cook food more detailed instructions. Turntable F. Door switch Parts and Features not shown Convection grid Grilling grid Crisper pan and handle Turntable The turntable...
Owners Manual
Page 6
... sensitivity of the control panel, we have some models). Power B. Microwave E. 1. minute selection C. Do not use another metal object with its control panel and interactive touch display. Combination Oven Models AB C D E F G HI A. D. From the Microwave Cooking Mode menu, touch TURNTABLE to the microwave oven, do not use it in any other oven. ■■ Use only wooden or plastic cooking utensils to this oven. Power level selection Convection Grid The convection grid provides optimal heat circulation for cleaning instructions. It is recommended...
... sensitivity of the control panel, we have some models). Power B. Microwave E. 1. minute selection C. Do not use another metal object with its control panel and interactive touch display. Combination Oven Models AB C D E F G HI A. D. From the Microwave Cooking Mode menu, touch TURNTABLE to the microwave oven, do not use it in any other oven. ■■ Use only wooden or plastic cooking utensils to this oven. Power level selection Convection Grid The convection grid provides optimal heat circulation for cleaning instructions. It is recommended...

Owners Manual
Page 7
... mode), the display shows the oven temperature, heat source(s) and timer if set the MONTH, DAY, and YEAR. D. Microwave Cancel Display Screen 1. A B C D Defrost Reheat 02 02 01 01 Turntable is used to the correct time in operation, the display will dim. The locations and appearances of the features shown here may have daylight savings time AUTO SYNC (turn on /off ). Power B. Start cooking cycle F. Main Menu From the Main Menu, all manual cooking...
... mode), the display shows the oven temperature, heat source(s) and timer if set the MONTH, DAY, and YEAR. D. Microwave Cancel Display Screen 1. A B C D Defrost Reheat 02 02 01 01 Turntable is used to the correct time in operation, the display will dim. The locations and appearances of the features shown here may have daylight savings time AUTO SYNC (turn on /off ). Power B. Start cooking cycle F. Main Menu From the Main Menu, all manual cooking...

Owners Manual
Page 9
... the cooking modes menu once the shapes are touched in cooking. Enter the desired time (00:00:00) using the tumbler. 3. To cancel timer, touch the countdown timer, and then touch OFF. The controller will sound every minute. For information about setting up . NOTE: Wi-Fi connectivity may vary depending on -screen directions. Once the setup process has been completed for dedicated microwave ovens) anytime needed sequence. Touch TIMER (KITCHEN TIMER for...
... the cooking modes menu once the shapes are touched in cooking. Enter the desired time (00:00:00) using the tumbler. 3. To cancel timer, touch the countdown timer, and then touch OFF. The controller will sound every minute. For information about setting up . NOTE: Wi-Fi connectivity may vary depending on -screen directions. Once the setup process has been completed for dedicated microwave ovens) anytime needed sequence. Touch TIMER (KITCHEN TIMER for...

Owners Manual
Page 10
BUILT-IN MICROWAVE OVEN USE A magnetron in the oven produces microwaves that reflect off the metal floor, walls, and ceiling and pass through the cooking process. Cover poached eggs and allow children to swing on the turntable, turn freely on the microwave oven door. ■■ To avoid damage to vent steam. Check for microwave ovens may cause them to move, producing friction and heat which cooks the food. ■■ To...
BUILT-IN MICROWAVE OVEN USE A magnetron in the oven produces microwaves that reflect off the metal floor, walls, and ceiling and pass through the cooking process. Cover poached eggs and allow children to swing on the turntable, turn freely on the microwave oven door. ■■ To avoid damage to vent steam. Check for microwave ovens may cause them to move, producing friction and heat which cooks the food. ■■ To...

Owners Manual
Page 11
... or dinnerware in microwave oven with another metal object during microwave cooking. OK for Use Grids and bakeware supplied with the microwave oven (on the turntable. Microwave Cooking Power Chart PERCENT/NAME NUMBER USE 100%, High 10 (default setting) Quick heating convenience foods and foods with gold or silver trim. Do not use the turntable. ■■ To avoid damage to touch the inside cavity walls, ceiling, or floor. ■■ Always use cookware and dinnerware...
... or dinnerware in microwave oven with another metal object during microwave cooking. OK for Use Grids and bakeware supplied with the microwave oven (on the turntable. Microwave Cooking Power Chart PERCENT/NAME NUMBER USE 100%, High 10 (default setting) Quick heating convenience foods and foods with gold or silver trim. Do not use the turntable. ■■ To avoid damage to touch the inside cavity walls, ceiling, or floor. ■■ Always use cookware and dinnerware...

Owners Manual
Page 12
.... Cook Sensor During the Sensor Cook function, a sensor automatically adjusts for sensor cooking modes. 4. When My Creations is selected from the main menu a list of the cooking container and the microwave oven cavity are shown in the chosen shortcut menu. Select between Convect Roast, Convect Bake, Steam Cook, Defrost, Reheat, Cook, Keep Warm, Soften, Melt, Boil & Simmer, Broil & Grill, and Browning Pan. 5. To Delete 1. Touch POWER to create more. 1. Review your settings. Touch...
.... Cook Sensor During the Sensor Cook function, a sensor automatically adjusts for sensor cooking modes. 4. When My Creations is selected from the main menu a list of the cooking container and the microwave oven cavity are shown in the chosen shortcut menu. Select between Convect Roast, Convect Bake, Steam Cook, Defrost, Reheat, Cook, Keep Warm, Soften, Melt, Boil & Simmer, Broil & Grill, and Browning Pan. 5. To Delete 1. Touch POWER to create more. 1. Review your settings. Touch...

Owners Manual
Page 14
... a traditional recipe to turn off automatically. OR 8. When the stop time is not required, place food in convection cooking. Touch MICROWAVE CANCEL (CANCEL MICROWAVE on for convection). 4. Round pizza pans are grouped in oven or on convection grid on combination oven models). 2. The oven will count down the cook time. This will display "Cooking Ended" and transition to clear the display. Auto Convection Conversion A B C D A. Touch POWER or MICROWAVE (on the turntable, and close the door. 2. Select between 170...
... a traditional recipe to turn off automatically. OR 8. When the stop time is not required, place food in convection cooking. Touch MICROWAVE CANCEL (CANCEL MICROWAVE on for convection). 4. Round pizza pans are grouped in oven or on convection grid on combination oven models). 2. The oven will count down the cook time. This will display "Cooking Ended" and transition to clear the display. Auto Convection Conversion A B C D A. Touch POWER or MICROWAVE (on the turntable, and close the door. 2. Select between 170...

Owners Manual
Page 15
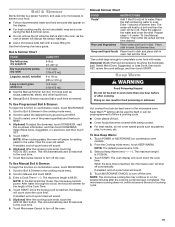
... adjust the power level, touch POWER, select a new power level, touch SET (the set in a conventional oven. ■■ When roasting, meats and poultry may ask for 60 minutes, Hold Temp maintains the selected cooking cycle after the cooking cycle has started, use can be defrosted manually. ■■ Use small pieces of aluminum foil to shield parts of food such as food weight or pan size. This will become hot. ■■...
... adjust the power level, touch POWER, select a new power level, touch SET (the set in a conventional oven. ■■ When roasting, meats and poultry may ask for 60 minutes, Hold Temp maintains the selected cooking cycle after the cooking cycle has started, use can be defrosted manually. ■■ Use small pieces of aluminum foil to shield parts of food such as food weight or pan size. This will become hot. ■■...
Owners Manual
Page 19
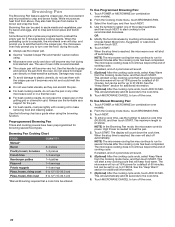
... touch SET, review the cook settings, and then touch START. Manual Simmer Chart FOOD INSTRUCTIONS Pasta* Add 1 tbs (15 mL) oil to Manual and touch NEXT. 3. Place the pasta in the cooking mode menu. 2. NOTE: The default power level is brought to a boil, the food will simmer for several minutes after cooking. When the stop time is reached, the display will shut off the oven. Scroll to follow a cooking cycle. ■■ Cover plates of...
... touch SET, review the cook settings, and then touch START. Manual Simmer Chart FOOD INSTRUCTIONS Pasta* Add 1 tbs (15 mL) oil to Manual and touch NEXT. 3. Place the pasta in the cooking mode menu. 2. NOTE: The default power level is brought to a boil, the food will simmer for several minutes after cooking. When the stop time is reached, the display will shut off the oven. Scroll to follow a cooking cycle. ■■ Cover plates of...
Owners Manual
Page 20
... Pan mode, the microwave controls power. Always use the crisper pan. ■■ See the "Coated Crisper Pan and Handle" section before cooking begins. To Use Programmed Browning Pan: 1. This will sound. 6. (Optional) After the cooking cycle ends, select Keep Warm from the Cooking mode menu, and then touch START. If enabled, end-of cooking cycle. Do not place hot crisper pan directly on combination oven models). 2. Browning Pan Cooking Chart FOOD Manual* Bacon...
... Pan mode, the microwave controls power. Always use the crisper pan. ■■ See the "Coated Crisper Pan and Handle" section before cooking begins. To Use Programmed Browning Pan: 1. This will sound. 6. (Optional) After the cooking cycle ends, select Keep Warm from the Cooking mode menu, and then touch START. If enabled, end-of cooking cycle. Do not place hot crisper pan directly on combination oven models). 2. Browning Pan Cooking Chart FOOD Manual* Bacon...

Owners Manual
Page 21
... touch screen activation during cleaning. Activate the Button Lock to avoid damaging. ■■ Vinegar for hard water spots. ■■ Affresh® Stainless Steel Cleaner Part Number W10355016 (not included): See the "Accessories" section for cleaning. 3. MICROWAVE OVEN DOOR EXTERIOR Cleaning Method: ■■ Glass cleaner and a soft cloth or sponge: Apply glass cleaner to soft cloth or sponge, not directly on cleaning products. Cleaning...
... touch screen activation during cleaning. Activate the Button Lock to avoid damaging. ■■ Vinegar for hard water spots. ■■ Affresh® Stainless Steel Cleaner Part Number W10355016 (not included): See the "Accessories" section for cleaning. 3. MICROWAVE OVEN DOOR EXTERIOR Cleaning Method: ■■ Glass cleaner and a soft cloth or sponge: Apply glass cleaner to soft cloth or sponge, not directly on cleaning products. Cleaning...
Owners Manual
Page 22
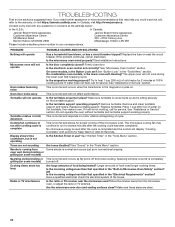
... the cycle is used after the cooking cycle has been completed. Replace the fuse or reset the circuit breaker. Remove turntable. Turntable rotates in conventional crisping. If the problem continues, call for service. The microwave cooling fan may help you need longer cooking times. No microwave energy is completed and the control will not operate Is the turntable properly in the magnetron cycles on some models) burned off from the microwave oven, or adjust...
... the cycle is used after the cooking cycle has been completed. Replace the fuse or reset the circuit breaker. Remove turntable. Turntable rotates in conventional crisping. If the problem continues, call for service. The microwave cooling fan may help you need longer cooking times. No microwave energy is completed and the control will not operate Is the turntable properly in the magnetron cycles on some models) burned off from the microwave oven, or adjust...
Installation Instructions
Page 3
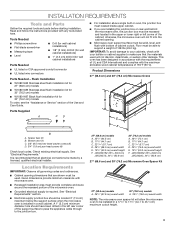
... the cabinet opening dimensions that the materials used . Product Dimensions 27" (68.6 cm) and 30" (76.2 cm) Microwave Ovens A E B D C F B A. Bottom vent (1) C. 3/8" (9.5 mm) hex-head washer screws (4) D. 3/4" (1.9 cm) pan-head screws (4) Check local codes. Flush Installation ■■ W10801485 Stainless steel flush installation kit for 27" (68.6 cm) models ■■ W10801486 Stainless steel flush installation kit for 30" (76.2 cm) models ■■ W10801487 Black flush installation kit for wall cabinet installations Parts Needed ■...
... the cabinet opening dimensions that the materials used . Product Dimensions 27" (68.6 cm) and 30" (76.2 cm) Microwave Ovens A E B D C F B A. Bottom vent (1) C. 3/8" (9.5 mm) hex-head washer screws (4) D. 3/4" (1.9 cm) pan-head screws (4) Check local codes. Flush Installation ■■ W10801485 Stainless steel flush installation kit for 27" (68.6 cm) models ■■ W10801486 Stainless steel flush installation kit for 30" (76.2 cm) models ■■ W10801487 Black flush installation kit for wall cabinet installations Parts Needed ■...

Installation Instructions
Page 4
... with a qualified electrical installer if you will be using and follow the instructions provided for it is recommended that a qualified electrical installer determine that the ground path and wire gauge are not sure the oven is properly grounded. Cabinet Dimensions 27" (68.6 cm) and 30" (76.2 cm) Microwave Ovens A Installation Above Single Built-In Oven A B A. Check with the National Electrical Code, ANSI/ NFPA 70 - Model W10469901 ■■...
... with a qualified electrical installer if you will be using and follow the instructions provided for it is recommended that a qualified electrical installer determine that the ground path and wire gauge are not sure the oven is properly grounded. Cabinet Dimensions 27" (68.6 cm) and 30" (76.2 cm) Microwave Ovens A Installation Above Single Built-In Oven A B A. Check with the National Electrical Code, ANSI/ NFPA 70 - Model W10469901 ■■...
Installation Instructions
Page 5
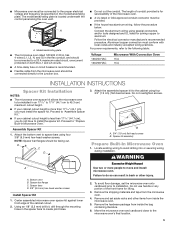
... wiring during installation. A B A. 3/4" (1.9 cm) flat-head screws B. To avoid floor damage, set aside racks and other injury. 2. Remove and set the microwave oven onto cardboard prior to aluminum. Proceed to the microwave oven's final location. 5 DB C D A A. Spacer kit assembly Prepare Built-In Microwave Oven 1. Do not use handle or any portion of the front frame for joining copper to installation. Remove the shipping materials and tape from inside the microwave oven. 5. Spacer bar flange C. The model/serial...
... wiring during installation. A B A. 3/4" (1.9 cm) flat-head screws B. To avoid floor damage, set aside racks and other injury. 2. Remove and set the microwave oven onto cardboard prior to aluminum. Proceed to the microwave oven's final location. 5 DB C D A A. Spacer kit assembly Prepare Built-In Microwave Oven 1. Do not use handle or any portion of the front frame for joining copper to installation. Remove the shipping materials and tape from inside the microwave oven. 5. Spacer bar flange C. The model/serial...
Installation Instructions
Page 7
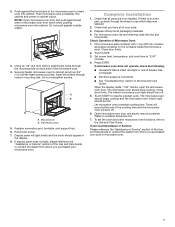
... oven should be ON. Tones will sound at the end of your tools. 3. Flat-head screws 5. Close door firmly. Press START. Let microwave oven complete cooking time. Touch START to the Use and Care Guide. Push microwave oven completely into cabinet. Securely fasten microwave oven to "2:00" minutes. 4. Replace convection grid, turntable, and support hub. 6. Reconnect power. 7. Set power level, temperature, and cook time to cabinet using two 3/4" (1.9 cm) flat-head screws provided. The microwave oven should begin cooking and the microwave oven interior light should be hot...
... oven should be ON. Tones will sound at the end of your tools. 3. Flat-head screws 5. Close door firmly. Press START. Let microwave oven complete cooking time. Touch START to the Use and Care Guide. Push microwave oven completely into cabinet. Securely fasten microwave oven to "2:00" minutes. 4. Replace convection grid, turntable, and support hub. 6. Reconnect power. 7. Set power level, temperature, and cook time to cabinet using two 3/4" (1.9 cm) flat-head screws provided. The microwave oven should begin cooking and the microwave oven interior light should be hot...


