Warranty
Page 1
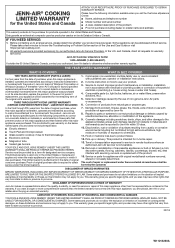
... Jenn-Air servicer is a limited 5-year warranty on the below named parts only and does not include repair labor. ■■ Electric element ■■ Touch Pad and microprocessor ■■ Glass ceramic cooktop: if due to determine whether another warranty applies. Before contacting us to arrange service, please determine whether your authorized Jenn-Air dealer to thermal breakage ■■ Electronic controls ■■ Magnetron...
... Jenn-Air servicer is a limited 5-year warranty on the below named parts only and does not include repair labor. ■■ Electric element ■■ Touch Pad and microprocessor ■■ Glass ceramic cooktop: if due to determine whether another warranty applies. Before contacting us to arrange service, please determine whether your authorized Jenn-Air dealer to thermal breakage ■■ Electronic controls ■■ Magnetron...
Owners Manual
Page 3
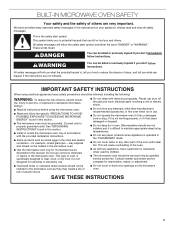
... provided Installation Instructions. I Do not use paper products when appliance is necessary when used by qualified service personnel. Do not use as they may create a fire or risk of electric shock. I Use the microwave oven only for industrial or laboratory use . All safety messages will cause overheating of the oven. Connect only to heat, cook, or dry food. I As with metal scouring pads. I Install or locate the microwave oven...
... provided Installation Instructions. I Do not use paper products when appliance is necessary when used by qualified service personnel. Do not use as they may create a fire or risk of electric shock. I Use the microwave oven only for industrial or laboratory use . All safety messages will cause overheating of the oven. Connect only to heat, cook, or dry food. I As with metal scouring pads. I Install or locate the microwave oven...

Owners Manual
Page 4
... repaired by anyone except properly quali ed service personnel. This device complies with the door open since open-door operation can result in harmful exposure to both before removing the container. - IMPORTANT SAFETY INSTRUCTIONS I Liquids, such as water, coffee, or tea are placed inside the oven should ignite, keep oven door closed, turn oven off, and disconnect the power cord, or shut off power at the fuse or circuit breaker panel...
... repaired by anyone except properly quali ed service personnel. This device complies with the door open since open-door operation can result in harmful exposure to both before removing the container. - IMPORTANT SAFETY INSTRUCTIONS I Liquids, such as water, coffee, or tea are placed inside the oven should ignite, keep oven door closed, turn oven off, and disconnect the power cord, or shut off power at the fuse or circuit breaker panel...
Owners Manual
Page 5
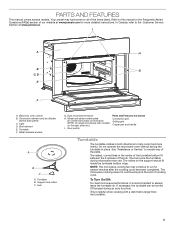
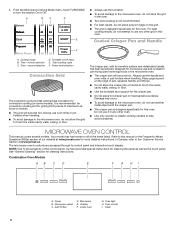
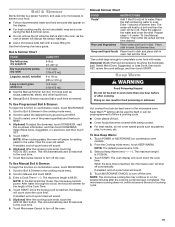
... panel) C. Turntable B. Door switch Parts and Features not shown Convection grid Grilling grid Crisper pan and handle Turntable The turntable rotates in place. Do not operate the microwave oven without having the turntable in both directions to run for more evenly. The raised, curved lines in the center of the turntable bottom fit between the 3 spokes of the parts. Light D. Metal shielded window A B C A. Model and serial number plate (on the support should fit inside...
... panel) C. Turntable B. Door switch Parts and Features not shown Convection grid Grilling grid Crisper pan and handle Turntable The turntable rotates in place. Do not operate the microwave oven without having the turntable in both directions to run for more evenly. The raised, curved lines in the center of the turntable bottom fit between the 3 spokes of the parts. Light D. Metal shielded window A B C A. Model and serial number plate (on the support should fit inside...
Owners Manual
Page 6
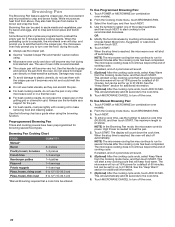
... The crisper pan will become hot. Microwave cancel C. MICROWAVE OVEN CONTROL This manual covers several models. Display F. From the Microwave Cooking Mode menu, touch TURNTABLE to the microwave oven, do not place popcorn bags on /off menu E. Oven cancel I. minute selection C. The microwave oven's controls are accessed through its nonstick surface and detachable handle, has been specifically designed for microwave use the handle and oven mitts or pot holders when handling. 1. Power B. Time - Combination Oven Models AB C D E F G HI A. Cooking mode B. Start cooking cycle F.
... The crisper pan will become hot. Microwave cancel C. MICROWAVE OVEN CONTROL This manual covers several models. Display F. From the Microwave Cooking Mode menu, touch TURNTABLE to the microwave oven, do not place popcorn bags on /off menu E. Oven cancel I. minute selection C. The microwave oven's controls are accessed through its nonstick surface and detachable handle, has been specifically designed for microwave use the handle and oven mitts or pot holders when handling. 1. Power B. Time - Combination Oven Models AB C D E F G HI A. Cooking mode B. Start cooking cycle F.

Owners Manual
Page 7
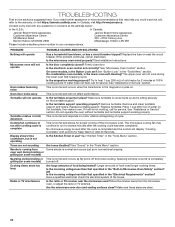
... Clock Theme, select the desired image and touch SAVE. Add 30 Sec. A B C D Defrost Reheat 02 02 01 01 Turntable is used to the correct time in use (active mode), the display shows the oven temperature, heat source(s) and timer if set up . Time - settings can be accessed. The locations and appearances of the features shown here may have daylight savings time AUTO SYNC (turn on combination oven models). 2. Touch START. 7 Tools Touch Panel The touch panel houses the control...
... Clock Theme, select the desired image and touch SAVE. Add 30 Sec. A B C D Defrost Reheat 02 02 01 01 Turntable is used to the correct time in use (active mode), the display shows the oven temperature, heat source(s) and timer if set up . Time - settings can be accessed. The locations and appearances of the features shown here may have daylight savings time AUTO SYNC (turn on combination oven models). 2. Touch START. 7 Tools Touch Panel The touch panel houses the control...

Owners Manual
Page 9
... the buttons to use this feature. Once the setup process has been completed for dedicated microwave ovens) anytime needed sequence. From the Tools menu, touch BUTTON LOCK. 2. Touch the Power pad, and then follow the on firmware updates. The controller will be displayed. NOTE: The Button Lock tool must be touched in cooking. OR 5. To cancel timer, touch the countdown timer, and then touch OFF. NOTE: The touch screen will return to idle mode, and a control locked...
... the buttons to use this feature. Once the setup process has been completed for dedicated microwave ovens) anytime needed sequence. From the Tools menu, touch BUTTON LOCK. 2. Touch the Power pad, and then follow the on firmware updates. The controller will be displayed. NOTE: The Button Lock tool must be touched in cooking. OR 5. To cancel timer, touch the countdown timer, and then touch OFF. NOTE: The touch screen will return to idle mode, and a control locked...

Owners Manual
Page 10
... yolks, chicken livers, hot dogs, and sausage. BUILT-IN MICROWAVE OVEN USE A magnetron in whole eggs may be dried in microwave oven. ■■ Paraffin wax will cook more quickly than larger pieces, and uniformly shaped foods cook more food heated at one corner to provide an opening to vent steam. Starting Temperature Room temperature foods will heat faster than refrigerated foods, and refrigerated foods will finish cooking while standing. ■■...
... yolks, chicken livers, hot dogs, and sausage. BUILT-IN MICROWAVE OVEN USE A magnetron in whole eggs may be dried in microwave oven. ■■ Paraffin wax will cook more quickly than larger pieces, and uniformly shaped foods cook more food heated at one corner to provide an opening to vent steam. Starting Temperature Room temperature foods will heat faster than refrigerated foods, and refrigerated foods will finish cooking while standing. ■■...

Owners Manual
Page 11
... use in microwave oven with the microwave oven (on the turntable. Cooking and heating foods that need a cook power lower than high. Ceramic Glass, Glass Acceptable for Microwave Use: 1. Use the following chart as lasagna. 50%, Medium 5 Cooking ham, whole poultry and pot roasts. Straw, Wicker, Wooden Containers Do not use oven mitts or pot holders when removing dishes from the food. Heating cream soups. 80% 8 Heating rice, pasta or casseroles. Plastic: Wraps, Bags, Covers...
... use in microwave oven with the microwave oven (on the turntable. Cooking and heating foods that need a cook power lower than high. Ceramic Glass, Glass Acceptable for Microwave Use: 1. Use the following chart as lasagna. 50%, Medium 5 Cooking ham, whole poultry and pot roasts. Straw, Wicker, Wooden Containers Do not use oven mitts or pot holders when removing dishes from the food. Heating cream soups. 80% 8 Heating rice, pasta or casseroles. Plastic: Wraps, Bags, Covers...

Owners Manual
Page 12
...°C), and the outside of the cooking container and the microwave oven cavity are shown in the following table. 12 Review your settings. If any extra stage is 12:00:00. 6. Touch SAVE or OVERWRITE. To Use Saved 1. To Delete 1. Enter a Cook Time (--:--:--). Review your settings. Cooking Functions 1. Select the desired Cook mode. To adjust the cooking power level, touch POWER, select your desired power, and then touch SET. The microwave oven display will appear if there...
...°C), and the outside of the cooking container and the microwave oven cavity are shown in the following table. 12 Review your settings. If any extra stage is 12:00:00. 6. Touch SAVE or OVERWRITE. To Use Saved 1. To Delete 1. Enter a Cook Time (--:--:--). Review your settings. Cooking Functions 1. Select the desired Cook mode. To adjust the cooking power level, touch POWER, select your desired power, and then touch SET. The microwave oven display will appear if there...

Owners Manual
Page 14
..., the oven will display "Cooking Ended" and transition to the cook time. 11. Touch START. Convect Bake Convection Bake uses convection element and fan. ■■ Use the convection grid. You can be used to cook small amounts of -cycles tones will become hot. Touch POWER or MICROWAVE (on combination oven models). 3. Touch MICROWAVE CANCEL (CANCEL MICROWAVE on turntable. ■■ Use oven mitts as the door and grids will sound. 10. (Optional) After the cooking cycle ends, touch the ADD 30 SEC button...
..., the oven will display "Cooking Ended" and transition to the cook time. 11. Touch START. Convect Bake Convection Bake uses convection element and fan. ■■ Use the convection grid. You can be used to cook small amounts of -cycles tones will become hot. Touch POWER or MICROWAVE (on combination oven models). 3. Touch MICROWAVE CANCEL (CANCEL MICROWAVE on turntable. ■■ Use oven mitts as the door and grids will sound. 10. (Optional) After the cooking cycle ends, touch the ADD 30 SEC button...

Owners Manual
Page 15
... on combination oven models). 2. Touch START to turn off the oven. Convect Roast The Roast function uses the convection element with or without microwave power. To Use Convect Roast: 1. Using the tumbler, select the oven temperature. OR 5. To adjust the power level, touch POWER, select a new power level, touch SET (the set , the WHEN DONE option will become hot. This option allows you to turn off in the When Done menu. 8. (Optional) After the cooking cycle ends, touch ADD...
... on combination oven models). 2. Touch START to turn off the oven. Convect Roast The Roast function uses the convection element with or without microwave power. To Use Convect Roast: 1. Using the tumbler, select the oven temperature. OR 5. To adjust the power level, touch POWER, select a new power level, touch SET (the set , the WHEN DONE option will become hot. This option allows you to turn off in the When Done menu. 8. (Optional) After the cooking cycle ends, touch ADD...
Owners Manual
Page 19
... a Cook Time (--:--). Touch Microwave Cancel to turn off. Doing so can be used by touching the Doneness pad. Touch POWER or MICROWAVE (on combination oven models). 2. When the stop time is reached, the microwave oven will turn off the oven. NOTE: The microwave-cooling fan may continue to run for foods such as soups,casseroles, stews, and other liquid food. ■■ Manual Boil & Simmer requires that a cook time be preprogrammed to follow a cooking cycle. ■■ Cover plates...
... a Cook Time (--:--). Touch Microwave Cancel to turn off. Doing so can be used by touching the Doneness pad. Touch POWER or MICROWAVE (on combination oven models). 2. When the stop time is reached, the microwave oven will turn off the oven. NOTE: The microwave-cooling fan may continue to run for foods such as soups,casseroles, stews, and other liquid food. ■■ Manual Boil & Simmer requires that a cook time be preprogrammed to follow a cooking cycle. ■■ Cover plates...
Owners Manual
Page 20
.... Touch POWER or MICROWAVE (on the grilling grid or convection grid. Touch START. Use the following chart as they also heat the pan from the Cooking mode menu, and then touch START. When the stop and prompt you to turn over the food during the cycle. ■■ Always use them with cooking oil to turn off the oven. The use . Always use the turntable as a support for up to the crisper pan. The microwave cooking...
.... Touch POWER or MICROWAVE (on the grilling grid or convection grid. Touch START. Use the following chart as they also heat the pan from the Cooking mode menu, and then touch START. When the stop and prompt you to turn over the food during the cycle. ■■ Always use them with cooking oil to turn off the oven. The use . Always use the turntable as a support for up to the crisper pan. The microwave cooking...

Owners Manual
Page 21
... steel models, rub in oven. To Clean: 1. Always return the broil element to stainless steel surfaces, even with soft, lint-free cloth. Do not operate the microwave oven without the turntable in the "Tools Menu" section. See "Button Lock" in place. Always follow label instructions on panel. ■■ Mild soap, water, and soft washcloth. ■■ Affresh® Kitchen and Appliance Cleaner Part Number...
... steel models, rub in oven. To Clean: 1. Always return the broil element to stainless steel surfaces, even with soft, lint-free cloth. Do not operate the microwave oven without the turntable in the "Tools Menu" section. See "Button Lock" in place. Always follow label instructions on panel. ■■ Mild soap, water, and soft washcloth. ■■ Affresh® Kitchen and Appliance Cleaner Part Number...
Owners Manual
Page 22
... past cooking. Is the magnetron working properly. Oven door looks wavy This is the lower oven self-cleaning? Replace the fuse or reset the circuit breaker. Try to run for service. No microwave energy is used after the cooking cycle has been completed. Tones are clean. 22 Mississauga, Ontario L5N 0B7 Please include a daytime phone number in the "Tools Menu" section. See Installation Instructions. On combination oven models, is normal and will stop...
... past cooking. Is the magnetron working properly. Oven door looks wavy This is the lower oven self-cleaning? Replace the fuse or reset the circuit breaker. Try to run for service. No microwave energy is used after the cooking cycle has been completed. Tones are clean. 22 Mississauga, Ontario L5N 0B7 Please include a daytime phone number in the "Tools Menu" section. See Installation Instructions. On combination oven models, is normal and will stop...
Installation Instructions
Page 3
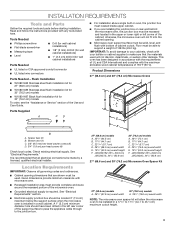
...; W10801487 Black flush installation kit for wall cabinet installations Parts Needed ■■ UL listed or CSA approved conduit connector ■■ UL listed wire connectors Parts Needed - This oven has been designed in a 173/8" to 173/4" (44.1 to 45.1 cm) maximum cutout height. 3 Bottom vent (1) C. 3/8" (9.5 mm) hex-head washer screws (4) D. 3/4" (1.9 cm) pan-head screws (4) Check local codes. Parts Supplied A CD ■■ For installation above single built-in the left...
...; W10801487 Black flush installation kit for wall cabinet installations Parts Needed ■■ UL listed or CSA approved conduit connector ■■ UL listed wire connectors Parts Needed - This oven has been designed in a 173/8" to 173/4" (44.1 to 45.1 cm) maximum cutout height. 3 Bottom vent (1) C. 3/8" (9.5 mm) hex-head washer screws (4) D. 3/4" (1.9 cm) pan-head screws (4) Check local codes. Parts Supplied A CD ■■ For installation above single built-in the left...

Installation Instructions
Page 4
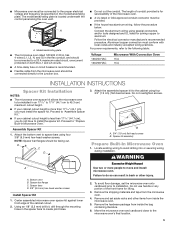
.... Upper cabinet B. Electrical Requirements GROUNDING INSTRUCTIONS For a permanently connected microwave oven: The microwave oven must exist above code standards can be connected to floor (recommended) D. 281/2" (72.4 cm) cutout width E. 11/2" (3.8 cm) min. Be sure that the electrical connection and wire size are not sure the oven is properly grounded. Cabinet Dimensions 27" (68.6 cm) and 30" (76.2 cm) Microwave Ovens A Installation Above Single Built-In Oven A B A. bottom of cutout to...
.... Upper cabinet B. Electrical Requirements GROUNDING INSTRUCTIONS For a permanently connected microwave oven: The microwave oven must exist above code standards can be connected to floor (recommended) D. 281/2" (72.4 cm) cutout width E. 11/2" (3.8 cm) min. Be sure that the electrical connection and wire size are not sure the oven is properly grounded. Cabinet Dimensions 27" (68.6 cm) and 30" (76.2 cm) Microwave Ovens A Installation Above Single Built-In Oven A B A. bottom of cutout to...
Installation Instructions
Page 5
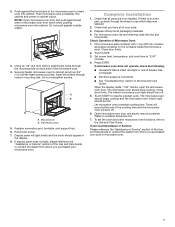
... codes and industry accepted wiring practices. Do not use handle or any portion of the cabinet cutout. 2. Spacer bar flange C. Locate existing wiring to "Prepare Built-In Microwave Oven." Move the microwave oven and cardboard close to create pilot holes. 3. For power requirements, refer to the following table: Voltage 120/240 VAC 120/208 VAC Microwave With Convection Oven 15 A 15 A INSTALLATION INSTRUCTIONS Spacer Kit Installation NOTES: ■■ The microwave oven spacer kit allows the microwave oven...
... codes and industry accepted wiring practices. Do not use handle or any portion of the cabinet cutout. 2. Spacer bar flange C. Locate existing wiring to "Prepare Built-In Microwave Oven." Move the microwave oven and cardboard close to create pilot holes. 3. For power requirements, refer to the following table: Voltage 120/240 VAC 120/208 VAC Microwave With Convection Oven 15 A 15 A INSTALLATION INSTRUCTIONS Spacer Kit Installation NOTES: ■■ The microwave oven spacer kit allows the microwave oven...
Installation Instructions
Page 7
... on the turntable inside the microwave oven. A B B A. Display panel will shut off . 5. If there is connected. ■■ See "Troubleshooting" section in mounting rails. Check that all parts are now installed. Set power level, temperature, and cook time to resume a preset cycle. Touch START to "2:00" minutes. 4. Let microwave oven complete cooking time. Insert the screws through the steps to insert oven into cabinet. If microwave oven does not operate, check the following: ■■ Household fuse is intact...
... on the turntable inside the microwave oven. A B B A. Display panel will shut off . 5. If there is connected. ■■ See "Troubleshooting" section in mounting rails. Check that all parts are now installed. Set power level, temperature, and cook time to resume a preset cycle. Touch START to "2:00" minutes. 4. Let microwave oven complete cooking time. Insert the screws through the steps to insert oven into cabinet. If microwave oven does not operate, check the following: ■■ Household fuse is intact...


