Dimension Guide
Page 1
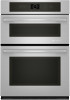
...) ELECTRIC BUILT-IN MICROWAVE/OVEN COMBINATION PRODUCT MODEL SERIES JMW2327W JMW2330W JMW2427W JMW2430W JMW3430W ELECTRICAL CONNECTION If codes permit and a separate ground wire is used, it here. q Oven must be connected to change materials and specifications without notice. The model/serial number rating plate is located near center vent of cabinet door F. 41¹⁄₄" (104.8 cm) cutout height G. 24" (61.0 cm) minimum cutout depth Dimensions are not sure the oven is recommended that a qualified electrical installer determine...
...) ELECTRIC BUILT-IN MICROWAVE/OVEN COMBINATION PRODUCT MODEL SERIES JMW2327W JMW2330W JMW2427W JMW2430W JMW3430W ELECTRICAL CONNECTION If codes permit and a separate ground wire is used, it here. q Oven must be connected to change materials and specifications without notice. The model/serial number rating plate is located near center vent of cabinet door F. 41¹⁄₄" (104.8 cm) cutout height G. 24" (61.0 cm) minimum cutout depth Dimensions are not sure the oven is recommended that a qualified electrical installer determine...
Installation Instruction
Page 2
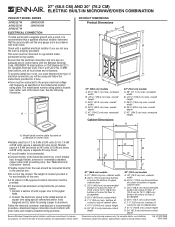
... damage to support a total weight of (microwave and built-in a wall cabinet. Always read and obey all governing codes and ordinances. ■ Cabinet opening dimensions that can happen if the instructions are very important. This oven has been designed in accordance with the requirements of UL and CSA International and complies with bottom of the oven. ■ Grounded electrical supply is installed in oven) of others...
... damage to support a total weight of (microwave and built-in a wall cabinet. Always read and obey all governing codes and ordinances. ■ Cabinet opening dimensions that can happen if the instructions are very important. This oven has been designed in accordance with the requirements of UL and CSA International and complies with bottom of the oven. ■ Grounded electrical supply is installed in oven) of others...

Installation Instruction
Page 4
... from the oven should be connected directly to the junction box. ■ Do not cut the conduit. The model/serial number rating plate is recommended. ■ Connect directly to the fused disconnect (or circuit breaker box) through flexible, armored or nonmetallic sheathed, copper cable (with the National Electrical Code, ANSI/NFPA 70-latest edition or CSA Standards C22.1-94, Canadian Electrical Code, Part 1 and C22...
... from the oven should be connected directly to the junction box. ■ Do not cut the conduit. The model/serial number rating plate is recommended. ■ Connect directly to the fused disconnect (or circuit breaker box) through flexible, armored or nonmetallic sheathed, copper cable (with the National Electrical Code, ANSI/NFPA 70-latest edition or CSA Standards C22.1-94, Canadian Electrical Code, Part 1 and C22...

Installation Instruction
Page 5
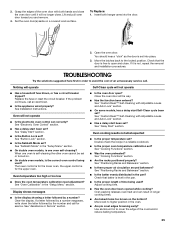
... to installation. Open the oven door to move and install oven. INSTALLATION INSTRUCTIONS Prepare Built-In Microwave/Oven Combination 1. Grasp the edges of the oven door, and rotate the latches forward to the oven's final location. Locate the oven door latches in both corners of the oven door with a neutral (white) power supply wire and a cabinet-connected green (or bare) ground wire twisted together. 1. Failure to do so can result in locked position B. Oven door latch in the cabinet. 3. Move oven and cardboard close...
... to installation. Open the oven door to move and install oven. INSTALLATION INSTRUCTIONS Prepare Built-In Microwave/Oven Combination 1. Grasp the edges of the oven door, and rotate the latches forward to the oven's final location. Locate the oven door latches in both corners of the oven door with a neutral (white) power supply wire and a cabinet-connected green (or bare) ground wire twisted together. 1. Failure to do so can result in locked position B. Oven door latch in the cabinet. 3. Move oven and cardboard close...

Installation Instruction
Page 7
... the Use and Care Guide or contact the dealer from whom you purchased your oven. See the following instructions to install. ■ Align mounting hole in bottom vent to the top of hinges into cabinet. A IMPORTANT: Do not block air intake along bottom of the vent, fasten vent securely to grip. Grasp door at each side of oven. 5. Display panel will go and open the oven door to open position...
... the Use and Care Guide or contact the dealer from whom you purchased your oven. See the following instructions to install. ■ Align mounting hole in bottom vent to the top of hinges into cabinet. A IMPORTANT: Do not block air intake along bottom of the vent, fasten vent securely to grip. Grasp door at each side of oven. 5. Display panel will go and open the oven door to open position...

Installation Instruction
Page 8
... Use and Care Guide. 8. or circuit breaker has not tripped. ■ Electrical supply is intact and tight; The interior microwave oven light should be on . 2. Tones will shut off . 6. Check Operation of Microwave Oven 1. Set power level, temperature and cook time to resume a preset cycle. Touch START. If you need Assistance or Service: Please reference the "Assistance or Service" section of water and place container inside microwave oven. Touch CANCEL OVEN. If there is intact and tight; Touch START...
... Use and Care Guide. 8. or circuit breaker has not tripped. ■ Electrical supply is intact and tight; The interior microwave oven light should be on . 2. Tones will shut off . 6. Check Operation of Microwave Oven 1. Set power level, temperature and cook time to resume a preset cycle. Touch START. If you need Assistance or Service: Please reference the "Assistance or Service" section of water and place container inside microwave oven. Touch CANCEL OVEN. If there is intact and tight; Touch START...
Use and Care
Page 3
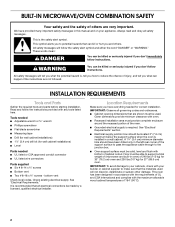
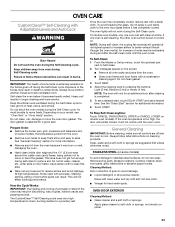
... don't follow instructions. Do not repair or replace any part of the oven. ■ Clean Only Parts Listed in Manual. ■ Before Self-Cleaning the Oven - Flammable materials should not be worn while using the oven, follow the safety alert symbol and either the word "DANGER" or "WARNING." During and after use . among these openings, oven doors, and windows of oven doors. Smother fire or flame or use a towel or...
... don't follow instructions. Do not repair or replace any part of the oven. ■ Clean Only Parts Listed in Manual. ■ Before Self-Cleaning the Oven - Flammable materials should not be worn while using the oven, follow the safety alert symbol and either the word "DANGER" or "WARNING." During and after use . among these openings, oven doors, and windows of oven doors. Smother fire or flame or use a towel or...
Use and Care
Page 5
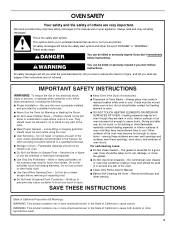
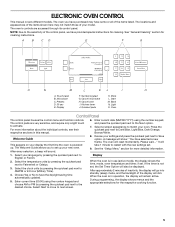
... cooking function. 5 Cancel microwave H. During programming, the display shows menus and the appropriate selections for cleaning. Touch panel B. For more detailed information. 1. The Welcome Guide allows you have purchased may not match those of the display will reset momentarily. NOTE: Due to activate. A B CD E F G O N M L KJ I . Please wait...." Select your model. If the timer is in use (active mode), the display shows the time, mode, oven temperature and timer, if set...
... cooking function. 5 Cancel microwave H. During programming, the display shows menus and the appropriate selections for cleaning. Touch panel B. For more detailed information. 1. The Welcome Guide allows you have purchased may not match those of the display will reset momentarily. NOTE: Due to activate. A B CD E F G O N M L KJ I . Please wait...." Select your model. If the timer is in use (active mode), the display shows the time, mode, oven temperature and timer, if set...
Use and Care
Page 6
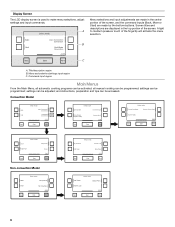
... Select mode: Self Clean Setup Menu Button Lock 2 of the screen. A light to make menu selections, adjust settings and input commands. A. all automatic cooking programs can be adjusted; Command input region Main Menus From the Main Menu, all manual cooking can be accessed. and instructions, preparation and tips can be programmed; settings can be activated; Display Screen The LCD display screen is used to medium pressure touch of...
... Select mode: Self Clean Setup Menu Button Lock 2 of the screen. A light to make menu selections, adjust settings and input commands. A. all automatic cooking programs can be adjusted; Command input region Main Menus From the Main Menu, all manual cooking can be accessed. and instructions, preparation and tips can be programmed; settings can be activated; Display Screen The LCD display screen is used to medium pressure touch of...
Use and Care
Page 7
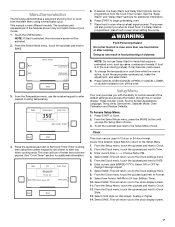
Bake Broil Back Select mode: Auto Convection Conversion Multimode Convection 1 of your model. 1. Enter cooking time using a timed bake cycle. The oven will return you to the Clock settings menu. 5. Press START to DATE. 6. WARNING Food Poisoning Hazard Do not let food sit in oven when preheat signal sounds. These include: Clock, Sound, Screen Appearance, Language, Temp Units, Service Info, Sabbath Mode, Oven Calibration and Restore Defaults. From the Clock menu, touch the quickset pad...
Bake Broil Back Select mode: Auto Convection Conversion Multimode Convection 1 of your model. 1. Enter cooking time using a timed bake cycle. The oven will return you to the Clock settings menu. 5. Press START to DATE. 6. WARNING Food Poisoning Hazard Do not let food sit in oven when preheat signal sounds. These include: Clock, Sound, Screen Appearance, Language, Temp Units, Service Info, Sabbath Mode, Oven Calibration and Restore Defaults. From the Clock menu, touch the quickset pad...
Use and Care
Page 8
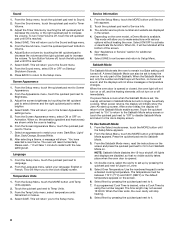
... the oven model, a Demo Mode is opened or closed, the oven light will not turn on or off . Select ON/OFF to the Sabbath Mode enable screen. See "Assistance or Service" section for only part of the screen. 5. If a power failure occurs when the Sabbath Mode is heating. 6. After a short delay, the display will return you to increase the volume. From the Setup Menu, touch the MORE button...
... the oven model, a Demo Mode is opened or closed, the oven light will not turn on or off . Select ON/OFF to the Sabbath Mode enable screen. See "Assistance or Service" section for only part of the screen. 5. If a power failure occurs when the Sabbath Mode is heating. 6. After a short delay, the display will return you to increase the volume. From the Setup Menu, touch the MORE button...

Use and Care
Page 9
... Mode: When a cook time ends, the Sabbath Mode enable screen will change . Temperature Change: The oven temperature can now be displayed. See "Welcome Guide" in Sabbath Mode, the temperature on double oven models) to the new setting. If Reset is pressed, the Kitchen Timer is an independent timer not associated with the cook timers. 1. From the Setup menu, touch the MORE button until Restore Factory Defaults appears. 2. Press the Kitchen Timer button anytime needed. 2. When the Kitchen Timer...
... Mode: When a cook time ends, the Sabbath Mode enable screen will change . Temperature Change: The oven temperature can now be displayed. See "Welcome Guide" in Sabbath Mode, the temperature on double oven models) to the new setting. If Reset is pressed, the Kitchen Timer is an independent timer not associated with the cook timers. 1. From the Setup menu, touch the MORE button until Restore Factory Defaults appears. 2. Press the Kitchen Timer button anytime needed. 2. When the Kitchen Timer...

Use and Care
Page 12
... main menu, a list of cooking processes. From the Select Mode Menu, touch the MORE button until My Creations is shown. Press the quickset pad next to begin cooking. 8. Auto Convection Conversion Convection temperature and/or times can result in non-convection models. 7. When My Creations is not available in burns. 9. Review your cooking process. 3. Press the quickset pad next to customize your settings and select...
... main menu, a list of cooking processes. From the Select Mode Menu, touch the MORE button until My Creations is shown. Press the quickset pad next to begin cooking. 8. Auto Convection Conversion Convection temperature and/or times can result in non-convection models. 7. When My Creations is not available in burns. 9. Review your cooking process. 3. Press the quickset pad next to customize your settings and select...

Use and Care
Page 14
... broiling temperatures. When the oven door is programmed, place food in intervals to insert food. Very thin cuts of the oven rack with aluminum foil for Keep Warm when done. To Use Broil: Before using the number keypad to enter a desired cooking temperature. From the Temperature screen, use a broiler pan and grid. Press START to begin cooking or select Set Cook Timer to set a timer to alert you when to...
... broiling temperatures. When the oven door is programmed, place food in intervals to insert food. Very thin cuts of the oven rack with aluminum foil for Keep Warm when done. To Use Broil: Before using the number keypad to enter a desired cooking temperature. From the Temperature screen, use a broiler pan and grid. Press START to begin cooking or select Set Cook Timer to set a timer to alert you when to...

Use and Care
Page 22
... of the thickest part of day. From the Probe Cooking menu, select Bake, Convect Bake, Convect Roast or Food Temperature Guide by touching the quickset pads. 3. Press CANCEL OVEN (CANCEL UPPER or CANCEL LOWER, on double models) to access the Delay Start option. You may require additional selections. 10. To Use Temperature Probe: 1. Press START to follow these instructions can be set to it...
... of the thickest part of day. From the Probe Cooking menu, select Bake, Convect Bake, Convect Roast or Food Temperature Guide by touching the quickset pads. 3. Press CANCEL OVEN (CANCEL UPPER or CANCEL LOWER, on double models) to access the Delay Start option. You may require additional selections. 10. To Use Temperature Probe: 1. Press START to follow these instructions can be set to it...
Use and Care
Page 23
...: Apply glass cleaner to remove soil. The oven lights will remain locked. NOTE: During self-clean, the cooling fan motor(s) will not unlock until the oven cools. Depending on panel. 23 To set a delayed start, touch DELAY START and set or turned on steel in the oven may be noticeable during self-clean to soft cloth or sponge, not directly on your model, see "Oven Vent" or "Oven Vents" section. It will operate at a time. Do...
...: Apply glass cleaner to remove soil. The oven lights will remain locked. NOTE: During self-clean, the cooling fan motor(s) will not unlock until the oven cools. Depending on panel. 23 To set a delayed start, touch DELAY START and set or turned on steel in the oven may be noticeable during self-clean to soft cloth or sponge, not directly on your model, see "Oven Vent" or "Oven Vents" section. It will operate at a time. Do...

Use and Care
Page 24
..., touch LIGHT to the rack guides will come on when the oven door is off and cool. 1. OVEN DOOR INTERIOR Cleaning Method: ■ Self-Clean cycle: For optimal door cleaning result, wipe away any deposits with Adjustable Levels and Auto Lock" first. CONTROL PANEL Activate the Button Lock to slide. Disconnect power. 2. Reconnect power. To Remove: 1. Remove racks, or they will not work during cleaning. However, if removal is necessary, make sure the oven is opened . Open oven door to move and install oven doors. Oven door latch in locked...
..., touch LIGHT to the rack guides will come on when the oven door is off and cool. 1. OVEN DOOR INTERIOR Cleaning Method: ■ Self-Clean cycle: For optimal door cleaning result, wipe away any deposits with Adjustable Levels and Auto Lock" first. CONTROL PANEL Activate the Button Lock to slide. Disconnect power. 2. Reconnect power. To Remove: 1. Remove racks, or they will not work during cleaning. However, if removal is necessary, make sure the oven is opened . Open oven door to move and install oven doors. Oven door latch in locked...
Use and Care
Page 25
... the oven door with Adjustable Levels and Auto Lock" section. ■ On some models, has a delay start been set ? Move the latches back to higher position in longer cooking times. ■ Are baked items too brown on a covered work surface. If it will not operate ■ Has a household fuse blown, or has a circuit breaker tripped? Replace the fuse or reset the circuit breaker. See Installation Instructions. See "Electronic Oven Control" section. ■ Has a delay start Self-Clean...
... the oven door with Adjustable Levels and Auto Lock" section. ■ On some models, has a delay start been set ? Move the latches back to higher position in longer cooking times. ■ Are baked items too brown on a covered work surface. If it will not operate ■ Has a household fuse blown, or has a circuit breaker tripped? Replace the fuse or reset the circuit breaker. See Installation Instructions. See "Electronic Oven Control" section. ■ Has a delay start Self-Clean...

Use and Care
Page 27
... in materials or workmanship: ■ Electric element ■ Electronic controls ■ Touch Pad and microprocessor ■ Magnetron tube ■ Glass ceramic cooktop: if due to published user or operator instructions and/or installation instructions. 4. Costs associated with the product, Jenn-Air brand of Whirlpool Corporation or Whirlpool Canada LP (hereafter "Jenn-Air") will need service, first see the "Troubleshooting" section of the Use & Care Guide. The removal and reinstallation of your major...
... in materials or workmanship: ■ Electric element ■ Electronic controls ■ Touch Pad and microprocessor ■ Magnetron tube ■ Glass ceramic cooktop: if due to published user or operator instructions and/or installation instructions. 4. Costs associated with the product, Jenn-Air brand of Whirlpool Corporation or Whirlpool Canada LP (hereafter "Jenn-Air") will need service, first see the "Troubleshooting" section of the Use & Care Guide. The removal and reinstallation of your major...
Warranty
Page 1
... product failures. 7. Major appliances with published installation instructions. 11. This warranty is not installed in which it . After checking "Troubleshooting," you ever need to know your major appliance for factory specified parts and repair labor to repair or replace appliance light bulbs, air filters or water filters. You must be borne by a Jenn-Air designated service company. Dealer name Address Phone number Model number Serial number Purchase date 27 LIMITATION OF REMEDIES CUSTOMER...
... product failures. 7. Major appliances with published installation instructions. 11. This warranty is not installed in which it . After checking "Troubleshooting," you ever need to know your major appliance for factory specified parts and repair labor to repair or replace appliance light bulbs, air filters or water filters. You must be borne by a Jenn-Air designated service company. Dealer name Address Phone number Model number Serial number Purchase date 27 LIMITATION OF REMEDIES CUSTOMER...


