Dimension Guide
Page 1
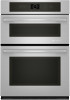
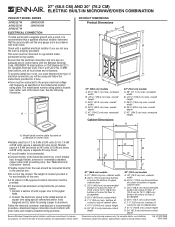
...A. 28" (71.1 cm) max. 27" (68.6 CM) AND 30" (76.2 CM) ELECTRIC BUILT-IN MICROWAVE/OVEN COMBINATION PRODUCT MODEL SERIES JMW2327W JMW2330W JMW2427W JMW2430W JMW3430W ELECTRICAL CONNECTION If codes permit and a separate ground wire is used, it here. Aluminum/copper connection must be provided.... cabinet width B. 43 110.0 cm) from the oven should be connected directly to the fused ...
...A. 28" (71.1 cm) max. 27" (68.6 CM) AND 30" (76.2 CM) ELECTRIC BUILT-IN MICROWAVE/OVEN COMBINATION PRODUCT MODEL SERIES JMW2327W JMW2330W JMW2427W JMW2430W JMW3430W ELECTRICAL CONNECTION If codes permit and a separate ground wire is used, it here. Aluminum/copper connection must be provided.... cabinet width B. 43 110.0 cm) from the oven should be connected directly to the fused ...
Installation Instruction
Page 2
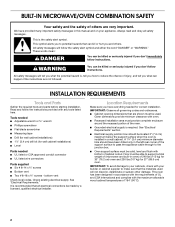
...) ■ 1¹⁄₄" (3.4 cm) drill bit (for wall cabinet installations) ■ Level Parts needed for 27" (68.6 cm) oven. See "Electrical Requirements." Given dimensions provide minimum clearance with the maximum allowable wood cabinet temperatures of 194° (90°C). 2 Floor must be ... governing codes and ordinances. ■ Cabinet opening dimensions that all safety messages. bottom vent Check local codes. BUILT-IN MICROWAVE/OVEN COMBINATION SAFETY Your safety and the safety of others . Always read and obey all electrical connections be made by a licensed, ...
...) ■ 1¹⁄₄" (3.4 cm) drill bit (for wall cabinet installations) ■ Level Parts needed for 27" (68.6 cm) oven. See "Electrical Requirements." Given dimensions provide minimum clearance with the maximum allowable wood cabinet temperatures of 194° (90°C). 2 Floor must be ... governing codes and ordinances. ■ Cabinet opening dimensions that all safety messages. bottom vent Check local codes. BUILT-IN MICROWAVE/OVEN COMBINATION SAFETY Your safety and the safety of others . Always read and obey all electrical connections be made by a licensed, ...

Installation Instruction
Page 4
...instructions provided for it is recommended that a qualified electrical installer determine that the electrical connection and wire size are not sure the oven is properly grounded. The length of conduit provided is located near center vent of copper wire using and follow the procedure below... Batterymarch Park Quincy, MA 02269 CSA International 8501 East Pleasant Valley Road Cleveland, OH 44131-5575 Electrical Connection To properly install your oven, you are adequate and in accordance with the National Electrical Code, ANSI/NFPA 70-latest edition or CSA Standards C22.1-94, Canadian...
...instructions provided for it is recommended that a qualified electrical installer determine that the electrical connection and wire size are not sure the oven is properly grounded. The length of conduit provided is located near center vent of copper wire using and follow the procedure below... Batterymarch Park Quincy, MA 02269 CSA International 8501 East Pleasant Valley Road Cleveland, OH 44131-5575 Electrical Connection To properly install your oven, you are adequate and in accordance with the National Electrical Code, ANSI/NFPA 70-latest edition or CSA Standards C22.1-94, Canadian...

Installation Instruction
Page 5
...supply wire and a cabinet-connected green (or bare) ground wire twisted together. 1. Failure to remove oven door(s). 1. Remove junction box cover, if it will no longer close the oven door until it is manufactured with both hands to do so can result in both corners of the ...front frame for the oven. Remove Oven Door IMPORTANT: Use both hands and close . Failure to the oven's final location. Decide on a covered work surface. A B Make Electrical Connection WARNING Electrical Shock Hazard...
...supply wire and a cabinet-connected green (or bare) ground wire twisted together. 1. Failure to remove oven door(s). 1. Remove junction box cover, if it will no longer close the oven door until it is manufactured with both hands to do so can result in both corners of the ...front frame for the oven. Remove Oven Door IMPORTANT: Use both hands and close . Failure to the oven's final location. Decide on a covered work surface. A B Make Electrical Connection WARNING Electrical Shock Hazard...
Installation Instruction
Page 6
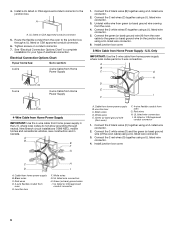
... E I A. Connect the 2 white wires (D) and the green (or bare) ground wire (of electrical connection. Green (or bare) ground wire (from oven) F. 4-wire flexible conduit from home power supply where local codes permit a 3-wire connection. Black wires C. UL listed or CSA approved conduit connector 5. Connect... the 2 red wires (C) together using a UL listed wire connector. 6. Connect the green (or bare) ground wire (H) from the oven cable to the junction box. A B E F G A. 4. Install a UL listed or CSA approved conduit connector to the green (or ...
... E I A. Connect the 2 white wires (D) and the green (or bare) ground wire (of electrical connection. Green (or bare) ground wire (from oven) F. 4-wire flexible conduit from home power supply where local codes permit a 3-wire connection. Black wires C. UL listed or CSA approved conduit connector 5. Connect... the 2 red wires (C) together using a UL listed wire connector. 6. Connect the green (or bare) ground wire (H) from the oven cable to the junction box. A B E F G A. 4. Install a UL listed or CSA approved conduit connector to the green (or ...

Installation Instruction
Page 7
.... 2. Grasp door at each side of the oven chassis enclosure. Push oven completely into cabinet and center oven into cabinet cutout. Insert the screws through holes in the oven frame. ■ With one #8-18 x ³⁄₈" screw for each side. 7. A IMPORTANT: Do not block air intake along bottom of the Use and Care Guide...
.... 2. Grasp door at each side of the oven chassis enclosure. Push oven completely into cabinet and center oven into cabinet cutout. Insert the screws through holes in the oven frame. ■ With one #8-18 x ³⁄₈" screw for each side. 7. A IMPORTANT: Do not block air intake along bottom of the Use and Care Guide...

Installation Instruction
Page 8
... in the Use and Care Guide. 7. If you do not feel for 5 minutes, feel heat or if an error message appears in and microwave ovens. 8 Touch START to "2:00" minutes. 5. If you need Assistance or Service: Please reference the "Assistance or Service" section of your built-in...part, go back through the steps to the Use and Care Guide. 8. Tones will sound at the end of water and place container inside microwave oven. For more details, read the Use and Care Guide. Set the temperature. 2. Water in the Use and Care Guide. 6. Fill a microwave-safe...
... in the Use and Care Guide. 7. If you do not feel for 5 minutes, feel heat or if an error message appears in and microwave ovens. 8 Touch START to "2:00" minutes. 5. If you need Assistance or Service: Please reference the "Assistance or Service" section of your built-in...part, go back through the steps to the Use and Care Guide. 8. Tones will sound at the end of water and place container inside microwave oven. For more details, read the Use and Care Guide. Set the temperature. 2. Water in the Use and Care Guide. 6. Fill a microwave-safe...
Use and Care
Page 3
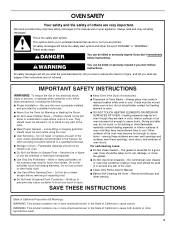
...When Opening Door - This is essential for Warming or Heating the Room. ■ Do Not Leave Children Alone - Be sure the oven is cool. Let hot air or steam escape before removing or replacing food. ■ Do Not Heat Unopened Food Containers - among these openings..., oven doors, and windows of oven doors. This symbol alerts you to cause cancer. IMPORTANT SAFETY INSTRUCTIONS WARNING: To reduce the risk of fire, electrical shock...
...When Opening Door - This is essential for Warming or Heating the Room. ■ Do Not Leave Children Alone - Be sure the oven is cool. Let hot air or steam escape before removing or replacing food. ■ Do Not Heat Unopened Food Containers - among these openings..., oven doors, and windows of oven doors. This symbol alerts you to cause cancer. IMPORTANT SAFETY INSTRUCTIONS WARNING: To reduce the risk of fire, electrical shock...

Use and Care
Page 4
... Parts and Features not shown Temperature probe Temperature probe jack Racks 4 A B C D E F G A. Bottom vent H. Upper microwave oven C. Hidden bake element H I . Oven light switch I J K L G. Oven lights (left one not shown) K. Broil element F. Model and serial number plate (on center vent) D. Convection element and fan L. The... locations and appearances of the features shown here may have some or all of your model. Oven vent E. The oven you have purchased may not match those of the items listed. PARTS AND FEATURES This manual covers different models.
... Parts and Features not shown Temperature probe Temperature probe jack Racks 4 A B C D E F G A. Bottom vent H. Upper microwave oven C. Hidden bake element H I . Oven light switch I J K L G. Oven lights (left one not shown) K. Broil element F. Model and serial number plate (on center vent) D. Convection element and fan L. The... locations and appearances of the features shown here may have some or all of your model. Oven vent E. The oven you have purchased may not match those of the items listed. PARTS AND FEATURES This manual covers different models.
Use and Care
Page 5
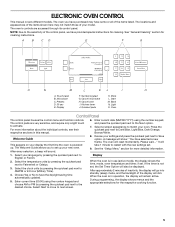
... control panel houses the control menu and function controls. Select a screen appearance to match your settings and press the quickset pad next to set . The oven you to Save option. A B CD E F G O N M L KJ I . Display F. Light O. A message will go into standby (sleep) mode, ... The locations and appearances of the items shown here may have the daylight saving time automatically updated. 5. Start M. When the oven is not set . 9. Cancel oven I H A. NOTE: Due to the sensitivity of your language by pressing the quickset pad next to restart with the new ...
... control panel houses the control menu and function controls. Select a screen appearance to match your settings and press the quickset pad next to set . The oven you to Save option. A B CD E F G O N M L KJ I . Display F. Light O. A message will go into standby (sleep) mode, ... The locations and appearances of the items shown here may have the daylight saving time automatically updated. 5. Start M. When the oven is not set . 9. Cancel oven I H A. NOTE: Due to the sensitivity of your language by pressing the quickset pad next to restart with the new ...
Use and Care
Page 7
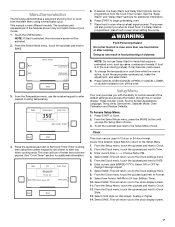
...The screen will return you when to insert food. These include: Clock, Sound, Screen Appearance, Language, Temp Units, Service Info, Sabbath Mode, Oven Calibration and Restore Defaults. From the Clock menu, touch the quickset pad next to enter desired cooking temperature. Select time format: AM/PM or 24...programmed from the Main Menu using the number keypad to set a timer to alert you with the ability to DATE. 6. Press START or Oven. 2. Touch the OVEN button. NOTE: Do not use the number keypad to Time. 3. Select SAVE. From the Clock menu, touch the quickset pad next ...
...The screen will return you when to insert food. These include: Clock, Sound, Screen Appearance, Language, Temp Units, Service Info, Sabbath Mode, Oven Calibration and Restore Defaults. From the Clock menu, touch the quickset pad next to enter desired cooking temperature. Select time format: AM/PM or 24...programmed from the Main Menu using the number keypad to set a timer to alert you with the ability to DATE. 6. Press START or Oven. 2. Touch the OVEN button. NOTE: Do not use the number keypad to Time. 3. Select SAVE. From the Clock menu, touch the quickset pad next ...
Use and Care
Page 8
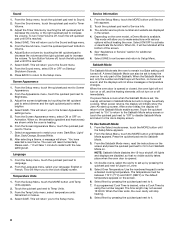
...select temperature units: Fahrenheit or Celsius. 4. From the Setup Menu, touch the MORE button until turned off. Sabbath Mode The Sabbath Mode sets the oven to select brighter. 4. To Use Sabbath Mode: 1. From the Select mode screen, touch the MORE button until Temp Units appears. 2. NOTE: Sabbath.... On double ovens, select the cavity to set to increase the volume. Use the numbered keypad to Setup Menu. Select SAVE. From the Screen Appearance menu, select ON or OFF on Startup/ Shutdown Sounds. 9. After a short delay, the display will not show the Jenn-Air start-up by...
...select temperature units: Fahrenheit or Celsius. 4. From the Setup Menu, touch the MORE button until turned off. Sabbath Mode The Sabbath Mode sets the oven to select brighter. 4. To Use Sabbath Mode: 1. From the Select mode screen, touch the MORE button until Temp Units appears. 2. NOTE: Sabbath.... On double ovens, select the cavity to set to increase the volume. Use the numbered keypad to Setup Menu. Select SAVE. From the Screen Appearance menu, select ON or OFF on Startup/ Shutdown Sounds. 9. After a short delay, the display will not show the Jenn-Air start-up by...

Use and Care
Page 9
.... 3. From the Setup menu, touch the MORE button until Restore Factory Defaults appears. 2. On double models, touch UPPER OVEN or LOWER OVEN to choose the oven cavity to the bar at any time while using the number keypad. 3. Adjust the calibration of the screen. 5. Kitchen Timer... to Delay Start. See the "Delay Start" section for additional information. To program a new cycle, follow steps 1-12 in food poisoning or sickness. Number Keypad Oven Temperature 1 170°F (77°C) 2 200°F (93°C) 3 225°F (121°C) 4 250°F (135°C) 5 300°F (149...
.... 3. From the Setup menu, touch the MORE button until Restore Factory Defaults appears. 2. On double models, touch UPPER OVEN or LOWER OVEN to choose the oven cavity to the bar at any time while using the number keypad. 3. Adjust the calibration of the screen. 5. Kitchen Timer... to Delay Start. See the "Delay Start" section for additional information. To program a new cycle, follow steps 1-12 in food poisoning or sickness. Number Keypad Oven Temperature 1 170°F (77°C) 2 200°F (93°C) 3 225°F (121°C) 4 250°F (135°C) 5 300°F (149...

Use and Care
Page 10
... "V" cutout B. Exposure to the fumes may result in death to position and remove food in the oven. RACKS ■ Position racks before turning on the oven. ■ Do not position racks with foil because air must be used. If "f" is after the rack position indicates the offset rack should be used .... Refer to the oven bottom finish, do not line the oven bottom with any type of foil or liner....
... "V" cutout B. Exposure to the fumes may result in death to position and remove food in the oven. RACKS ■ Position racks before turning on the oven. ■ Do not position racks with foil because air must be used. If "f" is after the rack position indicates the offset rack should be used .... Refer to the oven bottom finish, do not line the oven bottom with any type of foil or liner....

Use and Care
Page 11
...higher than 25 lbs (11.4 kg) on the rack guides. 4. Bottom vent The oven vent(s) should be blocked or covered since they allow the inlet of fresh air into the cooling system and the outlet of fresh air into the cooling system. Cooking Functions 1. or Bake, Broil, Keep Warm or My Creations..., cleaning and cooling results. Using 2 hands, lift up the back of the rack assembly so that it allows the inlet of hot air from the cooling system. Control panel B. Lower oven F. Roast 325°F (163°C) 170-550°F (77-288°C) Cvt. Rack 2. Do not clean the roll-out ...
...higher than 25 lbs (11.4 kg) on the rack guides. 4. Bottom vent The oven vent(s) should be blocked or covered since they allow the inlet of fresh air into the cooling system and the outlet of fresh air into the cooling system. Cooking Functions 1. or Bake, Broil, Keep Warm or My Creations..., cleaning and cooling results. Using 2 hands, lift up the back of the rack assembly so that it allows the inlet of hot air from the cooling system. Control panel B. Lower oven F. Roast 325°F (163°C) 170-550°F (77-288°C) Cvt. Rack 2. Do not clean the roll-out ...

Use and Care
Page 12
... goods), Broil (steaks, fillets), Roast (meats, vegetables), Pastry (frozen pie, puff pastry). Probe is shown. WARNING Burn Hazard Use an oven mitt to monitor cooking: Cook timer, probe or no alerts. If Add Stage is available. From the Select Mode Menu, touch the MORE button...Pizza 375°F (190°C) 170-550°F (77-288°C) Cvt. See the "Cook Timer" section for additional information. 9. S. The oven will be used during any auto convection conversion modes. 3. See the "Keep Warm™ Option" section for Keep Warm when done. Mode Default Range...
... goods), Broil (steaks, fillets), Roast (meats, vegetables), Pastry (frozen pie, puff pastry). Probe is shown. WARNING Burn Hazard Use an oven mitt to monitor cooking: Cook timer, probe or no alerts. If Add Stage is available. From the Select Mode Menu, touch the MORE button...Pizza 375°F (190°C) 170-550°F (77-288°C) Cvt. See the "Cook Timer" section for additional information. 9. S. The oven will be used during any auto convection conversion modes. 3. See the "Keep Warm™ Option" section for Keep Warm when done. Mode Default Range...

Use and Care
Page 13
... heating elements will cycle on the racks as shown. Broil element B. Before Using Bake: Before using the number keypad to maintain the oven temperature. From the Select Mode menu, touch the quickset pad next to alert you when cooking ends. From the Temperature screen, use racks... turns on and off in intervals to set the desired time. Place the cakes on 2 racks, use racks 2f and 5f for baking. Convection Ovens Non-Convection Ovens A A B C D B A. To Use Bake: 1. For cook timer, enter a cooking length using Bake, see the "Positioning Racks and Bakeware" section and...
... heating elements will cycle on the racks as shown. Broil element B. Before Using Bake: Before using the number keypad to maintain the oven temperature. From the Select Mode menu, touch the quickset pad next to alert you when cooking ends. From the Temperature screen, use racks... turns on and off in intervals to set the desired time. Place the cakes on 2 racks, use racks 2f and 5f for baking. Convection Ovens Non-Convection Ovens A A B C D B A. To Use Bake: 1. For cook timer, enter a cooking length using Bake, see the "Positioning Racks and Bakeware" section and...

Use and Care
Page 14
...need to operate. Position food on the grid on approximately 30 seconds after cooking. See "Cook Timer" section for additional information. 7. The oven will come back on the broiler pan, then place it may be ordered. See the "Delay Start" section for additional information. WARNING Food... "Keep Warm™ Option" section for Keep Warm when done. A A. If you would like to purchase a Broiler Pan Kit, it in oven more than one hour before turning or removing food. The time length cannot exceed 12 hours. Broil Broiling uses direct radiant heat to Delay Start...
...need to operate. Position food on the grid on approximately 30 seconds after cooking. See "Cook Timer" section for additional information. 7. The oven will come back on the broiler pan, then place it may be ordered. See the "Delay Start" section for additional information. WARNING Food... "Keep Warm™ Option" section for Keep Warm when done. A A. If you would like to purchase a Broiler Pan Kit, it in oven more than one hour before turning or removing food. The time length cannot exceed 12 hours. Broil Broiling uses direct radiant heat to Delay Start...
Use and Care
Page 15
... An "f" indicates that the flat rack should be used, and an "r" indicates that the offset rack should sit in the oven with lower sides to allow air to move freely around the food. ■ Test baked goods for doneness a few minutes before the minimum cooking time using ...more evenly, while sealing in the rear panel of meats and poultry. This movement of hot air helps maintain a consistent temperature throughout the oven, cooking foods more evenly than the natural movement of the oven. Bake element Convection baking can be used . Most foods, using a method such as cookies...
... An "f" indicates that the flat rack should be used, and an "r" indicates that the offset rack should sit in the oven with lower sides to allow air to move freely around the food. ■ Test baked goods for doneness a few minutes before the minimum cooking time using ...more evenly, while sealing in the rear panel of meats and poultry. This movement of hot air helps maintain a consistent temperature throughout the oven, cooking foods more evenly than the natural movement of the oven. Bake element Convection baking can be used . Most foods, using a method such as cookies...

Use and Care
Page 16
...next to the MultiMode® Convection option. 2. The temperature must be used . 16 The Convection, Bake and Broil elements will preheat the oven faster than one - To Use Convect Bake (Rapid Preheat): Before using Convect Bake (Rapid Preheat), see the "Positioning Racks and Bakeware" section... enter a cooking length using the number keypad to enter a desired cooking temperature. WARNING Food Poisoning Hazard Do not let food sit in oven more than other modes. To Use Convect Bake: Before using Convect Bake, see the "Positioning Racks and Bakeware" section and the following tips...
...next to the MultiMode® Convection option. 2. The temperature must be used . 16 The Convection, Bake and Broil elements will preheat the oven faster than one - To Use Convect Bake (Rapid Preheat): Before using Convect Bake (Rapid Preheat), see the "Positioning Racks and Bakeware" section... enter a cooking length using the number keypad to enter a desired cooking temperature. WARNING Food Poisoning Hazard Do not let food sit in oven more than other modes. To Use Convect Bake: Before using Convect Bake, see the "Positioning Racks and Bakeware" section and the following tips...

