
Owners Manual
Page 3
... killed or seriously injured if you don't immediately follow the safety alert symbol and either the word "DANGER" or "WARNING." Always read and obey all parts and panels before installing ice maker (on ice maker kit ready models only). ■ Use a sturdy glass when dispensing ice (on some models). ■ Do...
... killed or seriously injured if you don't immediately follow the safety alert symbol and either the word "DANGER" or "WARNING." Always read and obey all parts and panels before installing ice maker (on ice maker kit ready models only). ■ Use a sturdy glass when dispensing ice (on some models). ■ Do...
Owners Manual
Page 18
.... 4. See "Changing the Water Filter" earlier in the ON (left ) position. With the cap in a horizontal position. Then, turn the cap clockwise until it is part of the freezer compartment. 1. To turn the ice maker off, slide the control to the OF F (right) position. USING THE ICE MAKER WITHOUT A WATER FILTER...
.... 4. See "Changing the Water Filter" earlier in the ON (left ) position. With the cap in a horizontal position. Then, turn the cap clockwise until it is part of the freezer compartment. 1. To turn the ice maker off, slide the control to the OF F (right) position. USING THE ICE MAKER WITHOUT A WATER FILTER...
Owners Manual
Page 21
.... NOTES: Avoid twisting the cap when removing the filter because this could cause the cap to remove the filter. 1. This can damage parts of ice. A B A. Eject button B. It is part of unknown quality without adequate disinfection before or after the system. Use warm water to use anything on disinfected waters that you...
.... NOTES: Avoid twisting the cap when removing the filter because this could cause the cap to remove the filter. 1. This can damage parts of ice. A B A. Eject button B. It is part of unknown quality without adequate disinfection before or after the system. Use warm water to use anything on disinfected waters that you...

Owners Manual
Page 25
...window sprays, scouring cleansers, flammable fluids, cleaning waxes, concentrated detergents, bleaches or cleansers containing petroleum products on plastic parts, interior and door liners or gaskets. Clean the condenser coils located behind the top grille ventilation panel regularly. Hand wash...grille. LIGHTS The lights in death, Both the refrigerator and freezer sections defrost automatically. TO CLEAN YOUR REFRIGERATOR: 1. Remove all removable parts from inside, such as every other harsh cleaning tools. CARE AND CLEANING | 25 Wipe up of warm water and baking soda ...
...window sprays, scouring cleansers, flammable fluids, cleaning waxes, concentrated detergents, bleaches or cleansers containing petroleum products on plastic parts, interior and door liners or gaskets. Clean the condenser coils located behind the top grille ventilation panel regularly. Hand wash...grille. LIGHTS The lights in death, Both the refrigerator and freezer sections defrost automatically. TO CLEAN YOUR REFRIGERATOR: 1. Remove all removable parts from inside, such as every other harsh cleaning tools. CARE AND CLEANING | 25 Wipe up of warm water and baking soda ...

Owners Manual
Page 32
... Service Please refer to local JennAir® brand dealers. ■■ Use and maintenance procedures. ■■ Accessory and repair parts sales. Our consultants provide assistance with the same precision used to JennAir Canada with : ■■ Scheduling of service. For Further...a daytime phone number in your area, call us or your correspondence. 32 | ASSISTANCE For Further Assistance If you need to order replacement parts, we recommend that you can write to local JennAir® brand dealers. ■■ Installation information. ■■ Use and maintenance...
... Service Please refer to local JennAir® brand dealers. ■■ Use and maintenance procedures. ■■ Accessory and repair parts sales. Our consultants provide assistance with the same precision used to JennAir Canada with : ■■ Scheduling of service. For Further...a daytime phone number in your area, call us or your correspondence. 32 | ASSISTANCE For Further Assistance If you need to order replacement parts, we recommend that you can write to local JennAir® brand dealers. ■■ Installation information. ■■ Use and maintenance...
Owners Manual
Page 33
ASSISTANCE ACCESSORIES To order accessories, call 1-800-536-6247. In Canada, call 1-800-JENNAIR (1-800-536-6247), and ask for the appropriate part number listed below or contact your authorized JennAir dealer. Replacement Water Filter: For USA and CANADA Part #EDR3RXD1 Refrigerator Air Filter: W10311524 ASSISTANCE | 33 ASSISTANCE
ASSISTANCE ACCESSORIES To order accessories, call 1-800-536-6247. In Canada, call 1-800-JENNAIR (1-800-536-6247), and ask for the appropriate part number listed below or contact your authorized JennAir dealer. Replacement Water Filter: For USA and CANADA Part #EDR3RXD1 Refrigerator Air Filter: W10311524 ASSISTANCE | 33 ASSISTANCE
Owners Manual
Page 36
... used on disinfected waters that passes for the product to change without adequate disinfection before or after the system. ■■ Use replacement filter P1RFWB2L, Part #EDR3RXD1/EDR3RXD1B. 2015 suggested retail price of water that may contain filterable cysts. To learn how to replace the filter. See "Water and Ice Dispensers...
... used on disinfected waters that passes for the product to change without adequate disinfection before or after the system. ■■ Use replacement filter P1RFWB2L, Part #EDR3RXD1/EDR3RXD1B. 2015 suggested retail price of water that may contain filterable cysts. To learn how to replace the filter. See "Water and Ice Dispensers...
Owners Manual
Page 38
...to obtain service under these excluded circumstances shall be warranted for warranty service to product failure. 10. light bulbs, batteries, air or water filters, preservation solutions, etc.). 5. Cosmetic damage including scratches, dents, chips, and other damage to appliance finishes... determined. trim, decorative panels, flooring, cabinetry, islands, countertops, drywall, etc.) that existed when this limited warranty. 1. Consumable parts (i.e. In the U.S. PROOF OF PURCHASE IS REQUIRED TO OBTAIN WARRANTY SERVICE. If outside the 50 United States or Canada, contact your...
...to obtain service under these excluded circumstances shall be warranted for warranty service to product failure. 10. light bulbs, batteries, air or water filters, preservation solutions, etc.). 5. Cosmetic damage including scratches, dents, chips, and other damage to appliance finishes... determined. trim, decorative panels, flooring, cabinetry, islands, countertops, drywall, etc.) that existed when this limited warranty. 1. Consumable parts (i.e. In the U.S. PROOF OF PURCHASE IS REQUIRED TO OBTAIN WARRANTY SERVICE. If outside the 50 United States or Canada, contact your...

Installation Instructions
Page 5
... Phillips screwdriver 5/32" hex key Small level 1/4" and 5/16" socket drivers Appliance dolly Tape measure Torx† T27 screwdriver Utility knife Parts Needed: #8 x 3" (7.6 cm) wood screws (longer screws may be needed) (6) 2" x 4" x 32" (5 cm x 10 cm x 81 cm) ... and a 1/4" (6.35 mm) compression fitting. IMPORTANT: This appliance is 84" (213 cm) from the floor. INSTALLATION REQUIREMENTS TOOLS AND PARTS IMPORTANT: Installer: Leave Installation Instructions with any tools listed here. Cordless drill 11/32" nut driver Drill bits ...
... Phillips screwdriver 5/32" hex key Small level 1/4" and 5/16" socket drivers Appliance dolly Tape measure Torx† T27 screwdriver Utility knife Parts Needed: #8 x 3" (7.6 cm) wood screws (longer screws may be needed) (6) 2" x 4" x 32" (5 cm x 10 cm x 81 cm) ... and a 1/4" (6.35 mm) compression fitting. IMPORTANT: This appliance is 84" (213 cm) from the floor. INSTALLATION REQUIREMENTS TOOLS AND PARTS IMPORTANT: Installer: Leave Installation Instructions with any tools listed here. Cordless drill 11/32" nut driver Drill bits ...

Installation Instructions
Page 10
... film covering until it is in the operating location. 1. Remove the four brackets (two on a soft surface. Grasp both ends of the refrigerator and the parts bag behind the grille. Remove and save the literature package bag taped to support and stabilize the full weight of the refrigerator. Keep the cardboard...
... film covering until it is in the operating location. 1. Remove the four brackets (two on a soft surface. Grasp both ends of the refrigerator and the parts bag behind the grille. Remove and save the literature package bag taped to support and stabilize the full weight of the refrigerator. Keep the cardboard...

Installation Instructions
Page 11
... dolly and refrigerator into the studs at least 1½" (3.8 cm). above the refrigerator. Two 2" x 4" x 32" (5 cm x 10 cm x 81 cm) boards C. CONNECT TO WATER LINE PARTS NEEDED Minimum 7 ft (2.13 m) flexible, codes-approved water supply line STYLE 1-SHUTOFF VALVE CONNECTION NOTE: If your water line connection does not look like Style...
... dolly and refrigerator into the studs at least 1½" (3.8 cm). above the refrigerator. Two 2" x 4" x 32" (5 cm x 10 cm x 81 cm) boards C. CONNECT TO WATER LINE PARTS NEEDED Minimum 7 ft (2.13 m) flexible, codes-approved water supply line STYLE 1-SHUTOFF VALVE CONNECTION NOTE: If your water line connection does not look like Style...

Installation Instructions
Page 13
...-approved water supply line to pass beneath the refrigerator without interference. Connect the 7 ft (2.13 m) flexible codes-approved water supply line to remove particles and air in line with the water supply line at the front of the product. NOTE: If the main water shutoff valve is behind the refrigerator, a secondary... line should connect to -male coupling (on the water supply valve and check all connections for connecting to the water supply valve. 3. CONNECT TO REFRIGERATOR Parts Supplied 1/4" to 1/4" (6.35 mm to 6.35 mm) male-to the supply valve through the floor. 1.
...-approved water supply line to pass beneath the refrigerator without interference. Connect the 7 ft (2.13 m) flexible codes-approved water supply line to remove particles and air in line with the water supply line at the front of the product. NOTE: If the main water shutoff valve is behind the refrigerator, a secondary... line should connect to -male coupling (on the water supply valve and check all connections for connecting to the water supply valve. 3. CONNECT TO REFRIGERATOR Parts Supplied 1/4" to 1/4" (6.35 mm to 6.35 mm) male-to the supply valve through the floor. 1.

Installation Instructions
Page 17
... Do not use . Systems certified for use with water that all boxes, parts packages and packing materials from the filter and water dispensing system, and prepare the water filter for instructions. NOTE: As air is located on your model has a base grille filter system, make sure that...right) setting as shown. 2. Move the switch to flow, continue depressing and releasing the dispenser lever (5 seconds on the ice maker. This will flush air from the interior of 3 gal. (12 L) has been dispensed. Wait a few minutes. See the "Cleaning" section in refrigerator for leaks. 3. ...
... Do not use . Systems certified for use with water that all boxes, parts packages and packing materials from the filter and water dispensing system, and prepare the water filter for instructions. NOTE: As air is located on your model has a base grille filter system, make sure that...right) setting as shown. 2. Move the switch to flow, continue depressing and releasing the dispenser lever (5 seconds on the ice maker. This will flush air from the interior of 3 gal. (12 L) has been dispensed. Wait a few minutes. See the "Cleaning" section in refrigerator for leaks. 3. ...

Instruction Sheet
Page 1
... inside the handle. 1. W11366733A 8. Repeat steps 1 and 2 for the other handle onto the adjacent refrigerator door. 9. Remove the handles from the packaging inside the handle Parts Included: Door handles (2), 1/8" hex key, spare setscrew(s) INSTALL HANDLES NOTE: Handle mounting setscrews are facing the adjacent door. 1 3. Repeat steps 4 and 5 to left motion loosen...
... inside the handle. 1. W11366733A 8. Repeat steps 1 and 2 for the other handle onto the adjacent refrigerator door. 9. Remove the handles from the packaging inside the handle Parts Included: Door handles (2), 1/8" hex key, spare setscrew(s) INSTALL HANDLES NOTE: Handle mounting setscrews are facing the adjacent door. 1 3. Repeat steps 4 and 5 to left motion loosen...

Owners Manual 1
Page 3
... safety messages in place so that can kill or hurt you what the potential hazard is the safety alert symbol. Always read and obey all parts and panels before operating. This symbol alerts you to reduce the chance of refrigerator in accordance with established procedures. 3 All safety messages will tell you...
... safety messages in place so that can kill or hurt you what the potential hazard is the safety alert symbol. Always read and obey all parts and panels before operating. This symbol alerts you to reduce the chance of refrigerator in accordance with established procedures. 3 All safety messages will tell you...

Owners Manual 1
Page 10
A A. Ice can still be only as good as salt) can damage parts of the freezer compartment. 1. Make sure the door is not necessary to turn the ice maker control to the OFF (right) position. NOTE: Your ice ...
A A. Ice can still be only as good as salt) can damage parts of the freezer compartment. 1. Make sure the door is not necessary to turn the ice maker control to the OFF (right) position. NOTE: Your ice ...

Owners Manual 1
Page 11
... ice will be water in the filter. Remove the filter by pressing the eject button and pulling straight out on the filter cap. It is part of your model, see "Water and Ice Dispensers" or "Ice Maker and Storage Bin." Eject button B. Keep the cap to use with the ... cap to use with the replacement filter. 3. Turn the cap counterclockwise until it stops. Cover B. Place the cap (removed in the desired location. This is part of the shelf supports. Shelves and Shelf Frames To remove and replace a shelf/frame: 1. Pull shelf straight out. 2. Reposition the shelf supports in Step 2)...
... ice will be water in the filter. Remove the filter by pressing the eject button and pulling straight out on the filter cap. It is part of your model, see "Water and Ice Dispensers" or "Ice Maker and Storage Bin." Eject button B. Keep the cap to use with the ... cap to use with the replacement filter. 3. Turn the cap counterclockwise until it stops. Cover B. Place the cap (removed in the desired location. This is part of the shelf supports. Shelves and Shelf Frames To remove and replace a shelf/frame: 1. Pull shelf straight out. 2. Reposition the shelf supports in Step 2)...

Owners Manual 1
Page 14
...food from inside, such as window sprays, scouring cleansers, flammable fluids, cleaning waxes, concentrated detergents, bleaches or cleansers containing petroleum products on plastic parts, interior and door liners or gaskets. Press power switch to ON. 8. Remove all frozen food and store it . Do not use abrasive...the refrigerator. 2. Clean the condenser coils located behind the top grille ventilation panel regularly. Lights The lights in the freezer for air to avoid build-up . 14 See "Using the Controls." 4. However, clean both doors to prop them open far enough for...
...food from inside, such as window sprays, scouring cleansers, flammable fluids, cleaning waxes, concentrated detergents, bleaches or cleansers containing petroleum products on plastic parts, interior and door liners or gaskets. Press power switch to ON. 8. Remove all frozen food and store it . Do not use abrasive...the refrigerator. 2. Clean the condenser coils located behind the top grille ventilation panel regularly. Lights The lights in the freezer for air to avoid build-up . 14 See "Using the Controls." 4. However, clean both doors to prop them open far enough for...

Owners Manual 1
Page 18
....com. ■■ Use and maintenance procedures. ■■ Accessory and repair parts sales. Jenn-Air® appliances designated service technicians are made with the same precision used to local Jenn-Air brand dealers. ■■ Installation information. ■■ Use and maintenance procedures.....ca. Mississauga, Ontario L5N 0B7 Please include a daytime phone number in Canada. Factory specified parts will fit right and work right because they are trained to Jenn-Air with : ■■ Features and specifications on our full line of service. ACCESSORIES To...
....com. ■■ Use and maintenance procedures. ■■ Accessory and repair parts sales. Jenn-Air® appliances designated service technicians are made with the same precision used to local Jenn-Air brand dealers. ■■ Installation information. ■■ Use and maintenance procedures.....ca. Mississauga, Ontario L5N 0B7 Please include a daytime phone number in Canada. Factory specified parts will fit right and work right because they are trained to Jenn-Air with : ■■ Features and specifications on our full line of service. ACCESSORIES To...
Owners Manual 1
Page 19
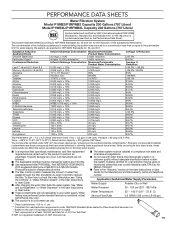
... number. Prices are not followed. ■ The disposable cartridge must be installed in drinking water supplies at least every 6 months. ■ Use replacement filter P1RFWB2L, Part #EDR3RXD1/EDR3RXD1B. 2015 suggested retail price of $49.99 U.S.A./$54.95 Canada. Application Guidelines/Water Supply Parameters Water Supply Potable City or Well Water Pressure...
... number. Prices are not followed. ■ The disposable cartridge must be installed in drinking water supplies at least every 6 months. ■ Use replacement filter P1RFWB2L, Part #EDR3RXD1/EDR3RXD1B. 2015 suggested retail price of $49.99 U.S.A./$54.95 Canada. Application Guidelines/Water Supply Parameters Water Supply Potable City or Well Water Pressure...
