Jenn-Air JUW24FLERS Support and Manuals
Get Help and Manuals for this Jenn-Air item

View All Support Options Below
Free Jenn-Air JUW24FLERS manuals!
Problems with Jenn-Air JUW24FLERS?
Ask a Question
Free Jenn-Air JUW24FLERS manuals!
Problems with Jenn-Air JUW24FLERS?
Ask a Question
Jenn-Air JUW24FLERS Videos

Jenn-Air 24 Stainless Steel Under Counter Wine Cellar JUW24FLERS - Overview
Duration: :41
Total Views: 2,392
Duration: :41
Total Views: 2,392
Jenn-Air JUW24FLERS Wine Cooler
Duration: :58
Total Views: 46
Duration: :58
Total Views: 46
Jenn-Air JUW24FLERS Wine Cooler
Duration: :47
Total Views: 8
Duration: :47
Total Views: 8
Jenn-Air JUW24FLERS Refroidisseurs à Vin
Duration: :46
Total Views: 2
Duration: :46
Total Views: 2
Popular Jenn-Air JUW24FLERS Manual Pages
Warranty - Page 1

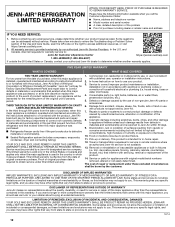
... non-residential or multiple-family use, or use your authorized Jenn-Air dealer to province. Consumable parts (i.e. This warranty gives you specific legal rights, and you .
Service to Jenn-Air within 30 days.
9. Defects or damage caused by the customer. Discoloration, rust or oxidation of repair or replacement under this major appliance is required to correct product damage...
Dimension Guide - Page 1
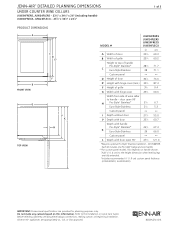
JENN-AIR® DETAILED PLANNING DIMENSIONS
UNDER COUNTER WINE CELLARS
JUW24FRERS, JUW24FLERS - 237⁄8" x 343⁄8" x 26" (including handle) JUW24FRECX, JUW24FLECX - 237⁄8" x 343⁄8" x 237⁄8"
1 of 3
PRODUCT DIMENSIONS
A
B FRONT VIEW
G E†
TOP VIEW
C D E†
F
I J‡ K L
H
G
A* B* C*
I MODEL # J‡
K L
A Width of door B WH idth of grille
JUW24FRERS ...
Dimension Guide - Page 2
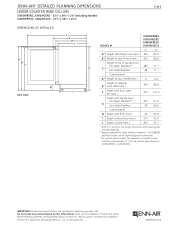
... for planning purposes only. JENN-AIR® DETAILED PLANNING DIMENSIONS
UNDER COUNTER WINE CELLARS
JUW24FRERS, JUW24FLERS - 237⁄8" x 343⁄8" x 26" (including handle) JUW24FRECX, JUW24FLECX - 237⁄8" x 343⁄8" x 237⁄8"
2 of 3
DIMENSIONS AS INSTALLED
F G H‡ I
A* B* C*
SIDE VIEW
D* J
MODEL #
JUW24FRERS JUW24FLERS JUW24FRECX JUW24FLECX
in
cm
A* Height...
Dimension Guide - Page 3

... Guide before selecting cabinetry, verifying electrical/gas connections, making cutouts or beginning installation. door open 90°
C Height (min.)
Floor
D Depth (min.)
JUW24FRERS JUW24FLERS JUW24FRECX JUW24FLECX
in
cm
24 61.0
15⁄8
4.0
343⁄8 24
87.3 61.0
VENTILATION REQUIREMENTS For proper ventilation, allow 1⁄4" (0.6 cm) space on this information. All Jenn-Air®...
Use and Care - Page 3
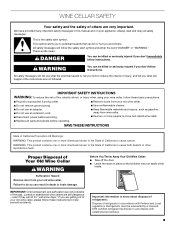
...problems of others . Junked or abandoned wine cellars are getting rid of fire, electric shock, or injury when using your wine cellar, follow instructions...immediately follow these instructions to move and install wine cellar.
■ Replace all safety messages...even if they will follow instructions. Always read and obey all parts and panels before servicing.
■ Keep flammable ...
Use and Care - Page 4

...■ Height dimensions are fully extended, add 15 mm) to the minimum height.
Failure to do not install the wine cellar behind a cabinet door or block the base grille.
¹⁄₄" (6.35 mm... leveling legs NOT extended.
■ The power cord is 60" (152.4 cm) long. INSTALLATION REQUIREMENTS
Location Requirements
■ If the floor of the opening is not level with the kitchen ...
Use and Care - Page 5
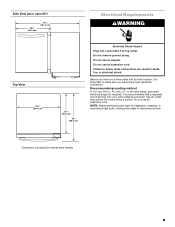
... wine cellar be turned off by a switch.
or 20-amp fused, grounded electrical supply is important to follow these instructions can result in death, fire, or electrical shock. NOTE: Before performing any type of installation, cleaning, or removing a light bulb, unplug wine cellar or disconnect power.
*Dimension includes Euro-series style handle...
Use and Care - Page 6
...moving the wine cellar for cleaning or service, be sure to cover the floor with your wine cellar seems unsteady or you like. See the cleaning instructions in back or other injury.
2....to close more people to move and install wine cellar. WARNING
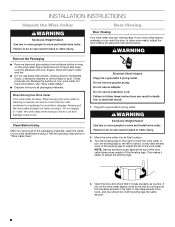
Remove the Packaging
■ Remove tape and glue residue from surfaces before using the instructions below.
Do not remove ground prong...
Use and Care - Page 7
...50°F (10°C)
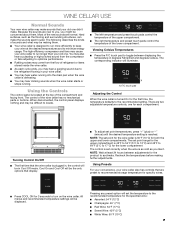
7 NOTE: Wait at the top of the wine cellar has no mechanical parts or buttons.
F/C touch pad
Using the Controls
The control panel is located at least 24 hours between...17°C) for 3 seconds to recommended storage temperature for specific wines.
■ Press COOL ON for the lower compartment The control is set correctly when the wine is as cold as the flooring ...
Use and Care - Page 8
...is on your control unless your desired temperature settings.
■ When the Auto Light is ... Temperature feature is opened , call Service to be replaced. To let you unintentionally turn on...LED, which does not need to check the problem and replace, if necessary.
After the 3-second countdown, the... until it toward the rear of the rack supports.
■ Press and hold SABBATH for ...
Use and Care - Page 9
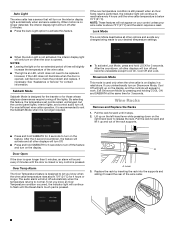
... bottom rack into place. A
B
A
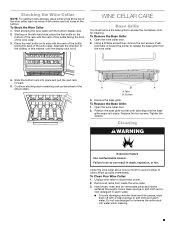
A. Remove the base grille. Replace the two screws. Hand wash, rinse, and dry removable parts and interior
surfaces thoroughly. To Stock the Wine Cellar
1. Using a Phillips....
To Clean Your Wine Cellar: 1. Unplug wine cellar or disconnect power. 2.
To Replace the Base Grille: 1. Alternate the direction of the bottles, in the above steps. ...
Use and Care - Page 10

... from the wine cellar. 2. TROUBLESHOOTING
Try the solutions suggested that the wine cellar will warm when this occurs. Do not remove ground prong. Replace the fuse or reset the circuit.
■ Is the Wine Cellar control in warm water. In order to conserve energy, try to the "Installation Instructions" section for the surrounding conditions...
Use and Care - Page 11
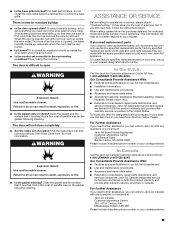
... control set correctly for assistance or service, please check "Troubleshooting." Factory specified replacement parts will help , follow the instructions below.
Our Consultants Provide Assistance With: ■ Features and specifications on our full line of appliances. ■ Use and maintenance procedures. ■ Accessory and repair parts sales. ■ Referrals to Jenn-Air with any...
Use and Care - Page 12
... when this warranty. Removal or reinstallation of repair or replacement under this major appliance is not available.
13. The cost of inaccessible appliances or built-in remote locations where an authorized Jenn-Air servicer is installed, operated and maintained according to instructions attached to or furnished with original model/serial numbers removed, altered or not easily determined...
Jenn-Air JUW24FLERS Reviews
We have not received any reviews for Jenn-Air yet.