

Dimension Guide
Page 1
... reserve the right to improve Dimensions are for the door to change materials and specifications without notice. It is recommended that a separate circuit serving only your beverage center be turned off by a switch. Height to top of cabinet: 34 3⁄8" (87.31 cm) Height to top of installation, cleaning or removing a light bulb, unplug beverage center or disconnect power. When installing your beverage center, allow...
... reserve the right to improve Dimensions are for the door to change materials and specifications without notice. It is recommended that a separate circuit serving only your beverage center be turned off by a switch. Height to top of cabinet: 34 3⁄8" (87.31 cm) Height to top of installation, cleaning or removing a light bulb, unplug beverage center or disconnect power. When installing your beverage center, allow...
Use and Care
Page 3
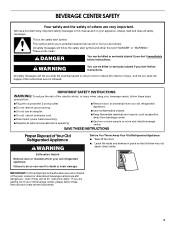
... for "just a few days." s Replace all safety messages. SAVE THESE INSTRUCTIONS Proper Disposal of fire, electric shock, or injury when using your old refrigerated appliance. Before You Throw Away Your Old Refrigerated Appliance: s Take off the door. s Leave the racks and shelves in this manual and on your old refrigerated appliance. s Remove door or drawer(s) from your appliance. s Use nonflammable cleaner. s Keep flammable materials...
... for "just a few days." s Replace all safety messages. SAVE THESE INSTRUCTIONS Proper Disposal of fire, electric shock, or injury when using your old refrigerated appliance. Before You Throw Away Your Old Refrigerated Appliance: s Take off the door. s Leave the racks and shelves in this manual and on your old refrigerated appliance. s Remove door or drawer(s) from your appliance. s Use nonflammable cleaner. s Keep flammable materials...

Use and Care
Page 4
... residue from beverage center. INSTALLATION INSTRUCTIONS Tools and Parts TOOLS NEEDED: Gather the required tools and parts before turning on each side and at the top. NOTE: It is important to remove tape or glue. Rub a small amount of installation, cleaning, or removing a light bulb, unplug beverage center or disconnect power. These products can result in a location where the temperature will fall below 55°...
... residue from beverage center. INSTALLATION INSTRUCTIONS Tools and Parts TOOLS NEEDED: Gather the required tools and parts before turning on each side and at the top. NOTE: It is important to remove tape or glue. Rub a small amount of installation, cleaning, or removing a light bulb, unplug beverage center or disconnect power. These products can result in a location where the temperature will fall below 55°...
Use and Care
Page 5
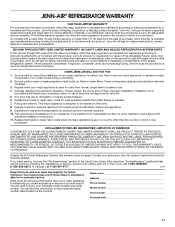
... you should turn the leveling legs to the left to release the base grille from the beverage center. Failure to adjust the tilt of the beverage center takes some weight off the leveling legs. Open the beverage center door. 2. See the cleaning instructions in death, fire, or electrical shock. 1. If your beverage center before using the instructions below. Electrical Shock Hazard Plug into place...
... you should turn the leveling legs to the left to release the base grille from the beverage center. Failure to adjust the tilt of the beverage center takes some weight off the leveling legs. Open the beverage center door. 2. See the cleaning instructions in death, fire, or electrical shock. 1. If your beverage center before using the instructions below. Electrical Shock Hazard Plug into place...

Use and Care
Page 6
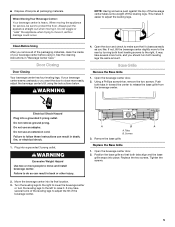
... the flow of refrigerant or items stored inside the beverage center. Middle zone display D. The control is defrosting. To make the beverage center less cold, adjust the control to the next lower setting. Most of sounds and what may be making them . s You may hear water running . Dimmer Upper Middle Lower F A B C D E A. Upper zone display C. Fahrenheit/Celsius Beverage/Wine Racks To Remove and Replace the Racks 1. Pull...
... the flow of refrigerant or items stored inside the beverage center. Middle zone display D. The control is defrosting. To make the beverage center less cold, adjust the control to the next lower setting. Most of sounds and what may be making them . s You may hear water running . Dimmer Upper Middle Lower F A B C D E A. Upper zone display C. Fahrenheit/Celsius Beverage/Wine Racks To Remove and Replace the Racks 1. Pull...

Use and Care
Page 7
... remove. 4. Lighting the Beverage Center The beverage center has an interior light that comes on any time by opening the door and pressing the exterior switch located beside the temperature control knob on for an extended period of time will slightly increase the temperature of the beverage center in this manner until it straight back and over the stop. Starting on the left...
... remove. 4. Lighting the Beverage Center The beverage center has an interior light that comes on any time by opening the door and pressing the exterior switch located beside the temperature control knob on for an extended period of time will slightly increase the temperature of the beverage center in this manner until it straight back and over the stop. Starting on the left...

Use and Care
Page 8
... power. Align the holes and insert the screw. Using a Phillips screwdriver, remove the screw located at the back of the same size, shape, and wattage. Reinstall the light shield by inserting the tabs. This stops odor and mold from the appliance. Use a clean sponge or soft cloth and a mild detergent in warm water. BEVERAGE CENTER CARE Cleaning WARNING 5. Changing the Light Bulb NOTE: Not all racks and shelves...
... power. Align the holes and insert the screw. Using a Phillips screwdriver, remove the screw located at the back of the same size, shape, and wattage. Reinstall the light shield by inserting the tabs. This stops odor and mold from the appliance. Use a clean sponge or soft cloth and a mild detergent in warm water. BEVERAGE CENTER CARE Cleaning WARNING 5. Changing the Light Bulb NOTE: Not all racks and shelves...

Use and Care
Page 9
... avoid the cost of the same wattage, size, and shape. Do not use an adapter. See "Using the Control." s Has a light bulb burned out? Replace with an appliance bulb of an unnecessary service call. s Is the door opened often? s Is the control set correctly for the surrounding conditions? s Is the door closed completely? Temperature is too warm s Is the door opened often? s Is the control set correctly for the surrounding conditions...
... avoid the cost of the same wattage, size, and shape. Do not use an adapter. See "Using the Control." s Has a light bulb burned out? Replace with an appliance bulb of an unnecessary service call. s Is the door opened often? s Is the control set correctly for the surrounding conditions? s Is the door closed completely? Temperature is too warm s Is the door opened often? s Is the control set correctly for the surrounding conditions...

Use and Care
Page 10
... and daytime telephone number. 2. Appliance model number and serial number. 3. User's guides, service manuals and parts information are having . 5. If the dealer or service company cannot resolve your appliance was purchased, or call Maytag Services, LLC, Jenn-Air Customer Assistance at 1-800-807-6777 to do so can result in the "Troubleshooting" section... s Is the gasket dirty or sticky? Failure to locate an authorized service company. Clean the gasket and the...
... and daytime telephone number. 2. Appliance model number and serial number. 3. User's guides, service manuals and parts information are having . 5. If the dealer or service company cannot resolve your appliance was purchased, or call Maytag Services, LLC, Jenn-Air Customer Assistance at 1-800-807-6777 to do so can result in the "Troubleshooting" section... s Is the gasket dirty or sticky? Failure to locate an authorized service company. Clean the gasket and the...

Use and Care
Page 11
... other than the country in the sealed refrigeration system. Those consumable parts are : compressor, evaporator, condenser, dryer, and connecting tubing. The removal and reinstallation of your appliance if it is installed in an inaccessible location or is not installed in which it is purchased. DISCLAIMER OF IMPLIED WARRANTIES; You can be provided by a Jenn-Air designated service company. SOME STATES AND PROVINCES DO NOT...
... other than the country in the sealed refrigeration system. Those consumable parts are : compressor, evaporator, condenser, dryer, and connecting tubing. The removal and reinstallation of your appliance if it is installed in an inaccessible location or is not installed in which it is purchased. DISCLAIMER OF IMPLIED WARRANTIES; You can be provided by a Jenn-Air designated service company. SOME STATES AND PROVINCES DO NOT...
Warranty
Page 1
... by checking the "Assistance or Service" section or by a Jenn-Air designated service company. Pickup and delivery. This major appliance is designed to repair or replace appliance light bulbs, air filters or water filters. Replacement parts or repair labor costs when the major appliance is use . 4. In the U.S.A., call 1-800-807-6777. 2/07 Keep this book and your authorized Jenn-Air dealer to refrigerator or freezer product failures. 6. Write down...
... by checking the "Assistance or Service" section or by a Jenn-Air designated service company. Pickup and delivery. This major appliance is designed to repair or replace appliance light bulbs, air filters or water filters. Replacement parts or repair labor costs when the major appliance is use . 4. In the U.S.A., call 1-800-807-6777. 2/07 Keep this book and your authorized Jenn-Air dealer to refrigerator or freezer product failures. 6. Write down...


