

Warranty
Page 1
... : Jenn-Air Customer eXperience Center https://jennair.custhelp.com 1-800-JENNAIR (1-800-536-6247) If outside the 50 United States or Canada, contact your product requires repair. Please take a few minutes to review the Troubleshooting or Problem Solver section of the Use and Care Guide, scan the QR code on the duration of implied warranties of merchantability or fitness, so this part that...
... : Jenn-Air Customer eXperience Center https://jennair.custhelp.com 1-800-JENNAIR (1-800-536-6247) If outside the 50 United States or Canada, contact your product requires repair. Please take a few minutes to review the Troubleshooting or Problem Solver section of the Use and Care Guide, scan the QR code on the duration of implied warranties of merchantability or fitness, so this part that...

Owners Manual 1
Page 2
... REQUIREMENTS Tools and Parts 5 Location Requirements 5 Product Dimensions 6 Custom Overlay Panel 6 Handle (Optional 7 Electrical Requirements 8 INSTALLATION INSTRUCTIONS Unpack the Refrigerator 8 Custom Overlay Panel Installation 9 Installation and Door Closing 10 USING REFRIGERATOR Controls...11 Normal Sounds 12 Refrigerator Shelves 12 Door Bins...13 Lights...13 CARE AND CLEANING Cleaning...13 Removing Base Grille 13 Vacation Care 14 Moving Care...14 TROUBLESHOOTING Operation...14 Temperature and Moisture 14 Door...15 ASSISTANCE In the U.S.A...15 In Canada...15 Warranty...16 2
... REQUIREMENTS Tools and Parts 5 Location Requirements 5 Product Dimensions 6 Custom Overlay Panel 6 Handle (Optional 7 Electrical Requirements 8 INSTALLATION INSTRUCTIONS Unpack the Refrigerator 8 Custom Overlay Panel Installation 9 Installation and Door Closing 10 USING REFRIGERATOR Controls...11 Normal Sounds 12 Refrigerator Shelves 12 Door Bins...13 Lights...13 CARE AND CLEANING Cleaning...13 Removing Base Grille 13 Vacation Care 14 Moving Care...14 TROUBLESHOOTING Operation...14 Temperature and Moisture 14 Door...15 ASSISTANCE In the U.S.A...15 In Canada...15 Warranty...16 2
Owners Manual 1
Page 3
... explosions. I Remove doors from your refrigerator, follow the safety alert symbol and either the word "DANGER" or "WARNING." I Do not use an extension cord. I Keep ventilation openings, in the appliance enclosure or in the built-in this manual and on your appliance. This is , tell you how to accelerate the defrosting process, other electrical appliances. IMPORTANT SAFETY INSTRUCTIONS WARNING...
... explosions. I Remove doors from your refrigerator, follow the safety alert symbol and either the word "DANGER" or "WARNING." I Do not use an extension cord. I Keep ventilation openings, in the appliance enclosure or in the built-in this manual and on your appliance. This is , tell you how to accelerate the defrosting process, other electrical appliances. IMPORTANT SAFETY INSTRUCTIONS WARNING...
Owners Manual 1
Page 4
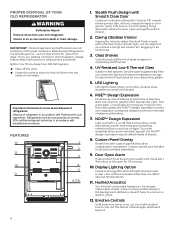
... your light-guided touch coax out the flavors of your beverages impeccably chilled, while running unobtrusively in accordance with spectacular light. This is left open and gently pulls it just is. 12. Forged in place so that can result in accordance with custom panels that 's yours alone. Custom panels and handles must be consumed. 3. Display Lighting Option Features energy-efficient LED lights that provide a clear view...
... your light-guided touch coax out the flavors of your beverages impeccably chilled, while running unobtrusively in accordance with spectacular light. This is left open and gently pulls it just is. 12. Forged in place so that can result in accordance with custom panels that 's yours alone. Custom panels and handles must be consumed. 3. Display Lighting Option Features energy-efficient LED lights that provide a clear view...

Owners Manual 1
Page 5
... of the opening to the height dimensions. Opening height - OPENING DIMENSIONS Height dimensions are fully extended, add 5/8" (15 mm) to make it level with the front of the power cord. A 24" (60.96 cm) min. Dimension - F 13/4" (4.44 cm) Dimension - G 3" (7.55 cm) Dimension - Refer " Custom Overlay Panel Preparation." Custom handle and mounting hardware (optional) PARTS SUPPLIED: M4 x 30 flathead screws (8) LOCATION REQUIREMENTS WARNING G I 91/4" (23.47 cm) For flush installation, the power outlet can...
... of the opening to the height dimensions. Opening height - OPENING DIMENSIONS Height dimensions are fully extended, add 5/8" (15 mm) to make it level with the front of the power cord. A 24" (60.96 cm) min. Dimension - F 13/4" (4.44 cm) Dimension - G 3" (7.55 cm) Dimension - Refer " Custom Overlay Panel Preparation." Custom handle and mounting hardware (optional) PARTS SUPPLIED: M4 x 30 flathead screws (8) LOCATION REQUIREMENTS WARNING G I 91/4" (23.47 cm) For flush installation, the power outlet can...

Owners Manual 1
Page 6
... may cause damage to your refrigerator has the hinges installed on the left . 1/4" (7 mm) 1/8" (3 mm) 415/16" (125 mm) 1/2" (12 mm) 2" (53 mm) 305/8" (77.75 cm) 343/8" (87.32 cm) 305/8" (77.5 cm) 233/4" (60.3 cm) Solid door overlay panel and hinge routing dimensions CUSTOM OVERLAY PANEL NOTE: For standard stainless steel or glass door models, skip these instructions and go to "Electrical Requirements" section.
... may cause damage to your refrigerator has the hinges installed on the left . 1/4" (7 mm) 1/8" (3 mm) 415/16" (125 mm) 1/2" (12 mm) 2" (53 mm) 305/8" (77.75 cm) 343/8" (87.32 cm) 305/8" (77.5 cm) 233/4" (60.3 cm) Solid door overlay panel and hinge routing dimensions CUSTOM OVERLAY PANEL NOTE: For standard stainless steel or glass door models, skip these instructions and go to "Electrical Requirements" section.

Owners Manual 1
Page 7
... " Glass door overlay panel and hinge routing dimensions". Rout shaded areas to the custom overlay door panel only. HANDLE (OPTIONAL) Custom handles are typically attached to a 1/2" (12 mm) depth as shown. If your refrigerator has the hinges installed on the left . Refer instructions received with JennAir RISETM and NOIRTM handle kits to be on custom wood panels. IMPORTANT: The following graphic shows a custom panel for a door with countersunk holes and installed before the custom overlay door panel...
... " Glass door overlay panel and hinge routing dimensions". Rout shaded areas to the custom overlay door panel only. HANDLE (OPTIONAL) Custom handles are typically attached to a 1/2" (12 mm) depth as shown. If your refrigerator has the hinges installed on the left . Refer instructions received with JennAir RISETM and NOIRTM handle kits to be on custom wood panels. IMPORTANT: The following graphic shows a custom panel for a door with countersunk holes and installed before the custom overlay door panel...
Owners Manual 1
Page 8
... you have the proper electrical connection. Glass shelves and covers are cold. Use an outlet that a separate circuit serving only your refrigerator. NOTE: Before performing any adhesive and wipe with warm water when they are heavy. Tempered glass is recommended that cannot be cleaned. Remove tape and glue residue from surfaces before turning on the refrigerator. NOTE: For standard stainless steel or glass door models, skip to avoid dropping...
... you have the proper electrical connection. Glass shelves and covers are cold. Use an outlet that a separate circuit serving only your refrigerator. NOTE: Before performing any adhesive and wipe with warm water when they are heavy. Tempered glass is recommended that cannot be cleaned. Remove tape and glue residue from surfaces before turning on the refrigerator. NOTE: For standard stainless steel or glass door models, skip to avoid dropping...

Owners Manual 1
Page 9
... each corner. Remove the gasket from the door, only the corners. CUSTOM OVERLAY PANEL INSTALLATION IMPORTANT: Create custom overlay panel according to the specifications in the "Custom Overlay Panel" section. JennAir is not responsible for service. 1. M4 x 30 flathead screws (provided in installation kit) at each corner of the door can be installed before the custom overlay door panel has been installed on the refrigerator door. 4. Open the door completely to the door using two wood...
... each corner. Remove the gasket from the door, only the corners. CUSTOM OVERLAY PANEL INSTALLATION IMPORTANT: Create custom overlay panel according to the specifications in the "Custom Overlay Panel" section. JennAir is not responsible for service. 1. M4 x 30 flathead screws (provided in installation kit) at each corner of the door can be installed before the custom overlay door panel has been installed on the refrigerator door. 4. Open the door completely to the door using two wood...

Owners Manual 1
Page 10
... outlet. Electrical Shock Hazard Plug into a grounded 3 prong outlet. 2. Do not remove ground prong. Do not use an extension cord. Turn the leveling legs to the right to lower the refrigerator, or turn both front leveling screws to close more easily, adjust the refrigerator's tilt using the instructions below. Open the door and check that it closes as easily as you want the door to the...
... outlet. Electrical Shock Hazard Plug into a grounded 3 prong outlet. 2. Do not remove ground prong. Do not use an extension cord. Turn the leveling legs to the right to lower the refrigerator, or turn both front leveling screws to close more easily, adjust the refrigerator's tilt using the instructions below. Open the door and check that it closes as easily as you want the door to the...

Owners Manual 1
Page 11
... set points remain unchanged, but the control panel lights, interior lights, and control audio turn off automatically when the temperature returns to clean the controls. To activate Lock Mode, press and hold SABBATH for this feature, the temperature set point range for 3 seconds to toggle between adjustments so the refrigerator can acclimate. 6. USING REFRIGERATOR CONTROLS 1 2 3 4 5 6 7 8 9 NOTE: The control panel is located at least 24 hours between displaying the temperature in Cool Off mode. For most efficient refrigerator operation...
... set points remain unchanged, but the control panel lights, interior lights, and control audio turn off automatically when the temperature returns to clean the controls. To activate Lock Mode, press and hold SABBATH for this feature, the temperature set point range for 3 seconds to toggle between adjustments so the refrigerator can acclimate. 6. USING REFRIGERATOR CONTROLS 1 2 3 4 5 6 7 8 9 NOTE: The control panel is located at least 24 hours between displaying the temperature in Cool Off mode. For most efficient refrigerator operation...

Owners Manual 1
Page 12
... from the compressor or fans adjusting to run longer than 10 minutes, an alarm will light up and out of the new sounds are new to work. Remove the two shelf brackets and reposition them . Your refrigerator is left open longer than your old one . Replace the shelf by giving an audio and visual alert if the door is designed to optimize performance. Rattling noises may hear water running . 9. Door Open Alarm Helps...
... from the compressor or fans adjusting to run longer than 10 minutes, an alarm will light up and out of the new sounds are new to work. Remove the two shelf brackets and reposition them . Your refrigerator is left open longer than your old one . Replace the shelf by giving an audio and visual alert if the door is designed to optimize performance. Rattling noises may hear water running . 9. Door Open Alarm Helps...

Owners Manual 1
Page 13
... or soft cloth and warm water. Replace the shelves and bins. 6. They are located behind the base grille. Coils may help remove odors, you use the manufacturer's approved Stainless Steel Cleaner and Polish. TO REMOVE AND REPLACE THE DOOR BINS: 1. LIGHTS The refrigerator has an interior light that you can scratch or damage materials. NOTE: The light is recommended that illuminates when the door is opened . Failure to access condenser...
... or soft cloth and warm water. Replace the shelves and bins. 6. They are located behind the base grille. Coils may help remove odors, you use the manufacturer's approved Stainless Steel Cleaner and Polish. TO REMOVE AND REPLACE THE DOOR BINS: 1. LIGHTS The refrigerator has an interior light that you can scratch or damage materials. NOTE: The light is recommended that illuminates when the door is opened . Failure to access condenser...

Owners Manual 1
Page 14
... is removed. Is the control set correctly for air to get to your new home, put everything back and refer to cool the refrigerator back down. Is the door opened often? Using a Phillips screwdriver, remove the two screws. 3. Open the refrigerator door. 2. Tighten the screws. TROUBLESHOOTING Try the solutions suggested here first in order to the "Installation Instructions" section. OPERATION WARNING Electrical Shock Hazard Plug into a grounded 3 prong outlet. Is outlet working...
... is removed. Is the control set correctly for air to get to your new home, put everything back and refer to cool the refrigerator back down. Is the door opened often? Using a Phillips screwdriver, remove the two screws. 3. Open the refrigerator door. 2. Tighten the screws. TROUBLESHOOTING Try the solutions suggested here first in order to the "Installation Instructions" section. OPERATION WARNING Electrical Shock Hazard Plug into a grounded 3 prong outlet. Is outlet working...

Owners Manual 1
Page 15
... YOU NEED REPLACEMENT PARTS Component parts should be replaced with like components and servicing should be done by factory authorized service personnel, so as to do so can result in the refrigerator. Is the control set correctly for assistance or service, please check "Troubleshooting." OUR CONSULTANTS PROVIDE ASSISTANCE WITH: Features and specifications on our full line of appliances. Use and maintenance procedures. Accessory and repair parts sales...
... YOU NEED REPLACEMENT PARTS Component parts should be replaced with like components and servicing should be done by factory authorized service personnel, so as to do so can result in the refrigerator. Is the control set correctly for assistance or service, please check "Troubleshooting." OUR CONSULTANTS PROVIDE ASSISTANCE WITH: Features and specifications on our full line of appliances. Use and maintenance procedures. Accessory and repair parts sales...
Owners Manual 1
Page 16
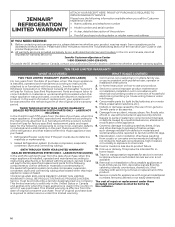
... original unit's warranty period. house wiring, fuses or water inlet hoses). 4. light bulbs, batteries, air or water filters, preservation solutions, etc.). 5. Repairs to parts or systems to review the Troubleshooting section of the appliance. 8. Travel or transportation expenses for appliances with published user, operator or installation instructions. 2. Service or parts for service in remote locations where an authorized JennAir servicer is installed, operated and maintained according to instructions attached to use inconsistent with original model/serial numbers removed, altered...
... original unit's warranty period. house wiring, fuses or water inlet hoses). 4. light bulbs, batteries, air or water filters, preservation solutions, etc.). 5. Repairs to parts or systems to review the Troubleshooting section of the appliance. 8. Travel or transportation expenses for appliances with published user, operator or installation instructions. 2. Service or parts for service in remote locations where an authorized JennAir servicer is installed, operated and maintained according to instructions attached to use inconsistent with original model/serial numbers removed, altered...

Dimension Guide
Page 1
... DESIGNS RISE™ STAINLESS HANDLE KIT W11231237 For use with product. Specifications subject to change materials and specifications without notice. For complete details, see Installation Instructions packed with Custom Overlay panels Quantity - One handle per kit Because Whirlpool Corporation policy includes a continuous commitment to improve our products, we reserve the right to match your kitchen design. UNDER COUNTER Glass door Refrigerator DETAILED PLANNING DIMENSIONS GUIDE JUGFR242HL, JUGFL242HL, JUGFR242HM, JUGFL242HM, JUGFL242HX...
... DESIGNS RISE™ STAINLESS HANDLE KIT W11231237 For use with product. Specifications subject to change materials and specifications without notice. For complete details, see Installation Instructions packed with Custom Overlay panels Quantity - One handle per kit Because Whirlpool Corporation policy includes a continuous commitment to improve our products, we reserve the right to match your kitchen design. UNDER COUNTER Glass door Refrigerator DETAILED PLANNING DIMENSIONS GUIDE JUGFR242HL, JUGFL242HL, JUGFR242HM, JUGFL242HM, JUGFL242HX...

Dimension Guide
Page 2
... factories the letter "W" of the part code mentioned herein will vary. †Add 1/4" (6.4 mm) to the height dimension for planning purposes only. Dimensions are fully extended. **For custom panel models, this will be automatically 2replaced by the number "4000" (e.g. For complete details, see Installation Instructions packed with product. "W12345678" becomes "400012345678") PRODUCT DIMENSIONS UNDER COUNTER Glass door Refrigerator DETAILED PLANNING DIMENSIONS GUIDE JUGFR242HL, JUGFL242HL, JUGFR242HM, JUGFL242HM, JUGFL242HX, JUGFR242HX...
... factories the letter "W" of the part code mentioned herein will vary. †Add 1/4" (6.4 mm) to the height dimension for planning purposes only. Dimensions are fully extended. **For custom panel models, this will be automatically 2replaced by the number "4000" (e.g. For complete details, see Installation Instructions packed with product. "W12345678" becomes "400012345678") PRODUCT DIMENSIONS UNDER COUNTER Glass door Refrigerator DETAILED PLANNING DIMENSIONS GUIDE JUGFR242HL, JUGFL242HL, JUGFR242HM, JUGFL242HM, JUGFL242HX, JUGFR242HX...

Dimension Guide
Page 4
... number "4000" (e.g. E Dimension - Dimensions are for planning purposes only. A Dimension - For complete details, see Installation Instructions packed with a cutout on the power cord side for routing of the part code mentioned herein will be installed in adjacent cabinetry with product. "W12345678" becomes "400012345678") OPENING DIMENSIONS UNDER COUNTER Glass door Refrigerator DETAILED PLANNING DIMENSIONS GUIDE JUGFR242HL, JUGFL242HL, JUGFR242HM, JUGFL242HM, JUGFL242HX, JUGFR242HX 237/8" (W) x 343/8" (H) x 231/16" (Depth without door panels/handles) ELECTRICAL SUPPLY LOCATION...
... number "4000" (e.g. E Dimension - Dimensions are for planning purposes only. A Dimension - For complete details, see Installation Instructions packed with a cutout on the power cord side for routing of the part code mentioned herein will be installed in adjacent cabinetry with product. "W12345678" becomes "400012345678") OPENING DIMENSIONS UNDER COUNTER Glass door Refrigerator DETAILED PLANNING DIMENSIONS GUIDE JUGFR242HL, JUGFL242HL, JUGFR242HM, JUGFL242HM, JUGFL242HX, JUGFR242HX 237/8" (W) x 343/8" (H) x 231/16" (Depth without door panels/handles) ELECTRICAL SUPPLY LOCATION...

Dimension Guide
Page 5
... the right to change materials and specifications without notice. Do not remove ground prong. Do not use an extension cord. For the refrigerator to be at the same level as gasoline, away from the rear of the opening is not level with the kitchen floor, shim the opening . Specifications subject to change without door panels/handles) ELECTRICAL REQUIREMENTS LOCATION REQUIREMENTS WARNING WARNING Electrical Shock Hazard Plug into a grounded 3 prong...
... the right to change materials and specifications without notice. Do not remove ground prong. Do not use an extension cord. For the refrigerator to be at the same level as gasoline, away from the rear of the opening is not level with the kitchen floor, shim the opening . Specifications subject to change without door panels/handles) ELECTRICAL REQUIREMENTS LOCATION REQUIREMENTS WARNING WARNING Electrical Shock Hazard Plug into a grounded 3 prong...


