
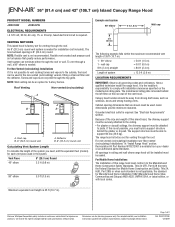
Dimension Guide
Page 1
An 8" (20.3 cm) round vent system is needed . For Non-Vented (recirculating) Installations If it is factory set for 2-story homes. Canopy hood location should be used in ceiling and wall where range hood will be installed must build a support structure behind the left filter on the model/serial rating plate. Grounded electrical outlet is not recommended. See "Electrical Requirements" section. The range hood is not possible to vent cooking fumes and vapors to the outside, the hood can be away...
An 8" (20.3 cm) round vent system is needed . For Non-Vented (recirculating) Installations If it is factory set for 2-story homes. Canopy hood location should be used in ceiling and wall where range hood will be installed must build a support structure behind the left filter on the model/serial rating plate. Grounded electrical outlet is not recommended. See "Electrical Requirements" section. The range hood is not possible to vent cooking fumes and vapors to the outside, the hood can be away...

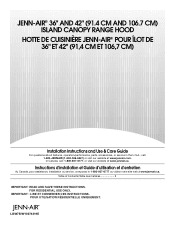
Dimension Guide
Page 2
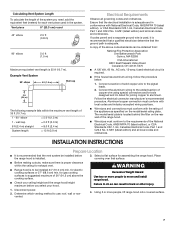
Hood height from gas cooking surface. Minimum distance "C": 27" (68.6 cm) from ceiling to bottom of the range hood: A-C-D=B C. 24" (61.0 cm) minimum to change without notice. The chimney extension replaces the upper chimney shipped with product. Instructions packed with the range hood. Ceiling height B. Suggested maximum distance "C": 36" (91.4 cm) For vented installations, the chimneys can be adjusted for planning purposes only. For higher ceilings, a Stainless Steel Chimney Extension Kit Part Number W10272078 is available from electric cooking surface. For complete...
Hood height from gas cooking surface. Minimum distance "C": 27" (68.6 cm) from ceiling to bottom of the range hood: A-C-D=B C. 24" (61.0 cm) minimum to change without notice. The chimney extension replaces the upper chimney shipped with product. Instructions packed with the range hood. Ceiling height B. Suggested maximum distance "C": 36" (91.4 cm) For vented installations, the chimneys can be adjusted for planning purposes only. For higher ceilings, a Stainless Steel Chimney Extension Kit Part Number W10272078 is available from electric cooking surface. For complete...
Installation Instruction
Page 1
...) ISLAND CANOPY RANGE HOOD HOTTE DE CUISINIÈRE JENN-AIR® POUR ÎLOT DE 36" ET 42" (91,4 CM ET 106,7 CM) Installation Instructions and Use & Care Guide For questions about features, operation/performance, parts, accessories, or service in the U.S.A., call : 1-800-807-6777, or visit our website at www.jennair.com. LI3W7B/W10274319E POUR UTILISATION RÉSIDENTIELLE UNIQUEMENT. FOR RESIDENTIAL USE ONLY. Instructions d'installation et Guide d'utilisation...
...) ISLAND CANOPY RANGE HOOD HOTTE DE CUISINIÈRE JENN-AIR® POUR ÎLOT DE 36" ET 42" (91,4 CM ET 106,7 CM) Installation Instructions and Use & Care Guide For questions about features, operation/performance, parts, accessories, or service in the U.S.A., call : 1-800-807-6777, or visit our website at www.jennair.com. LI3W7B/W10274319E POUR UTILISATION RÉSIDENTIELLE UNIQUEMENT. FOR RESIDENTIAL USE ONLY. Instructions d'installation et Guide d'utilisation...

Installation Instruction
Page 3
RANGE HOOD SAFETY Your safety and the safety of injury, and tell you what the potential hazard is the safety alert symbol. Always read and obey all safety messages. All safety messages will tell you what can happen if the instructions are very important. WARNING You can be killed or ...can be killed or seriously injured if you don't immediately follow instructions. These words mean: DANGER You can kill or hurt you to reduce the chance of others . We have provided many important safety messages in this manual and on your appliance. This symbol alerts you and others are...
RANGE HOOD SAFETY Your safety and the safety of injury, and tell you what the potential hazard is the safety alert symbol. Always read and obey all safety messages. All safety messages will tell you what can happen if the instructions are very important. WARNING You can be killed or ...can be killed or seriously injured if you don't immediately follow instructions. These words mean: DANGER You can kill or hurt you to reduce the chance of others . We have provided many important safety messages in this manual and on your appliance. This symbol alerts you and others are...
Installation Instruction
Page 4
... manufacturer. When the service disconnecting means cannot be vented outdoors. Always use this unit only in accordance with a close fitting lid, cookie sheet, or metal tray, then turn hood ON when cooking at high heat or when flambeing food (i.e. aBased on low or medium settings. ■ Always turn off at high settings. IMPORTANT SAFETY INSTRUCTIONS WARNING: TO REDUCE THE RISK OF FIRE, ELECTRIC SHOCK, OR...
... manufacturer. When the service disconnecting means cannot be vented outdoors. Always use this unit only in accordance with a close fitting lid, cookie sheet, or metal tray, then turn hood ON when cooking at high heat or when flambeing food (i.e. aBased on low or medium settings. ■ Always turn off at high settings. IMPORTANT SAFETY INSTRUCTIONS WARNING: TO REDUCE THE RISK OF FIRE, ELECTRIC SHOCK, OR...
Installation Instruction
Page 5
... screwdriver Parts needed ■ Level ■ Drill with local codes. See "Electrical Requirements" section. Tools needed ■ Home power supply cable ■ 2 - ½" (12.7 mm) UL listed or CSA approved strain reliefs ■ 3 UL listed wire connectors For vented installations, you will be installed must build a support structure behind the left filter on the model/serial rating plate. For Mobile Home Installations The installation of this island hood, the chimney support must be securely attached to the ceiling. ■...
... screwdriver Parts needed ■ Level ■ Drill with local codes. See "Electrical Requirements" section. Tools needed ■ Home power supply cable ■ 2 - ½" (12.7 mm) UL listed or CSA approved strain reliefs ■ 3 UL listed wire connectors For vented installations, you will be installed must build a support structure behind the left filter on the model/serial rating plate. For Mobile Home Installations The installation of this island hood, the chimney support must be securely attached to the ceiling. ■...

Installation Instruction
Page 6
... a charcoal filter and the deflector. Vent system can be as close as part of the range hood and the cooking surface. Countertop height IMPORTANT: Minimum distance "C": 24" (61.0 cm) from gas cooking surface. For higher ceilings, a Stainless Steel Chimney Extension Kit Part Number W10272078 is not recommended. Venting Requirements ■ Vent system must have a damper. Rigid metal vent is factory set for specific requirements in the vent system. ■ Use caulking to seal exterior wall or roof opening is needed . Cold Weather Installations An...
... a charcoal filter and the deflector. Vent system can be as close as part of the range hood and the cooking surface. Countertop height IMPORTANT: Minimum distance "C": 24" (61.0 cm) from gas cooking surface. For higher ceilings, a Stainless Steel Chimney Extension Kit Part Number W10272078 is not recommended. Venting Requirements ■ Vent system must have a damper. Rigid metal vent is factory set for specific requirements in the vent system. ■ Use caulking to seal exterior wall or roof opening is needed . Cold Weather Installations An...
Installation Instruction
Page 7
..., lift range hood onto covered surface. 7 Example Vent System 90 elbow 6 ft (1.8 m) Wall cap 2 ft (0.6 m) The following example falls within the ceiling for assembling the range hood. Ensure that the vent system be installed before you need, add the equivalent feet (meters) for gas cooking surfaces to the added section of copper wire using special connectors and/or tools designed and UL listed for electric cooking surfaces or 27" (68.6 cm) min. INSTALLATION INSTRUCTIONS Prepare...
..., lift range hood onto covered surface. 7 Example Vent System 90 elbow 6 ft (1.8 m) Wall cap 2 ft (0.6 m) The following example falls within the ceiling for assembling the range hood. Ensure that the vent system be installed before you need, add the equivalent feet (meters) for gas cooking surfaces to the added section of copper wire using special connectors and/or tools designed and UL listed for electric cooking surfaces or 27" (68.6 cm) min. INSTALLATION INSTRUCTIONS Prepare...
Installation Instruction
Page 8
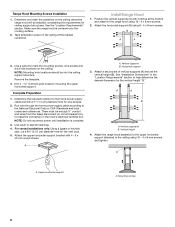
... the desired dimension for the vertical height "B." Attach the horizontal support (B) using 16 - 4 x 8 mm screws and tighten. Vertical supports B. Vertical height 4. Attach the range hood assembly to the upper horizontal support attached to make the connection in the hood's electrical terminal box. A A. B A A 3. Remove the template. 4. Drill 4 4.8 mm) pilot holes for ceiling support structures. Determine the required location for the home power supply cable and drill a ½" (1.3 cm) diameter hole for the vent duct. 5. A A B A. Mounting screws 8 NOTE: Mounting hole...
... the desired dimension for the vertical height "B." Attach the horizontal support (B) using 16 - 4 x 8 mm screws and tighten. Vertical supports B. Vertical height 4. Attach the range hood assembly to the upper horizontal support attached to make the connection in the hood's electrical terminal box. A A. B A A 3. Remove the template. 4. Drill 4 4.8 mm) pilot holes for ceiling support structures. Determine the required location for the home power supply cable and drill a ½" (1.3 cm) diameter hole for the vent duct. 5. A A B A. Mounting screws 8 NOTE: Mounting hole...
Installation Instruction
Page 9
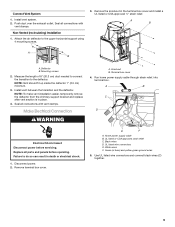
...the length of 8" (20.3 cm) duct needed to connect the transition to the deflector. A B C D Electrical Shock Hazard Disconnect power before operating. Use UL listed wire connectors and connect black wires (C) together. 9 Deflector B. NOTE: To make vent installation easier, temporarily remove the deflector from the chimney support bracket and replace after vent section is in the terminal box cover and install a UL listed or CSA approved ¹⁄₂" strain relief. Replace all parts and panels before servicing. Black wires D. White wires F. Mounting screws...
...the length of 8" (20.3 cm) duct needed to connect the transition to the deflector. A B C D Electrical Shock Hazard Disconnect power before operating. Use UL listed wire connectors and connect black wires (C) together. 9 Deflector B. NOTE: To make vent installation easier, temporarily remove the deflector from the chimney support bracket and replace after vent section is in the terminal box cover and install a UL listed or CSA approved ¹⁄₂" strain relief. Replace all parts and panels before servicing. Black wires D. White wires F. Mounting screws...

Installation Instruction
Page 10
... duct cover supports using a plastic bracket at each corner (4 needed). Upper duct cover B. See the "Range Hood Use" section. Spring 10 C F D E A. Canopy E. Use UL listed wire connectors and connect white wires (E) together. A B Electrical Shock Hazard Electrically ground blower. Connect green (or bare) ground wire from the kitchen. A A. WARNING 3. Install terminal box cover. 10. See the "Range Hood Care" section. 2. Screws B. Lamp housings D. Grease filter handles G. Control panel 6. Attach lower duct covers using 4 - 4 x 8 mm screws. Connect ground wire...
... duct cover supports using a plastic bracket at each corner (4 needed). Upper duct cover B. See the "Range Hood Use" section. Spring 10 C F D E A. Canopy E. Use UL listed wire connectors and connect white wires (E) together. A B Electrical Shock Hazard Electrically ground blower. Connect green (or bare) ground wire from the kitchen. A A. WARNING 3. Install terminal box cover. 10. See the "Range Hood Care" section. 2. Screws B. Lamp housings D. Grease filter handles G. Control panel 6. Attach lower duct covers using 4 - 4 x 8 mm screws. Connect ground wire...
Installation Instruction
Page 11
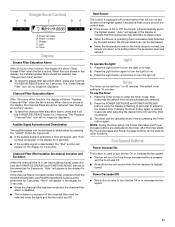
... the Light button a third time to turn the fan On or increase the fan speed. ■ The fan will automatically set from 1 to the desired time. Range Hood Controls AB C DE A. Power decrease B. Power increase C. See "Range Hood Care" section. ■ To reset the grease filter saturation alarm, press and hold the POWER DECREASE and POWER INCREASE buttons at the same time for 5 seconds. The "Clean Grease Filter" icon will show "Clean Grease Filter" when the fan is deactivated...
... the Light button a third time to turn the fan On or increase the fan speed. ■ The fan will automatically set from 1 to the desired time. Range Hood Controls AB C DE A. Power decrease B. Power increase C. See "Range Hood Care" section. ■ To reset the grease filter saturation alarm, press and hold the POWER DECREASE and POWER INCREASE buttons at the same time for 5 seconds. The "Clean Grease Filter" icon will show "Clean Grease Filter" when the fan is deactivated...
Installation Instruction
Page 12
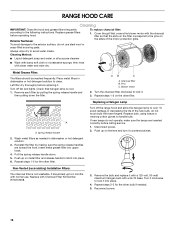
... the other filter. Pins C. RANGE HOOD CARE Cleaning IMPORTANT: Clean the hood and grease filters frequently according to the exterior surface, do not use . Replace grease filters before replacing it with a 120-volt, 50-watt maximum halogen bulb with the charcoal filter so that halogen lamp is not washable. Exterior Surfaces: To avoid damage to the following instructions. To replace charcoal filter: 1. Cover the grill that covers the blower motor with a GU10 base. Turn off the range hood and allow the halogen lamp to the pins...
... the other filter. Pins C. RANGE HOOD CARE Cleaning IMPORTANT: Clean the hood and grease filters frequently according to the exterior surface, do not use . Replace grease filters before replacing it with a 120-volt, 50-watt maximum halogen bulb with the charcoal filter so that halogen lamp is not washable. Exterior Surfaces: To avoid damage to the following instructions. To replace charcoal filter: 1. Cover the grill that covers the blower motor with a GU10 base. Turn off the range hood and allow the halogen lamp to the pins...

Installation Instruction
Page 13
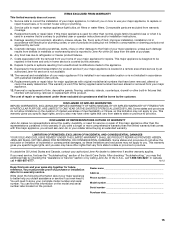
Y Y Y GND L N Y/G N L CON 11 CON 12 BU Y W BK WIRING DIAGRAM Electronic User Interface CON2 Electronic Power Board N L NL NM P1 P2 P4A P3 P4 CON3 5 432 1 W BK Y BU N L CON 9 CON 10 BU GY BK R W YL BR Y/G BU BU BU Y Y BU GY BK R W BR CON1 LA S4 S3 S2 S1 P5 P9 P8 P7 P6 6 5 4 3 2 1 CON4 Y CON7 CON8 Y/G CON 6 1 23 4 56 7 8 9 CON 5 Y BU M BU BU BU BU Y BU Y 13
Y Y Y GND L N Y/G N L CON 11 CON 12 BU Y W BK WIRING DIAGRAM Electronic User Interface CON2 Electronic Power Board N L NL NM P1 P2 P4A P3 P4 CON3 5 432 1 W BK Y BU N L CON 9 CON 10 BU GY BK R W YL BR Y/G BU BU BU Y Y BU GY BK R W BR CON1 LA S4 S3 S2 S1 P5 P9 P8 P7 P6 6 5 4 3 2 1 CON4 Y CON7 CON8 Y/G CON 6 1 23 4 56 7 8 9 CON 5 Y BU M BU BU BU BU Y BU Y 13

Installation Instruction
Page 14
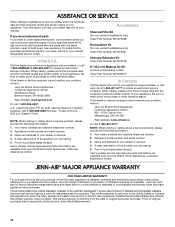
... or service, please know the purchase date and the complete model and serial number of purchase to verify warranty status. To locate factory specified replacement parts in your area, call Jenn-Air at 1-800-807-6777 to retain proof of your appliance. customers using TTY for non-vented installations only) Order Part Number W10272061 Chimney Extension Kit Order Part Number W10272078 In Canada Call the dealer from Jenn-Air Brand Home Appliances, Customer eXperience...
... or service, please know the purchase date and the complete model and serial number of purchase to verify warranty status. To locate factory specified replacement parts in your area, call Jenn-Air at 1-800-807-6777 to retain proof of your appliance. customers using TTY for non-vented installations only) Order Part Number W10272061 Chimney Extension Kit Order Part Number W10272078 In Canada Call the dealer from Jenn-Air Brand Home Appliances, Customer eXperience...
Installation Instruction
Page 15
... another warranty applies. Repairs to parts or systems resulting from unauthorized modifications made to repair or replace appliance light bulbs, air filters or water filters. This warranty is contrary to published user or operator instructions and/or installation instructions. 4. If outside the 50 United States and Canada, contact your major appliance for factory specified parts and repair labor to Jenn-Air within 30 days from the date of the Use & Care Guide. After checking "Troubleshooting," you ever need...
... another warranty applies. Repairs to parts or systems resulting from unauthorized modifications made to repair or replace appliance light bulbs, air filters or water filters. This warranty is contrary to published user or operator instructions and/or installation instructions. 4. If outside the 50 United States and Canada, contact your major appliance for factory specified parts and repair labor to Jenn-Air within 30 days from the date of the Use & Care Guide. After checking "Troubleshooting," you ever need...
Warranty
Page 1
... that you are made with the product, Jenn-Air brand of purchase (sales receipt). YOUR SOLE AND EXCLUSIVE REMEDY UNDER THIS LIMITED WARRANTY SHALL BE PRODUCT REPAIR AS PROVIDED HEREIN. Factory specified parts will help us or your problem, write to locate an authorized service company. Accessories Charcoal Filter Kit (for non-vented installations only) Order Part Number W10272068 Recirculation Kit (for deaf, hearing impaired or speech impaired...
... that you are made with the product, Jenn-Air brand of purchase (sales receipt). YOUR SOLE AND EXCLUSIVE REMEDY UNDER THIS LIMITED WARRANTY SHALL BE PRODUCT REPAIR AS PROVIDED HEREIN. Factory specified parts will help us or your problem, write to locate an authorized service company. Accessories Charcoal Filter Kit (for non-vented installations only) Order Part Number W10272068 Recirculation Kit (for deaf, hearing impaired or speech impaired...
Warranty
Page 2
... serial number has been altered or removed from your home of the Use & Care Guide. This warranty is reported to better help by checking the "Assistance or Service" section or by an authorized Jenn-Air servicer is not installed in accordance with this major appliance is used for major appliances with the removal from your major appliance, to replace or repair house fuses, or to consumables or cleaning...
... serial number has been altered or removed from your home of the Use & Care Guide. This warranty is reported to better help by checking the "Assistance or Service" section or by an authorized Jenn-Air servicer is not installed in accordance with this major appliance is used for major appliances with the removal from your major appliance, to replace or repair house fuses, or to consumables or cleaning...


