
Dimension Guide
Page 1
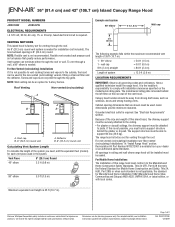
...16/09 36" (91.4 cm) and 42" (106.7 cm) Island Canopy Range Hood PRODUCT MODEL NUMBERS JXI8036W JXI8042W ELECTRICAL REQUIREMENTS • A 120 volt, 60 Hz, AC only, 15- Flexible vent creates back pressure and air turbulence that are recycled through the top grille. The model/serial rating plate is ...not possible to vent cooking fumes and vapors to the outside, the hood can be used in ceiling and wall where range hood will be installed must be...
...16/09 36" (91.4 cm) and 42" (106.7 cm) Island Canopy Range Hood PRODUCT MODEL NUMBERS JXI8036W JXI8042W ELECTRICAL REQUIREMENTS • A 120 volt, 60 Hz, AC only, 15- Flexible vent creates back pressure and air turbulence that are recycled through the top grille. The model/serial rating plate is ...not possible to vent cooking fumes and vapors to the outside, the hood can be used in ceiling and wall where range hood will be installed must be...

Dimension Guide
Page 2
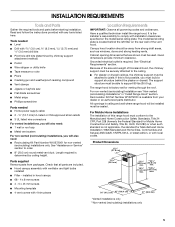
...) installations only INSTALLATION DIMENSIONS B C A D A. The chimney extension replaces the upper chimney shipped with product. Instructions packed with the range hood. Minimum distance "C": 27" (68.6 cm) from your dealer or an authorized parts distributor. For higher ceilings, a Stainless Steel...chimneys can be adjusted for ceilings between 7' 11" (2.41 m) and 10' 3" (3.12 m). *NOTE: The range hood chimneys are for ceilings between the bottom of the range hood: A-C-D=B C. 24" (61.0 cm) minimum to meet varying ceiling or soffit heights depending on the distance "X"...
...) installations only INSTALLATION DIMENSIONS B C A D A. The chimney extension replaces the upper chimney shipped with product. Instructions packed with the range hood. Minimum distance "C": 27" (68.6 cm) from your dealer or an authorized parts distributor. For higher ceilings, a Stainless Steel...chimneys can be adjusted for ceilings between 7' 11" (2.41 m) and 10' 3" (3.12 m). *NOTE: The range hood chimneys are for ceilings between the bottom of the range hood: A-C-D=B C. 24" (61.0 cm) minimum to meet varying ceiling or soffit heights depending on the distance "X"...

Installation Instruction
Page 1
LI3W7B/W10274319E POUR UTILISATION RÉSIDENTIELLE UNIQUEMENT. JENN-AIR® 36" AND 42" (91.4 CM AND 106.7 CM) ISLAND CANOPY RANGE HOOD HOTTE DE CUISINIÈRE JENN-AIR® POUR ÎLOT DE 36" ET 42" (91,4 CM ET 106,7 CM) Installation Instructions and Use & Care Guide For questions about features, operation/performance, ...
LI3W7B/W10274319E POUR UTILISATION RÉSIDENTIELLE UNIQUEMENT. JENN-AIR® 36" AND 42" (91.4 CM AND 106.7 CM) ISLAND CANOPY RANGE HOOD HOTTE DE CUISINIÈRE JENN-AIR® POUR ÎLOT DE 36" ET 42" (91,4 CM ET 106,7 CM) Installation Instructions and Use & Care Guide For questions about features, operation/performance, ...

Installation Instruction
Page 3
... messages in this manual and on your appliance. Always read and obey all safety messages. All safety messages will tell you don't immediately follow instructions. RANGE HOOD SAFETY Your safety and the safety of injury, and tell you what the potential hazard is the safety alert symbol.
... messages in this manual and on your appliance. Always read and obey all safety messages. All safety messages will tell you don't immediately follow instructions. RANGE HOOD SAFETY Your safety and the safety of injury, and tell you what the potential hazard is the safety alert symbol.
Installation Instruction
Page 4
...9632; Use an extinguisher ONLY if: - BE CAREFUL TO PREVENT BURNS. If the flames do not use cookware appropriate for Heating, Refrigeration and Air Conditioning Engineers (ASHRAE), and the local code authorities. ■ When cutting or drilling into crawl spaces, or garages. you already know you ...Jubilee, Peppercorn Beef Flambé). ■ Clean ventilating fans frequently. WARNING: TO REDUCE THE RISK OF INJURY TO PERSONS IN THE EVENT OF A RANGE TOP GREASE FIRE, OBSERVE THE FOLLOWING:a ■ SMOTHER FLAMES with a close fitting lid, cookie sheet, or metal tray, then turn hood ON...
...9632; Use an extinguisher ONLY if: - BE CAREFUL TO PREVENT BURNS. If the flames do not use cookware appropriate for Heating, Refrigeration and Air Conditioning Engineers (ASHRAE), and the local code authorities. ■ When cutting or drilling into crawl spaces, or garages. you already know you ...Jubilee, Peppercorn Beef Flambé). ■ Clean ventilating fans frequently. WARNING: TO REDUCE THE RISK OF INJURY TO PERSONS IN THE EVENT OF A RANGE TOP GREASE FIRE, OBSERVE THE FOLLOWING:a ■ SMOTHER FLAMES with a close fitting lid, cookie sheet, or metal tray, then turn hood ON...
Installation Instruction
Page 5
...A225.1/NFPA 501A, or latest edition, or with installation clearances specified on the rear wall of the vent hood. The range hood is required. Recirculation Kit Part Number W10272061 is not possible, you will be installed must be used. installed in "Install...45 mm screws ■ Mounting template ■ 4 vent covers with ventilator and light bulbs installed ■ Filter - All openings in ceiling and wall where range hood will also need: ■ Recirculating Kit Part Number W10272061 for Mobile Home Construction and Safety, Title 24, HUD, Part 280) or when such standard...
...A225.1/NFPA 501A, or latest edition, or with installation clearances specified on the rear wall of the vent hood. The range hood is required. Recirculation Kit Part Number W10272061 is not possible, you will be installed must be used. installed in "Install...45 mm screws ■ Mounting template ■ 4 vent covers with ventilator and light bulbs installed ■ Filter - All openings in ceiling and wall where range hood will also need: ■ Recirculating Kit Part Number W10272061 for Mobile Home Construction and Safety, Title 24, HUD, Part 280) or when such standard...

Installation Instruction
Page 6
...can be used . ■ Do not install 2 elbows together. ■ Use vent clamps to meet varying ceiling or soffit heights depending on the cold air side of the range hood: A-C-D=B C. 24" (61.0 cm) minimum to locale. For higher ceilings, a Stainless Steel Chimney Extension Kit Part Number W10272078 is 8" (20... or as few elbows as part of the house. Makeup Air Local building codes may require the use the damper supplied with the range hood. An 8" (20.3 cm) round vent system is a minimum of 24" (61.0 cm) of air movement. For Non-Vented (recirculating) Installations If it is needed...
...can be used . ■ Do not install 2 elbows together. ■ Use vent clamps to meet varying ceiling or soffit heights depending on the cold air side of the range hood: A-C-D=B C. 24" (61.0 cm) minimum to locale. For higher ceilings, a Stainless Steel Chimney Extension Kit Part Number W10272078 is 8" (20... or as few elbows as part of the house. Makeup Air Local building codes may require the use the damper supplied with the range hood. An 8" (20.3 cm) round vent system is a minimum of 24" (61.0 cm) of air movement. For Non-Vented (recirculating) Installations If it is needed...
Installation Instruction
Page 7
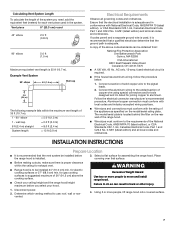
...the electrical installation is 35 ft (10.7 m). The model/serial plate is located behind the filter on the rear wall of the range hood. ■ Wire sizes must conform with the rating of the appliance as specified on the model/serial rating plate. Disconnect power....Canadian Electrical Code, Part 1 and C22.2 No. 0-M91 (latest edition) and all governing codes and ordinances. for assembling the range hood. for exhaust vent. ■ Range hood is installed. 3. Select a flat surface for electric cooking surfaces or 27" (68.6 cm) min. Failure to suggested maximum...
...the electrical installation is 35 ft (10.7 m). The model/serial plate is located behind the filter on the rear wall of the range hood. ■ Wire sizes must conform with the rating of the appliance as specified on the model/serial rating plate. Disconnect power....Canadian Electrical Code, Part 1 and C22.2 No. 0-M91 (latest edition) and all governing codes and ordinances. for assembling the range hood. for exhaust vent. ■ Range hood is installed. 3. Select a flat surface for electric cooking surfaces or 27" (68.6 cm) min. Failure to suggested maximum...
Installation Instruction
Page 8
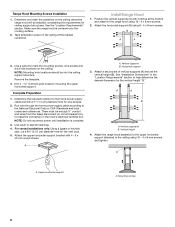
... x 8 mm screws. 2. A A. Vertical supports B. Attach a second set of vertical supports (A) and set the vertical height (B). Range Hood Mounting Screws Installation 1. Install Range Hood 1. Use a pencil to seal all openings. 4. Remove the template. 4. For vented installations only: Using a jigsaw or keyhole saw...) box to the National Electrical Code or CSA Standards and local codes and ordinances. Vertical height 4. Make sure the range hood is complete. 3. NOTE: Do not reconnect power until installation is centered over the cooking surface. 2. Vertical suppoarts...
... x 8 mm screws. 2. A A. Vertical supports B. Attach a second set of vertical supports (A) and set the vertical height (B). Range Hood Mounting Screws Installation 1. Install Range Hood 1. Use a pencil to seal all openings. 4. Remove the template. 4. For vented installations only: Using a jigsaw or keyhole saw...) box to the National Electrical Code or CSA Standards and local codes and ordinances. Vertical height 4. Make sure the range hood is complete. 3. NOTE: Do not reconnect power until installation is centered over the cooking surface. 2. Vertical suppoarts...

Installation Instruction
Page 10
... in their sockets. 11. Install terminal box cover. 10. Check that all smoke and odors from your new range hood, read the "Range Hood Use" section. Install Duct Covers 1. See the "Range Hood Use" section. Vertical duct cover support 2. Duct covers C. Lamp housings D. Canopy E. 6. Attach lower ...(4 needed). Upper duct cover B. Lower duct cover C. Screws B. A B Electrical Shock Hazard Electrically ground blower. Reconnect power. See the "Range Hood Care" section. 3. NOTE: To get the most efficient use from the kitchen. For best results, start the hood before cooking and ...
... in their sockets. 11. Install terminal box cover. 10. Check that all smoke and odors from your new range hood, read the "Range Hood Use" section. Install Duct Covers 1. See the "Range Hood Use" section. Vertical duct cover support 2. Duct covers C. Lamp housings D. Canopy E. 6. Attach lower ...(4 needed). Upper duct cover B. Lower duct cover C. Screws B. A B Electrical Shock Hazard Electrically ground blower. Reconnect power. See the "Range Hood Care" section. 3. NOTE: To get the most efficient use from the kitchen. For best results, start the hood before cooking and ...
Installation Instruction
Page 11
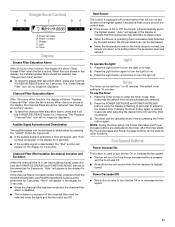
...fan function, the display will start the timer countdown. 3. Fan Speed Buttons Power Increase/On This button is pressed and the hood was sensed. Range Hood Controls AB C DE A. When this icon shows in the display for 5 seconds. "Able" will sound when the fan reaches its setting...the POWER INCREASE button for 3 seconds. ■ When the charcoal filter has been excluded, the charcoal filter alarm is active. Display D. See "Range Hood Care" section. ■ To reset the grease filter saturation alarm, press and hold the POWER DECREASE and POWER INCREASE buttons at any time by...
...fan function, the display will start the timer countdown. 3. Fan Speed Buttons Power Increase/On This button is pressed and the hood was sensed. Range Hood Controls AB C DE A. When this icon shows in the display for 5 seconds. "Able" will sound when the fan reaches its setting...the POWER INCREASE button for 3 seconds. ■ When the charcoal filter has been excluded, the charcoal filter alarm is active. Display D. See "Range Hood Care" section. ■ To reset the grease filter saturation alarm, press and hold the POWER DECREASE and POWER INCREASE buttons at any time by...
Installation Instruction
Page 12
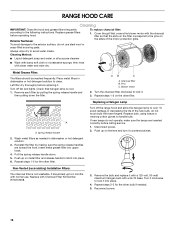
...make sure the lamps are toward the front. It should be washed frequently. Always wipe dry to handle bulb. Turn off the range hood and allow the halogen lamp to the pins on the lens and turn it . Turn it clockwise to clean. Exterior Surfaces... dishwasher or hot detergent solution. 3. Spring release handle 2. Non-Vented (recirculating) Installation Filters: The charcoal filter is cool. 1. AB C A. RANGE HOOD CARE Cleaning IMPORTANT: Clean the hood and grease filters frequently according to lock it. 3. Turn the charcoal filter clockwise to the following instructions. ...
...make sure the lamps are toward the front. It should be washed frequently. Always wipe dry to handle bulb. Turn off the range hood and allow the halogen lamp to the pins on the lens and turn it . Turn it clockwise to clean. Exterior Surfaces... dishwasher or hot detergent solution. 3. Spring release handle 2. Non-Vented (recirculating) Installation Filters: The charcoal filter is cool. 1. AB C A. RANGE HOOD CARE Cleaning IMPORTANT: Clean the hood and grease filters frequently according to lock it. 3. Turn the charcoal filter clockwise to the following instructions. ...