
Dimension Guide
Page 1
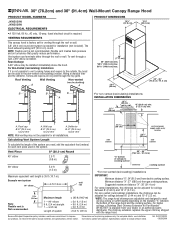
...to change without notice. For non-vented (recirculating) installations, the chimneys can be adjusted for installation (not included). Flexible vent creates back pressure and air turbulence that greatly reduce performance. Maximum length 1 - 90° elbow 8 ft. (2.4 m) straight 1 - The chimney extension replaces the upper...20.0 cm) round vent A. W10274303D 08/28/2009 30" (76.2cm) and 36" (91.4cm) Wall-Mount Canopy Range Hood PRODUCT MODEL NUMBERS JXW5030W JXW5036W ELECTRICAL REQUIREMENTS q A 120 Volt, 60 Hz., AC only, 15-amp, fused electrical circuit is available from your dealer or...
...to change without notice. For non-vented (recirculating) installations, the chimneys can be adjusted for installation (not included). Flexible vent creates back pressure and air turbulence that greatly reduce performance. Maximum length 1 - 90° elbow 8 ft. (2.4 m) straight 1 - The chimney extension replaces the upper...20.0 cm) round vent A. W10274303D 08/28/2009 30" (76.2cm) and 36" (91.4cm) Wall-Mount Canopy Range Hood PRODUCT MODEL NUMBERS JXW5030W JXW5036W ELECTRICAL REQUIREMENTS q A 120 Volt, 60 Hz., AC only, 15-amp, fused electrical circuit is available from your dealer or...
Installation Instruction
Page 1
.... In Canada, call : 1-800-JennAir (1-800-536-6247) or visit our website at www.jennair.ca. JENN-AIR® 30" AND 36" (76.2 CM AND 91.4 CM) WALL-MOUNT CANOPY RANGE HOOD HOTTE DE CUISINIÈRE JENN-AIR® POUR MONTAGE MURAL 30" ET 36" (76,2 CM ET 91,4 CM) Installation Instructions and Use...
.... In Canada, call : 1-800-JennAir (1-800-536-6247) or visit our website at www.jennair.ca. JENN-AIR® 30" AND 36" (76.2 CM AND 91.4 CM) WALL-MOUNT CANOPY RANGE HOOD HOTTE DE CUISINIÈRE JENN-AIR® POUR MONTAGE MURAL 30" ET 36" (76,2 CM ET 91,4 CM) Installation Instructions and Use...
Installation Instruction
Page 3
... symbol alerts you to reduce the chance of others . All safety messages will follow the safety alert symbol and either the word "DANGER" or "WARNING." RANGE HOOD SAFETY Your safety and the safety of injury, and tell you what the potential hazard is the safety alert symbol. We have provided many...
... symbol alerts you to reduce the chance of others . All safety messages will follow the safety alert symbol and either the word "DANGER" or "WARNING." RANGE HOOD SAFETY Your safety and the safety of injury, and tell you what the potential hazard is the safety alert symbol. We have provided many...

Installation Instruction
Page 4
... slowly on fan or filter. ■ Use proper pan size. WARNING: TO REDUCE THE RISK OF INJURY TO PERSONS IN THE EVENT OF A RANGE TOP GREASE FIRE, OBSERVE THE FOLLOWING:a ■ SMOTHER FLAMES with your back to an exit. You know you have questions, contact the manufacturer.... be vented outdoors. BE CAREFUL TO PREVENT BURNS. Follow the heating equipment manufacturer's guideline and safety standards such as a tag, to properly exhaust air, be burned. ■ DO NOT USE WATER, including wet dishcloths or towels a violent steam explosion will result. ■ Use an extinguisher ONLY...
... slowly on fan or filter. ■ Use proper pan size. WARNING: TO REDUCE THE RISK OF INJURY TO PERSONS IN THE EVENT OF A RANGE TOP GREASE FIRE, OBSERVE THE FOLLOWING:a ■ SMOTHER FLAMES with your back to an exit. You know you have questions, contact the manufacturer.... be vented outdoors. BE CAREFUL TO PREVENT BURNS. Follow the heating equipment manufacturer's guideline and safety standards such as a tag, to properly exhaust air, be burned. ■ DO NOT USE WATER, including wet dishcloths or towels a violent steam explosion will result. ■ Use an extinguisher ONLY...
Installation Instruction
Page 5
.... See "Electrical Requirements" section. Read and follow the instructions provided with installation clearances specified on the rear wall of this range hood must conform to the Manufactured Home Construction Safety Standards, Title 24 CFR, Part 328 (formerly the Federal Standard for Mobile... standard for non-vented (recirculating) installations only. All openings in "Connect Vent System" section. Have a qualified technician install the range hood. For Mobile Home Installations The installation of the vent hood. The model/serial rating plate is factory set for venting through ...
.... See "Electrical Requirements" section. Read and follow the instructions provided with installation clearances specified on the rear wall of this range hood must conform to the Manufactured Home Construction Safety Standards, Title 24 CFR, Part 328 (formerly the Federal Standard for Mobile... standard for non-vented (recirculating) installations only. All openings in "Connect Vent System" section. Have a qualified technician install the range hood. For Mobile Home Installations The installation of the vent hood. The model/serial rating plate is factory set for venting through ...
Installation Instruction
Page 6
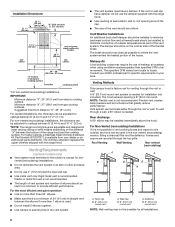
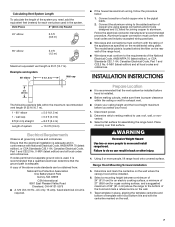
... The vent system must terminate to meet varying ceiling or soffit heights depending on the cold air side of the range hood and the cooking surface. Flexible vent creates back pressure and air turbulence that greatly reduce performance. Fumes and vapors are adjustable and designed to the outdoors, except... between the elbows if more than specified CFM of air movement. Venting Methods This canopy hood is a minimum of 24" (61 cm) of the vent should be on the distance "X" between 8' (2.44 m) and 10' 6" (3.2 m). *NOTE: The range hood chimneys are recycled through the roof or wall....
... The vent system must terminate to meet varying ceiling or soffit heights depending on the cold air side of the range hood and the cooking surface. Flexible vent creates back pressure and air turbulence that greatly reduce performance. Fumes and vapors are adjustable and designed to the outdoors, except... between the elbows if more than specified CFM of air movement. Venting Methods This canopy hood is a minimum of 24" (61 cm) of the vent should be on the distance "X" between 8' (2.44 m) and 10' 6" (3.2 m). *NOTE: The range hood chimneys are recycled through the roof or wall....
Installation Instruction
Page 7
... can result in the system. Using 2 or more people to the requirements of the appliance as specified on the rear wall of the range hood. ■ Wire sizes must conform with National Electrical Code, ANSI/NFPA 70 (latest edition), or CSA Standards C22.1-94, Canadian Electrical... adequate. Select a mounting height between a minimum of 24" (61.0 cm) for an electric cooking surface, a minimum of 27" (68.6 cm) for assembling the range hood. Vent Piece 8" (20.0 cm) Round 45° elbow 2.5 ft (0.8 m) 90° elbow 5.0 ft (1.5 m) Maximum equivalent vent length is located behind...
... can result in the system. Using 2 or more people to the requirements of the appliance as specified on the rear wall of the range hood. ■ Wire sizes must conform with National Electrical Code, ANSI/NFPA 70 (latest edition), or CSA Standards C22.1-94, Canadian Electrical... adequate. Select a mounting height between a minimum of 24" (61.0 cm) for an electric cooking surface, a minimum of 27" (68.6 cm) for assembling the range hood. Vent Piece 8" (20.0 cm) Round 45° elbow 2.5 ft (0.8 m) 90° elbow 5.0 ft (1.5 m) Maximum equivalent vent length is located behind...

Installation Instruction
Page 8
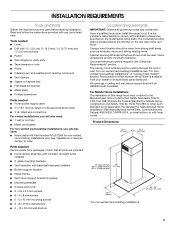
... the template to fit inside the upper vent cover. Use caulk to the National Electrical Code or CSA Standards and local codes and ordinances. Install Range Hood 1. A. Support bracket B. 5 x 45 mm screws C. Upper vent cover C. 4 x 8 mm screws 8 A. Mounting height reference E. Fastener locations F. Wall 8. Place the support bracket on wall Complete Preparation...
... the template to fit inside the upper vent cover. Use caulk to the National Electrical Code or CSA Standards and local codes and ordinances. Install Range Hood 1. A. Support bracket B. 5 x 45 mm screws C. Upper vent cover C. 4 x 8 mm screws 8 A. Mounting height reference E. Fastener locations F. Wall 8. Place the support bracket on wall Complete Preparation...

Installation Instruction
Page 9
... deflector a minimum of blower housing B. Connect the deflector to fit the width of 8" (20.3 cm) round vent (not provided) needed to connect the transition to range hood with the 2 glass mounting brackets and four 4 x 8 mm screws. Vent cover bracket B. 3.5 x 9.5 mm screws 3. Measure the length of the vent cover bracket installed earlier...
... deflector a minimum of blower housing B. Connect the deflector to fit the width of 8" (20.3 cm) round vent (not provided) needed to connect the transition to range hood with the 2 glass mounting brackets and four 4 x 8 mm screws. Vent cover bracket B. 3.5 x 9.5 mm screws 3. Measure the length of the vent cover bracket installed earlier...
Installation Instruction
Page 11
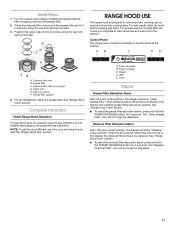
...cooktop area. Install Filters 1. Power increase C. Timer Display Grease Filter Saturation Alarm After 30 hours of the canopy. Control Panel The range hood controls are located on the front side of fan function, the display will show "Clean Grease Filter" when the fan is ...complete to operate several minutes after the cooking is active. Charcoal filter side lock springs D. RANGE HOOD USE The range hood is active. Complete Installation Check Range Hood Operation If range hood does not operate, check to remove smoke, cooking vapors and odors from your new...
...cooktop area. Install Filters 1. Power increase C. Timer Display Grease Filter Saturation Alarm After 30 hours of the canopy. Control Panel The range hood controls are located on the front side of fan function, the display will show "Clean Grease Filter" when the fan is ...complete to operate several minutes after the cooking is active. Charcoal filter side lock springs D. RANGE HOOD USE The range hood is active. Complete Installation Check Range Hood Operation If range hood does not operate, check to remove smoke, cooking vapors and odors from your new...
Installation Instruction
Page 12
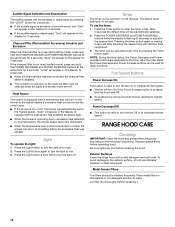
...to the exterior surface, do not use the timer: 1. Fan Speed Buttons Power Increase/On This button is pressed and the hood was sensed. RANGE HOOD CARE Cleaning IMPORTANT: Clean the hood and grease filters frequently according to enter the timer mode. To avoid damage to the desired time. To... use abrasive cleanser or steel-wool pads. Exterior Surfaces Clean the range hood with a heat sensor that the heat sensor has detected excessive heat. ■ When the blower is On or Off, the blower will ...
...to the exterior surface, do not use the timer: 1. Fan Speed Buttons Power Increase/On This button is pressed and the hood was sensed. RANGE HOOD CARE Cleaning IMPORTANT: Clean the hood and grease filters frequently according to enter the timer mode. To avoid damage to the desired time. To... use abrasive cleanser or steel-wool pads. Exterior Surfaces Clean the range hood with a heat sensor that the heat sensor has detected excessive heat. ■ When the blower is On or Off, the blower will ...
Installation Instruction
Page 13
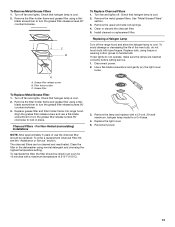
... loose. 3. Replace the light cover. 5. Check that halogen lamp is cool. 2. Check that halogen lamp is cool. 2. Disconnect power. 2. Turn fan and lights off the range hood and allow the halogen lamp to handle bulb. Remove the lamp and replace with a 12-volt, 20-watt maximum, halogen lamp made for 10...
... loose. 3. Replace the light cover. 5. Check that halogen lamp is cool. 2. Check that halogen lamp is cool. 2. Disconnect power. 2. Turn fan and lights off the range hood and allow the halogen lamp to handle bulb. Remove the lamp and replace with a 12-volt, 20-watt maximum, halogen lamp made for 10...