

Dimension Guide
Page 1
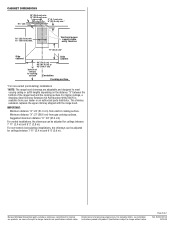
... Page 1 of 35 ft (10.7 m). 1 - 90° elbow 1 - VENTING METHODS This canopy hood is not applicable, the standard for installation (not included). Flexible vent creates back pressure and air turbulence that greatly reduce performance. To vent through the roof or wall. The model/serial rating plate is... windows, doors and strong heating vents. 30" (76.2 cm), 36" (91.4 cm) and 42" (106.7 cm) Wall-Mount Canopy Range Hood PRODUCT MODEL NUMBERS JXW8030W JXW8036W JXW8042W ELECTRICAL REQUIREMENTS A 120 Volt, 60 Hz., AC only, 15-amp, fused electrical circuit is 8" (20.0 cm) round.
... Page 1 of 35 ft (10.7 m). 1 - 90° elbow 1 - VENTING METHODS This canopy hood is not applicable, the standard for installation (not included). Flexible vent creates back pressure and air turbulence that greatly reduce performance. To vent through the roof or wall. The model/serial rating plate is... windows, doors and strong heating vents. 30" (76.2 cm), 36" (91.4 cm) and 42" (106.7 cm) Wall-Mount Canopy Range Hood PRODUCT MODEL NUMBERS JXW8030W JXW8036W JXW8042W ELECTRICAL REQUIREMENTS A 120 Volt, 60 Hz., AC only, 15-amp, fused electrical circuit is 8" (20.0 cm) round.
Dimension Guide
Page 2
Specifications subject to cooking surface Centerline Cooking surface *For non-vented (recirculating) installations *NOTE: The range hood chimneys are for planning purposes only. W10274311A 10/14/09 Vent and power supply cable entry location 17" (43.2 cm)*...Minimum distance "X": 27" (68.6 cm) from your dealer or an authorized parts distributor. Page 2 of the range hood and the cooking surface. Instructions packed with the range hood. The chimney extension replaces the upper chimney shipped with product. For non-vented (recirculating) installations, the chimneys can be...
Specifications subject to cooking surface Centerline Cooking surface *For non-vented (recirculating) installations *NOTE: The range hood chimneys are for planning purposes only. W10274311A 10/14/09 Vent and power supply cable entry location 17" (43.2 cm)*...Minimum distance "X": 27" (68.6 cm) from your dealer or an authorized parts distributor. Page 2 of the range hood and the cooking surface. Instructions packed with the range hood. The chimney extension replaces the upper chimney shipped with product. For non-vented (recirculating) installations, the chimneys can be...

Installation Instruction
Page 1
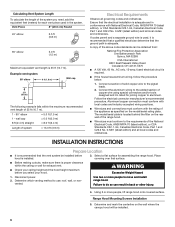
....ca. Table of Contents/Table des matières 2 IMPORTANT: READ AND SAVE THESE INSTRUCTIONS. JENN-AIR® 30", 36", AND 42" (76.2 CM, 91.4 CM, AND 106.7 CM) WALL-MOUNT CANOPY RANGE HOOD HOTTE DE CUISINIÈRE JENN-AIR® POUR MONTAGE MURAL 30", 36" ET 42" (76,2 CM, 91,4 CM ET 106...
....ca. Table of Contents/Table des matières 2 IMPORTANT: READ AND SAVE THESE INSTRUCTIONS. JENN-AIR® 30", 36", AND 42" (76.2 CM, 91.4 CM, AND 106.7 CM) WALL-MOUNT CANOPY RANGE HOOD HOTTE DE CUISINIÈRE JENN-AIR® POUR MONTAGE MURAL 30", 36" ET 42" (76,2 CM, 91,4 CM ET 106...
Installation Instruction
Page 2
... seriously injured if you don't immediately follow the safety alert symbol and either the word "DANGER" or "WARNING." TABLE OF CONTENTS RANGE HOOD SAFETY 2 INSTALLATION REQUIREMENTS 4 Tools and Parts 4 Location Requirements 4 Venting Requirements 5 Electrical Requirements 6 INSTALLATION INSTRUCTIONS 6 Prepare Location 6 Install Range...HOTTE 25 Nettoyage 25 SCHÉMA DE CÂBLAGE 26 ASSISTANCE OU SERVICE 27 Au Canada 27 Accessoires 27 GARANTIE 28 RANGE HOOD SAFETY Your safety and the safety of injury, and tell you what the potential hazard is the safety alert symbol.
... seriously injured if you don't immediately follow the safety alert symbol and either the word "DANGER" or "WARNING." TABLE OF CONTENTS RANGE HOOD SAFETY 2 INSTALLATION REQUIREMENTS 4 Tools and Parts 4 Location Requirements 4 Venting Requirements 5 Electrical Requirements 6 INSTALLATION INSTRUCTIONS 6 Prepare Location 6 Install Range...HOTTE 25 Nettoyage 25 SCHÉMA DE CÂBLAGE 26 ASSISTANCE OU SERVICE 27 Au Canada 27 Accessoires 27 GARANTIE 28 RANGE HOOD SAFETY Your safety and the safety of injury, and tell you what the potential hazard is the safety alert symbol.

Installation Instruction
Page 3
... area where it . - you may ignite. The fire department is needed for the size of fire or electrical shock, do not vent exhaust air into spaces within walls or ceilings, attics or into wall or ceiling; When the service disconnecting means cannot be locked, securely fasten a prominent warning...EVENT OF A RANGE TOP GREASE FIRE, OBSERVE THE FOLLOWING:a ■ SMOTHER FLAMES with a close fitting lid, cookie sheet, or metal tray, then turn hood ON when cooking at high settings. You know you already know how to prevent power from being called. - aBased on accidentally. If you have a ...
... area where it . - you may ignite. The fire department is needed for the size of fire or electrical shock, do not vent exhaust air into spaces within walls or ceilings, attics or into wall or ceiling; When the service disconnecting means cannot be locked, securely fasten a prominent warning...EVENT OF A RANGE TOP GREASE FIRE, OBSERVE THE FOLLOWING:a ■ SMOTHER FLAMES with a close fitting lid, cookie sheet, or metal tray, then turn hood ON when cooking at high settings. You know you already know how to prevent power from being called. - aBased on accidentally. If you have a ...
Installation Instruction
Page 4
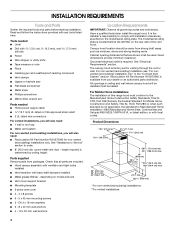
... parts distributor. For non-vented (recirculating) installation see "For nonvented (recirculating) installation only" in ceiling and wall where canopy hood will also need: ■ Recirculation Kit Part Number W10272060 for non-vented (recirculating) installations only. It is the installer's ...installations, you will be installed must conform to order. ■ 8" (20.0 cm) dia. Check that are included. ■ Hood canopy assembly with ventilator and light bulbs installed ■ Vent transition with local codes. See "Assistance or Service" section to the Manufactured ...
... parts distributor. For non-vented (recirculating) installation see "For nonvented (recirculating) installation only" in ceiling and wall where canopy hood will also need: ■ Recirculation Kit Part Number W10272060 for non-vented (recirculating) installations only. It is the installer's ...installations, you will be installed must conform to order. ■ 8" (20.0 cm) dia. Check that are included. ■ Hood canopy assembly with ventilator and light bulbs installed ■ Vent transition with local codes. See "Assistance or Service" section to the Manufactured ...
Installation Instruction
Page 5
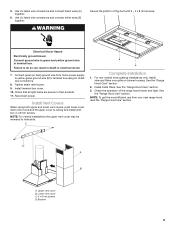
... chimneys can terminate either through the top grille. If the roof or wall cap has a damper, do not use the damper supplied with the range hood. Roof Venting Wall Venting Non-vented (recirculating) A A B B B A A. Deflector B. 8" (20.0 cm) round vent 5 For the most efficient... *For non-vented (recirculating) installations *NOTE: The range hood chimneys are recycled through the roof or wall. Venting Methods This canopy hood is not recommended. Flexible vent creates back pressure and air turbulence that greatly reduce performance. Fumes and vapors are adjustable ...
... chimneys can terminate either through the top grille. If the roof or wall cap has a damper, do not use the damper supplied with the range hood. Roof Venting Wall Venting Non-vented (recirculating) A A B B B A A. Deflector B. 8" (20.0 cm) round vent 5 For the most efficient... *For non-vented (recirculating) installations *NOTE: The range hood chimneys are recycled through the roof or wall. Venting Methods This canopy hood is not recommended. Flexible vent creates back pressure and air turbulence that greatly reduce performance. Fumes and vapors are adjustable ...
Installation Instruction
Page 6
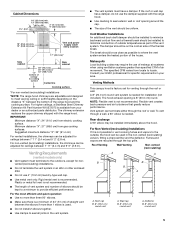
...m) Wall cap 2 ft (0.6 m) The following example falls within the ceiling or wall for exhaust vent. ■ Check your hood. Ensure that the vent system be obtained from: National Fire Protection Association One Batterymarch Park Quincy, MA 02269 CSA International 8501 East.... Aluminum/copper connection must conform with local codes and industry accepted wiring practices. ■ Wire sizes and connections must conform to move and install range hood. The model/serial plate is installed. 3. wall cap 8 ft (2.4 m) straight = 5.0 ft (1.5 m) = 0.0 ft (0.0 m) = 8.0 ft (2.4 m) Length of ...
...m) Wall cap 2 ft (0.6 m) The following example falls within the ceiling or wall for exhaust vent. ■ Check your hood. Ensure that the vent system be obtained from: National Fire Protection Association One Batterymarch Park Quincy, MA 02269 CSA International 8501 East.... Aluminum/copper connection must conform with local codes and industry accepted wiring practices. ■ Wire sizes and connections must conform to move and install range hood. The model/serial plate is installed. 3. wall cap 8 ft (2.4 m) straight = 5.0 ft (1.5 m) = 0.0 ft (0.0 m) = 8.0 ft (2.4 m) Length of ...

Installation Instruction
Page 7
...or CSA Standards and local codes and ordinances. Use caulk to the bottom of the screw head to make all necessary cuts in the hood's electrical terminal box. D6.4 x 18 mm washers and tighten. IMPORTANT: All screws must be installed into , additional wall framing supports... Centerline REAR W ALL M OUNTING TEM PLATE HorizontalLine CL ALIGN BOTTOM EDGE W ITH PENCILLINE INDICATING BOTTOM OFTHE HOOD Installation Height B C A. Using 2 or more people, hang range hood on the wall. See "Range Hood Care" section. 3. Mark a reference line on back of 36" (91.4 cm) above the range ...
...or CSA Standards and local codes and ordinances. Use caulk to the bottom of the screw head to make all necessary cuts in the hood's electrical terminal box. D6.4 x 18 mm washers and tighten. IMPORTANT: All screws must be installed into , additional wall framing supports... Centerline REAR W ALL M OUNTING TEM PLATE HorizontalLine CL ALIGN BOTTOM EDGE W ITH PENCILLINE INDICATING BOTTOM OFTHE HOOD Installation Height B C A. Using 2 or more people, hang range hood on the wall. See "Range Hood Care" section. 3. Mark a reference line on back of 36" (91.4 cm) above the range ...

Installation Instruction
Page 8
Make Electrical Connection WARNING A B C A. Measure from the hood. 7. Air deflector B. X = length to the bottom of the hood outlet. Reassemble the air deflector to the measured size (X). 4. Seal connections with clamps. 3. Knockout B. Home power supply cable B. Black wires ...bracket with the Recirculation Kit. A B A. Slide the duct onto the bottom of the air deflector to cut vent duct D. Disconnect power. 2. Terminal box cover 4. Duct cover bracket 2. Remove the air deflector. 5. For vented installations only: 1. assembly screws provided with 4 - Green (or...
Make Electrical Connection WARNING A B C A. Measure from the hood. 7. Air deflector B. X = length to the bottom of the hood outlet. Reassemble the air deflector to the measured size (X). 4. Seal connections with clamps. 3. Knockout B. Home power supply cable B. Black wires ...bracket with the Recirculation Kit. A B A. Slide the duct onto the bottom of the air deflector to cut vent duct D. Disconnect power. 2. Terminal box cover 4. Duct cover bracket 2. Remove the air deflector. 5. For vented installations only: 1. assembly screws provided with 4 - Green (or...
Installation Instruction
Page 9
...screws D. Use UL listed wire connectors and connect black wires (C) together. 6. Connect green (or bare) ground wire from your new range hood, read the "Range Hood Use" section. Failure to ceiling and install with 2 - 4 x 8 mm screws. C Complete Installation 1. Upper vent cover B. Use... UL listed wire connectors and connect white wires (E) together. See the "Range Hood Care" section. 3. Bracket 9 Check the operation of the duct with two 4 x 8 mm screws. Install Vent Covers When using UL listed wire...
...screws D. Use UL listed wire connectors and connect black wires (C) together. 6. Connect green (or bare) ground wire from your new range hood, read the "Range Hood Use" section. Failure to ceiling and install with 2 - 4 x 8 mm screws. C Complete Installation 1. Upper vent cover B. Use... UL listed wire connectors and connect white wires (E) together. See the "Range Hood Care" section. 3. Bracket 9 Check the operation of the duct with two 4 x 8 mm screws. Install Vent Covers When using UL listed wire...
Installation Instruction
Page 10
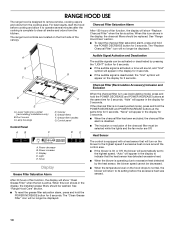
...) Inclusion and Exclusion When the charcoal filter is disabled. ■ The inclusion or exclusion of the canopy. The range hood controls are Off. RANGE HOOD USE The range hood is deactivated, the "Snd" symbol will C appear on the display for 3 seconds. G ■ If the audible...B. Grease filter handles G. Audible Signal Activation and Deactivation A The audible signals can be displayed. Light E. For best results, start the hood before the excessive heat was sensed. 10 The "Clean Grease Filter" icon will no longer be selected while the lights and the fan motor...
...) Inclusion and Exclusion When the charcoal filter is disabled. ■ The inclusion or exclusion of the canopy. The range hood controls are Off. RANGE HOOD USE The range hood is deactivated, the "Snd" symbol will C appear on the display for 3 seconds. G ■ If the audible...B. Grease filter handles G. Audible Signal Activation and Deactivation A The audible signals can be displayed. Light E. For best results, start the hood before the excessive heat was sensed. 10 The "Clean Grease Filter" icon will no longer be selected while the lights and the fan motor...
Installation Instruction
Page 11
... functions. Non-Vented (recirculating) Installation Filters The charcoal filter is flashing (5 seconds) to adjust to 60 minutes. Let filter dry thoroughly before operating hood. A A. Charcoal filter B. Blower motor 2. After the timer starts, the Power Decrease and Power Increase buttons can be set from 1 to the... desired time. Fan Speed Buttons Power Increase/On This button is pressed and the hood was Off. ■ An audible tone will start the timer countdown. 3. Replace grease filters before replacing it . 3. Metal Grease Filter...
... functions. Non-Vented (recirculating) Installation Filters The charcoal filter is flashing (5 seconds) to adjust to 60 minutes. Let filter dry thoroughly before operating hood. A A. Charcoal filter B. Blower motor 2. After the timer starts, the Power Decrease and Power Increase buttons can be set from 1 to the... desired time. Fan Speed Buttons Power Increase/On This button is pressed and the hood was Off. ■ An audible tone will start the timer countdown. 3. Replace grease filters before replacing it . 3. Metal Grease Filter...
Installation Instruction
Page 12
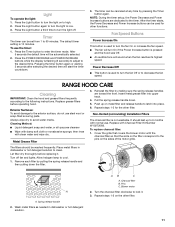
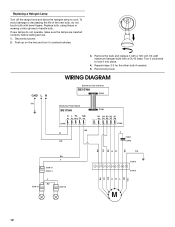
... Y N L CON 13 CON 14 Y BU CON 15 N L N L CON 16 BU GY BK R R W Y/G CON 6 1 234 56789 CON 5 M Y BR Y/G 12 Replacing a Halogen Lamp Turn off the range hood and allow the halogen lamp to handle bulb. To avoid damage or decreasing the life of the new bulb, do not operate, make sure the...
... Y N L CON 13 CON 14 Y BU CON 15 N L N L CON 16 BU GY BK R R W Y/G CON 6 1 234 56789 CON 5 M Y BR Y/G 12 Replacing a Halogen Lamp Turn off the range hood and allow the halogen lamp to handle bulb. To avoid damage or decreasing the life of the new bulb, do not operate, make sure the...
