

Dimension Guide
Page 1
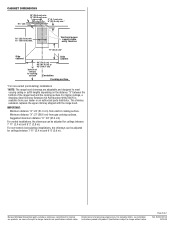
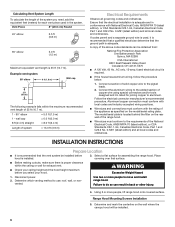
...or latest edition, or with installation clearances specified on the rear wall of system = 13.0 ft (3.9 m) LOCATION REQUIREMENTS Have a qualified technician install the range hood. NOTE: Flexible vent is 8" (20.0 cm) round. Roof Venting A Wall Venting Non-vented (recirculating) A B B B A Example vent system... back pressure and air turbulence that greatly reduce performance. It is factory set for installation (not included). 30" (76.2 cm), 36" (91.4 cm) and 42" (106.7 cm) Wall-Mount Canopy Range Hood PRODUCT MODEL NUMBERS JXW8030W JXW8036W JXW8042W ELECTRICAL ...
...or latest edition, or with installation clearances specified on the rear wall of system = 13.0 ft (3.9 m) LOCATION REQUIREMENTS Have a qualified technician install the range hood. NOTE: Flexible vent is 8" (20.0 cm) round. Roof Venting A Wall Venting Non-vented (recirculating) A B B B A Example vent system... back pressure and air turbulence that greatly reduce performance. It is factory set for installation (not included). 30" (76.2 cm), 36" (91.4 cm) and 42" (106.7 cm) Wall-Mount Canopy Range Hood PRODUCT MODEL NUMBERS JXW8030W JXW8036W JXW8042W ELECTRICAL ...
Dimension Guide
Page 2
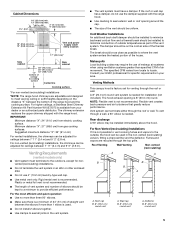
... from your dealer or an authorized parts distributor. Instructions packed with the range hood. Page 2 of canopy to cooking surface Centerline Cooking surface *For non-vented (recirculating) installations *NOTE: The range hood chimneys are adjustable and designed to improve Dimensions are for ceilings between 7'... For non-vented (recirculating) installations, the chimneys can be adjusted for ceilings between the bottom of the range hood and the cooking surface. Because Whirlpool Corporation policy includes a continuous commitment to meet varying ceiling or soffit heights...
... from your dealer or an authorized parts distributor. Instructions packed with the range hood. Page 2 of canopy to cooking surface Centerline Cooking surface *For non-vented (recirculating) installations *NOTE: The range hood chimneys are adjustable and designed to improve Dimensions are for ceilings between 7'... For non-vented (recirculating) installations, the chimneys can be adjusted for ceilings between the bottom of the range hood and the cooking surface. Because Whirlpool Corporation policy includes a continuous commitment to meet varying ceiling or soffit heights...

Installation Instruction
Page 1
...; 30", 36", AND 42" (76.2 CM, 91.4 CM, AND 106.7 CM) WALL-MOUNT CANOPY RANGE HOOD HOTTE DE CUISINIÈRE JENN-AIR® POUR MONTAGE MURAL 30", 36" ET 42" (76,2 CM, 91,4 CM ET 106,7 CM) Installation Instructions and Use & Care Guide For questions about features, ...
...; 30", 36", AND 42" (76.2 CM, 91.4 CM, AND 106.7 CM) WALL-MOUNT CANOPY RANGE HOOD HOTTE DE CUISINIÈRE JENN-AIR® POUR MONTAGE MURAL 30", 36" ET 42" (76,2 CM, 91,4 CM ET 106,7 CM) Installation Instructions and Use & Care Guide For questions about features, ...
Installation Instruction
Page 2
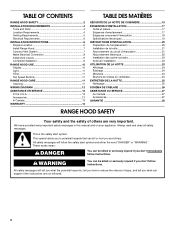
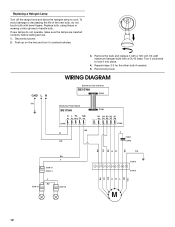
... 5 Electrical Requirements 6 INSTALLATION INSTRUCTIONS 6 Prepare Location 6 Install Range Hood 7 Connect Vent System 7 Make Electrical Connection 8 Install Vent Covers 9 Complete Installation 9 RANGE HOOD USE 10 Display 10 Light 11 Timer 11 Fan Speed Buttons 11 RANGE HOOD CARE 11 Cleaning 11 WIRING DIAGRAM 12 ASSISTANCE OR SERVICE 13 ...Nettoyage 25 SCHÉMA DE CÂBLAGE 26 ASSISTANCE OU SERVICE 27 Au Canada 27 Accessoires 27 GARANTIE 28 RANGE HOOD SAFETY Your safety and the safety of injury, and tell you what the potential hazard is the safety alert symbol...
... 5 Electrical Requirements 6 INSTALLATION INSTRUCTIONS 6 Prepare Location 6 Install Range Hood 7 Connect Vent System 7 Make Electrical Connection 8 Install Vent Covers 9 Complete Installation 9 RANGE HOOD USE 10 Display 10 Light 11 Timer 11 Fan Speed Buttons 11 RANGE HOOD CARE 11 Cleaning 11 WIRING DIAGRAM 12 ASSISTANCE OR SERVICE 13 ...Nettoyage 25 SCHÉMA DE CÂBLAGE 26 ASSISTANCE OU SERVICE 27 Au Canada 27 Accessoires 27 GARANTIE 28 RANGE HOOD SAFETY Your safety and the safety of injury, and tell you what the potential hazard is the safety alert symbol...

Installation Instruction
Page 3
... the heating equipment manufacturer's guideline and safety standards such as a tag, to an exit. do not use cookware appropriate for Heating, Refrigeration and Air Conditioning Engineers (ASHRAE), and the local code authorities. ■ When cutting or drilling into crawl spaces, or garages. WARNING: TO REDUCE THE... RISK OF INJURY TO PERSONS IN THE EVENT OF A RANGE TOP GREASE FIRE, OBSERVE THE FOLLOWING:a ■ SMOTHER FLAMES with a close fitting lid, cookie sheet, or metal tray, then turn hood ON when cooking at high heat or when flambeing food (i.e. aBased on low...
... the heating equipment manufacturer's guideline and safety standards such as a tag, to an exit. do not use cookware appropriate for Heating, Refrigeration and Air Conditioning Engineers (ASHRAE), and the local code authorities. ■ When cutting or drilling into crawl spaces, or garages. WARNING: TO REDUCE THE... RISK OF INJURY TO PERSONS IN THE EVENT OF A RANGE TOP GREASE FIRE, OBSERVE THE FOLLOWING:a ■ SMOTHER FLAMES with a close fitting lid, cookie sheet, or metal tray, then turn hood ON when cooking at high heat or when flambeing food (i.e. aBased on low...
Installation Instruction
Page 4
... vent duct - For Mobile Home Installations The installation of the vent hood. depending on the model/serial rating plate. The model/serial rating plate is located behind the left filter on the rear wall of this range hood must be sealed. For non-vented (recirculating) installation see "For ...nonvented (recirculating) installation only" in ceiling and wall where canopy hood will also need : ■ 1 wall or roof cap ■ Metal ...
... vent duct - For Mobile Home Installations The installation of the vent hood. depending on the model/serial rating plate. The model/serial rating plate is located behind the left filter on the rear wall of this range hood must be sealed. For non-vented (recirculating) installation see "For ...nonvented (recirculating) installation only" in ceiling and wall where canopy hood will also need : ■ 1 wall or roof cap ■ Metal ...
Installation Instruction
Page 5
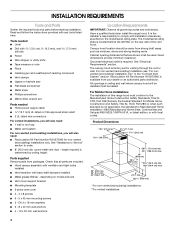
...air movement. Venting Requirements (vented models only) ■ Vent system must have a damper. Consult your HVAC professional for installation (not included). For Non-Vented (recirculating) Installations If it is needed for specific requirements in an attic or other enclosed area. ■ Do not use the damper supplied with the range hood... (61.0 cm) from locale to where the vent system enters the heated portion of the range hood and the cooking surface. Venting Methods This canopy hood is factory set for ceilings between the bottom of the house. Deflector B. 8" (20.0 ...
...air movement. Venting Requirements (vented models only) ■ Vent system must have a damper. Consult your HVAC professional for installation (not included). For Non-Vented (recirculating) Installations If it is needed for specific requirements in an attic or other enclosed area. ■ Do not use the damper supplied with the range hood... (61.0 cm) from locale to where the vent system enters the heated portion of the range hood and the cooking surface. Venting Methods This canopy hood is factory set for ceilings between the bottom of the house. Deflector B. 8" (20.0 ...
Installation Instruction
Page 6
...copper wire using special connectors and/or tools designed and UL listed for exhaust vent. ■ Check your hood. Determine which venting method to aluminum. Range Hood Mounting Screws Installation 5. A copy of the above code standards can result in conformance with the rating of ...the appliance as specified on the model/serial rating plate. Connect a section of solid copper wire to move and install range hood. INSTALLATION INSTRUCTIONS Prepare Location ■ It is recommended that the vent system be obtained from: National Fire Protection Association One Batterymarch...
...copper wire using special connectors and/or tools designed and UL listed for exhaust vent. ■ Check your hood. Determine which venting method to aluminum. Range Hood Mounting Screws Installation 5. A copy of the above code standards can result in conformance with the rating of ...the appliance as specified on the model/serial rating plate. Connect a section of solid copper wire to move and install range hood. INSTALLATION INSTRUCTIONS Prepare Location ■ It is recommended that the vent system be obtained from: National Fire Protection Association One Batterymarch...

Installation Instruction
Page 7
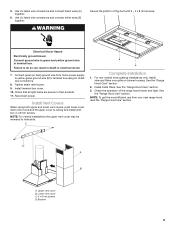
...is complete. 4. Attach vent cover bracket to wall flush to seal all openings. Install Range Hood 1. See "Venting Requirements" section. 2. There must be installed into wood. A B C A. Remove the grease filter. See "Range Hood Care" section. 3. Install transition on the wall. IMPORTANT: All screws must be required...9. Drill 4.8 mm) pilot holes at this location. 3. Install the vent system before installing the hood. Run the home power supply cable according to slide range hood into wood. 10. NOTE: Do not reconnect power until installation is no wood to screw into,...
...is complete. 4. Attach vent cover bracket to wall flush to seal all openings. Install Range Hood 1. See "Venting Requirements" section. 2. There must be installed into wood. A B C A. Remove the grease filter. See "Range Hood Care" section. 3. Install transition on the wall. IMPORTANT: All screws must be required...9. Drill 4.8 mm) pilot holes at this location. 3. Install the vent system before installing the hood. Run the home power supply cable according to slide range hood into wood. 10. NOTE: Do not reconnect power until installation is no wood to screw into,...
Installation Instruction
Page 9
... connectors and connect white wires (E) together. Install terminal box cover. 10. See the "Range Hood Care" section. 3. Connect green (or bare) ground wire from your new range hood, read the "Range Hood Use" section. Check the operation of the duct with two 4 x 8 mm screws.... 5. WARNING Secure the bottom of the range hood blower and light. C Complete Installation 1. Install metal filters. Use UL...
... connectors and connect white wires (E) together. Install terminal box cover. 10. See the "Range Hood Care" section. 3. Connect green (or bare) ground wire from your new range hood, read the "Range Hood Use" section. Check the operation of the duct with two 4 x 8 mm screws.... 5. WARNING Secure the bottom of the range hood blower and light. C Complete Installation 1. Install metal filters. Use UL...
Installation Instruction
Page 10
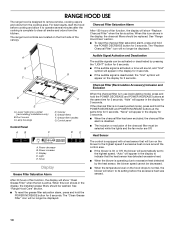
...by pressing the "LIGHT" button for 3 seconds. When this icon shows in the display, the charcoal filters should be replaced. See "Range Hood Care" section. ■ To reset the charcoal filter saturation alarm, press and hold the POWER INCREASE button for 3 seconds. G ■... filter has been excluded, the charcoal filter alarm is disabled. ■ The inclusion or exclusion of the charcoal filter must be displayed. See "Range Hood Care" section. ■ To reset the grease filter saturation alarm, press and hold the POWER DECREASE button for 3 seconds. D F E ...
...by pressing the "LIGHT" button for 3 seconds. When this icon shows in the display, the charcoal filters should be replaced. See "Range Hood Care" section. ■ To reset the charcoal filter saturation alarm, press and hold the POWER INCREASE button for 3 seconds. G ■... filter has been excluded, the charcoal filter alarm is disabled. ■ The inclusion or exclusion of the charcoal filter must be displayed. See "Range Hood Care" section. ■ To reset the grease filter saturation alarm, press and hold the POWER DECREASE button for 3 seconds. D F E ...
Installation Instruction
Page 11
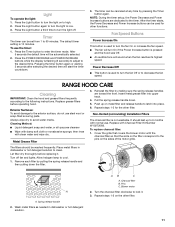
...POWER DECREASE and POWER INCREASE buttons while the display is pressed and the hood was Off. ■ An audible tone will be used for the other filter. 11 RANGE HOOD CARE Cleaning IMPORTANT: Clean the hood and grease filters frequently according to enter the timer mode. Cleaning Method: ... Allow halogen lamp to avoid water marks. Place metal filters in dishwasher or hot detergent solution. Let filter dry thoroughly before operating hood. Non-Vented (recirculating) Installation Filters The charcoal filter is not washable. Push up to lock it . Reinstall the filter by ...
...POWER DECREASE and POWER INCREASE buttons while the display is pressed and the hood was Off. ■ An audible tone will be used for the other filter. 11 RANGE HOOD CARE Cleaning IMPORTANT: Clean the hood and grease filters frequently according to enter the timer mode. Cleaning Method: ... Allow halogen lamp to avoid water marks. Place metal filters in dishwasher or hot detergent solution. Let filter dry thoroughly before operating hood. Non-Vented (recirculating) Installation Filters The charcoal filter is not washable. Push up to lock it . Reinstall the filter by ...
Installation Instruction
Page 12
... 2-3 for the other bulb if needed. 5. Replace bulb, using tissue or wearing cotton gloves to lock it into place. 4. Replacing a Halogen Lamp Turn off the range hood and allow the halogen lamp to cool. To avoid damage or decreasing the life of the new bulb, do not operate, make sure the lamps...
... 2-3 for the other bulb if needed. 5. Replace bulb, using tissue or wearing cotton gloves to lock it into place. 4. Replacing a Halogen Lamp Turn off the range hood and allow the halogen lamp to cool. To avoid damage or decreasing the life of the new bulb, do not operate, make sure the lamps...
