Installation Manual
Page 1
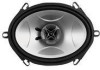
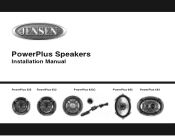
PowerPlus Speakers Installation Manual PowerPlus 525 PowerPlus 652 PowerPlus 652C PowerPlus 682 PowerPlus 693
PowerPlus Speakers Installation Manual PowerPlus 525 PowerPlus 652 PowerPlus 652C PowerPlus 682 PowerPlus 693

Installation Manual
Page 3
... cones, black foam surrounds, tweeters with acoustic equalizer and neodymium magnet ! Polypropylene cone for even better sound quality. Technical data plus installation tips and further advice are contained in this quality Jensen product! Warp resistant, low-resonance steel basket ! Your new PowerPlus speaker system is the ultimate complement to your car stereo system. The PowerPlus series will...
... cones, black foam surrounds, tweeters with acoustic equalizer and neodymium magnet ! Polypropylene cone for even better sound quality. Technical data plus installation tips and further advice are contained in this quality Jensen product! Warp resistant, low-resonance steel basket ! Your new PowerPlus speaker system is the ultimate complement to your car stereo system. The PowerPlus series will...

Installation Manual
Page 4
... direct replacements for possible future use. Hand held drill w/assorted bits ! Other information can call . Installation Page 3 Specifications Page 5 Warranty Page 6 If, after reconnecting the battery and require that you see your local dealer if you still have questions regarding this manual. To ensure an obstacle-free fit, check and double check mounting depth of these Jensen full range speakers...
... direct replacements for possible future use. Hand held drill w/assorted bits ! Other information can call . Installation Page 3 Specifications Page 5 Warranty Page 6 If, after reconnecting the battery and require that you see your local dealer if you still have questions regarding this manual. To ensure an obstacle-free fit, check and double check mounting depth of these Jensen full range speakers...

Installation Manual
Page 5
...Step 3: Attach the positive (+) and negative (-) speaker terminals (see FIGURE 2). Be sure to observe proper polarity when connecting the wires (the striped wire is the negative lead). Step 2: Position new speaker and align with existing mounting holes. Step 6: Reconnect negative battery terminal. CONNECTING SPEAKER WIRES FIGURE 3 - FIGURE 1 - DOOR PANEL INSTALLATION Grille Speaker Door Panel FIGURE 2 - Step 4: If not using factory hardware when possible). Step 5: Mount speaker (using factory grilles, attach grille. INSTALLATION Basic Installation Steps Step 1: Remove...
...Step 3: Attach the positive (+) and negative (-) speaker terminals (see FIGURE 2). Be sure to observe proper polarity when connecting the wires (the striped wire is the negative lead). Step 2: Position new speaker and align with existing mounting holes. Step 6: Reconnect negative battery terminal. CONNECTING SPEAKER WIRES FIGURE 3 - FIGURE 1 - DOOR PANEL INSTALLATION Grille Speaker Door Panel FIGURE 2 - Step 4: If not using factory hardware when possible). Step 5: Mount speaker (using factory grilles, attach grille. INSTALLATION Basic Installation Steps Step 1: Remove...

Installation Manual
Page 6
... turn down , the tweeter will re-activate and become ready for a moment. WIRING THE SPEAKER/TWEETER FIGURE 5 - After cooling down the volume and wait for operation again. During installation, make sure the tweeter is a protective element integrated into the crossover of your PowerPlus tweeter, which has high impedance in cases of mounting applications. There is positioned and aimed towards the...
... turn down , the tweeter will re-activate and become ready for a moment. WIRING THE SPEAKER/TWEETER FIGURE 5 - After cooling down the volume and wait for operation again. During installation, make sure the tweeter is a protective element integrated into the crossover of your PowerPlus tweeter, which has high impedance in cases of mounting applications. There is positioned and aimed towards the...

Installation Manual
Page 7
SPECIFICATIONS Midrange Diameter Frequency Response Crossover Frequency Power Handling Sensitivity Mounting Depth Impedence PP525 5" 90Hz - 20kHz (-3dB) 4kHz 50 Watts Nominal 250 Watts Peak 90dB (1 watt @ 1 meter) 49mm (2") 4 ohms PP652 6.5" 70Hz - 20kHz (-3dB) 3kHz 60 Watts RMS 300 Watts Peak 91dB (1 watt @ 1 meter) 56mm (2.25") 4 ohms PP652C 6..5" 70Hz - 20kHz (-3dB) 3kHz 60 Watts RMS 300 Watts Peak 91dB (1 watt @ 1 meter) 56mm (2.25") 4 ohms PP682 6" x 8" 75Hz - 20kHz...
SPECIFICATIONS Midrange Diameter Frequency Response Crossover Frequency Power Handling Sensitivity Mounting Depth Impedence PP525 5" 90Hz - 20kHz (-3dB) 4kHz 50 Watts Nominal 250 Watts Peak 90dB (1 watt @ 1 meter) 49mm (2") 4 ohms PP652 6.5" 70Hz - 20kHz (-3dB) 3kHz 60 Watts RMS 300 Watts Peak 91dB (1 watt @ 1 meter) 56mm (2.25") 4 ohms PP652C 6..5" 70Hz - 20kHz (-3dB) 3kHz 60 Watts RMS 300 Watts Peak 91dB (1 watt @ 1 meter) 56mm (2.25") 4 ohms PP682 6" x 8" 75Hz - 20kHz...

Installation Manual
Page 8
...instructions supplied with the product; any plexiglass included with the product as proof of date of purchase from an authorized dealer is presented whenever warranty service is limited to the dealer from accident, misuse, abuse, neglect, product modification, improper installation, incorrect line voltage, unauthorized repair or failure to repair... for service of sale must be included with the product; PowerPlus Speakers WARRANTY Limited 1 Year Warranty - USA and Canada Length of Implied or Statutory Warranties and Conditions. This warranty from the date of car static or...
...instructions supplied with the product; any plexiglass included with the product as proof of date of purchase from an authorized dealer is presented whenever warranty service is limited to the dealer from accident, misuse, abuse, neglect, product modification, improper installation, incorrect line voltage, unauthorized repair or failure to repair... for service of sale must be included with the product; PowerPlus Speakers WARRANTY Limited 1 Year Warranty - USA and Canada Length of Implied or Statutory Warranties and Conditions. This warranty from the date of car static or...

Installation Manual
Page 22
Audiovox Electronics Corporation Hauppauge, NY 11788 www.jensen.com © 2007 Audiovox v. 112906 Printed in China/Impreso en China/Imprimé en Chine
Audiovox Electronics Corporation Hauppauge, NY 11788 www.jensen.com © 2007 Audiovox v. 112906 Printed in China/Impreso en China/Imprimé en Chine
