Operation Manual
Page 1
VM9022HD Installation and Operation Manual video 2 8 0 WattsPeak 60w x 4 | 40w x 1
VM9022HD Installation and Operation Manual video 2 8 0 WattsPeak 60w x 4 | 40w x 1

Operation Manual
Page 3
... your new Jensen VM9022HD Mobile Multimedia Receiver for choosing a Jensen product. If you take a few minutes to follow. We hope you will find the instructions in this owner's manual clear and easy to look through it, you for maximum enjoyment. Preparation...1 Installation ...5 Anti...-Theft Feature ...7 Controls and Indicators ...8 Remote Control ...10 Using the TFT Monitor ...13 Operating Instructions ...14 Multi-ZONE Operation...16 Setup Menu...17 Tuner Operation ...19 Satellite Radio Operation ...21 DVD/VCD Video...
... your new Jensen VM9022HD Mobile Multimedia Receiver for choosing a Jensen product. If you take a few minutes to follow. We hope you will find the instructions in this owner's manual clear and easy to look through it, you for maximum enjoyment. Preparation...1 Installation ...5 Anti...-Theft Feature ...7 Controls and Indicators ...8 Remote Control ...10 Using the TFT Monitor ...13 Operating Instructions ...14 Multi-ZONE Operation...16 Setup Menu...17 Tuner Operation ...19 Satellite Radio Operation ...21 DVD/VCD Video...

Operation Manual
Page 5
...• Play, Pause, Stop, Next Track and Previous Track • ESP - 2MB Buffer Tuner • HD Radio Tuner* • USA / Europe Frequency Spacing • 24 Station Presets (18 FM / 6 AM) • Auto Stereo / Mono • Auto Store • RDS - We recommend having...before beginning the installation. Radio Data System Satellite Radio Ready • Compatible with Touch Screen Interface • Two Audio /Video Auxiliary Inputs • 200-Ohm Preamp Line Output - HD Radio™ and the HD and HD Radio logos are proprietary trademarks of the Jensen VM9022HD Mobile Multimedia Receiver....
...• Play, Pause, Stop, Next Track and Previous Track • ESP - 2MB Buffer Tuner • HD Radio Tuner* • USA / Europe Frequency Spacing • 24 Station Presets (18 FM / 6 AM) • Auto Stereo / Mono • Auto Store • RDS - We recommend having...before beginning the installation. Radio Data System Satellite Radio Ready • Compatible with Touch Screen Interface • Two Audio /Video Auxiliary Inputs • 200-Ohm Preamp Line Output - HD Radio™ and the HD and HD Radio logos are proprietary trademarks of the Jensen VM9022HD Mobile Multimedia Receiver....

Operation Manual
Page 6
... connected and operating properly, the CAMERA source mode will need these conditions, use extra caution during installation to avoid causing a short circuit. HD Radio Module Mounting Hardware 9. NOTE: If the VM9022HD is "navigation ready." Only connect the unit to the unit and result in a fire. 2 Never use the video display function while driving the...
... connected and operating properly, the CAMERA source mode will need these conditions, use extra caution during installation to avoid causing a short circuit. HD Radio Module Mounting Hardware 9. NOTE: If the VM9022HD is "navigation ready." Only connect the unit to the unit and result in a fire. 2 Never use the video display function while driving the...

Operation Manual
Page 9
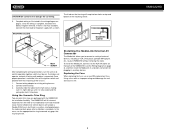
...radio using the reverse procedure in step 1. 2b Install Bracket Here Non-Designated Screw Prohibited M5X6 SCREW c. Install the half-sleeve. The PARKING BRAKE wire MUST BE CONNECTED as directed in the manual. Install half-sleeve into the mating sockets on "). a. CAUTION: Do not block the cooling fan exit. Install adapter if necessary (optional). VM9022HD INSTALLATION... ISO DIN Installation This unit...
...radio using the reverse procedure in step 1. 2b Install Bracket Here Non-Designated Screw Prohibited M5X6 SCREW c. Install the half-sleeve. The PARKING BRAKE wire MUST BE CONNECTED as directed in the manual. Install half-sleeve into the mating sockets on "). a. CAUTION: Do not block the cooling fan exit. Install adapter if necessary (optional). VM9022HD INSTALLATION... ISO DIN Installation This unit...
Operation Manual
Page 10
... a variety of the mounting sleeve. Using a fuse with the VM9022HD for plugging in a location convenient for installation flexibility. To install the MediaLink, connect it into four holes on page 3), and then install the MediaLink in auxiliary devices. Once the wiring is fully seated .... Once proper operation is complete. The VM9022HD will accept a Double-DIN chassis, but there is usually a small gap between the radio and dash piece after installation is achieved, turn the unit on to your VM9022HD without removing the radio. If unit does not operate, recheck ...
... a variety of the mounting sleeve. Using a fuse with the VM9022HD for plugging in a location convenient for installation flexibility. To install the MediaLink, connect it into four holes on page 3), and then install the MediaLink in auxiliary devices. Once the wiring is fully seated .... Once proper operation is complete. The VM9022HD will accept a Double-DIN chassis, but there is usually a small gap between the radio and dash piece after installation is achieved, turn the unit on to your VM9022HD without removing the radio. If unit does not operate, recheck ...

Operation Manual
Page 18
...assigned the "Select" feature. Steering Wheel Control (SWC) The VM9022HD is displayed on the screen. Mute 4. Band ** If ...5mm - Select "AUX2" mode to access and control auxiliary devices connected to such as AM-FM Tuner, CD, etc. AUX1 No Video Signal 01:53 PM E Q R E A R...the PAC (Pacific Accessory Corporation) steering wheel control adapter SWIPS. DISC SOURCE MENU DISC RADIO AUX 1 F SD USB NAV R O N T SAT iPod BT R E ...icon and level indication is compatible with the PAC adapter for detailed installation information. Mute Press the MUTE button on the front panel (8) ...
...assigned the "Select" feature. Steering Wheel Control (SWC) The VM9022HD is displayed on the screen. Mute 4. Band ** If ...5mm - Select "AUX2" mode to access and control auxiliary devices connected to such as AM-FM Tuner, CD, etc. AUX1 No Video Signal 01:53 PM E Q R E A R...the PAC (Pacific Accessory Corporation) steering wheel control adapter SWIPS. DISC SOURCE MENU DISC RADIO AUX 1 F SD USB NAV R O N T SAT iPod BT R E ...icon and level indication is compatible with the PAC adapter for detailed installation information. Mute Press the MUTE button on the front panel (8) ...

Operation Manual
Page 20
...front zone source from front to specify the source. Controlling the Rear Zone Screen(s) If you have a rear touch screen installed, you would like to rear zone, move the F/R switch (32) located on the right side of your rear ... the REAR button on the left corner of the rear screen. VM9022HD MULTI-ZONE OPERATION Independent sources can be seen on the front screen while DVD video is selected as illustrated below. Table 4: Multi-Zone Source Options FRONT ZONE HD Disc SD Radio HD O O O Radio Disc O O X SD O X O USB O O O NAV O O O SAT X O O iPod O O O BT O ...
...front zone source from front to specify the source. Controlling the Rear Zone Screen(s) If you have a rear touch screen installed, you would like to rear zone, move the F/R switch (32) located on the right side of your rear ... the REAR button on the left corner of the rear screen. VM9022HD MULTI-ZONE OPERATION Independent sources can be seen on the front screen while DVD video is selected as illustrated below. Table 4: Multi-Zone Source Options FRONT ZONE HD Disc SD Radio HD O O O Radio Disc O O X SD O X O USB O O O NAV O O O SAT X O O iPod O O O BT O ...

Operation Manual
Page 27
... press the >/|| button on the remote control) to play begins. Use the left/right arrows at the bottom of the repeated section. VM9022HD DVD/VCD VIDEO OPERATION NOTE: When properly installed, DVD video cannot be authorized (see "General Sub-menu Features" on page 17). If you must be displayed on the main...
... press the >/|| button on the remote control) to play begins. Use the left/right arrows at the bottom of the repeated section. VM9022HD DVD/VCD VIDEO OPERATION NOTE: When properly installed, DVD video cannot be authorized (see "General Sub-menu Features" on page 17). If you must be displayed on the main...

Operation Manual
Page 33
...P 0006 A Sort of songs Controlling Your iPod The unit will only play music files.) Video Playback While iPod video can be viewed on the VM9022HD screen, you must set the following touch screen icons and remote control buttons are used to access the iPod menus: Menu Music Photos Videos Touch...time 4. ID3 information 6. Enter 7. Touch to resume normal playback. To return to the iPod menu from your iPod has the latest Apple firmware installed to iPod mode when an iPod is plugged back into the MediaLink4. Release to view the SOURCE MENU and select a new playback source 17.
...P 0006 A Sort of songs Controlling Your iPod The unit will only play music files.) Video Playback While iPod video can be viewed on the VM9022HD screen, you must set the following touch screen icons and remote control buttons are used to access the iPod menus: Menu Music Photos Videos Touch...time 4. ID3 information 6. Enter 7. Touch to resume normal playback. To return to the iPod menu from your iPod has the latest Apple firmware installed to iPod mode when an iPod is plugged back into the MediaLink4. Release to view the SOURCE MENU and select a new playback source 17.

Operation Manual
Page 38
VM9022HD TROUBLESHOOTING Table 7: Troubleshooting Problem Cause Corrective Action GENERAL Unit will not power on Radio Fuse blown Car battery fuse blown Illegal operation Remote control does not function Battery depleted Battery installed incorrectly No/low audio output Improper audio output connection Volume set too ... is not engaged Flashing image or interference appears on screen DVD is not compatible with new one Remove battery and install correctly Check wiring and correct Increase volume level Review wiring diagram and check "MUTE" connection Replace speakers Adjust the ...
VM9022HD TROUBLESHOOTING Table 7: Troubleshooting Problem Cause Corrective Action GENERAL Unit will not power on Radio Fuse blown Car battery fuse blown Illegal operation Remote control does not function Battery depleted Battery installed incorrectly No/low audio output Improper audio output connection Volume set too ... is not engaged Flashing image or interference appears on screen DVD is not compatible with new one Remove battery and install correctly Check wiring and correct Increase volume level Review wiring diagram and check "MUTE" connection Replace speakers Adjust the ...

Operation Manual
Page 43
...will be proven defective in cosmetic, decorative or non-operative structural parts • Correction of antenna problems • Costs incurred for installation, removal or reinstallation of the product • Consequential damage to compact discs, USB devices, digital media cards, accessories or vehicle electrical... from state to state. Lost or damaged packages are pleased to offer you require service. Limited Warranty CD or Multimedia Radios/Headunits Audiovox Electronics Corporation ("the Company") is authorized to assume for the Company any liability other than expressed herein in...
...will be proven defective in cosmetic, decorative or non-operative structural parts • Correction of antenna problems • Costs incurred for installation, removal or reinstallation of the product • Consequential damage to compact discs, USB devices, digital media cards, accessories or vehicle electrical... from state to state. Lost or damaged packages are pleased to offer you require service. Limited Warranty CD or Multimedia Radios/Headunits Audiovox Electronics Corporation ("the Company") is authorized to assume for the Company any liability other than expressed herein in...

Quick Start Guide
Page 1
..., or have the installation handled by an experienced technician. AUX IN 1 *MediaLink LU E WOOFER SURROUND SURROUND SWC SAT Radio Connect to HD Radio Module (See Module Connections Diagram) HD RADIO Steering Wheel Control (...) IMPORTANT: Incorrect wiring connections can damage the unit. For technical assistance, call the Jensen customer support line at 1-800-323-4815. MediaLink Cable / BLACK MZ7-TFT Touch Screen...Connections Diagram for additional connections through the MediaLink. VM9022HD Mobile Multimedia Receiver Quick Start Guide BLACK YELLOW Rear View Video Camera YELLOW WHITE RED...
..., or have the installation handled by an experienced technician. AUX IN 1 *MediaLink LU E WOOFER SURROUND SURROUND SWC SAT Radio Connect to HD Radio Module (See Module Connections Diagram) HD RADIO Steering Wheel Control (...) IMPORTANT: Incorrect wiring connections can damage the unit. For technical assistance, call the Jensen customer support line at 1-800-323-4815. MediaLink Cable / BLACK MZ7-TFT Touch Screen...Connections Diagram for additional connections through the MediaLink. VM9022HD Mobile Multimedia Receiver Quick Start Guide BLACK YELLOW Rear View Video Camera YELLOW WHITE RED...


