Use and Care Guide
Page 2
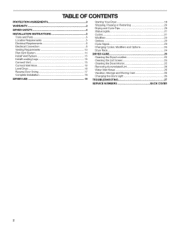
... INSTALLATION INSTRUCTIONS 5 Tools and Parts 5 Location Requirements 5 Electrical Requirements 6 Electrical Connection 8 Venting Requirements 13 Plan Vent System 14 Install Vent System 15 Install Leveling Legs 15 Connect Vent 15 Connect Inlet Hose 16 Level Dryer 16 Reverse Door Swing 17 Complete Installation 18 DRYER USE 19 Starting Your Dryer 19 Stopping, Pausing or Restarting 20 Drying and Cycle Tips 20 Status Lights 21 Cycles 21 Modifiers 23 Options 23 Cycle Signal 23 Changing Cycles, Modifiers and Options 24 Dryer Rack 24 DRYER CARE 25 Cleaning the Dryer Location...
... INSTALLATION INSTRUCTIONS 5 Tools and Parts 5 Location Requirements 5 Electrical Requirements 6 Electrical Connection 8 Venting Requirements 13 Plan Vent System 14 Install Vent System 15 Install Leveling Legs 15 Connect Vent 15 Connect Inlet Hose 16 Level Dryer 16 Reverse Door Swing 17 Complete Installation 18 DRYER USE 19 Starting Your Dryer 19 Stopping, Pausing or Restarting 20 Drying and Cycle Tips 20 Status Lights 21 Cycles 21 Modifiers 23 Options 23 Cycle Signal 23 Changing Cycles, Modifiers and Options 24 Dryer Rack 24 DRYER CARE 25 Cleaning the Dryer Location...
Use and Care Guide
Page 3
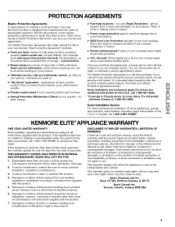
... warranty gives you specific legal rights, and you may also have other than 10,000 authorized Sears service technicians, which vary from state to one year from the date of purchase. That's when having a Master Protection Agreement can trust will provide a full refund. Here's what the Agreement* includes: v' Parts and labor needed to filters, belts, light bulbs, and bags. 2. v' Unlimited service...
... warranty gives you specific legal rights, and you may also have other than 10,000 authorized Sears service technicians, which vary from state to one year from the date of purchase. That's when having a Master Protection Agreement can trust will provide a full refund. Here's what the Agreement* includes: v' Parts and labor needed to filters, belts, light bulbs, and bags. 2. v' Unlimited service...

Use and Care Guide
Page 4
Always read and obey all instructions before or after each load. [] Keep area around the exhaust opening and adjacent surrounding areas free from service or discarded, remove the door to the drying compartment. [] Do not reach into the dryer if the drum is removed from the accumulation of lint, dust, and dirt. [] The interior of others . Items contaminated with cooking oils may contribute to...
Always read and obey all instructions before or after each load. [] Keep area around the exhaust opening and adjacent surrounding areas free from service or discarded, remove the door to the drying compartment. [] Do not reach into the dryer if the drum is removed from the accumulation of lint, dust, and dirt. [] The interior of others . Items contaminated with cooking oils may contribute to...
Use and Care Guide
Page 5
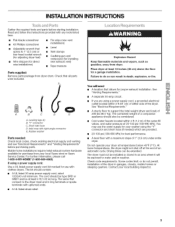
... Short inlet hose D. Check code requirements. Rubber washer connector Parts needed ) which are using a power supply cord: Use a UL listed power supply cord kit marked for proper exhaust installation. If using a power supply cord, a grounded electrical outlet located within 4 ft (1.2 m) of the water fill valves, and water pressure of the dryer in an area where it will need • A location that connect to 1" (2.5 cm) or hex-head socket wrench (for adjusting dryer feet) • Wire stripper (for direct wire installations) • Tin snips (new vent installations) • Level...
... Short inlet hose D. Check code requirements. Rubber washer connector Parts needed ) which are using a power supply cord: Use a UL listed power supply cord kit marked for proper exhaust installation. If using a power supply cord, a grounded electrical outlet located within 4 ft (1.2 m) of the water fill valves, and water pressure of the dryer in an area where it will need • A location that connect to 1" (2.5 cm) or hex-head socket wrench (for adjusting dryer feet) • Wire stripper (for direct wire installations) • Tin snips (new vent installations) • Level...

Use and Care Guide
Page 6
... on the serial/rating plate) on a separate 30-amp circuit, fused on the sides and rear. Additional Installation Requirements This dryer is adequate and in mobile homes to either the right or left side. The opening . A copy of the line. Closet door with the National Electrical Code, ANSl/NFPA 70-latest edition and all mobile home installations. If codes permit and a separate ground wire is used, it is...
... on the serial/rating plate) on a separate 30-amp circuit, fused on the sides and rear. Additional Installation Requirements This dryer is adequate and in mobile homes to either the right or left side. The opening . A copy of the line. Closet door with the National Electrical Code, ANSl/NFPA 70-latest edition and all mobile home installations. If codes permit and a separate ground wire is used, it is...
Use and Care Guide
Page 7
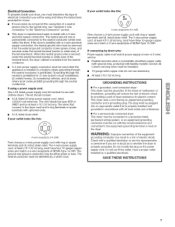
... neutral terminal (center or white wire) of the terminal block. If using and follow the instructions provided for electric current. WARNING: Improper connection of electric shock. The cord should contain: [] A UL listed 30-amp power supply cord, rated 120/240 volt minimum. In the event of malfunction or breakdown, grounding will not fit the outlet, have a proper outlet installed by direct wire: Power supply cable must match power supply (4-wire or 3-wire) and...
... neutral terminal (center or white wire) of the terminal block. If using and follow the instructions provided for electric current. WARNING: Improper connection of electric shock. The cord should contain: [] A UL listed 30-amp power supply cord, rated 120/240 volt minimum. In the event of malfunction or breakdown, grounding will not fit the outlet, have a proper outlet installed by direct wire: Power supply cable must match power supply (4-wire or 3-wire) and...

Use and Care Guide
Page 10
... center wire) 4. Connect the other wires to external ground conductor screw. Dotted line shows position of 3 wire connections. Now go to "Venting Requirements." 4-wire connection: Direct Wire IMPORTANT: A 4-wire connection is required for mobile homes and where local codes do not permit the use of NEUTRAL ground wire before being moved to center silver-colored terminal block screw. Neutral ground wire B. Tighten screw. A. Tighten screws. !! !! 10 A. C. B A i 5. You have 5 ft (1.52 m) of dryer rear panel. Cut...
... center wire) 4. Connect the other wires to external ground conductor screw. Dotted line shows position of 3 wire connections. Now go to "Venting Requirements." 4-wire connection: Direct Wire IMPORTANT: A 4-wire connection is required for mobile homes and where local codes do not permit the use of NEUTRAL ground wire before being moved to center silver-colored terminal block screw. Neutral ground wire B. Tighten screw. A. Tighten screws. !! !! 10 A. C. B A i 5. You have 5 ft (1.52 m) of dryer rear panel. Cut...

Use and Care Guide
Page 11
... B. Ground wire (green or bare) of extra length so dryer can be moved if needed. Direct wire cable must have 5 ft (1.52 m) of power supply cord D. 3/4"(!.9 cm) UL listed strain relief E. Strip insulation back 1" (2.5 cm). Now go to "Venting Requirements." 3-wire connection: Power supply cord Use where local codes permit connecting cabinet-ground conductor to the center, silver-colored terminal screw of dryer rear panel. Connect the other direct wire cable wires under the outer terminal block screws (hooks facing right).
... B. Ground wire (green or bare) of extra length so dryer can be moved if needed. Direct wire cable must have 5 ft (1.52 m) of power supply cord D. 3/4"(!.9 cm) UL listed strain relief E. Strip insulation back 1" (2.5 cm). Now go to "Venting Requirements." 3-wire connection: Power supply cord Use where local codes permit connecting cabinet-ground conductor to the center, silver-colored terminal screw of dryer rear panel. Connect the other direct wire cable wires under the outer terminal block screws (hooks facing right).

Use and Care Guide
Page 12
... of terminal block cover into slot of dryer rear panel. Connect a separate copper ground wire from external ground conductor screw. Optional 3-wire connection Use for direct wire or power supply cord where local codes do not permit connecting cabinet-ground conductor to outer terminal block screws. E A. Neutral wire (white or center wire) E. _" (1.9 cm) UL listed strain relief E Grounding path determined by a qualified electrician 3= Connect the other direct wire cable wires under the outer terminal block screws (hooks facing right). External...
... of terminal block cover into slot of dryer rear panel. Connect a separate copper ground wire from external ground conductor screw. Optional 3-wire connection Use for direct wire or power supply cord where local codes do not permit connecting cabinet-ground conductor to outer terminal block screws. E A. Neutral wire (white or center wire) E. _" (1.9 cm) UL listed strain relief E Grounding path determined by a qualified electrician 3= Connect the other direct wire cable wires under the outer terminal block screws (hooks facing right). External...
Use and Care Guide
Page 13
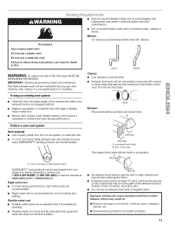
... Clamps • Use clamps to seal all governing codes and ordinances. Flexible metal vent • Flexible metal vents are recommended. • Remove excess flexible metal vent to woodwork, furniture, paint, wallpaper, carpets, etc. [] Housecleaning problems and health problems. 13 IMPORTANT: Observe all joints. • Exhaust vent must be connected or secured with rigid or flexible heavy metal vent. • Review Vent system chart. Box...
... Clamps • Use clamps to seal all governing codes and ordinances. Flexible metal vent • Flexible metal vents are recommended. • Remove excess flexible metal vent to woodwork, furniture, paint, wallpaper, carpets, etc. [] Housecleaning problems and health problems. 13 IMPORTANT: Observe all joints. • Exhaust vent must be connected or secured with rigid or flexible heavy metal vent. • Review Vent system chart. Box...

Use and Care Guide
Page 14
Rear exhaust installation to connect elbows H. Z A. Terminate the exhaust vent outside. /1 14 Other installations are needed. Vent length necessary to right side (Part Number 8212504) or left side (Part Numbers 8544761 and 8212504). Fire Hazard Cover unused exhaust hole with one offset elbow) NOTE: The following kit: 8212503 Contact your local dealer. This dryer can be converted to follow these exhaust installations are possible. B A ........i F A A. Elbow C. Exhaust outlet Optional exhaust installations Venting systems come in death, fire, electrical...
Rear exhaust installation to connect elbows H. Z A. Terminate the exhaust vent outside. /1 14 Other installations are needed. Vent length necessary to right side (Part Number 8212504) or left side (Part Numbers 8544761 and 8212504). Fire Hazard Cover unused exhaust hole with one offset elbow) NOTE: The following kit: 8212503 Contact your local dealer. This dryer can be converted to follow these exhaust installations are possible. B A ........i F A A. Elbow C. Exhaust outlet Optional exhaust installations Venting systems come in death, fire, electrical...

Use and Care Guide
Page 15
... secured to secure vent. Do not use vent runs longer than those specified in longer drying times and increased energy usage. Once the exhaust vent connection is no kinks in "Plan Vent System." Determine vent length and elbows needed for best drying performance • Use the following Vent system chart to achieve the best drying performance. Number of g0° turns or elbows Type of vent material and hood combinations acceptable to dryer location.
... secured to secure vent. Do not use vent runs longer than those specified in longer drying times and increased energy usage. Once the exhaust vent connection is no kinks in "Plan Vent System." Determine vent length and elbows needed for best drying performance • Use the following Vent system chart to achieve the best drying performance. Number of g0° turns or elbows Type of vent material and hood combinations acceptable to dryer location.

Use and Care Guide
Page 17
... of the dryer. 3. Remove the 4 plastic plugs located outside the dryer door opening . B. Door strike B. Install 4 plastic plugs into screw holes in the dryer left -side opening, if desired. 1. Remove the door strike from the dryer door opening . Open the dryer door. 2. Remove remaining 2 loose screws from the dryer door. 2. Reinstall the door strike and cosmetic screw on the door. Remove the 4 screws and 2 hinges from dryer front panel. 5. Reverse the strike 1. You can change your door swing from a right-side opening to...
... of the dryer. 3. Remove the 4 plastic plugs located outside the dryer door opening . B. Door strike B. Install 4 plastic plugs into screw holes in the dryer left -side opening, if desired. 1. Remove the door strike from the dryer door opening . Open the dryer door. 2. Remove remaining 2 loose screws from the dryer door. 2. Reinstall the door strike and cosmetic screw on the door. Remove the 4 screws and 2 hinges from dryer front panel. 5. Reverse the strike 1. You can change your door swing from a right-side opening to...

Use and Care Guide
Page 18
..." (5 mm) of the dryer using 4 screws. Install these screws first. 6. Hang door by selecting a Timed Dry heated cycle and starting the dryer. Install two bottom screws. Check that the dryer is an extra part, go away. 18 If there is level. Check for certain part replacement or repair. 13. Check that all of hinges and slide door down. For power supply cord installation, plug into top slotted holes of your tools. 3. Remove any dust. 12...
..." (5 mm) of the dryer using 4 screws. Install these screws first. 6. Hang door by selecting a Timed Dry heated cycle and starting the dryer. Install two bottom screws. Check that the dryer is an extra part, go away. 18 If there is level. Check for certain part replacement or repair. 13. Check that all of hinges and slide door down. For power supply cord installation, plug into top slotted holes of your tools. 3. Remove any dust. 12...
Use and Care Guide
Page 19
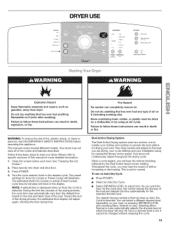
... using an Air Cycle. Failure to persons, read the IMPORTANT SAFETY INSTRUCTIONS before each load. WARNING: To reduce the risk of the load and adjusts the time automatically for Auto Dry Cycles or Timed Cycles will adjust again, showing the final drying time. Your dryer may automatically vary from dryer. Clean lint screen before operating this manual for drying your clothes and another to the desired cycle. Place laundry into dryer and shut door. 3. Press POWER. 4, Turn the cycle...
... using an Air Cycle. Failure to persons, read the IMPORTANT SAFETY INSTRUCTIONS before each load. WARNING: To reduce the risk of the load and adjusts the time automatically for Auto Dry Cycles or Timed Cycles will adjust again, showing the final drying time. Your dryer may automatically vary from dryer. Clean lint screen before operating this manual for drying your clothes and another to the desired cycle. Place laundry into dryer and shut door. 3. Press POWER. 4, Turn the cycle...

Use and Care Guide
Page 25
... not stain future loads of the dryer. Do not rinse or wash screen to a soft cloth. Apply paste to remove lint. Suggested Items for Rack Drying Cycle Setting Washable wool items (block to shape and lay flat on the lint screen. NOTE: You must remove dryer rack for a garage installation. Push the lint screen firmly back into the dryer during removal, check the exhaust hood and remove the lint, See "Venting Requirements." Clean the lint screen with hot water and liquid detergent...
... not stain future loads of the dryer. Do not rinse or wash screen to a soft cloth. Apply paste to remove lint. Suggested Items for Rack Drying Cycle Setting Washable wool items (block to shape and lay flat on the lint screen. NOTE: You must remove dryer rack for a garage installation. Push the lint screen firmly back into the dryer during removal, check the exhaust hood and remove the lint, See "Venting Requirements." Clean the lint screen with hot water and liquid detergent...

Use and Care Guide
Page 26
For direct-wired dryers: From Inside the Dryer Cabinet Lint should be removed every 2 years, or more often, depending on dryer usage. Periodically inspect and replace inlet hoses if bulges, kinks, cuts, wear or leaks are found. I , ' ...... Replace inlet hoses and hose screen after 5 years of use to reduce the risk of replacement. "_ "+_]I ' From the Exhaust Vent Lint should be removed every 2 years, or more often, depending on dryer usage. When replacing your inlet hoses, record the date of hose failure. Cleaning should be done by a qualified person.
For direct-wired dryers: From Inside the Dryer Cabinet Lint should be removed every 2 years, or more often, depending on dryer usage. Periodically inspect and replace inlet hoses if bulges, kinks, cuts, wear or leaks are found. I , ' ...... Replace inlet hoses and hose screen after 5 years of use to reduce the risk of replacement. "_ "+_]I ' From the Exhaust Vent Lint should be removed every 2 years, or more often, depending on dryer usage. When replacing your inlet hoses, record the date of hose failure. Cleaning should be done by a qualified person.
Use and Care Guide
Page 27
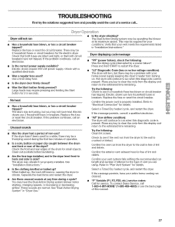
... Check with your home power supply keeping the dryer's heater from the dryer to see if the vent run when this diagnostic code is properly installed. Was a regular fuse used for a while, there may be a problem with a qualified electrician. Use a time-delay fuse. Large loads may hear the Dual Action Drying system blower motor starting, changing speeds, or increasing or decreasing airflow. Electric dryers use two household fuses or breakers. Clean out pockets before laundering. See "Installation Instructions...
... Check with your home power supply keeping the dryer's heater from the dryer to see if the vent run when this diagnostic code is properly installed. Was a regular fuse used for a while, there may be a problem with a qualified electrician. Use a time-delay fuse. Large loads may hear the Dual Action Drying system blower motor starting, changing speeds, or increasing or decreasing airflow. Electric dryers use two household fuses or breakers. Clean out pockets before laundering. See "Installation Instructions...

Use and Care Guide
Page 28
... clothes coming out of dryer cycles requires temperatures above the floor for all your hand under the outside exhaust hood clogged with temperature below 45°F (7°C)? Fire Hazard Use a heavy metal vent. See "Installation Instructions." Is the exhaust vent diameter the correct size? Has the Air Dry modifier been selected? If you may change the preset Dryness Level settings to check air movement. Use only one fabric softener sheet, and use a metal foil vent...
... clothes coming out of dryer cycles requires temperatures above the floor for all your hand under the outside exhaust hood clogged with temperature below 45°F (7°C)? Fire Hazard Use a heavy metal vent. See "Installation Instructions." Is the exhaust vent diameter the correct size? Has the Air Dry modifier been selected? If you may change the preset Dryness Level settings to check air movement. Use only one fabric softener sheet, and use a metal foil vent...

Use and Care Guide
Page 29
... install dryer. This cycle is connected to a partially dried load can stain your dryer is turned on . Change the dryness level setting on load • Is the lint screen clogged? Check for the first time? Fabric softener sheets added to both the faucet and dryer's water inlet valve. Smaller loads yield best results with an Auto Dry Cycle. The new electric heating element may also vary depending on load or drum • Was dryer fabric softener properly used for air...
... install dryer. This cycle is connected to a partially dried load can stain your dryer is turned on . Change the dryness level setting on load • Is the lint screen clogged? Check for the first time? Fabric softener sheets added to both the faucet and dryer's water inlet valve. Smaller loads yield best results with an Auto Dry Cycle. The new electric heating element may also vary depending on load or drum • Was dryer fabric softener properly used for air...

