

Use and Care Guide
Page 1
...: 1-800-4-MY-HOME (_) For assembly questions, call: 1-800-913-8999 MFG No: 720-0670 Date: 10/20/2008 Sears, Roebuck and Co., Hoffman Estates, IL 60179 U.S.A. Use and Care Guide ® Liquid Propane Gas Grill Sears Model No. 122.16643900 Kmart Item No. 640-082960815-7 • Parts •...Troubleshooting /_ WARNING" Read this Owner's Manual in a convenient place for outdoor use only and is not intended to be sure your gas grill is properly assembled, installed and maintained. Note to Consumer Leave this Owner's manual carefully and be installed in or on recreational vehicles or ...
...: 1-800-4-MY-HOME (_) For assembly questions, call: 1-800-913-8999 MFG No: 720-0670 Date: 10/20/2008 Sears, Roebuck and Co., Hoffman Estates, IL 60179 U.S.A. Use and Care Guide ® Liquid Propane Gas Grill Sears Model No. 122.16643900 Kmart Item No. 640-082960815-7 • Parts •...Troubleshooting /_ WARNING" Read this Owner's Manual in a convenient place for outdoor use only and is not intended to be sure your gas grill is properly assembled, installed and maintained. Note to Consumer Leave this Owner's manual carefully and be installed in or on recreational vehicles or ...
Use and Care Guide
Page 2
... RCNalIifNorGnia to an LP gas tank that could result in the vicinity of purchase, you pay for Recreational vehicles, ANSI A 119.2, and CSA Z240 RV series recreational vehicle code, as applicable. Ten-Year Limited Warranty on Kenmore Grill If this grill fails due to a ...defecting material or workmanship within the warranty period, or are designed for free repair (or replacement if repair proves impossible). Combustion by products produced when using your gas grill to cause cancer, birth defects, or other grill parts while the grill...
... RCNalIifNorGnia to an LP gas tank that could result in the vicinity of purchase, you pay for Recreational vehicles, ANSI A 119.2, and CSA Z240 RV series recreational vehicle code, as applicable. Ten-Year Limited Warranty on Kenmore Grill If this grill fails due to a ...defecting material or workmanship within the warranty period, or are designed for free repair (or replacement if repair proves impossible). Combustion by products produced when using your gas grill to cause cancer, birth defects, or other grill parts while the grill...
Use and Care Guide
Page 3
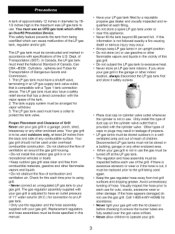
...; Do not obstruct the flow of Grill Never use your gas grill. The LP gas tank must not be used again. • Keep the gas regulator hose away from the back and side of the grill. Your gas grill is provided with the vapor space of the U.S. Disconnected LP gas tanks must have a collar to be... stored in an LP gas supply tank valve outlet, that is to protect the...
...; Do not obstruct the flow of Grill Never use your gas grill. The LP gas tank must not be used again. • Keep the gas regulator hose away from the back and side of the grill. Your gas grill is provided with the vapor space of the U.S. Disconnected LP gas tanks must have a collar to be... stored in an LP gas supply tank valve outlet, that is to protect the...
Use and Care Guide
Page 4
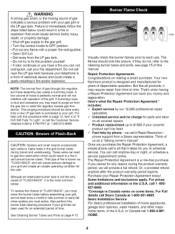
Do not call your grill, and at least once a month in fire and/or explosion. Your new Kenmore product is loud and excessive you cancel for an extended period...for the user. This purging procedure should look like all covered repairs ,/ Product replacement up to your grill and create an unsafe operating condition for years of "FLASH-BACK", you money and aggravation. This ...form of us as "FLASH-BACK" and can cause serious damage to $1500 if your gas grill or the LP gas tank. To reduce the chance of dependable operation. That's when having a Repair Protection Agreement can ...
Do not call your grill, and at least once a month in fire and/or explosion. Your new Kenmore product is loud and excessive you cancel for an extended period...for the user. This purging procedure should look like all covered repairs ,/ Product replacement up to your grill and create an unsafe operating condition for years of "FLASH-BACK", you money and aggravation. This ...form of us as "FLASH-BACK" and can cause serious damage to $1500 if your gas grill or the LP gas tank. To reduce the chance of dependable operation. That's when having a Repair Protection Agreement can ...
Use and Care Guide
Page 7
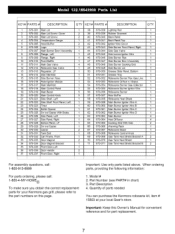
..., providing the following information: 1. Important: Use only parts listed above. Model # 2. Quantity of parts needed You can purchase the Kenmore rotisserie kit, item # 15803 at your Kenmore gas grill, please refer to the part numbers on this page. Important: Keep this Owner's Manual for convenient reference and for your local Sear...Manifold 18 670-018 Main Control Panel 19 670-019 Main Bezel 20 670-020 Main Control Knob 21 670-021 Side Shelf, Left 22 670-022 Side Shelf Front Panel, Left 23 670-023 TitTer 24 670-024 Bottle Opener 25 670-025 Swivel Caster With Brake ...
..., providing the following information: 1. Important: Use only parts listed above. Model # 2. Quantity of parts needed You can purchase the Kenmore rotisserie kit, item # 15803 at your Kenmore gas grill, please refer to the part numbers on this page. Important: Keep this Owner's Manual for convenient reference and for your local Sear...Manifold 18 670-018 Main Control Panel 19 670-019 Main Bezel 20 670-020 Main Control Knob 21 670-021 Side Shelf, Left 22 670-022 Side Shelf Front Panel, Left 23 670-023 TitTer 24 670-024 Bottle Opener 25 670-025 Swivel Caster With Brake ...
Use and Care Guide
Page 8
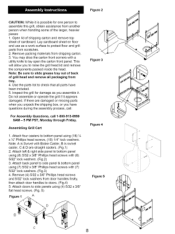
... B is possible for damage as a work surface to protect floor and grill parts from scratches. 2. Attach left & right side panel to assemble this grill, obtain assistance from tray. 4. Assembling Grill Cart 1. Attach back panel to check that all packaging from another person when...straight casters. (Fig.l) 2. Remove packing materials from door handles firstly, then attach door handles to raise the grill head lid and remove the components packed inside the head. Use the parts list to side panel & bottom panel using (4) 5/32 x 3/8" flat head screws. (Fig. 5) Figure 1 A ...
... B is possible for damage as a work surface to protect floor and grill parts from scratches. 2. Attach left & right side panel to assemble this grill, obtain assistance from tray. 4. Assembling Grill Cart 1. Attach back panel to check that all packaging from another person when...straight casters. (Fig.l) 2. Remove packing materials from door handles firstly, then attach door handles to raise the grill head lid and remove the components packed inside the head. Use the parts list to side panel & bottom panel using (4) 5/32 x 3/8" flat head screws. (Fig. 5) Figure 1 A ...
Use and Care Guide
Page 9
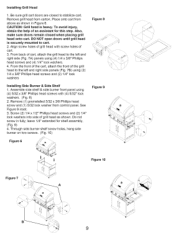
...Figure 6. leave 1/4" extended for this step. Place onto cart from above as shown. Remove grill head from control panel. Screw (2) 1/4 x 1/2" Phillips head screws and (2) 1/4" lock washers into side of an assistant for shelf assembly. (Fig. 9) 4. Remove (1) preinstalled 5/32 x ...6 Figure 10 Figure 7 A J i / B 9 DO NOT open doors until grill head is heavy. See Figure 9 inset. 3. Be sure grill cart doors are closed when placing grill head onto cart. Assemble side shelf & side burner front panel using (4) 1/4 x 3/8" Phillips i head screws and (4) 1/4" lock ...
...Figure 6. leave 1/4" extended for this step. Place onto cart from above as shown. Remove grill head from control panel. Screw (2) 1/4 x 1/2" Phillips head screws and (2) 1/4" lock washers into side of an assistant for shelf assembly. (Fig. 9) 4. Remove (1) preinstalled 5/32 x ...6 Figure 10 Figure 7 A J i / B 9 DO NOT open doors until grill head is heavy. See Figure 9 inset. 3. Be sure grill cart doors are closed when placing grill head onto cart. Assemble side shelf & side burner front panel using (4) 1/4 x 3/8" Phillips i head screws and (4) 1/4" lock ...

Use and Care Guide
Page 10
... of control panel). 2.Install battery into igniter wire electrode on underside of burner(Fig. 14). Insert side burner valve control stem through 5 to control and valve with screw removed in step 1. 5. Insert valve ...side shelf. Figure 12 A B Figure 13 I Wsuhreenthyaot ualhl asvcerefwinsishaendd naustssemarbelintigghtgarilnl,d msaekceure. Remove two screws and washers from previous step. Using (3) 5/32 x 1/2" screws and (3) 1/2" lock washers, securely attach side burner shelf to install side burner valve. Reattach burner to underside of side burner shelf to make room to grill...
... of control panel). 2.Install battery into igniter wire electrode on underside of burner(Fig. 14). Insert side burner valve control stem through 5 to control and valve with screw removed in step 1. 5. Insert valve ...side shelf. Figure 12 A B Figure 13 I Wsuhreenthyaot ualhl asvcerefwinsishaendd naustssemarbelintigghtgarilnl,d msaekceure. Remove two screws and washers from previous step. Using (3) 5/32 x 1/2" screws and (3) 1/2" lock washers, securely attach side burner shelf to install side burner valve. Reattach burner to underside of side burner shelf to make room to grill...

Use and Care Guide
Page 11
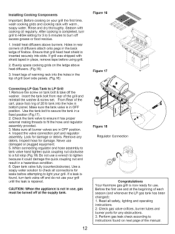
...(Fig. 17) 4. Push grease tray back to gas tank heat shields as shown (Fig. 19). Assemble 2pcs longer gas tank heat shield bracket A to down (Fig. 16 A) 2. Installing Gas Tank Heat Shield 1. Figure 16 B Figure 17 ...Figure 18 Figure 19 A 11 Attach gas tank heat shield bracket A other ... assembly screws need to from down to up to gas tank heat shields using (2) 5/32 x 3/8" Phillips head screws with (4) 5/32" lock washers...
...(Fig. 17) 4. Push grease tray back to gas tank heat shields as shown (Fig. 19). Assemble 2pcs longer gas tank heat shield bracket A to down (Fig. 16 A) 2. Installing Gas Tank Heat Shield 1. Figure 16 B Figure 17 ...Figure 18 Figure 19 A 11 Attach gas tank heat shield bracket A other ... assembly screws need to from down to up to gas tank heat shields using (2) 5/32 x 3/8" Phillips head screws with (4) 5/32" lock washers...
Use and Care Guide
Page 12
... regulator assembly provided. 3. Use a soapy water solution to light your grill. Before the first use and at the supply tank. 12 Figure 18 Regulator Connection Congratulations Your Kenmore gas grill is inserted securely into slots• If grill was shipped with cooking oil regularly• After cooking is completed, turn...If a leak is found on next page of the manual. Insert the tank bolt from rear of grill bowl side panels• (Fig.16) Figure 16 Figure 17 Connecting LP Gas Tank to burn off the washer. Make sure the tank valve is repaired. Make sure all connections for...
... regulator assembly provided. 3. Use a soapy water solution to light your grill. Before the first use and at the supply tank. 12 Figure 18 Regulator Connection Congratulations Your Kenmore gas grill is inserted securely into slots• If grill was shipped with cooking oil regularly• After cooking is completed, turn...If a leak is found on next page of the manual. Insert the tank bolt from rear of grill bowl side panels• (Fig.16) Figure 16 Figure 17 Connecting LP Gas Tank to burn off the washer. Make sure the tank valve is repaired. Make sure all connections for...
Use and Care Guide
Page 13
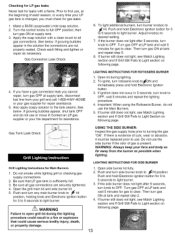
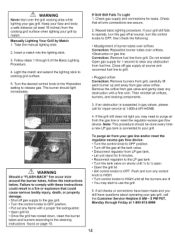
... See below . Contact an LP gas supplier or your gas supplier for gas leaks. , Make a 50/50 (soap/water) mild soap solution. 2. LIGHTING INSTRUCTIONS FOR SIDE BURNER Grill Lighting Instructions for 3 to 5 seconds to clear. Do not smoke while lighting grill or checking gas supply connections. 2. Then turn any...Electronic Ignition button. 3. If burner still does not light, see Match Lighting section and If Grill Still Fails to OFF. If there is evidence of gas is present. If the side burner does not light after 5 seconds, turn knob to ,ON and immediately press and ...
... See below . Contact an LP gas supplier or your gas supplier for gas leaks. , Make a 50/50 (soap/water) mild soap solution. 2. LIGHTING INSTRUCTIONS FOR SIDE BURNER Grill Lighting Instructions for 3 to 5 seconds to clear. Do not smoke while lighting grill or checking gas supply connections. 2. Then turn any...Electronic Ignition button. 3. If burner still does not light, see Match Lighting section and If Grill Still Fails to OFF. If there is evidence of gas is present. If the side burner does not light after 5 seconds, turn knob to ,ON and immediately press and ...
Use and Care Guide
Page 14
... that all checks or corrections have questions about operating your gas grill, call for leaks. Check gas supply and connections for repair service at the tank valve. • Disconnect regulator from your grill still fails to your grill by Match 1. \ WARNING Never lean over orifices. •... position. • Put out any obstruction from the cooking grid surface when lighting your grill. Light the match and extend the lighting stick to release gas. Check that could result in gas valves, please call the Customer Service Helpline 8 AM - 5 PM PST, Monday through...
... that all checks or corrections have questions about operating your gas grill, call for leaks. Check gas supply and connections for repair service at the tank valve. • Disconnect regulator from your grill still fails to your grill by Match 1. \ WARNING Never lean over orifices. •... position. • Put out any obstruction from the cooking grid surface when lighting your grill. Light the match and extend the lighting stick to release gas. Check that could result in gas valves, please call the Customer Service Helpline 8 AM - 5 PM PST, Monday through...
Use and Care Guide
Page 15
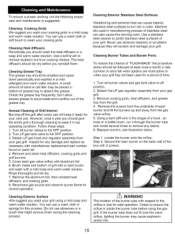
... wash with aluminum foil. 6. Secure the main burner on the back wall of fire box with 2 screws. _.I WARNING The location of your gas grill. 3. You can cause exterior stainless steel surfaces to clean your next use. Cleaning Heat diffusers Periodically you wash your cooking grids in color. Cleaning... should be emptied and wiped down periodically and washed in late summer or early fall when spiders are most active or when your grill using the gas grill. Never use abrasives or a brush that might remove finish during the cleaning process. To ensure a proper working unit the following...
... wash with aluminum foil. 6. Secure the main burner on the back wall of fire box with 2 screws. _.I WARNING The location of your gas grill. 3. You can cause exterior stainless steel surfaces to clean your next use. Cleaning Heat diffusers Periodically you wash your cooking grids in color. Cleaning... should be emptied and wiped down periodically and washed in late summer or early fall when spiders are most active or when your grill using the gas grill. Never use abrasives or a brush that might remove finish during the cleaning process. To ensure a proper working unit the following...
Use and Care Guide
Page 16
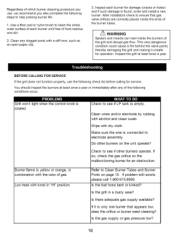
...to help prolong burner life. 1. If so, check the gas orifice on the malfunctioning burner for operation. Refer to electrode assembly. Is the gas supply or gas pressure low? 16 Regardless of the grill and disrupt gas flow. Check to clean the entire outer surface of each ...burner for service. Is the grill in "HI" position. Inspect each burner until free of gas. This very dangerous condition...
...to help prolong burner life. 1. If so, check the gas orifice on the malfunctioning burner for operation. Refer to electrode assembly. Is the gas supply or gas pressure low? 16 Regardless of the grill and disrupt gas flow. Check to clean the entire outer surface of each ...burner for service. Is the grill in "HI" position. Inspect each burner until free of gas. This very dangerous condition...
Use and Care Guide
Page 17
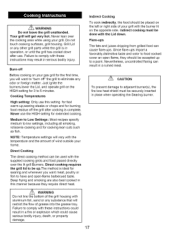
... the burners,lower the Lid, and operate grill on the left or right side of the grill housing with the Lid down after cooking is in a fire or explosion which could result in operation, or until the grill has cooled down . Direct cooking requires the grill lid to be done with aluminum foil, ...Only use this manner because they should be used with the supplied cooking grids and food placed directly over the cooking area while using your gas grill for searing and whenever you will get very hot. Indirect cooking must be accepted up .The method is ideal for the first time, ...
... the burners,lower the Lid, and operate grill on the left or right side of the grill housing with the Lid down after cooking is in a fire or explosion which could result in operation, or until the grill has cooled down . Direct cooking requires the grill lid to be done with aluminum foil, ...Only use this manner because they should be used with the supplied cooking grids and food placed directly over the cooking area while using your gas grill for searing and whenever you will get very hot. Indirect cooking must be accepted up .The method is ideal for the first time, ...
Use and Care Guide
Page 18
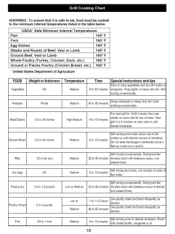
...or margarine. Potatoes Whole Meat/Steaks 1/2 to 3/4 inches Medium 40 to 1 inch Medium Grill turning four times. 2-4 minutes on each side or until desired amount of 5 to 5 minutes on each side for two minutes. Grill turning occassionally. Hot dogs NA Poultry-Cut 1/4 to 1/2 pounds Poultry Whole 2 to ...3 pounds Fish 3/4 to 60 minutes Wrap individually in heavy duty foil. Next grill 3 to 10 minutes four sides. WARNING: To ensure that it is :safe to eat, fo_ must be cooked to 15 minutes with melted butter, margarine or...
...or margarine. Potatoes Whole Meat/Steaks 1/2 to 3/4 inches Medium 40 to 1 inch Medium Grill turning four times. 2-4 minutes on each side or until desired amount of 5 to 5 minutes on each side for two minutes. Grill turning occassionally. Hot dogs NA Poultry-Cut 1/4 to 1/2 pounds Poultry Whole 2 to ...3 pounds Fish 3/4 to 60 minutes Wrap individually in heavy duty foil. Next grill 3 to 10 minutes four sides. WARNING: To ensure that it is :safe to eat, fo_ must be cooked to 15 minutes with melted butter, margarine or...


