

Use and Care Guide
Page 1
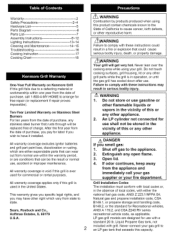
... Leave this Owner's manual carefully and be installed in or on recreational vehicles or boats. Use and Care Guide ® Liquid Propane Gas Grill Sears Model No. 122.16643900 Kmart Item No. 640-082960815-7 • Parts • Assembly • Safety Rules • Use and Care • Troubleshooting /_ WARNING" Read this Owner's Manual in a convenient place for outdoor use only and is not intended to be sure your gas grill is properly assembled, installed and maintained...
... Leave this Owner's manual carefully and be installed in or on recreational vehicles or boats. Use and Care Guide ® Liquid Propane Gas Grill Sears Model No. 122.16643900 Kmart Item No. 640-082960815-7 • Parts • Assembly • Safety Rules • Use and Care • Troubleshooting /_ WARNING" Read this Owner's Manual in a convenient place for outdoor use only and is not intended to be sure your gas grill is properly assembled, installed and maintained...
Use and Care Guide
Page 2
... by products produced when using your fire department. Grill Installation Codes The installation must conform with local codes or, in the United States. Warranty Safety Precautions. Hardware List Parts Diagram Parts List Assembly Instructions. Shut off gas to cause cancer, birth defects, or other right which are either the national fuel gas code, ANSI Z 223.1/NFPA $4, Natural gas and propane installation code, CSA B149.1, or propane storage and handling code, B149.2, or the...
... by products produced when using your fire department. Grill Installation Codes The installation must conform with local codes or, in the United States. Warranty Safety Precautions. Hardware List Parts Diagram Parts List Assembly Instructions. Shut off gas to cause cancer, birth defects, or other right which are either the national fuel gas code, ANSI Z 223.1/NFPA $4, Natural gas and propane installation code, CSA B149.1, or propane storage and handling code, B149.2, or the...
Use and Care Guide
Page 3
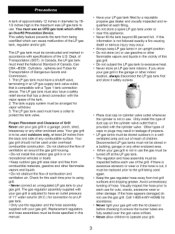
... -B339, Cylinders, spheres and Tubes for cuts, cracks, excessive wear or other damage. Avoid unnecessary twisting of Transportation (DOT). Dept. The LP gas tank used again. • Keep the gas regulator hose away from hot grill surfaces and dripping grease. Only install the type of dust cap on the cylinder valve outlet that is not in use the regulator and the hose assembly supplied with specifications of the...
... -B339, Cylinders, spheres and Tubes for cuts, cracks, excessive wear or other damage. Avoid unnecessary twisting of Transportation (DOT). Dept. The LP gas tank used again. • Keep the gas regulator hose away from hot grill surfaces and dripping grease. Only install the type of dust cap on the cylinder valve outlet that is not in use the regulator and the hose assembly supplied with specifications of the...
Use and Care Guide
Page 4
... the gas grill. • Turn the control knobs to your covered product can not extinguish, call anytime day or night, or schedule a service appointment online. For help by our 10,000 professional repair specialists •"/ Unlimited service and no charge for the user. ! These webs can lead to 5 PM PST at 1-800-361-6665 Sears Installation Service For Sears professional installation of gas through the regulator and hose assembly...
... the gas grill. • Turn the control knobs to your covered product can not extinguish, call anytime day or night, or schedule a service appointment online. For help by our 10,000 professional repair specialists •"/ Unlimited service and no charge for the user. ! These webs can lead to 5 PM PST at 1-800-361-6665 Sears Installation Service For Sears professional installation of gas through the regulator and hose assembly...

Use and Care Guide
Page 5
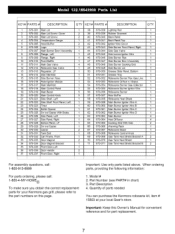
Item Description Phillips Head Screw 1 Phillips Head Screw 2 Phillips Head Screw 3 Lock Washer 4 Flat Washer 5 Phillips Head Screw 6 Tank Bolt 7 Specification 1/4 x 1/2" 1/4 x 3/8" 5/32 x 3/8" 1/4" 5/32" 5/32 x 1/2" Quantity 26pcs 4 pcs 39pcs 30 pcs 43 pcs 2 pcs 1 pc 5 The following table illustrates a breakdown of assembly. It highlights what components are used in the various stages of the hardware pack.
Item Description Phillips Head Screw 1 Phillips Head Screw 2 Phillips Head Screw 3 Lock Washer 4 Flat Washer 5 Phillips Head Screw 6 Tank Bolt 7 Specification 1/4 x 1/2" 1/4 x 3/8" 5/32 x 3/8" 1/4" 5/32" 5/32 x 1/2" Quantity 26pcs 4 pcs 39pcs 30 pcs 43 pcs 2 pcs 1 pc 5 The following table illustrates a breakdown of assembly. It highlights what components are used in the various stages of the hardware pack.
Use and Care Guide
Page 7
... 1 1 1 1 1 1 1 1 1 1 1 1 1 1 1 1 1 1 1 1 1 1 1 1 1 4 4 2 1 1 1 2 1 2 For assembly questions, call: 1-800-913-8999 For parts ordering, please call: 1-800-4-MY-HOME(_) To make sure you obtain the correct replacement parts for part replacement. 7 Important: Use only parts listed above. Part Description 4. Quantity of parts needed You can purchase the Kenmore rotisserie kit, item # 15803 at your Kenmore gas grill, please refer to the part numbers on this Owner's Manual for convenient reference and for your local Sear's store.
... 1 1 1 1 1 1 1 1 1 1 1 1 1 1 1 1 1 1 1 1 1 1 1 1 1 4 4 2 1 1 1 2 1 2 For assembly questions, call: 1-800-913-8999 For parts ordering, please call: 1-800-4-MY-HOME(_) To make sure you obtain the correct replacement parts for part replacement. 7 Important: Use only parts listed above. Part Description 4. Quantity of parts needed You can purchase the Kenmore rotisserie kit, item # 15803 at your Kenmore gas grill, please refer to the part numbers on this Owner's Manual for convenient reference and for your local Sear's store.
Use and Care Guide
Page 8
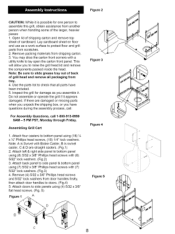
... of shipping carton and remove top sheet of the larger, heavier pieces 1. Lay cardboard sheet on floor and use as you assemble it. This will allow you have been included. 5. Do not assemble or operate the grill if it appears damaged. Remove packing materials from door handles firstly, then attach door handles to doors. (Fig.4) 5. Use the parts list to check that...
... of shipping carton and remove top sheet of the larger, heavier pieces 1. Lay cardboard sheet on floor and use as you assemble it. This will allow you have been included. 5. Do not assemble or operate the grill if it appears damaged. Remove packing materials from door handles firstly, then attach door handles to doors. (Fig.4) 5. Use the parts list to check that...
Use and Care Guide
Page 9
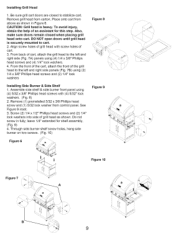
... of cart. Be sure grill cart doors are closed when placing grill head onto cart. Remove grill head from carton. DO NOT open doors until grill head is heavy. Through side burner shelf screw holes, hang side burner on two screws. (Fig. 10) Figure 9 Figure 6 Figure 10 Figure 7 A J i / B 9 InstallingGrillHead 1. Assemble side shelf & side burner front panel using (2) 1/4 x 3/8" Phillips head screws and (2) 1/4" lock washers Installing Side Burner & Side Shelf 1.
... of cart. Be sure grill cart doors are closed when placing grill head onto cart. Remove grill head from carton. DO NOT open doors until grill head is heavy. Through side burner shelf screw holes, hang side burner on two screws. (Fig. 10) Figure 9 Figure 6 Figure 10 Figure 7 A J i / B 9 InstallingGrillHead 1. Assemble side shelf & side burner front panel using (2) 1/4 x 3/8" Phillips head screws and (2) 1/4" lock washers Installing Side Burner & Side Shelf 1.

Use and Care Guide
Page 10
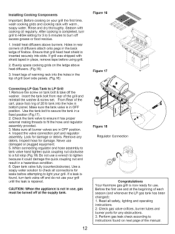
... step. See Figure 13. 4. See Figure 12 A inset. 2. Place side burner control knob bezel over side burner valve control stem. Insert valve orifice tip into burner tube as shown in step 1. 5. Plug ignition wire into ignition box with screws removed in Fig. 12. Repeat steps 2 through hole in side burner control panel. Insert side burner valve control stem through 5 to main control panel with 2 screws removed in step 2. (Fig. 11) 6. Figure 12 A B Figure 13 I Wsuhreenthyaot...
... step. See Figure 13. 4. See Figure 12 A inset. 2. Place side burner control knob bezel over side burner valve control stem. Insert valve orifice tip into burner tube as shown in step 1. 5. Plug ignition wire into ignition box with screws removed in Fig. 12. Repeat steps 2 through hole in side burner control panel. Insert side burner valve control stem through 5 to main control panel with 2 screws removed in step 2. (Fig. 11) 6. Figure 12 A B Figure 13 I Wsuhreenthyaot...

Use and Care Guide
Page 11
... screws with (4) 5/32" lock washers as shown (Fig. 19). Assemble 2pcs longer gas tank heat shield bracket A to gas tank heat shields using (2) 5/32 x 3/8" Phillips head screws with (4) 5/32" lock washers from it, then insert grease cup into grease tray as shown (Fig. 18) Installing grease cup From grease back to pull out grease tray, remove the packaging materials from up , finish preassembly whole gas tank heat shield (Fig. 16 B). 3.
... screws with (4) 5/32" lock washers as shown (Fig. 19). Assemble 2pcs longer gas tank heat shield bracket A to gas tank heat shields using (2) 5/32 x 3/8" Phillips head screws with (4) 5/32" lock washers from it, then insert grease cup into grease tray as shown (Fig. 18) Installing grease cup From grease back to pull out grease tray, remove the packaging materials from up , finish preassembly whole gas tank heat shield (Fig. 16 B). 3.
Use and Care Guide
Page 12
... regulator and hose assembly to tank valve hand tighten quick coupling nut clockwise to burn off at the beginning of the grill and reinstall the washer & screw set. Check gas valve orifices, burner tubes and burner ports for use a wrench to tighten because it has proper external mating threads to LP Grill 1.Remove the screw on next page of firebox• Ensure that grill head heat shield is repaired...
... regulator and hose assembly to tank valve hand tighten quick coupling nut clockwise to burn off at the beginning of the grill and reinstall the washer & screw set. Check gas valve orifices, burner tubes and burner ports for use a wrench to tighten because it has proper external mating threads to LP Grill 1.Remove the screw on next page of firebox• Ensure that grill head heat shield is repaired...
Use and Care Guide
Page 13
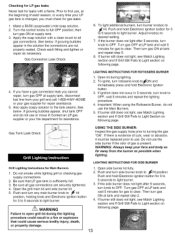
... full. 3. LIGHTING INSTRUCTIONS FOR SIDE BURNER Grill Lighting Instructions for assistance. Open the grill main lid and side burner lid.,, 5. Push and hold Electronic Ignition button. 3. Turn gas OFF at supply tank, disconnect fuel line from the burner as possible when lighting. Then turn gas ON at LP tank and wait 5 minutes for repair assistance. 5. Gas Connection Leak Check 6. Important: When using the Rotisserie Burner, do not use . If burner still does not light, see Match Lighting section...
... full. 3. LIGHTING INSTRUCTIONS FOR SIDE BURNER Grill Lighting Instructions for assistance. Open the grill main lid and side burner lid.,, 5. Push and hold Electronic Ignition button. 3. Turn gas OFF at supply tank, disconnect fuel line from the burner as possible when lighting. Then turn gas ON at LP tank and wait 5 minutes for repair assistance. 5. Gas Connection Leak Check 6. Important: When using the Rotisserie Burner, do not use . If burner still does not light, see Match Lighting section...
Use and Care Guide
Page 14
... for 1 second to use the grill 5. Do not smoke! Open gas supply for leaks. To purge air from your gas line and/or reset the regulator excess gas flow device: • Turn the control knob to OFF position. • Turn off gas supply at least 18 inches) from the cooking grid surface when lighting your gas grill, call for repair service at the tank valve. • Disconnect regulator from gas valve orifice.
... for 1 second to use the grill 5. Do not smoke! Open gas supply for leaks. To purge air from your gas line and/or reset the regulator excess gas flow device: • Turn the control knob to OFF position. • Turn off gas supply at least 18 inches) from the cooking grid surface when lighting your gas grill, call for repair service at the tank valve. • Disconnect regulator from gas valve orifice.
Use and Care Guide
Page 15
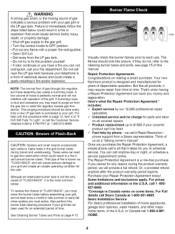
... hose or a bottle brush, run it in a soap and warm water solution. A small amount of Grill Interior Burning-off position. 2. Reconnect gas source and observe burner flame for a period of each gas valve orifice with manufacturer replacement part number found on the back wall of fire box with 2 screws. _.I WARNING The location of grease tray to accumulate and overflow out of your grill using the gas grill. Cover each burner...
... hose or a bottle brush, run it in a soap and warm water solution. A small amount of Grill Interior Burning-off position. 2. Reconnect gas source and observe burner flame for a period of each gas valve orifice with manufacturer replacement part number found on the back wall of fire box with 2 screws. _.I WARNING The location of grease tray to accumulate and overflow out of your grill using the gas grill. Cover each burner...
Use and Care Guide
Page 16
... 15. Clean any of the following conditions occur: I ",Jr,_To]_H_"] Grill won't light when the control knob is only one burner that gas valve orifices are correctly placed inside the ends of the burner tubes. /_ WARNING Spiders and insects can nest inside the burners of the grill and disrupt gas flow. Refer to electrode assembly. Clean wires and/or electrode by rubbing with...
... 15. Clean any of the following conditions occur: I ",Jr,_To]_H_"] Grill won't light when the control knob is only one burner that gas valve orifices are correctly placed inside the ends of the burner tubes. /_ WARNING Spiders and insects can nest inside the burners of the grill and disrupt gas flow. Refer to electrode assembly. Clean wires and/or electrode by rubbing with...
Use and Care Guide
Page 17
... grease into the grease tray. Since flare-ups impart a favorably,distinctive taste and color to have and open flame, they require direct heat. Just ignite the burners,lower the Lid, and operate grill on your grill with these instructions could result in serious bodily injury. Cooking Temperatures High setting: Only use this manner because they should be securely inserted in place when operating the Searing burner...
... grease into the grease tray. Since flare-ups impart a favorably,distinctive taste and color to have and open flame, they require direct heat. Just ignite the burners,lower the Lid, and operate grill on your grill with these instructions could result in serious bodily injury. Cooking Temperatures High setting: Only use this manner because they should be securely inserted in place when operating the Searing burner...
Use and Care Guide
Page 18
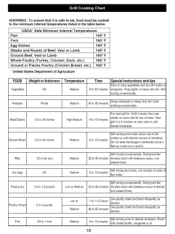
... Fish 3/4 to 1 inch Medium Grill turning four times. 2-4 minutes on each of Agriculture FOOD Vegetables Weight or thickness NA Temperature Medium Time 8 to 15 minutes with barbecue sauce, turn several times. Low or Medium Grill turning occassionally. Brush 8 to 20 minutes Special instructions and tips Slice or ... on each side or until desired amount of doneness. WARNING: To ensure that it is :safe to eat, fo_ must be cooked to desired doneness. Grill turning occassionally. Next grill 3 to 15 minutes Pre heat grill for 15-20 minutes then sear steaks on each side for two ...
... Fish 3/4 to 1 inch Medium Grill turning four times. 2-4 minutes on each of Agriculture FOOD Vegetables Weight or thickness NA Temperature Medium Time 8 to 15 minutes with barbecue sauce, turn several times. Low or Medium Grill turning occassionally. Brush 8 to 20 minutes Special instructions and tips Slice or ... on each side or until desired amount of doneness. WARNING: To ensure that it is :safe to eat, fo_ must be cooked to desired doneness. Grill turning occassionally. Next grill 3 to 15 minutes Pre heat grill for 15-20 minutes then sear steaks on each side for two ...

Use and Care Guide
Page 19
For Sears professional installation of a!! For the replacement pa_s, accessories and owner's manuals that you need to do4t-yourself. in your home -of home appliances and items iike garage door openers and water heaters. ® Regi_erred Trad; _mark _ _r Tra#emark _'_ Service f_ark oi Sea_s Bra_s _ Matca R,egisttada _'[M' _a_ca de...'_,M_ a_eu_ _e_e de _e_rs _rand_ LLC LLC B_a_ds, LLC major brand appliances, lawn and garden equipment, or heating and cooling systems, no ma_er who made it, no ma_er who so!d it! Your Home For expe_ troubleshooting and home solutions advice: For repair-
For Sears professional installation of a!! For the replacement pa_s, accessories and owner's manuals that you need to do4t-yourself. in your home -of home appliances and items iike garage door openers and water heaters. ® Regi_erred Trad; _mark _ _r Tra#emark _'_ Service f_ark oi Sea_s Bra_s _ Matca R,egisttada _'[M' _a_ca de...'_,M_ a_eu_ _e_e de _e_rs _rand_ LLC LLC B_a_ds, LLC major brand appliances, lawn and garden equipment, or heating and cooling systems, no ma_er who made it, no ma_er who so!d it! Your Home For expe_ troubleshooting and home solutions advice: For repair-


