Use and Care Guide
Page 2
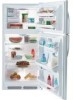
... not easily climb inside the refrigerator compartment. Number: _ Purchase Date: N: TABLE OF CONTENTS NI Welcome 2 i_ Safety Instructions 2-3 _, Warranty 3 Protection Agreements 4 tnstallationoolncludes connecting optional Ice Maker To Water Supply 5=6 Door Removal & Reversal 7-8 Features At A Glance 9 Temperature Controls Looking Inside Ice Service 10 11-13 14 Food Storage & Energy Saving Tips ... 15 Normal Operating Sounds & Sights .... 16 Care & Cleaning Before You Call 17o18 19 Please Read AH instructions Before Using This Refrigerator. FOR YOUR...
... not easily climb inside the refrigerator compartment. Number: _ Purchase Date: N: TABLE OF CONTENTS NI Welcome 2 i_ Safety Instructions 2-3 _, Warranty 3 Protection Agreements 4 tnstallationoolncludes connecting optional Ice Maker To Water Supply 5=6 Door Removal & Reversal 7-8 Features At A Glance 9 Temperature Controls Looking Inside Ice Service 10 11-13 14 Food Storage & Energy Saving Tips ... 15 Normal Operating Sounds & Sights .... 16 Care & Cleaning Before You Call 17o18 19 Please Read AH instructions Before Using This Refrigerator. FOR YOUR...
Use and Care Guide
Page 3
... of refrigerant, connecting tubing, and compressor), free of charge, if defective in material or workmanship. 30 DAY FULL WARRANTY ON WATER FILTER CARTRIDGE (if equipped) For thirty days from cooling, but does not disconnect the power to the instructions supplied with it, Sears will replace the refrigerator water filter cartridge if it , Sears will repair this refrigerator is operated and maintained according to the light bulbs and other rights which are used for storage...
... of refrigerant, connecting tubing, and compressor), free of charge, if defective in material or workmanship. 30 DAY FULL WARRANTY ON WATER FILTER CARTRIDGE (if equipped) For thirty days from cooling, but does not disconnect the power to the instructions supplied with it, Sears will replace the refrigerator water filter cartridge if it , Sears will repair this refrigerator is operated and maintained according to the light bulbs and other rights which are used for storage...
Use and Care Guide
Page 4
... can save you an outstanding service program, affordably priced. Sears Installation Service For Sears professional installation of your covered product if four or more information about concerning Sears Canada Maintenance Agreements, call 1-800-361-6665. But like garage door openers, water heaters, and other major home items, in -home repair. • Even if you don't need repairs, provides an annual Preventive...
... can save you an outstanding service program, affordably priced. Sears Installation Service For Sears professional installation of your covered product if four or more information about concerning Sears Canada Maintenance Agreements, call 1-800-361-6665. But like garage door openers, water heaters, and other major home items, in -home repair. • Even if you don't need repairs, provides an annual Preventive...
Use and Care Guide
Page 5
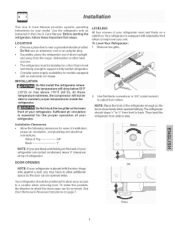
... adapter pHug, LEVEMNG All four corners of your refrigerator must be reversed, See Door Removal & Reversal Instructions on the lower front of your refrigerator. space so the door can be installed on the back of your model Use the refrigerator onUy as instructed in which the doors open can be able to a!low additiona! This Use & Care ManuaU provides specific operating instructions for your refrigerator (air-cooled condenser, leave 3" dea rance at top of refrigerator.
... adapter pHug, LEVEMNG All four corners of your refrigerator must be reversed, See Door Removal & Reversal Instructions on the lower front of your refrigerator. space so the door can be installed on the back of your model Use the refrigerator onUy as instructed in which the doors open can be able to a!low additiona! This Use & Care ManuaU provides specific operating instructions for your refrigerator (air-cooled condenser, leave 3" dea rance at top of refrigerator.

Use and Care Guide
Page 6
... before connecting a water supply line to begin producing ice, Air in areas where temperatures fall below freezing. - Manufacturer will not be responsible for the ice maker to the refrigerator. DO NOT install water supply tubing in new plumbing lines may cause ice to electrical power source, 10, To turn with water pressure between 20 and 120 psi, A water supply line made of ¼ inch (6,4 mm) OD, copper tubing or braided water line, To determine the length of copper tubing needed...
... before connecting a water supply line to begin producing ice, Air in areas where temperatures fall below freezing. - Manufacturer will not be responsible for the ice maker to the refrigerator. DO NOT install water supply tubing in new plumbing lines may cause ice to electrical power source, 10, To turn with water pressure between 20 and 120 psi, A water supply line made of ¼ inch (6,4 mm) OD, copper tubing or braided water line, To determine the length of copper tubing needed...
Use and Care Guide
Page 7
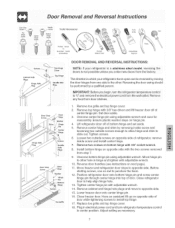
... your refrigerator doors open can be performed by removing inside screw and install center hinge. 7. Close refrigerator door to opposite side. 15. Have an assistant lift up on next page#. Adjust setting as necessary. Remove top hinge with adjustable wrench. 1O. Reverse door handles, see instructions on opposite side of door while tightening screws to "0" and remove the electrical power cord from step 7. 9. Tighten center hinge punwith adjustable wrench 14. Close freezer door. Plug in hinge and tighten with 3/8" hex driver...
... your refrigerator doors open can be performed by removing inside screw and install center hinge. 7. Close refrigerator door to opposite side. 15. Have an assistant lift up on next page#. Adjust setting as necessary. Remove top hinge with adjustable wrench. 1O. Reverse door handles, see instructions on opposite side of door while tightening screws to "0" and remove the electrical power cord from step 7. 9. Tighten center hinge punwith adjustable wrench 14. Close freezer door. Plug in hinge and tighten with 3/8" hex driver...

Use and Care Guide
Page 8
... dovetail button, 3, Remove screw and dovetail button and install on opposite side, Use rubbing alcohol to remove any adhesive residue from old trim lock locations, t Dovetai! TO ATTACH TRIM: 1. On these models, only the hinges will need to be easier to reverse while doors are off,) 1, Remove two screws attaching handle to top of refrigerator door, 2, Swing top of handle away from door and slide handle down and off ,, 1. Insert new adhesive...
... dovetail button, 3, Remove screw and dovetail button and install on opposite side, Use rubbing alcohol to remove any adhesive residue from old trim lock locations, t Dovetai! TO ATTACH TRIM: 1. On these models, only the hinges will need to be easier to reverse while doors are off,) 1, Remove two screws attaching handle to top of refrigerator door, 2, Swing top of handle away from door and slide handle down and off ,, 1. Insert new adhesive...

Use and Care Guide
Page 9
Freezer She(f ...... Freezer Contro( Refrigerator Contro) Specia( )tern Ful( She(f Crisper //- Fixed Door Bin _Door Rack Dairy Door Ta() Bott(e Retainer Snugger N Door Bin Fixed Door Bin Door Rack Features may vary according to model
Freezer She(f ...... Freezer Contro( Refrigerator Contro) Specia( )tern Ful( She(f Crisper //- Fixed Door Bin _Door Rack Dairy Door Ta() Bott(e Retainer Snugger N Door Bin Fixed Door Bin Door Rack Features may vary according to model
Use and Care Guide
Page 10
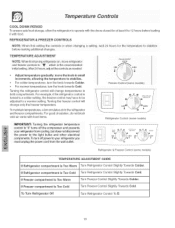
... temperature, To maintain temperatures, a fan circulates air in small increments, atlowing the temperature to the light bulbs and other electrical components.To turn the knob towards Cold, Turning the refrigerator control will change temperatures in both compartments, For exam pie, if the refrigerator control is the recommended initial setting, After 24 hours, adjust the controls as needed. I c_d_,coutd I c_do, Refrigerator & Freezer Control (some models) % cou,t _ o-,....o.... ;...... o For colder temperatures, turn the knob towards Colder, o For warmer temperatures, turn off power...
... temperature, To maintain temperatures, a fan circulates air in small increments, atlowing the temperature to the light bulbs and other electrical components.To turn the knob towards Cold, Turning the refrigerator control will change temperatures in both compartments, For exam pie, if the refrigerator control is the recommended initial setting, After 24 hours, adjust the controls as needed. I c_d_,coutd I c_do, Refrigerator & Freezer Control (some models) % cou,t _ o-,....o.... ;...... o For colder temperatures, turn the knob towards Colder, o For warmer temperatures, turn off power...
Use and Care Guide
Page 11
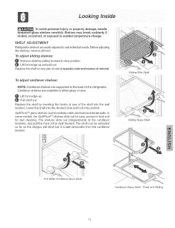
... models, the SpillProof rM shelves slide out for fast cleaning. Sliding Wire Shelf Sliding Glass Shelf Full Width Cantilever Glass Shelf Cantilever Glass Shelf - Lift front edge up and pull out. To adjust cantilever shelves: NOTE: cantilevei Shelves are supported at rear of removal. To adjust sliding shelves: 0 Remove shelf by inserting the hooks at the backo f the [drigeratorl Cantilever shelves are easily adjusted to food and for easy access to suit individual needs...
... models, the SpillProof rM shelves slide out for fast cleaning. Sliding Wire Shelf Sliding Glass Shelf Full Width Cantilever Glass Shelf Cantilever Glass Shelf - Lift front edge up and pull out. To adjust cantilever shelves: NOTE: cantilevei Shelves are supported at rear of removal. To adjust sliding shelves: 0 Remove shelf by inserting the hooks at the backo f the [drigeratorl Cantilever shelves are easily adjusted to food and for easy access to suit individual needs...
Use and Care Guide
Page 12
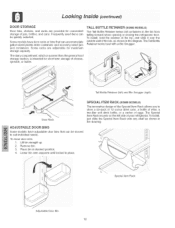
... your refrigerator. Remove bin. 3. Some racks are provided for convenient storage of eggs. To install, just slide the Special item Rack onto any shelf as shown in the bin from faNNingforward when opening or dosing the refrigerator door. Special item Rack N Adjustable Door Bin 12 The Special item Rack mounts on the left side of cheese, spreads, or butter. SPECIAL ITEM RACK (SOME MODELS...
... your refrigerator. Remove bin. 3. Some racks are provided for convenient storage of eggs. To install, just slide the Special item Rack onto any shelf as shown in the bin from faNNingforward when opening or dosing the refrigerator door. Special item Rack N Adjustable Door Bin 12 The Special item Rack mounts on the left side of cheese, spreads, or butter. SPECIAL ITEM RACK (SOME MODELS...
Use and Care Guide
Page 13
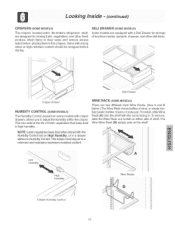
...install, slide Wine Rack (A} onto the shelf with the curve facing in, To remove, slide the Wine Rack out, Install on either side of shelf, The Wire Wine Rack (B} simply sets on some modeUswith crisper drawers, allows you to adjust the humidity within the crisper..., Deli Drawer Crisper Drawer HUMIDITY CONTROL (SOME MODELS) The Humidity Control present on the shelfi Low Humidity ./ j i¸ Wine Racks Crisper Humidity Control 13 WINE RACK (SOME MODELS) There are equipped with the Humidity Control set On High Humidity, o[ in a drawer without a Humidity Control This keeps incoming air to ...
...install, slide Wine Rack (A} onto the shelf with the curve facing in, To remove, slide the Wine Rack out, Install on either side of shelf, The Wire Wine Rack (B} simply sets on some modeUswith crisper drawers, allows you to adjust the humidity within the crisper..., Deli Drawer Crisper Drawer HUMIDITY CONTROL (SOME MODELS) The Humidity Control present on the shelfi Low Humidity ./ j i¸ Wine Racks Crisper Humidity Control 13 WINE RACK (SOME MODELS) There are equipped with the Humidity Control set On High Humidity, o[ in a drawer without a Humidity Control This keeps incoming air to ...
Use and Care Guide
Page 14
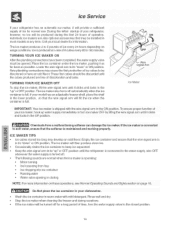
... ice makers are free of 8 cubes every 80 to the closed position, 14 Piace the ice contauner under the ice maker, pushing t as far back as possibie. chemicals from tray * into ice container Running water Water valve opening or closing Do NotplacetheiceContaineinr yourdiehwasherl * Wash the ice container in warm water with mild detergent, Rinse well and dry, Stop the ice maker when cleaning the freezer and during the firs1 24 hours ol operation. ice Service...
... ice makers are free of 8 cubes every 80 to the closed position, 14 Piace the ice contauner under the ice maker, pushing t as far back as possibie. chemicals from tray * into ice container Running water Water valve opening or closing Do NotplacetheiceContaineinr yourdiehwasherl * Wash the ice container in warm water with mild detergent, Rinse well and dry, Stop the ice maker when cleaning the freezer and during the firs1 24 hours ol operation. ice Service...
Use and Care Guide
Page 15
... refrigerator run more efficiently, See the Care and Cleaning Chart on page 17, o Do not overcrowd the refrigerator or block cold air vents, Doing so causes the refrigerator to run longer and use more energy, o Cover foods and wipe containers dry before placing them in the refrigerator, This cuts down on moisture build-u p inside the unit, o Organize the refrigerator to reduce door openings, Remove as many items as needed...
... refrigerator run more efficiently, See the Care and Cleaning Chart on page 17, o Do not overcrowd the refrigerator or block cold air vents, Doing so causes the refrigerator to run longer and use more energy, o Cover foods and wipe containers dry before placing them in the refrigerator, This cuts down on moisture build-u p inside the unit, o Organize the refrigerator to reduce door openings, Remove as many items as needed...
Use and Care Guide
Page 16
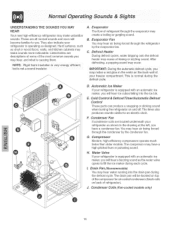
... evaporator may have a condenser fan. may hear water running into the ice bin. The timer also produces sounds similar to Drain Pan (Nonremovable) You may notice a red giow in the drawing at the left, you will be located on top of your freezer compartment. -[hi s is n0[ma I during the defrost Cycle, Do Automatic ice Maker if your refrigerator as the water valve opens to fill the ice maker during the defrost...
... evaporator may have a condenser fan. may hear water running into the ice bin. The timer also produces sounds similar to Drain Pan (Nonremovable) You may notice a red giow in the drawing at the left, you will be located on top of your freezer compartment. -[hi s is n0[ma I during the defrost Cycle, Do Automatic ice Maker if your refrigerator as the water valve opens to fill the ice maker during the defrost...

Use and Care Guide
Page 17
... in 1 quart of compressor at most home improvement or major department stores. • Condenser Cleaning No need to move the refrigerator beyond the pJumbing connections. - Use a non-abrasive stainless steel cleaner. Part Interior/Door Liner Door Gaskets Drawers/Bins Glass Shelves Toe Grille Exterior and Handles Exterior and Handles (Stainless Steel Models Only) Condenser Coils (Fan-cooled models only) Condenser Coils (Air-cooled models only) Defrost Water Pan Care & Cleaning Table What To Use Tips and Precautions • Soap and water Use 2 tablespoons of...
... in 1 quart of compressor at most home improvement or major department stores. • Condenser Cleaning No need to move the refrigerator beyond the pJumbing connections. - Use a non-abrasive stainless steel cleaner. Part Interior/Door Liner Door Gaskets Drawers/Bins Glass Shelves Toe Grille Exterior and Handles Exterior and Handles (Stainless Steel Models Only) Condenser Coils (Fan-cooled models only) Condenser Coils (Air-cooled models only) Defrost Water Pan Care & Cleaning Table What To Use Tips and Precautions • Soap and water Use 2 tablespoons of...
Use and Care Guide
Page 18
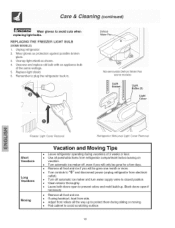
Clean interior thoroughly. Adjust front rollers all food and ice if you will be gone for a few days. wear gloves to avoid scratching surface. 18 Defrost Nonremovable Defrost Water Pan (some models) Light Bu,bs (2) Light Freezer Light Cover Removal Refrigerator Mid-Level Light Cover Removal Short Vacations Long Vacations Moving Vacation and Moving Tips Leave refrigerator operating during sliding or moving. Block doors open to "0" and disconnect power (unplug refrigerator from electrical outlet). Turn automatic ice maker off automatic ice maker and...
Clean interior thoroughly. Adjust front rollers all food and ice if you will be gone for a few days. wear gloves to avoid scratching surface. 18 Defrost Nonremovable Defrost Water Pan (some models) Light Bu,bs (2) Light Freezer Light Cover Removal Refrigerator Mid-Level Light Cover Removal Short Vacations Long Vacations Moving Vacation and Moving Tips Leave refrigerator operating during sliding or moving. Block doors open to "0" and disconnect power (unplug refrigerator from electrical outlet). Turn automatic ice maker off automatic ice maker and...

Use and Care Guide
Page 19
... of ice in refrigerator. Then check freezer temperatures and adjust as needed. • The cabinet is not level. • Floor is satisfactory. Automatic ice maker not working . To Property Instal! Freezer temperature too cold. Wait 20 minutes and check again. • Set freezer control to a warmer setting. Your Refrigerator See "Installation" Section On Pages 5=6 To Reverse The Doors "Door Removal & Reversal" Section On Pages 7=8 Common Occurrences Refrigerator does not run. Cabinet light not working . (some models) Before calling for service, review this...
... of ice in refrigerator. Then check freezer temperatures and adjust as needed. • The cabinet is not level. • Floor is satisfactory. Automatic ice maker not working . To Property Instal! Freezer temperature too cold. Wait 20 minutes and check again. • Set freezer control to a warmer setting. Your Refrigerator See "Installation" Section On Pages 5=6 To Reverse The Doors "Door Removal & Reversal" Section On Pages 7=8 Common Occurrences Refrigerator does not run. Cabinet light not working . (some models) Before calling for service, review this...


