
User Manual
Page 2
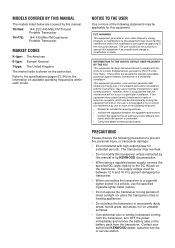
... by KENWOOD documentation. • When using a regulated power supply, connect the specified DC cable (option) to the DC IN jack on available operating frequencies within each model. The user could lose the authority to the specifications {pages 53, 54} for extended periods. INFORMATION TO THE DIGITAL DEVICE USER REQUIRED BY THE FCC This equipment has been tested and found to radio or television reception, which the receiver...
... by KENWOOD documentation. • When using a regulated power supply, connect the specified DC cable (option) to the DC IN jack on available operating frequencies within each model. The user could lose the authority to the specifications {pages 53, 54} for extended periods. INFORMATION TO THE DIGITAL DEVICE USER REQUIRED BY THE FCC This equipment has been tested and found to radio or television reception, which the receiver...
User Manual
Page 3
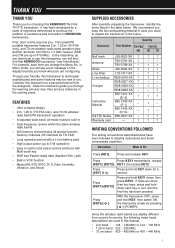
...-XX 1 Charger W08-0928-XX - THANK YOU THANK YOU Thank you for choosing this transceiver, you will see a text message on the display that KENWOOD is technically sophisticated and some features may be a personal tutorial from country to country, the following meter band descriptions are configuring. Press and release KEY. Quantity Accessory Part Number TH-F6A TH-F7E (K) (E) (T) Belt hook J29-0623-XX 1 Antenna T90...
...-XX 1 Charger W08-0928-XX - THANK YOU THANK YOU Thank you for choosing this transceiver, you will see a text message on the display that KENWOOD is technically sophisticated and some features may be a personal tutorial from country to country, the following meter band descriptions are configuring. Press and release KEY. Quantity Accessory Part Number TH-F6A TH-F7E (K) (E) (T) Belt hook J29-0623-XX 1 Antenna T90...

User Manual
Page 4
...STRAP 1 INSTALLING THE BELT CLIP 1 CHARGING THE Li-ion BATTERY PACK 2 CONNECTING TO A CIGARETTE LIGHTER SOCKET 2 CONNECTING TO A REGULATED POWER SUPPLY 2 CHAPTER 2 YOUR FIRST QSO FIRST QSO 3 CHAPTER 3 GETTING ACQUAINTED KEYS AND CONTROLS 4 DISPLAY 5 BASIC OPERATION SWITCHING POWER ON/ OFF 6 ADJUSTING VOLUME 6 ADJUSTING SQUELCH 6 SELECTING A BAND 6 MULTI-SCROLL KEY 6 TRANSMITTING 7 Selecting Output Power 7 SELECTING A FREQUENCY 7 VFO mode 7 MHz mode 7 Direct Frequency Entry 7 CHAPTER 4 MENU SETUP WHAT IS A MENU 9 MENU ACCESS 9 SELECTING A MENU LANGUAGE 9 MENU FUNCTION LIST...
...STRAP 1 INSTALLING THE BELT CLIP 1 CHARGING THE Li-ion BATTERY PACK 2 CONNECTING TO A CIGARETTE LIGHTER SOCKET 2 CONNECTING TO A REGULATED POWER SUPPLY 2 CHAPTER 2 YOUR FIRST QSO FIRST QSO 3 CHAPTER 3 GETTING ACQUAINTED KEYS AND CONTROLS 4 DISPLAY 5 BASIC OPERATION SWITCHING POWER ON/ OFF 6 ADJUSTING VOLUME 6 ADJUSTING SQUELCH 6 SELECTING A BAND 6 MULTI-SCROLL KEY 6 TRANSMITTING 7 Selecting Output Power 7 SELECTING A FREQUENCY 7 VFO mode 7 MHz mode 7 Direct Frequency Entry 7 CHAPTER 4 MENU SETUP WHAT IS A MENU 9 MENU ACCESS 9 SELECTING A MENU LANGUAGE 9 MENU FUNCTION LIST...
User Manual
Page 5
... PERIPHERALS SP/MIC JACK 45 SELECTING SP/MIC JACK FUNCTION 45 SP/MIC 45 TNC 45 PC 46 CHAPTER 15 TROUBLESHOOTING GENERAL INFORMATION 47 SERVICE 47 SERVICE NOTE 47 CLEANING 47 BACKUP BATTERY 47 TROUBLESHOOTING 48 MICROPROCESSOR RESET 50 INITIAL SETTINGS 50 VFO RESET 50 MENU RESET 50 FULL RESET 50 PERFORMING RESET 50 OPERATION NOTICES 51 OPERATING VOLTAGE 51 TUNING IN SSB/ CW MODE 51 RECEIVING IN AM BAND 51 RECEIVING SIGNALS IN CITIES...
... PERIPHERALS SP/MIC JACK 45 SELECTING SP/MIC JACK FUNCTION 45 SP/MIC 45 TNC 45 PC 46 CHAPTER 15 TROUBLESHOOTING GENERAL INFORMATION 47 SERVICE 47 SERVICE NOTE 47 CLEANING 47 BACKUP BATTERY 47 TROUBLESHOOTING 48 MICROPROCESSOR RESET 50 INITIAL SETTINGS 50 VFO RESET 50 MENU RESET 50 FULL RESET 50 PERFORMING RESET 50 OPERATION NOTICES 51 OPERATING VOLTAGE 51 TUNING IN SSB/ CW MODE 51 RECEIVING IN AM BAND 51 RECEIVING SIGNALS IN CITIES...

User Manual
Page 7
... completes. CONNECTING TO A REGULATED POWER SUPPLY To connect the transceiver to an appropriate regulated power supply, use an optional PG-2W DC cable. 1 Confirm that the transceiver power is OFF. • While charging the battery pack, leave the transceiver power OFF. 2 Insert the charger plug into an AC wall outlet. • Charging starts and 2 LEDs on the DC cable to the DC IN jack of both...
... completes. CONNECTING TO A REGULATED POWER SUPPLY To connect the transceiver to an appropriate regulated power supply, use an optional PG-2W DC cable. 1 Confirm that the transceiver power is OFF. • While charging the battery pack, leave the transceiver power OFF. 2 Insert the charger plug into an AC wall outlet. • Charging starts and 2 LEDs on the DC cable to the DC IN jack of both...

User Manual
Page 11
... A BAND By default, two frequencies are displayed on top is turned OFF. These keys change the frequencies, memory channels, and other indicators. 2 To switch the transceiver OFF, press [ ] (POWER) again. • When you are present. In Menu mode, you press [A/B], the "s" icon moves, indicating which the background noise is just eliminated when no signals are not receiving a signal, press and hold [MONI] to unmute the speaker, then adjust...
... A BAND By default, two frequencies are displayed on top is turned OFF. These keys change the frequencies, memory channels, and other indicators. 2 To switch the transceiver OFF, press [ ] (POWER) again. • When you are present. In Menu mode, you press [A/B], the "s" icon moves, indicating which the background noise is just eliminated when no signals are not receiving a signal, press and hold [MONI] to unmute the speaker, then adjust...

User Manual
Page 12
... control or [ ]/ [ ]. s Direct Frequency Entry In addition to turn the Tuning control or press [ ]/ [ ], there is another way of the transmission coverage, a high pitched error beep sounds. 3 GETTING ACQUAINTED s MHz Mode If the desired operating frequency is far away from the current frequency, it is quicker to use the MHz tuning mode. x When you finish speaking, release the PTT switch. Or, press [ ]/ [ ] to change the output power...
... control or [ ]/ [ ]. s Direct Frequency Entry In addition to turn the Tuning control or press [ ]/ [ ], there is another way of the transmission coverage, a high pitched error beep sounds. 3 GETTING ACQUAINTED s MHz Mode If the desired operating frequency is far away from the current frequency, it is quicker to use the MHz tuning mode. x When you finish speaking, release the PTT switch. Or, press [ ]/ [ ] to change the output power...

User Manual
Page 14
... English. MENU SETUP WHAT IS A MENU? Function Scan resume method SCAN RESUME 1 TIME: Time-Operated mode CARRIER: Carrier-Operated mode SEEK: Seek and stop mode M.GRP LINK 2 Memory Group Link configuration MR METHOD 3 Memory Recall condition PROG VFO 4 Programmable VFO frequency range (A-band only) Selections Default Ref. Once familiar with a brief explanation of the currently selected Menu No. 4 Turn the Tuning control or press [ ]/ [ ] to select your needs without using many controls and switches. Many...
... English. MENU SETUP WHAT IS A MENU? Function Scan resume method SCAN RESUME 1 TIME: Time-Operated mode CARRIER: Carrier-Operated mode SEEK: Seek and stop mode M.GRP LINK 2 Memory Group Link configuration MR METHOD 3 Memory Recall condition PROG VFO 4 Programmable VFO frequency range (A-band only) Selections Default Ref. Once familiar with a brief explanation of the currently selected Menu No. 4 Turn the Tuning control or press [ ]/ [ ] to select your needs without using many controls and switches. Many...
User Manual
Page 17
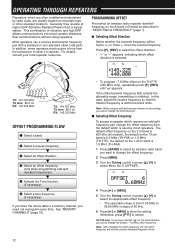
.... Note: After changing the offset frequency, the new offset frequency will be used by most repeaters. In addition, some repeaters must receive a tone from the default which is 5.0 MHz (TH-F6A) or 1.6 MHz (TH-F7E); s Selecting Offset Frequency To access a repeater which offset direction is 600 kHz (all models); See "MEMORY CHANNELS" {page 15}. • To program -7.6 MHz offset on the A-band or B-band as described in...
.... Note: After changing the offset frequency, the new offset frequency will be used by most repeaters. In addition, some repeaters must receive a tone from the default which is 5.0 MHz (TH-F6A) or 1.6 MHz (TH-F7E); s Selecting Offset Frequency To access a repeater which offset direction is 600 kHz (all models); See "MEMORY CHANNELS" {page 15}. • To program -7.6 MHz offset on the A-band or B-band as described in...

User Manual
Page 18
... that you select the frequency within the amateur radio band on the 2 m and 1.25 m (TH-F6A only) bands. Note: You cannot use the Tone and CTCSS/ DCS functions at the same time. Freq. (Hz) No. TH-F7E only: x To transmit a 1750 Hz tone, simply press [CALL] without pressing the PTT switch to transmit a 1750 Hz tone (default setting). However, pressing [REV] after...
... that you select the frequency within the amateur radio band on the 2 m and 1.25 m (TH-F6A only) bands. Note: You cannot use the Tone and CTCSS/ DCS functions at the same time. Freq. (Hz) No. TH-F7E only: x To transmit a 1750 Hz tone, simply press [CALL] without pressing the PTT switch to transmit a 1750 Hz tone (default setting). However, pressing [REV] after...

User Manual
Page 20
... DCS settings, etc.). 4 Press [F]. • A memory channel number appears and blinks. • " " indicates the current channel is empty; Store only one frequency to use as a simplex & repeater channel or two separate frequencies to the channel. The data listed below can quickly recall a programmed channel through simple operation. To confirm the transmit frequency, press [REV]. N/A: Cannot be the same as the original odd-split channel memory data. 15 Then you need...
... DCS settings, etc.). 4 Press [F]. • A memory channel number appears and blinks. • " " indicates the current channel is empty; Store only one frequency to use as a simplex & repeater channel or two separate frequencies to the channel. The data listed below can quickly recall a programmed channel through simple operation. To confirm the transmit frequency, press [REV]. N/A: Cannot be the same as the original odd-split channel memory data. 15 Then you need...

User Manual
Page 24
... may use the Call channel as a simplex or odd-split channel. The default Call channel frequencies are stored in the Call channel. Each Call channel can be on the same band as an oddsplit channel, select a receive frequency first. 3 Press [F], [CALL]. • The selected frequency and related data are 144.000 MHz for the 2 m band, 223.000 MHz for 1.25 m band (TH-F6A), 430.000 MHz (TH-F7E)/ 440...
... may use the Call channel as a simplex or odd-split channel. The default Call channel frequencies are stored in the Call channel. Each Call channel can be on the same band as an oddsplit channel, select a receive frequency first. 3 Press [F], [CALL]. • The selected frequency and related data are 144.000 MHz for the 2 m band, 223.000 MHz for 1.25 m band (TH-F6A), 430.000 MHz (TH-F7E)/ 440...

User Manual
Page 27
... VFO receive frequency is displayed in a bar-graph Memory Channel Scans the Memory channels and displays the signal strength of each frequency is outside of the Program Scan frequency range {page 23}, the transceiver scans the entire frequency range available for the 2 m band. (Refer to receiver VFO frequency range in VFO mode, 3 types of Scan, you can change the scan frequency direction by turning the Tuning control or press [ ]/ [ ]. Scan Type Purpose Band Scan Scans the entire band of the frequency you are operating and receiving...
... VFO receive frequency is displayed in a bar-graph Memory Channel Scans the Memory channels and displays the signal strength of each frequency is outside of the Program Scan frequency range {page 23}, the transceiver scans the entire frequency range available for the 2 m band. (Refer to receiver VFO frequency range in VFO mode, 3 types of Scan, you can change the scan frequency direction by turning the Tuning control or press [ ]/ [ ]. Scan Type Purpose Band Scan Scans the entire band of the frequency you are operating and receiving...

User Manual
Page 42
...]. 2 Turn the Tuning control or press [ ]/ [ ] to select Menu No. 19 (KEY BEEP). 3 Press [ ] or [MNU]. 4 Turn the Tuning control or press [ ]/ [ ] to select "OFF". 5 Press [ ] or [MNU] to detect a signal. Note: Use the PB-42L (Lithium battery pack) within the temperature range of the transceiver. It automatically activates when the squelch is closed and no key is linked to store the setting. Otherwise...
...]. 2 Turn the Tuning control or press [ ]/ [ ] to select Menu No. 19 (KEY BEEP). 3 Press [ ] or [MNU]. 4 Turn the Tuning control or press [ ]/ [ ] to select "OFF". 5 Press [ ] or [MNU] to detect a signal. Note: Use the PB-42L (Lithium battery pack) within the temperature range of the transceiver. It automatically activates when the squelch is closed and no key is linked to store the setting. Otherwise...

User Manual
Page 45
... received, an alarm sounds for A-band. TX INHIBIT You can also press [A/B] to alternate the A and B-band. 3 To return to store the setting. x You cannot program the 100 kHz or lower digits. SINGLE BAND OPERATION If you do not want to use the A and B-band receivers at the same time, you selected. 1 Select your desired frequency or memory channel. 2 Press [F], [ENT]. • " " icon appears. • When a signal...
... received, an alarm sounds for A-band. TX INHIBIT You can also press [A/B] to alternate the A and B-band. 3 To return to store the setting. x You cannot program the 100 kHz or lower digits. SINGLE BAND OPERATION If you do not want to use the A and B-band receivers at the same time, you selected. 1 Select your desired frequency or memory channel. 2 Press [F], [ENT]. • " " icon appears. • When a signal...

User Manual
Page 46
...) settings return to "L" level (Low Power) automatically. Note: x If TNC is selected for Menu No. 9 (SP/MIC JACK), the squelch status (REM/ SQ) changes based on either band is ON, you use the internal VOX function. You can adjust the volume balance level of the bands. 1 Press [BAL]. • The balance scale and blinking cursor appear. 2 Turn the Tuning control or press [ ]/ [ ] to transmit mode. 41...
...) settings return to "L" level (Low Power) automatically. Note: x If TNC is selected for Menu No. 9 (SP/MIC JACK), the squelch status (REM/ SQ) changes based on either band is ON, you use the internal VOX function. You can adjust the volume balance level of the bands. 1 Press [BAL]. • The balance scale and blinking cursor appear. 2 Turn the Tuning control or press [ ]/ [ ] to transmit mode. 41...

User Manual
Page 48
... to select the transmit frequency. 6 Turn a transceiver power OFF. 7 Press [PTT]+[MR]+[ ] (POWER). • The transceiver enters Remote Control mode. You will automatically enter transmit mode and send the corresponding command to the instruction manual of the transceiver will be controlled. On the portable transceiver: 1 Press [PTT]+[VFO]+[ ] (POWER). • The current secret access code number appears. To change the transmit/ receive frequency: [VFO] ¬ [ENT] ¬...
... to select the transmit frequency. 6 Turn a transceiver power OFF. 7 Press [PTT]+[MR]+[ ] (POWER). • The transceiver enters Remote Control mode. You will automatically enter transmit mode and send the corresponding command to the instruction manual of the transceiver will be controlled. On the portable transceiver: 1 Press [PTT]+[VFO]+[ ] (POWER). • The current secret access code number appears. To change the transmit/ receive frequency: [VFO] ¬ [ENT] ¬...

User Manual
Page 50
... settings. 6 Press [ ] (POWER) to turn the transceiver OFF. 7 Connect a peripheral to the SP/MIC jack. 8 Press [ ] (POWER) to transmit and receive 9600 bps packet signal. This option allows you plug the speaker microphone or headset into the SP/MIC jack, access Menu No. 9 and select "SP/MIC" (default). SP/MIC Function SP/MIC Peripheral Type Speaker microhone, headset, earphone, TNC without a squelch status support TNC TNC with a squelch status support PC PC with the memory channel control software for Menu...
... settings. 6 Press [ ] (POWER) to turn the transceiver OFF. 7 Connect a peripheral to the SP/MIC jack. 8 Press [ ] (POWER) to transmit and receive 9600 bps packet signal. This option allows you plug the speaker microphone or headset into the SP/MIC jack, access Menu No. 9 and select "SP/MIC" (default). SP/MIC Function SP/MIC Peripheral Type Speaker microhone, headset, earphone, TNC without a squelch status support TNC TNC with a squelch status support PC PC with the memory channel control software for Menu...

User Manual
Page 53
... control 1 The speaker for the open fuse. low to expand the frequency range. Problem Probable Cause Corrective Action Ref. b) Investigate the cause for the band you does not allow the frequency to incomplete programming. Tone Alert. The receiving sound volume is weak even if the signal is strong. 1 Attenuator function is too 5 Charge or replace the battery pack. " 1 Press [F] (1 s) to switch OFF Transceiver Lock. 2 Press [A/B]+[ ] (POWER) to exit Channel Display mode...
... control 1 The speaker for the open fuse. low to expand the frequency range. Problem Probable Cause Corrective Action Ref. b) Investigate the cause for the band you does not allow the frequency to incomplete programming. Tone Alert. The receiving sound volume is weak even if the signal is strong. 1 Attenuator function is too 5 Charge or replace the battery pack. " 1 Press [F] (1 s) to switch OFF Transceiver Lock. 2 Press [A/B]+[ ] (POWER) to exit Channel Display mode...

User Manual
Page 63
... Battery Pack Installing 1 Charging 2 Lock Function 38 Manual Dialing 31 Marine Channels, VHF 57 Memory Channel Groups 18 Group Link 24 Lockout 27 Naming a 17 Recall Mode 16 Transfer 18 Menu Access 9 Function List 9 Reset 50 Meter 5 MHz Mode 7 MHz Scan 23 Microphone PF Keys (optional) ... 38 Microprocessor Reset 50 Monitor 39 Narrow Band FM Operation ........ 39 Normal Scan 22 Odd-split Frequency 12, 15 Offset Programming 12 Programming Flow 12 Selecting, Direction 12 Selecting, Frequency 12 Operating...
... Battery Pack Installing 1 Charging 2 Lock Function 38 Manual Dialing 31 Marine Channels, VHF 57 Memory Channel Groups 18 Group Link 24 Lockout 27 Naming a 17 Recall Mode 16 Transfer 18 Menu Access 9 Function List 9 Reset 50 Meter 5 MHz Mode 7 MHz Scan 23 Microphone PF Keys (optional) ... 38 Microprocessor Reset 50 Monitor 39 Narrow Band FM Operation ........ 39 Normal Scan 22 Odd-split Frequency 12, 15 Offset Programming 12 Programming Flow 12 Selecting, Direction 12 Selecting, Frequency 12 Operating...


