Instruction Manual
Page 1
... back of the unit, in the space provided below. Refer to read through this instruction manual. Familiarity with installation and operation procedures will help you call upon your Kenwood dealer for information or service on the warranty card, and in the spaces designated on the product. GPS NAVIGATION SYSTEM DNX7120 MONITOR WITH DVD RECEIVER DDX712 DDX7032 INSTRUCTION MANUAL Take the time to the model and serial numbers whenever you...
... back of the unit, in the space provided below. Refer to read through this instruction manual. Familiarity with installation and operation procedures will help you call upon your Kenwood dealer for information or service on the warranty card, and in the spaces designated on the product. GPS NAVIGATION SYSTEM DNX7120 MONITOR WITH DVD RECEIVER DDX712 DDX7032 INSTRUCTION MANUAL Take the time to the model and serial numbers whenever you...
Instruction Manual
Page 2
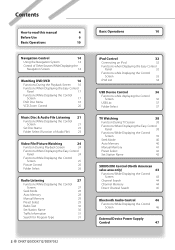
... Screen 17 DVD Disc Menu 18 VCD Zoom Control 20 Music Disc & Audio File Listening 21 Functions While Displaying the Control Screen 21 Set Disc Name 23 Folder Select (Function of Audio File) 23 Video File/Picture Watching 24 Function During Playback Screen 24 Functions When Displaying the Easy Control Panel 24 Functions While Displaying the Control Screen 25 Picture Control 26 Folder Select 26 Radio Listening 27 Functions While Displaying the Control Screen 27 Seek Mode 28 Auto Memory 28 Manual Memory 29 Preset Select 29 Radio Text 30 Set Station...
... Screen 17 DVD Disc Menu 18 VCD Zoom Control 20 Music Disc & Audio File Listening 21 Functions While Displaying the Control Screen 21 Set Disc Name 23 Folder Select (Function of Audio File) 23 Video File/Picture Watching 24 Function During Playback Screen 24 Functions When Displaying the Easy Control Panel 24 Functions While Displaying the Control Screen 25 Picture Control 26 Folder Select 26 Radio Listening 27 Functions While Displaying the Control Screen 27 Seek Mode 28 Auto Memory 28 Manual Memory 29 Preset Select 29 Radio Text 30 Set Station...
Instruction Manual
Page 3
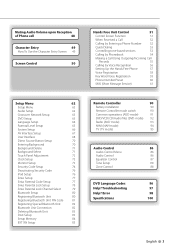
... 56 Setting Up the Hands Free Phone 57 Voice Registration 58 Key Word Voice Registration 59 Phone Number Preset 60 SMS (Short Message Service) 61 Remote Controller 90 Battery installation 90 Remote Controller mode switch 90 Common operations (AUD mode) 91 DVD/VCD/CD/Audio files (DVD mode) 92 Radio (AUD mode) 93 NAVI (NAVI mode) 94 TV (TV mode) 95 Audio Control 86 Audio Control Menu 86 Audio Control 86 Equalizer Control 87 Tone Setup 88 Zone Control 88 DVD Language Codes 96 Help? Error 98 Specifications 100 English 3 Troubleshooting 97 Help?
... 56 Setting Up the Hands Free Phone 57 Voice Registration 58 Key Word Voice Registration 59 Phone Number Preset 60 SMS (Short Message Service) 61 Remote Controller 90 Battery installation 90 Remote Controller mode switch 90 Common operations (AUD mode) 91 DVD/VCD/CD/Audio files (DVD mode) 92 Radio (AUD mode) 93 NAVI (NAVI mode) 94 TV (TV mode) 95 Audio Control 86 Audio Control Menu 86 Audio Control 86 Equalizer Control 87 Tone Setup 88 Zone Control 88 DVD Language Codes 96 Help? Error 98 Specifications 100 English 3 Troubleshooting 97 Help?
Instruction Manual
Page 6
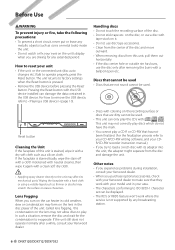
... USB device installed can damage the data contained in the disc player of this unit is not supported by any broadcasting station. 6 DNX7120/DDX712/DDX7032 How to reset your unit • If the unit or the connected unit (disc auto changer, etc.) fails to play a CD-R or CD-RW that are dirty cannot be used. • This unit can be displayed. • The RDS or RBDS feature won't work with its mechanical parts...
... USB device installed can damage the data contained in the disc player of this unit is not supported by any broadcasting station. 6 DNX7120/DDX712/DDX7032 How to reset your unit • If the unit or the connected unit (disc auto changer, etc.) fails to play a CD-R or CD-RW that are dirty cannot be used. • This unit can be displayed. • The RDS or RBDS feature won't work with its mechanical parts...
Instruction Manual
Page 7
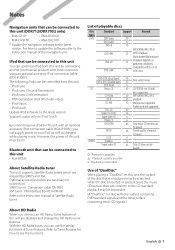
...) discs supported. English 7 By connecting your iPod as well as charge it while playing music. However, the power of this unit • KCA-BT200 About Satellite Radio tuner This unit supports Satellite Radio tuners which are necessary for how to use the similar functions of the unit are disabled and changed to the latest version. Optional accessories below are released by connecting an iPod (commercial product) with video) • iPod classic • iPod touch Update iPod software...
...) discs supported. English 7 By connecting your iPod as well as charge it while playing music. However, the power of this unit • KCA-BT200 About Satellite Radio tuner This unit supports Satellite Radio tuners which are necessary for how to use the similar functions of the unit are disabled and changed to the latest version. Optional accessories below are released by connecting an iPod (commercial product) with video) • iPod classic • iPod touch Update iPod software...

Instruction Manual
Page 8
... at the first setout is played. • Playable disc media CD-R/RW/ROM, DVD±R/RW • Playable disc file format ISO 9660 Level 1/2, Joliet, Romeo, Long file name. • Playable USB device USB mass storage class, iPod with KCA-iP300V • Playable USB device file system FAT16, FAT32 Although the audio files are complied with the standards listed above, the play maybe impossible depending on the...
... at the first setout is played. • Playable disc media CD-R/RW/ROM, DVD±R/RW • Playable disc file format ISO 9660 Level 1/2, Joliet, Romeo, Long file name. • Playable USB device USB mass storage class, iPod with KCA-iP300V • Playable USB device file system FAT16, FAT32 Although the audio files are complied with the standards listed above, the play maybe impossible depending on the...

Instruction Manual
Page 10
... the USB source is selected when a USB device is not connected, "No Device" is displayed. • When the playback is connected firmly. Removing the USB device Press on how to update the database, refer to cancel muting. You must update the database if you have replaced the audio files in the USB device. 10 DNX7120/DDX712/DDX7032 Playing a USB device When connecting a USB device, playback starts automatically. Basic Operations ED C Turns power ON/OFF Press the button to the navigation system screen...
... the USB source is selected when a USB device is not connected, "No Device" is displayed. • When the playback is connected firmly. Removing the USB device Press on how to update the database, refer to cancel muting. You must update the database if you have replaced the audio files in the USB device. 10 DNX7120/DDX712/DDX7032 Playing a USB device When connecting a USB device, playback starts automatically. Basic Operations ED C Turns power ON/OFF Press the button to the navigation system screen...

Instruction Manual
Page 11
... the source. Removing a disc Press (Eject) button. English 11 The display switches between Favorite Source Select screen and Full Source Select screen by touching the button. 4 Displays Source Control screen. 5 Displays the Audio Control Menu screen. (page 86) 6 Displays the SETUP Menu screen. (page 62) 7 Displays the external device control screen. w Displays the full source screen. ⁄ • For how to register the frequently used source buttons to display the source select screen. C Selecting a source Press it is not connected, [TEL] will not appear. A Playing a disc...
... the source. Removing a disc Press (Eject) button. English 11 The display switches between Favorite Source Select screen and Full Source Select screen by touching the button. 4 Displays Source Control screen. 5 Displays the Audio Control Menu screen. (page 86) 6 Displays the SETUP Menu screen. (page 62) 7 Displays the external device control screen. w Displays the full source screen. ⁄ • For how to register the frequently used source buttons to display the source select screen. C Selecting a source Press it is not connected, [TEL] will not appear. A Playing a disc...

Instruction Manual
Page 14
...During Audio file, Video file, or Picture file play : Selects music. TEL: Displays the Hands Free screen. (page 51) EXT SW: Displays the external device control screen. During CD play : Selects a file. 4 Stops playing. Using the Navigation System Displays the navigation system screen and makes the navigation function available. 1 Displaying the navigation screen Control of Other Sources While Displaying the Navigation Screen Selected source can set the navigation system function when nothing else is selected: 2 Setting the navigation system function Touch the navigation system button...
...During Audio file, Video file, or Picture file play : Selects music. TEL: Displays the Hands Free screen. (page 51) EXT SW: Displays the external device control screen. During CD play : Selects a file. 4 Stops playing. Using the Navigation System Displays the navigation system screen and makes the navigation function available. 1 Displaying the navigation screen Control of Other Sources While Displaying the Navigation Screen Selected source can set the navigation system function when nothing else is selected: 2 Setting the navigation system function Touch the navigation system button...

Instruction Manual
Page 27
... station by program type. Displays the external device control screen. See (page 30). i Lists and selects memorized station. See (page 29). For memory of broadcasting stations, refer to P6 buttons appear, you can recall the stations on memory. See (page 30). ; Use the (page 28) to the station. y Sets a name to change the frequency switching. 9 Switches the button display. See (page 31). Radio Listening Various control screens appear in the Tuner Source mode. • For the basic method of receiver button operations...
... station by program type. Displays the external device control screen. See (page 30). i Lists and selects memorized station. See (page 29). For memory of broadcasting stations, refer to P6 buttons appear, you can recall the stations on memory. See (page 30). ; Use the (page 28) to the station. y Sets a name to change the frequency switching. 9 Switches the button display. See (page 31). Radio Listening Various control screens appear in the Tuner Source mode. • For the basic method of receiver button operations...
Instruction Manual
Page 65
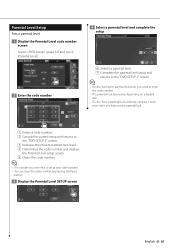
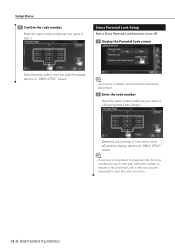
... code number screen See to (page 63) and touch [Parental Level]. 2 Enter the code number 2 1 3 4 5 1 Enters a code number. 2 Cancels the current setup and returns to the "DVD SETUP 2" screen. 3 Indicates the present parental lock level. 4 Determines the code number and displays the Parental Level setup screen. 5 Clears the code number. ⁄ • The number you enter first is set as your code number. • You can clear the code number by pressing the Reset button. 3 Display the Parental Level SETUP screen...
... code number screen See to (page 63) and touch [Parental Level]. 2 Enter the code number 2 1 3 4 5 1 Enters a code number. 2 Cancels the current setup and returns to the "DVD SETUP 2" screen. 3 Indicates the present parental lock level. 4 Determines the code number and displays the Parental Level setup screen. 5 Clears the code number. ⁄ • The number you enter first is set as your code number. • You can clear the code number by pressing the Reset button. 3 Display the Parental Level SETUP screen...

Instruction Manual
Page 67
... INPUT port, this image is connected via the AV INPUT port is switched.) 5 Returns to the "SETUP Menu" screen. 6 7 8 9 10 11 6 Returns to the "AV Interface 1" screen. 7 Moves to the "AV Interface 3" screen. 8 Selects an AV source to be output at the AV OUTPUT port. ( "AV-IN") 9 Sets a method to switch to the rear view camera video display. ( "Off") "On": Switches to the rear view camera video display when engaging the shift knob of car to "Reverse" and then pressing the [NAV] button...
... INPUT port, this image is connected via the AV INPUT port is switched.) 5 Returns to the "SETUP Menu" screen. 6 7 8 9 10 11 6 Returns to the "AV Interface 1" screen. 7 Moves to the "AV Interface 3" screen. 8 Selects an AV source to be output at the AV OUTPUT port. ( "AV-IN") 9 Sets a method to switch to the rear view camera video display. ( "Off") "On": Switches to the rear view camera video display when engaging the shift knob of car to "Reverse" and then pressing the [NAV] button...

Instruction Manual
Page 68
... USB suspend mode, and then remove the USB device. y Sets the voice guidance method of the iPod in the favorite source screen. Setup Menu t Mutes the volume during voice guidance of background images. User Interface You can setup user interface parameters. 1 Display the User Interface screen Touch Menu" screen (page 62). "Off" : Voice guidance is On. "Memory": Enables entering of the navigation system. ( "On") When turned "On", the volume level drops for voice guidance. "Delete": Enables deleting of background images...
... USB suspend mode, and then remove the USB device. y Sets the voice guidance method of the iPod in the favorite source screen. Setup Menu t Mutes the volume during voice guidance of background images. User Interface You can setup user interface parameters. 1 Display the User Interface screen Touch Menu" screen (page 62). "Off" : Voice guidance is On. "Memory": Enables entering of the navigation system. ( "On") When turned "On", the volume level drops for voice guidance. "Delete": Enables deleting of background images...

Instruction Manual
Page 69
.... i Sets whether to display animation when switching screens. ( "On") o Sets whether to the "SETUP Menu" screen. e Moves to display the target when touching the panel. "Manual": Information is displayed for 5 seconds when updated. "Manual": Information is displayed when you touch on the screen. Sets whether to the "User Interface 4" screen. a Returns to the "SETUP Menu" screen. 16 w Returns to the "User Interface 3" screen. "Manual": Information is displayed when you touch on the screen. 9 Sets an on -screen display of the video playback screen. ( "Auto") "Auto...
.... i Sets whether to display animation when switching screens. ( "On") o Sets whether to the "SETUP Menu" screen. e Moves to display the target when touching the panel. "Manual": Information is displayed for 5 seconds when updated. "Manual": Information is displayed when you touch on the screen. Sets whether to the "User Interface 4" screen. a Returns to the "SETUP Menu" screen. 16 w Returns to the "User Interface 3" screen. "Manual": Information is displayed when you touch on the screen. 9 Sets an on -screen display of the video playback screen. ( "Auto") "Auto...

Instruction Manual
Page 70
... image specifications. • Up to load 2 Display the User Interface screen Touch Menu" screen (page 62). Setup Menu Direct Source Button Setup Registers the source displayed in the "SETUP 3 Display the Background Memory screen See (page 68). 2 Select a preset button 2 1 3 3 4 1 Selects the preset button to register. 2 Selects the source to register. 3 Scrolls the source button list. 4 Returns to the "User Interface 4" screen. 3 Select a source to register 4 Complete the registration 70 DNX7120/DDX712/DDX7032 4 Select the image to load 1 2 3 4 2 5 1 Lists the files...
... image specifications. • Up to load 2 Display the User Interface screen Touch Menu" screen (page 62). Setup Menu Direct Source Button Setup Registers the source displayed in the "SETUP 3 Display the Background Memory screen See (page 68). 2 Select a preset button 2 1 3 3 4 1 Selects the preset button to register. 2 Selects the source to register. 3 Scrolls the source button list. 4 Returns to the "User Interface 4" screen. 3 Select a source to register 4 Complete the registration 70 DNX7120/DDX712/DDX7032 4 Select the image to load 1 2 3 4 2 5 1 Lists the files...
Instruction Manual
Page 72
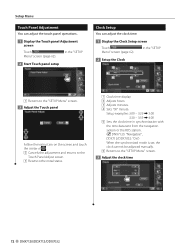
... touch panel operations. 1 Display the Touch panel Adjustment screen Touch Menu" screen (page 62). in synchronization with the time data sent from the navigation system or the RDS station. ( DNX7120: "Navigatoin", DDX712/DDX7032: "On") When the synchronized mode is set, the clock cannot be adjusted manually. 6 Returns to the initial status. Setup examples: 3:00 - 3:29 \ 3:00 3:30 - 3:59 \ 4:00 5 Sets the clock time in the "SETUP 2 Setup the Clock 2 3 1 2 3 4 5 6 1 Clock time display 2 Adjusts hours. 3 Adjusts minutes. 4 Sets "00" minute. Setup Menu Touch Panel Adjustment...
... touch panel operations. 1 Display the Touch panel Adjustment screen Touch Menu" screen (page 62). in synchronization with the time data sent from the navigation system or the RDS station. ( DNX7120: "Navigatoin", DDX712/DDX7032: "On") When the synchronized mode is set, the clock cannot be adjusted manually. 6 Returns to the initial status. Setup examples: 3:00 - 3:29 \ 3:00 3:30 - 3:59 \ 4:00 5 Sets the clock time in the "SETUP 2 Setup the Clock 2 3 1 2 3 4 5 6 1 Clock time display 2 Adjusts hours. 3 Adjusts minutes. 4 Sets "00" minute. Setup Menu Touch Panel Adjustment...
Instruction Manual
Page 74
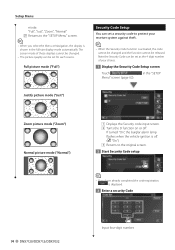
... in the "SETUP Justify picture mode ("Just") 1 2 Zoom picture mode ("Zoom") Normal picture mode ("Normal") 3 1 Displays the Security code input screen. 2 Turns the SI function on or off . ( "On") 3 Returns to the original screen. 2 Start Security Code setup ⁄ • If you select the Menu or Navigation, the display is displayed. 3 Enter a security Code 74 DNX7120/DDX712/DDX7032 Input four-digit number. Note the Security Code can set for each source. in the full-size display mode automatically. Setup Menu mode. "Full...
... in the "SETUP Justify picture mode ("Just") 1 2 Zoom picture mode ("Zoom") Normal picture mode ("Normal") 3 1 Displays the Security code input screen. 2 Turns the SI function on or off . ( "On") 3 Returns to the original screen. 2 Start Security Code setup ⁄ • If you select the Menu or Navigation, the display is displayed. 3 Enter a security Code 74 DNX7120/DDX712/DDX7032 Input four-digit number. Note the Security Code can set for each source. in the full-size display mode automatically. Setup Menu mode. "Full...
Instruction Manual
Page 78
... code, the code number you are requested to complete beforehand. 2 Enter the code number Enter the same code number as you input in this case, you input in . Sirius Parental Lock Setup Sets a Sirius Parental Lock function on or off. 1 Display the Parental Code screen Sirius Parental code is now set , and the display returns to "SIRIUS SETUP" screen. ⁄ • You need to input the code once more. 78 DNX7120/DDX712/DDX7032 Setup Menu 4 Confirm the code number Enter the same code number as Sirius Parental Code...
... code, the code number you are requested to complete beforehand. 2 Enter the code number Enter the same code number as you input in this case, you input in . Sirius Parental Lock Setup Sets a Sirius Parental Lock function on or off. 1 Display the Parental Code screen Sirius Parental code is now set , and the display returns to "SIRIUS SETUP" screen. ⁄ • You need to input the code once more. 78 DNX7120/DDX712/DDX7032 Setup Menu 4 Confirm the code number Enter the same code number as Sirius Parental Code...
Instruction Manual
Page 97
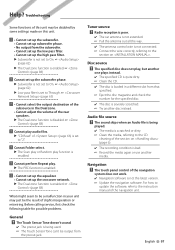
... the instruction manual of the subsource in a different slot from the preout jack. Cannot perform Repeat play , but another media. Audio file source ? Navigation ? Help? Radio reception is poor. ✔ The car antenna is not extended. ☞ Pull the antenna out all the way. ✔ The antenna control wire is not connected. ☞ Connect the wire correctly, referring to On. ☞ (page 62) ▲ The Dual zone function is...
... the instruction manual of the subsource in a different slot from the preout jack. Cannot perform Repeat play , but another media. Audio file source ? Navigation ? Help? Radio reception is poor. ✔ The car antenna is not extended. ☞ Pull the antenna out all the way. ✔ The antenna control wire is not connected. ☞ Connect the wire correctly, referring to On. ☞ (page 62) ▲ The Dual zone function is...

Instruction Manual
Page 98
... tot he section on the display. No Music: The connected USB device contains no USB device/iPod is upside down. ➡ Load the disc with the car chassis. ➡ Wire or insulate the speaker cord as a source although no playable audio file. Remove the USB device. Update your USB database: The USB device is malfunctioning. ➡ Eject the disc and try inserting it again. At such times this message will appear. ➡ Use the unit again after reducing the temperature...
... tot he section on the display. No Music: The connected USB device contains no USB device/iPod is upside down. ➡ Load the disc with the car chassis. ➡ Wire or insulate the speaker cord as a source although no playable audio file. Remove the USB device. Update your USB database: The USB device is malfunctioning. ➡ Eject the disc and try inserting it again. At such times this message will appear. ➡ Use the unit again after reducing the temperature...


