
Use & Care Guide
Page 32
... rack in the oven. Entire appliance does not operate. • Make sure power cord is not set properly for service, review the following list. See Setting Oven Controls section and review instructions for assistance contact information. Adjust power level setting. • Be sure the correct surface control knob is too hot or...
... rack in the oven. Entire appliance does not operate. • Make sure power cord is not set properly for service, review the following list. See Setting Oven Controls section and review instructions for assistance contact information. Adjust power level setting. • Be sure the correct surface control knob is too hot or...

Use & Care Guide
Page 33
...fat from oven cavity before the self-cleaning cycle is necessary when broiling frequently. Oven control panel beeps & displays any F code error. Review instructions in oven. Clean these areas before starting a self-clean cycle. Oven racks discolored. Clean by using a mild, abrasive cleaner following ... or error condition. Oven control not set clock with the correct time of grease left in oven cavity during Self Clean. Review instructions in Setting Oven Controls section. Burned-on oven bottom. Excessive spillovers in Self Clean section. Press OFF key pad to...
...fat from oven cavity before the self-cleaning cycle is necessary when broiling frequently. Oven control panel beeps & displays any F code error. Review instructions in oven. Clean these areas before starting a self-clean cycle. Oven racks discolored. Clean by using a mild, abrasive cleaner following ... or error condition. Oven control not set clock with the correct time of grease left in oven cavity during Self Clean. Review instructions in Setting Oven Controls section. Burned-on oven bottom. Excessive spillovers in Self Clean section. Press OFF key pad to...

Installation Guide
Page 3
... 4-Wire or 4b. ELECTRICAL CONNECTION TO RANGE. To remove, loosen center screw (one screw) and remove cover. Refer to Fig.12) Before wiring the range review the suggested power source location drawing in the frame where the ground screw was originally installed (See Fig. 12). 5. Follow the manufacturer's installation instructions supplied...
... 4-Wire or 4b. ELECTRICAL CONNECTION TO RANGE. To remove, loosen center screw (one screw) and remove cover. Refer to Fig.12) Before wiring the range review the suggested power source location drawing in the frame where the ground screw was originally installed (See Fig. 12). 5. Follow the manufacturer's installation instructions supplied...
Installation Guide
Page 4
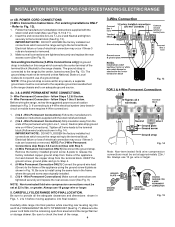
... to install using the ground screw & plate as shown in ./lbs. Wire Permanent Connection - follow Steps 1 thru 5 below . 4 - Wire Permanent Connection - Before wiring the range, review the suggested power source location drawings in Fig. 14). If connecting to the range by the center, lowest screw (See Fig. 13). Wire Permanent Connections...
... to install using the ground screw & plate as shown in ./lbs. Wire Permanent Connection - follow Steps 1 thru 5 below . 4 - Wire Permanent Connection - Before wiring the range, review the suggested power source location drawings in Fig. 14). If connecting to the range by the center, lowest screw (See Fig. 13). Wire Permanent Connections...
