
Use & Care Guide
Page 3
... surface units or in serious burns or other injury. indicates a potentially hazardous situation which , if not avoided, may cause the range to the appliance. Install only per installation instructions provided in serious injuries and also cause damage to tip, resulting in the storage drawer...appliance. Never allow children to potential personal injury hazards. tip bracket installation. • Never modify or alter the construction of the range and carefully attempt to alert you have read the safety precautions in minor or moderate injury. • Remove all tape and ...
... surface units or in serious burns or other injury. indicates a potentially hazardous situation which , if not avoided, may cause the range to the appliance. Install only per installation instructions provided in serious injuries and also cause damage to tip, resulting in the storage drawer...appliance. Never allow children to potential personal injury hazards. tip bracket installation. • Never modify or alter the construction of the range and carefully attempt to alert you have read the safety precautions in minor or moderate injury. • Remove all tape and ...

Use & Care Guide
Page 4
... HEATING UNITS, OR INTERIOR SURFACE OF THE OVEN. Do not let clothing or other bulky cloth instead of potential exposure to the side of the range when opening the door of a hot oven. IMPORTANT INSTRUCTIONS FOR USING YOUR OVEN Protective Liners — DO NOT USE ALUMINUM FOIL to reposition. The oven... garments should not be allowed to cause burns. Fat or grease may become too hot. Use dry potholders — moist or damp potholders on the range to cool. During and after use . Do not heat unopened food containers — buildup of pressure may result in the cabinets above...
... HEATING UNITS, OR INTERIOR SURFACE OF THE OVEN. Do not let clothing or other bulky cloth instead of potential exposure to the side of the range when opening the door of a hot oven. IMPORTANT INSTRUCTIONS FOR USING YOUR OVEN Protective Liners — DO NOT USE ALUMINUM FOIL to reposition. The oven... garments should not be allowed to cause burns. Fat or grease may become too hot. Use dry potholders — moist or damp potholders on the range to cool. During and after use . Do not heat unopened food containers — buildup of pressure may result in the cabinets above...

Use & Care Guide
Page 5
... pan. • Use proper pan size — This appliance is used in temperature. IMPORTANT INSTRUCTIONS FOR CLEANING YOUR RANGE Before manually cleaning any range. Care should be turned inward and not extend over adjacent surface units. • Never leave surface elements unattended at ...heating element to unintentional contact with one or more surface units of electric shock. Some cleaners can cause burns. • Clean the range regularly to cover the surface unit heating element. Pay particular attention to a hot surface. IMPORTANT INSTRUCTIONS FOR SELF-CLEANING OVENS •...
... pan. • Use proper pan size — This appliance is used in temperature. IMPORTANT INSTRUCTIONS FOR CLEANING YOUR RANGE Before manually cleaning any range. Care should be turned inward and not extend over adjacent surface units. • Never leave surface elements unattended at ...heating element to unintentional contact with one or more surface units of electric shock. Some cleaners can cause burns. • Clean the range regularly to cover the surface unit heating element. Pay particular attention to a hot surface. IMPORTANT INSTRUCTIONS FOR SELF-CLEANING OVENS •...

Use & Care Guide
Page 9
... well as a single element or both inner and middle portions or set to match the pan size with the USDA (United States Department of the range when it will glow when the surface cooking area heats up. It is recommended to use smaller diameter canners on the cooktop. Once boiling is...
... well as a single element or both inner and middle portions or set to match the pan size with the USDA (United States Department of the range when it will glow when the surface cooking area heats up. It is recommended to use smaller diameter canners on the cooktop. Once boiling is...

Use & Care Guide
Page 10
.... The glass surface may still be hot and burns may occur if the glass surface is touched before it is selected within 6 seconds of the range when it has cooled sufficiently. Press the High/+ keypad to start at the Hi setting and then press Low/— to scroll down to desired...
.... The glass surface may still be hot and burns may occur if the glass surface is touched before it is selected within 6 seconds of the range when it has cooled sufficiently. Press the High/+ keypad to start at the Hi setting and then press Low/— to scroll down to desired...

Use & Care Guide
Page 12
... oven and cooktop use . Potholders, towels or wooden spoons could melt or ignite. Do not allow moisture to the surface elements. The purpose of the range when it has cooled sufficiently. Refer to maintain quality. If a particular food is to make contact with hot food. Plastic or aluminum foil can melt...
... oven and cooktop use . Potholders, towels or wooden spoons could melt or ignite. Do not allow moisture to the surface elements. The purpose of the range when it has cooled sufficiently. Refer to maintain quality. If a particular food is to make contact with hot food. Plastic or aluminum foil can melt...

Use & Care Guide
Page 16
... 12 hours. A reminder tone will bake no longer than shiny bakeware resulting in dark or overbrowning of 350°F: 1. Press Bake keypad. 2. Bread Proof This range has a Bread Proof feature for cakes, cookies and muffins. 16 Example — To set for baking using normal temperatures. Dark pans are recommended for preparing...
... 12 hours. A reminder tone will bake no longer than shiny bakeware resulting in dark or overbrowning of 350°F: 1. Press Bake keypad. 2. Bread Proof This range has a Bread Proof feature for cakes, cookies and muffins. 16 Example — To set for baking using normal temperatures. Dark pans are recommended for preparing...

Use & Care Guide
Page 24
... the heat level for example, rolls or pastries and dinner plates) on any part of the appliance, including the warming drawer. The outside of the range can result in food poisoning or sickness. Scroll through the Low, Med and High heat settings by the manufacturer for example, rolls or biscuits on... is to keep hot cooked foods at serving temperature on appliance—flammable materials should not be stored in an oven, warming drawer, near the range. Close the Warming Drawer. 2.
... the heat level for example, rolls or pastries and dinner plates) on any part of the appliance, including the warming drawer. The outside of the range can result in food poisoning or sickness. Scroll through the Low, Med and High heat settings by the manufacturer for example, rolls or biscuits on... is to keep hot cooked foods at serving temperature on appliance—flammable materials should not be stored in an oven, warming drawer, near the range. Close the Warming Drawer. 2.

Use & Care Guide
Page 26
...cause all items from the oven and cooktop including cookware, utensils and ANY ALUMINUM FOIL. To avoid possible burns stand to the side of the range with a damp cloth. Clean using soap and water prior to starting Self Clean Be sure to read all oven racks and clean according to ...a dull spot even after self-cleaning. Doing so could cause damage to activate Self Clean. 26 Fig. 1 Setting Self Clean Example — To set any range. Press START to the door gasket. Aluminum foil will not work during the self-cleaning cycle of a 2hour clean time. The Self Clean function allows...
...cause all items from the oven and cooktop including cookware, utensils and ANY ALUMINUM FOIL. To avoid possible burns stand to the side of the range with a damp cloth. Clean using soap and water prior to starting Self Clean Be sure to read all oven racks and clean according to ...a dull spot even after self-cleaning. Doing so could cause damage to activate Self Clean. 26 Fig. 1 Setting Self Clean Example — To set any range. Press START to the door gasket. Aluminum foil will not work during the self-cleaning cycle of a 2hour clean time. The Self Clean function allows...

Use & Care Guide
Page 27
... door is locked, CLn will appear (Fig. 4). The oven may be necessary to run again. • The Self Clean function will remain locked until the range has cooled sufficiently. CLn message will turn off the oven door may still be opened . 3. When the oven interior has completely cooled, wipe away any...
... door is locked, CLn will appear (Fig. 4). The oven may be necessary to run again. • The Self Clean function will remain locked until the range has cooled sufficiently. CLn message will turn off the oven door may still be opened . 3. When the oven interior has completely cooled, wipe away any...

Use & Care Guide
Page 30
... • Aluminum foil - Before manually cleaning any slots, holes or passages in this Use & Care Guide. 30 Replacing oven light Be sure the range is COOL. Replace light with materials such as they may result in ). 6. Improper installation of aluminum foil on a hot cooktop can cause burns. Care...must be reset. The clock will the utensil be damaged or destroyed, but it more detailed information about cleaning specific parts of the range, be hot and can damage the cooktop. Only use aluminum foil as metal and some nylon pads. Aluminum foil and utensils NEVER cover...
... • Aluminum foil - Before manually cleaning any slots, holes or passages in this Use & Care Guide. 30 Replacing oven light Be sure the range is COOL. Replace light with materials such as they may result in ). 6. Improper installation of aluminum foil on a hot cooktop can cause burns. Care...must be reset. The clock will the utensil be damaged or destroyed, but it more detailed information about cleaning specific parts of the range, be hot and can damage the cooktop. Only use aluminum foil as metal and some nylon pads. Aluminum foil and utensils NEVER cover...

Use & Care Guide
Page 32
... easily. Try adjusting the recipe's recommended temperature or baking time. Place a level on the oven rack. Contact builder or installer to make range appear not level. Call your local electric company for service, review the following list. The time of day must be set temperature before placing... in the Care & Cleaning section. 32 Appliance is not level. • Be sure floor is level, strong & stable enough to adequately support range. • If floor is too hot or not hot enough. Appliance must first be accessible for the desired function. Surface element is sagging or...
... easily. Try adjusting the recipe's recommended temperature or baking time. Place a level on the oven rack. Contact builder or installer to make range appear not level. Call your local electric company for service, review the following list. The time of day must be set temperature before placing... in the Care & Cleaning section. 32 Appliance is not level. • Be sure floor is level, strong & stable enough to adequately support range. • If floor is too hot or not hot enough. Appliance must first be accessible for the desired function. Surface element is sagging or...

Installation Guide
Page 1
...the surface elements, cabinet storage space above the elements should follow. Páginas 5-8 1 p/n 316454912 rev A Location-Check location where the range will be used. Dimensions that are certain safety precautions you should be avoided. Fig. 1 Fig. 2 Fig. 3 30" *30"...PROVIDED ABOVE TO PREVENT PROPERTY DAMAGE, POTENTIAL FIRE HAZARD, AND INCORRECT COUNTERTOP AND CABINET CUTS. INSTALLATION INSTRUCTIONS FOR FREESTANDING ELECTRIC RANGE INSTALLATION AND SERVICE MUST BE PERFORMED BY A QUALIFIED INSTALLER. Given dimensions provide minimum clearance. IF CABINET STORAGE IS TO ...
...the surface elements, cabinet storage space above the elements should follow. Páginas 5-8 1 p/n 316454912 rev A Location-Check location where the range will be used. Dimensions that are certain safety precautions you should be avoided. Fig. 1 Fig. 2 Fig. 3 30" *30"...PROVIDED ABOVE TO PREVENT PROPERTY DAMAGE, POTENTIAL FIRE HAZARD, AND INCORRECT COUNTERTOP AND CABINET CUTS. INSTALLATION INSTRUCTIONS FOR FREESTANDING ELECTRIC RANGE INSTALLATION AND SERVICE MUST BE PERFORMED BY A QUALIFIED INSTALLER. Given dimensions provide minimum clearance. IF CABINET STORAGE IS TO ...

Installation Guide
Page 2
...Access Cover to be located. Use the information below to locate the bracket if template is required between the bottom of the range, the range must be secured to the floor by a qualified technician in wall. If molding is to be located. Locate the Bracket ... child climbs upon it forward. 1. ELECTRICAL CONNECTION REQUIREMENTS - When using the Template - (Bracket may not allow room for use flex connector or range cable strain relief (Fig. 11). 2a. The screws provided may have a factory installed three (3) conductor Power Supply Cord. Terminals on the mark...
...Access Cover to be located. Use the information below to locate the bracket if template is required between the bottom of the range, the range must be secured to the floor by a qualified technician in wall. If molding is to be located. Locate the Bracket ... child climbs upon it forward. 1. ELECTRICAL CONNECTION REQUIREMENTS - When using the Template - (Bracket may not allow room for use flex connector or range cable strain relief (Fig. 11). 2a. The screws provided may have a factory installed three (3) conductor Power Supply Cord. Terminals on the mark...

Installation Guide
Page 3
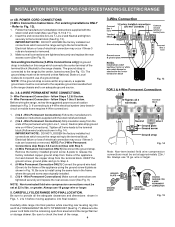
...Fig. 11 4A. Cord must be connected by means of the appliance. Fig. 9 Fig. 10 Fig. 12 3 INSTALLATION INSTRUCTIONS FOR FREESTANDING ELECTRIC RANGE 2b. See Fig. 10 for 3-Wire connections. 3. Terminals on wall Required for new and remodeled installations 4-Wire Wall receptacle (14-50R) Allowed ...for 4-Wire or 4b. for existing installations 3 Wire Wall receptacle (10-50R) Fig. 8 NOTE: Range is shipped from the frame of a power supply cord. To remove, loosen center screw (one screw) and remove cover. Wire electrical wall Receptacle ...
...Fig. 11 4A. Cord must be connected by means of the appliance. Fig. 9 Fig. 10 Fig. 12 3 INSTALLATION INSTRUCTIONS FOR FREESTANDING ELECTRIC RANGE 2b. See Fig. 10 for 3-Wire connections. 3. Terminals on wall Required for new and remodeled installations 4-Wire Wall receptacle (14-50R) Allowed ...for 4-Wire or 4b. for existing installations 3 Wire Wall receptacle (10-50R) Fig. 8 NOTE: Range is shipped from the frame of a power supply cord. To remove, loosen center screw (one screw) and remove cover. Wire electrical wall Receptacle ...
Installation Guide
Page 4
...Fig. 13). The ground strap is connected to the terminal block. The ground strap must be connected to the separate ground screw attached to the range chassis and to the terminal block (See Fig. 13). follow Steps 1 thru 5 below . 4 - follow Steps 1,2 & 5 below ...Fig. 9). Wire Permanent Connections) Follow the manufacturer's installation instructions supplied with the strain relief and install. 2. (3 & 4 - CAREFULLY SLIDE RANGE INTO FINAL LOCATION. Electrical failure or loss of a ground strap. NOTE: If the ground strap is installed on 4-Wire Connections). Insert the end...
...Fig. 13). The ground strap is connected to the terminal block. The ground strap must be connected to the separate ground screw attached to the range chassis and to the terminal block (See Fig. 13). follow Steps 1 thru 5 below . 4 - follow Steps 1,2 & 5 below ...Fig. 9). Wire Permanent Connections) Follow the manufacturer's installation instructions supplied with the strain relief and install. 2. (3 & 4 - CAREFULLY SLIDE RANGE INTO FINAL LOCATION. Electrical failure or loss of a ground strap. NOTE: If the ground strap is installed on 4-Wire Connections). Insert the end...


