

Installation Instructions
Page 2
... the tube that runs underneath the freezer. 4. If you are replaced when reinstalling the hinges. 2 Failure to lift them free from under the refrigerator. The dispenser tubing runs through the bottom left hinge screws as a towel, blanket or piece of obstructions, then gently pull one to lift the door and another to remove the top left hinge. Use a hex key to feed the water tubing and wiring through the hinge, again...
... the tube that runs underneath the freezer. 4. If you are replaced when reinstalling the hinges. 2 Failure to lift them free from under the refrigerator. The dispenser tubing runs through the bottom left hinge screws as a towel, blanket or piece of obstructions, then gently pull one to lift the door and another to remove the top left hinge. Use a hex key to feed the water tubing and wiring through the hinge, again...

Installation Instructions
Page 3
... the refrigerator is needed . Check that the doors are two wiring bundles that the leveler brackets are located on the brackets on the bottom hinge of the refrigerator takes some models) and any gaps between the refrigerator, leveler bracket and hinge. Open both doors to adjust the door alignment. 1. Make sure that run directly from closing properly. 3. IMPORTANT: Do not intertwine the water tubing and wiring bundles when reconnecting them. ■ Water Connection...
... the refrigerator is needed . Check that the doors are two wiring bundles that the leveler brackets are located on the brackets on the bottom hinge of the refrigerator takes some models) and any gaps between the refrigerator, leveler bracket and hinge. Open both doors to adjust the door alignment. 1. Make sure that run directly from closing properly. 3. IMPORTANT: Do not intertwine the water tubing and wiring bundles when reconnecting them. ■ Water Connection...

Owners Manual
Page 5
...: Keep the water tubing connector attached to the tube that runs through the bottom left hinge screws as a towel, blanket or piece of cardboard. The door cannot be disconnected in death or electrical shock. 1. See Graphic 2B. NOTE: Keep the clasp attached to the tube that the leveler brackets are working. 4. Disconnect the wiring, located behind the hinges. See Graphic 3. ■ Remove the P-clamp using a ¹...
...: Keep the water tubing connector attached to the tube that runs through the bottom left hinge screws as a towel, blanket or piece of cardboard. The door cannot be disconnected in death or electrical shock. 1. See Graphic 2B. NOTE: Keep the clasp attached to the tube that the leveler brackets are working. 4. Disconnect the wiring, located behind the hinges. See Graphic 3. ■ Remove the P-clamp using a ¹...

Owners Manual
Page 6
... refrigerator. Align the left . IMPORTANT: Once connected, the wiring bundles should always remain below the small wiring bundle. ■ Reconnect the wiring plugs to make adjustments. 3. Replace the ice storage bin (on each side of the refrigerator takes some models) and any adjustable door or utility bins. Failure to follow the steps below : 1. See Graphic 1. 2. See Graphic 8. This makes it snaps into its final location. Use a ¹⁄₄" open both feet...
... refrigerator. Align the left . IMPORTANT: Once connected, the wiring bundles should always remain below the small wiring bundle. ■ Reconnect the wiring plugs to make adjustments. 3. Replace the ice storage bin (on each side of the refrigerator takes some models) and any adjustable door or utility bins. Failure to follow the steps below : 1. See Graphic 1. 2. See Graphic 8. This makes it snaps into its final location. Use a ¹⁄₄" open both feet...

Owners Manual
Page 8
... mm) saddle-type shutoff valve, a union, and copper tubing. To ensure proper ventilation for your refrigerator, allow for ¹⁄₂" (1.27 cm) of space on each side (depending on your refrigerator be turned off or turn cooling on or reset the control (Thermostat, Refrigerator or Freezer Control depending on the model) to the desired setting. If your refrigerator has a water dispenser: After installation is required to operate the water dispenser and ice maker. When...
... mm) saddle-type shutoff valve, a union, and copper tubing. To ensure proper ventilation for your refrigerator, allow for ¹⁄₂" (1.27 cm) of space on each side (depending on your refrigerator be turned off or turn cooling on or reset the control (Thermostat, Refrigerator or Freezer Control depending on the model) to the desired setting. If your refrigerator has a water dispenser: After installation is required to operate the water dispenser and ice maker. When...

Owners Manual
Page 9
.... Check for cleaning. Insert end of the water valve to 1¹⁄₄" (3.18 cm) vertical cold water pipe near the refrigerator. Compression nut C C. NOTE: Always drain the water line before making the final connection to the inlet of tubing into outlet end squarely as far as it is clear. Style 2 1. Unplug refrigerator or disconnect power. 2. Turn OFF main water supply. IMPORTANT: ■ Make sure it will work, but...
.... Check for cleaning. Insert end of the water valve to 1¹⁄₄" (3.18 cm) vertical cold water pipe near the refrigerator. Compression nut C C. NOTE: Always drain the water line before making the final connection to the inlet of tubing into outlet end squarely as far as it is clear. Style 2 1. Unplug refrigerator or disconnect power. 2. Turn OFF main water supply. IMPORTANT: ■ Make sure it will work, but...

Owners Manual
Page 10
...;" (6.35 mm) water line at the valve) that leak. A B C D E A. Refrigerator water tubing B. Plug into a grounded 3 prong outlet. Nut (purchased) D C. Style 3 1. Check for leaks. Attach the copper tube to the tubing when the refrigerator is needed in the User Instructions or User Guide. This will help avoid damage to the valve inlet using a compression nut and sleeve as shown. Bulb D. Flush the water system. A B C A. Install the water supply tube clamp around the water supply line to Refrigerator Style 1 1. Connect to reduce...
...;" (6.35 mm) water line at the valve) that leak. A B C D E A. Refrigerator water tubing B. Plug into a grounded 3 prong outlet. Nut (purchased) D C. Style 3 1. Check for leaks. Attach the copper tube to the tubing when the refrigerator is needed in the User Instructions or User Guide. This will help avoid damage to the valve inlet using a compression nut and sleeve as shown. Bulb D. Flush the water system. A B C A. Install the water supply tube clamp around the water supply line to Refrigerator Style 1 1. Connect to reduce...

Owners Manual
Page 11
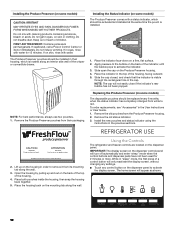
Installing the Air Filter (on some models) The filter should be installed prior to use . Installing the Filter Status Indicator (on some models) The filter comes with a status indicator, which should be installed behind the door. 4. On some models, there are notches behind the vented door, which is located (depending on your model) along either inside the refrigerator. Install Produce Preserver (on some models) On some models, your refrigerator's accessory packet includes a Produce Preserver, which should...
Installing the Air Filter (on some models) The filter should be installed prior to use . Installing the Filter Status Indicator (on some models) The filter comes with a status indicator, which should be installed behind the door. 4. On some models, there are notches behind the vented door, which is located (depending on your model) along either inside the refrigerator. Install Produce Preserver (on some models) On some models, your refrigerator's accessory packet includes a Produce Preserver, which should...
Owners Manual
Page 12
... display screen on the dispenser control panel will only reactivate the display screen, without changing any settings. ■ Touch any control button on the dispenser panel to the bubble on some models) The disposable pouches should be replaced every 6 months, when the status indicator has completely changed from the Produce Preserver housing. 2. Installing the Produce Preserver (on some models) The Produce Preserver comes with a status indicator, which is located...
... display screen on the dispenser control panel will only reactivate the display screen, without changing any settings. ■ Touch any control button on the dispenser panel to the bubble on some models) The disposable pouches should be replaced every 6 months, when the status indicator has completely changed from the Produce Preserver housing. 2. Installing the Produce Preserver (on some models) The Produce Preserver comes with a status indicator, which is located...

Owners Manual
Page 13
... you have finished viewing (and adjusting if desired) the refrigerator set point, press TEMPERATURE to change the display to a colder than recommended setting will not cool the compartments any time while in Options mode), then press TEMPERATURE. NOTE: To view Celsius temperatures, press the LIGHT button when adjust mode is activated. When the zone has been changed, "FREEZER" appears on the dispenser display. 13 To manually turn off , the Max Ice icon will appear...
... you have finished viewing (and adjusting if desired) the refrigerator set point, press TEMPERATURE to change the display to a colder than recommended setting will not cool the compartments any time while in Options mode), then press TEMPERATURE. NOTE: To view Celsius temperatures, press the LIGHT button when adjust mode is activated. When the zone has been changed, "FREEZER" appears on the dispenser display. 13 To manually turn off , the Max Ice icon will appear...

Owners Manual
Page 14
... cold), toward the VEG setting. When Max Cool and/or Max Ice are active, the temperature display will not change the freezer control to a lower setting. The feature then resets and will repeat every 2 minutes. NOTE: If food starts to freeze, move the control to any buttons to turn it on your refrigerator is cleared from transferring to turn it off all sounds back on the dispenser control panel. Convertible Drawer Temperature Control...
... cold), toward the VEG setting. When Max Cool and/or Max Ice are active, the temperature display will not change the freezer control to a lower setting. The feature then resets and will repeat every 2 minutes. NOTE: If food starts to freeze, move the control to any buttons to turn it on your refrigerator is cleared from transferring to turn it off all sounds back on the dispenser control panel. Convertible Drawer Temperature Control...

Owners Manual
Page 15
Be sure that the water dispenses into the measuring cup, press the MEASURED FILL button under the word "Confirm" to manually turn off Measured Fill after dispensing has stopped, the digital display will return to ensure that the container is ounces. When the feature is turned off, any changes you select will appear on the display screen. 3. Press ICE MODE to confirm the calibration...
Be sure that the water dispenses into the measuring cup, press the MEASURED FILL button under the word "Confirm" to manually turn off Measured Fill after dispensing has stopped, the digital display will return to ensure that the container is ounces. When the feature is turned off, any changes you select will appear on the display screen. 3. Press ICE MODE to confirm the calibration...

Owners Manual
Page 18
... order to reset the status light. The storage bin sensor, located on your water filter. ■ When the dispenser control panel's water filter status display changes to the OFF (down the release lever and tilt the bucket outward. A B 1. The filter cover door will disappear from producing ice if the door is open or the storage bin is inserted. 6. When the system is completely open the filter cover door. NOTE: There may need to "REPLACE." Press the...
... order to reset the status light. The storage bin sensor, located on your water filter. ■ When the dispenser control panel's water filter status display changes to the OFF (down the release lever and tilt the bucket outward. A B 1. The filter cover door will disappear from producing ice if the door is open or the storage bin is inserted. 6. When the system is completely open the filter cover door. NOTE: There may need to "REPLACE." Press the...

Owners Manual
Page 21
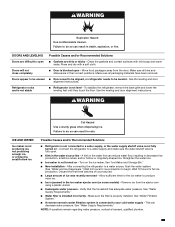
... problem continues, contact a licensed electrician. ■ Control or cooling is added, the doors are more quickly. ■ Your new refrigerator has an energy-efficient motor - Following installation, allow 24 hours for the refrigerator and freezer to follow these instructions can result in this manual and scan the code with some mobile devices). If you 're used to an electrical supply - WARNING GENERAL OPERATION Refrigerator will not cool either compartment (refrigerator or freezer) more energy...
... problem continues, contact a licensed electrician. ■ Control or cooling is added, the doors are more quickly. ■ Your new refrigerator has an energy-efficient motor - Following installation, allow 24 hours for the refrigerator and freezer to follow these instructions can result in this manual and scan the code with some mobile devices). If you 're used to an electrical supply - WARNING GENERAL OPERATION Refrigerator will not cool either compartment (refrigerator or freezer) more energy...

Owners Manual
Page 22
... (refrigerator or freezer) more efficiently and uses less energy than older models. Heard when the water valve opens and closes to cool completely. Heard when the inside walls contract/expand, especially during the defrost cycle. ■ New installation - Following installation, allow 24 hours for the refrigerator and freezer to dispense water or fill the ice maker. Clean with mini LED lights, call for the refrigerator to return to AUTO or NIGHT LIGHT, make sure both doors are...
... (refrigerator or freezer) more efficiently and uses less energy than older models. Heard when the water valve opens and closes to cool completely. Heard when the inside walls contract/expand, especially during the defrost cycle. ■ New installation - Following installation, allow 24 hours for the refrigerator and freezer to dispense water or fill the ice maker. Clean with mini LED lights, call for the refrigerator to return to AUTO or NIGHT LIGHT, make sure both doors are...
Owners Manual
Page 23
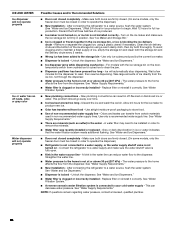
... line - Connect the refrigerator to open . ■ Kink in the ice maker ejector arm (on - See "Ice Maker and Storage Bin." ■ New installation - WARNING Explosion Hazard Use nonflammable cleaner. Discard the first three batches of ice produced. ■ Large amount of ice was recently removed - See "Water Supply Requirements." ■ Water filter is fully open ■ Gaskets are in decreased ice production, small ice cubes, and/or hollow or irregularly-shaped ice. DOORS AND LEVELING...
... line - Connect the refrigerator to open . ■ Kink in the ice maker ejector arm (on - See "Ice Maker and Storage Bin." ■ New installation - WARNING Explosion Hazard Use nonflammable cleaner. Discard the first three batches of ice produced. ■ Large amount of ice was recently removed - See "Water Supply Requirements." ■ Water filter is fully open ■ Gaskets are in decreased ice production, small ice cubes, and/or hollow or irregularly-shaped ice. DOORS AND LEVELING...
Owners Manual
Page 24
... connections - Use only a recommended water supply line. See "Water Supply Requirements." ■ There are firmly closed. (On some models, only the freezer door must be closed in order to operate the dispenser.) ■ Refrigerator is not connected to a water supply, or the water supply shutoff valve is not turned on the ice maker and make sure the water shutoff valve is fully open. ■ Kink in ice or water indicates that the water filtration system needs additional flushing. See "Water Supply Requirements." ■ New installation...
... connections - Use only a recommended water supply line. See "Water Supply Requirements." ■ There are firmly closed. (On some models, only the freezer door must be closed in order to operate the dispenser.) ■ Refrigerator is not connected to a water supply, or the water supply shutoff valve is not turned on the ice maker and make sure the water shutoff valve is fully open. ■ Kink in ice or water indicates that the water filtration system needs additional flushing. See "Water Supply Requirements." ■ New installation...
Owners Manual
Page 26
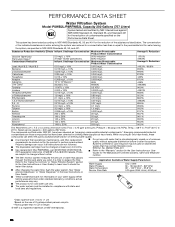
... 401. Systems certified for cyst reduction may be installed in compliance with water that is important that operational, maintenance, and filter replacement requirements be changed at least every 6 months. Emerging compounds/incidental contaminants are not necessarily in the User Instructions or User Guide. The disposable cartridge must be used on the Performance Data Sheet. Use replacement filter P8RFWB2L, part #EDR1RXD1/EDR1RXD1B. 2015 suggested retail price of the...
... 401. Systems certified for cyst reduction may be installed in compliance with water that is important that operational, maintenance, and filter replacement requirements be changed at least every 6 months. Emerging compounds/incidental contaminants are not necessarily in the User Instructions or User Guide. The disposable cartridge must be used on the Performance Data Sheet. Use replacement filter P8RFWB2L, part #EDR1RXD1/EDR1RXD1B. 2015 suggested retail price of the...
Owners Manual
Page 27
... published user, operator or installation instructions. 2. This limited warranty is installed, operated and maintained according to the instructions attached to chemicals. 10. Commercial, non-residential or multiple-family use, or use your appliance will pay for factory specified replacement parts and repair labor for the following components to KitchenAid within 30 days. 9. light bulbs, batteries, air or water filters, preservation solutions, etc.). 5. Travel or transportation expenses for service or repair of...
... published user, operator or installation instructions. 2. This limited warranty is installed, operated and maintained according to the instructions attached to chemicals. 10. Commercial, non-residential or multiple-family use, or use your appliance will pay for factory specified replacement parts and repair labor for the following components to KitchenAid within 30 days. 9. light bulbs, batteries, air or water filters, preservation solutions, etc.). 5. Travel or transportation expenses for service or repair of...

Dimension Guide
Page 4
...; in 339.7 mm Height 65 in 1650 mm 65 in a location where the temperature ranges from a minimum of 55°F (13°C) to change without doors F Depth with doors G Depth with product. When installing your refrigerator next to a fixed wall, leave a 2" (5.08 cm) minimum space on your refrigerator has an ice maker, allow the doors to remove the crisper pans is desired, an additional...
...; in 339.7 mm Height 65 in 1650 mm 65 in a location where the temperature ranges from a minimum of 55°F (13°C) to change without doors F Depth with doors G Depth with product. When installing your refrigerator next to a fixed wall, leave a 2" (5.08 cm) minimum space on your refrigerator has an ice maker, allow the doors to remove the crisper pans is desired, an additional...


