
User Manual
Page 5
... the Wrist Strap and Lens Cap 3 Loading the Battery 3 Turning the Camera On and Off 4 Checking the Battery Level 5 Automatic Powerdown Saves Batteries 6 Checking Camera Status 7 Status Bar Icons 7 Inserting an Optional MMC/SD Card 8 Choosing Internal or Removable Memory 10 Checking Your Picture's Location 10 2 Taking Pictures 11 Taking a Picture 11 Previewing Your Picture on the LCD 12 Displaying the Picture Just Taken 13 Using the Flash 14 Using the Digital Zoom 15 Other Picture-Taking Settings 16 iii
... the Wrist Strap and Lens Cap 3 Loading the Battery 3 Turning the Camera On and Off 4 Checking the Battery Level 5 Automatic Powerdown Saves Batteries 6 Checking Camera Status 7 Status Bar Icons 7 Inserting an Optional MMC/SD Card 8 Choosing Internal or Removable Memory 10 Checking Your Picture's Location 10 2 Taking Pictures 11 Taking a Picture 11 Previewing Your Picture on the LCD 12 Displaying the Picture Just Taken 13 Using the Flash 14 Using the Digital Zoom 15 Other Picture-Taking Settings 16 iii

User Manual
Page 6
... Selecting Pictures for Printing 19 Creating a Print Order 19 Resolution and Print Sizes 19 Running a Slide Show 20 Starting the Slide Show 20 Other Review Settings 20 4 Customizing Your Camera Settings 21 Setup Options 21 Capture Options 22 Setting Image Quality 22 Setting Macro 22 Turning QuickView On or Off 22 Review Options 23 Setting Video Out 23 Print Order 24 Copying Pictures 25 Viewing Camera Information 25 Formatting Camera Memory or MMC/SD Card 26 Selecting a Language 27 Date/Time Settings...
... Selecting Pictures for Printing 19 Creating a Print Order 19 Resolution and Print Sizes 19 Running a Slide Show 20 Starting the Slide Show 20 Other Review Settings 20 4 Customizing Your Camera Settings 21 Setup Options 21 Capture Options 22 Setting Image Quality 22 Setting Macro 22 Turning QuickView On or Off 22 Review Options 23 Setting Video Out 23 Print Order 24 Copying Pictures 25 Viewing Camera Information 25 Formatting Camera Memory or MMC/SD Card 26 Selecting a Language 27 Date/Time Settings...
User Manual
Page 11
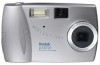
...-and-shoot operation. Add special effects; fix red-eye; Review Display your computer. After you install the included software: Transfer pictures to your home printer, make a slide show; make prints at a KODAK Picture Maker kiosk, or take your MMC/SD card to friends and family. Set Up Select camera settings. and much more. 1 Store pictures in the camera's 8 MB internal memory or on an optional, removable MultiMedia (MMC) or Secure Digital (SD) card. E-mail pictures to your purchase of the KODAK EASYSHARE DX3700 Digital Camera...
...-and-shoot operation. Add special effects; fix red-eye; Review Display your computer. After you install the included software: Transfer pictures to your home printer, make a slide show; make prints at a KODAK Picture Maker kiosk, or take your MMC/SD card to friends and family. Set Up Select camera settings. and much more. 1 Store pictures in the camera's 8 MB internal memory or on an optional, removable MultiMedia (MMC) or Secure Digital (SD) card. E-mail pictures to your purchase of the KODAK EASYSHARE DX3700 Digital Camera...
User Manual
Page 12
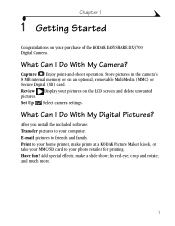
... at http://www.kodak.com/go/accessories. 2 If your camera to custom-fit your camera was packaged with a KODAK EASYSHARE Camera Dock, the KODAK Ni-MH Rechargeable Battery Pack is provided on a CD instead of in printed form. Chapter 1 Camera Package Contents The KODAK EASYSHARE DX3700 Digital Camera includes: 1 2 3 4 1 Camera 2 Lithium battery, KCRV3 or equivalent* 7 3 Wrist strap 4 USB cable 6 5 Lens cap 5 6 Video cable 7 Dock insert (Do not discard.)** 8 User's Guide,*** Quick Start Guide, and Software CD (not shown...
... at http://www.kodak.com/go/accessories. 2 If your camera to custom-fit your camera was packaged with a KODAK EASYSHARE Camera Dock, the KODAK Ni-MH Rechargeable Battery Pack is provided on a CD instead of in printed form. Chapter 1 Camera Package Contents The KODAK EASYSHARE DX3700 Digital Camera includes: 1 2 3 4 1 Camera 2 Lithium battery, KCRV3 or equivalent* 7 3 Wrist strap 4 USB cable 6 5 Lens cap 5 6 Video cable 7 Dock insert (Do not discard.)** 8 User's Guide,*** Quick Start Guide, and Software CD (not shown...

User Manual
Page 14
... Save, Delete, or Copy operations that are removed for an explanation of the status bar icons. 2 To turn the camera on, press the power button until the ready light turns off. Chapter 1 Turning the Camera On and Off Power button 1 To turn the camera off, press the power button until the ready light glows. NOTE: The first time the camera is turned on the LCD. In Capture mode, the status bar is briefly displayed on , the Language and Date/Time need...
... Save, Delete, or Copy operations that are removed for an explanation of the status bar icons. 2 To turn the camera on, press the power button until the ready light turns off. Chapter 1 Turning the Camera On and Off Power button 1 To turn the camera off, press the power button until the ready light glows. NOTE: The first time the camera is turned on the LCD. In Capture mode, the status bar is briefly displayed on , the Language and Date/Time need...
User Manual
Page 31
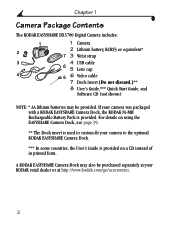
Chapter 4 4 Customizing Your Camera Settings Slide the Mode selector to Setup to customize the camera settings. Setup Options Capture Options (page 22) Format (page 26) Review Options (page 23) Language (page 27) Copy (page 25) Date/Time (page 27) About Camera (page 25) 21
Chapter 4 4 Customizing Your Camera Settings Slide the Mode selector to Setup to customize the camera settings. Setup Options Capture Options (page 22) Format (page 26) Review Options (page 23) Language (page 27) Copy (page 25) Date/Time (page 27) About Camera (page 25) 21

User Manual
Page 32
... Capture Options icon, then the buttons to highlight QuickView. icon, then the m Best (2160 x 1440) for small print sizes, e-mailing, or screen display (small file size; Turning QuickView On or Off 1 Slide the Mode selector to Setup . 2 Press the buttons to highlight the Capture Options buttons to highlight Macro. The setting remains until you change it . Chapter 4 Capture Options Setting Image Quality 1 Slide the Mode selector to Setup . 2 Press the buttons to...
... Capture Options icon, then the buttons to highlight QuickView. icon, then the m Best (2160 x 1440) for small print sizes, e-mailing, or screen display (small file size; Turning QuickView On or Off 1 Slide the Mode selector to Setup . 2 Press the buttons to highlight the Capture Options buttons to highlight Macro. The setting remains until you change it . Chapter 4 Capture Options Setting Image Quality 1 Slide the Mode selector to Setup . 2 Press the buttons to...

User Manual
Page 35
.../SD card. (You cannot copy pictures from the internal memory after a copy, see page 18). The information includes camera model and current firmware version. 25 For information on picture numbering after they are copied, not moved. Chapter 4 Copying Pictures The Copy feature lets you wish to remove the pictures from a card to internal memory.) NOTE: Before using this Camera feature displays information about the camera. 1 Slide the Mode selector to Setup . 2 Press the buttons to highlight the Copy menu...
.../SD card. (You cannot copy pictures from the internal memory after a copy, see page 18). The information includes camera model and current firmware version. 25 For information on picture numbering after they are copied, not moved. Chapter 4 Copying Pictures The Copy feature lets you wish to remove the pictures from a card to internal memory.) NOTE: Before using this Camera feature displays information about the camera. 1 Slide the Mode selector to Setup . 2 Press the buttons to highlight the Copy menu...

User Manual
Page 37
... format. 4 Press the buttons to accept the changes. 27 Date/Time Settings Setting the Date and Time Set the date and time if you want to use. 4 Press Select to accept the changes and return to highlight SET, then press Select. Press the to Setup . 2 Press the Select. Chapter 4 Selecting a Language The Language feature allows you to display the menus and screen messages in different languages. 1 Slide the Mode selector to adjust the date and time settings...
... format. 4 Press the buttons to accept the changes. 27 Date/Time Settings Setting the Date and Time Set the date and time if you want to use. 4 Press Select to accept the changes and return to highlight SET, then press Select. Press the to Setup . 2 Press the Select. Chapter 4 Selecting a Language The Language feature allows you to display the menus and screen messages in different languages. 1 Slide the Mode selector to adjust the date and time settings...

User Manual
Page 38
... you take while Date Stamp is printed in the bottom right corner of pictures you change it. 28 Placing the Date on Pictures Use the Date Stamp setting to imprint the date on . Press Select. The current date is on your pictures. 1 Make sure the camera date and time are correct (see page 27). 2 Slide the Mode selector to Setup . 3 Press the buttons to highlight the Date/Time Set buttons to highlight the desired date format. 5 Press Select. icon...
... you take while Date Stamp is printed in the bottom right corner of pictures you change it. 28 Placing the Date on Pictures Use the Date Stamp setting to imprint the date on . Press Select. The current date is on your pictures. 1 Make sure the camera date and time are correct (see page 27). 2 Slide the Mode selector to Setup . 3 Press the buttons to highlight the Date/Time Set buttons to highlight the desired date format. 5 Press Select. icon...

User Manual
Page 44
Connect button You can transfer files while the green light is blinking. m Your pictures are transferred to the following default location on page 33). Place the front tabs of the camera. 3 Place the camera in the EASYSHARE Camera Dock. 4 Push the Connect button. m If you wish to change the default location, Click Setup before you have connected as shown in the EASYSHARE Camera Dock cavity. For more information, see page 39. Transferring on the...
Connect button You can transfer files while the green light is blinking. m Your pictures are transferred to the following default location on page 33). Place the front tabs of the camera. 3 Place the camera in the EASYSHARE Camera Dock. 4 Push the Connect button. m If you wish to change the default location, Click Setup before you have connected as shown in the EASYSHARE Camera Dock cavity. For more information, see page 39. Transferring on the...

User Manual
Page 45
.... m Or, select the Guided Transfer radio button, then click Transfer. Click the online help : On a WINDOWS-based computer-right-click the Picture Transfer icon on your computer. Chapter 6 Transferring on how to: m add special effects, make a custom slide show, fix red-eye, crop, and rotate m e-mail pictures m print to your pictures are transferred, Picture Transfer Software closes and KODAK Picture Software opens. In the KODAK Picture Software window, click the thumbnail of a picture to display it , and select a destination folder on the taskbar...
.... m Or, select the Guided Transfer radio button, then click Transfer. Click the online help : On a WINDOWS-based computer-right-click the Picture Transfer icon on your computer. Chapter 6 Transferring on how to: m add special effects, make a custom slide show, fix red-eye, crop, and rotate m e-mail pictures m print to your pictures are transferred, Picture Transfer Software closes and KODAK Picture Software opens. In the KODAK Picture Software window, click the thumbnail of a picture to display it , and select a destination folder on the taskbar...

User Manual
Page 57
... for the flash to your position so the a bright light (backlit). Chapter 8 Camera Problem Cause Solution Shutter button does Camera is not turned on . Part of the picture Something was not centered when centering picture in correctly in front of Change your internal memory is full. Camera does not Battery is too dark. function. viewfinder. light is blinking. The camera is Wait until the light stops processing a picture, the blinking, then take another ready light is...
... for the flash to your position so the a bright light (backlit). Chapter 8 Camera Problem Cause Solution Shutter button does Camera is not turned on . Part of the picture Something was not centered when centering picture in correctly in front of Change your internal memory is full. Camera does not Battery is too dark. function. viewfinder. light is blinking. The camera is Wait until the light stops processing a picture, the blinking, then take another ready light is...

User Manual
Page 66
... support representative, please have the camera connected to a customer support representative. toll line, 44-0-131-458-6714, between the hours of 9:00 a.m. m Europe-call the Kodak Digital Imaging Support Centre toll free number associated with your computer, and have the following information available: Operating system Processor speed (MHz Computer model Amount of memory (MB Exact error message you received Version of installation CD Camera serial number Telephone Numbers m U.S.-call toll free...
... support representative, please have the camera connected to a customer support representative. toll line, 44-0-131-458-6714, between the hours of 9:00 a.m. m Europe-call the Kodak Digital Imaging Support Centre toll free number associated with your computer, and have the following information available: Operating system Processor speed (MHz Computer model Amount of memory (MB Exact error message you received Version of installation CD Camera serial number Telephone Numbers m U.S.-call toll free...

User Manual
Page 72
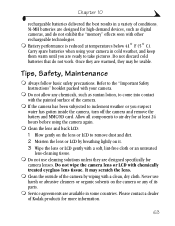
... Original Factory Settings - Camera Feature Flash Quality QuickView Video Out Date/Time Date Stamp Date Format Language Factory Setting Auto Best On NTSC 01/01/2001; 0:00 On DD/MM/YYYY English Using Your Batteries m Replacement Types-your camera operates dependably, we do not recommend or support alkaline batteries. m For acceptable battery life, and to make sure your camera can use the following battery types: - 1, KODAK Lithium Battery, KCRV3 * - 2, 1.5 volt AA Lithium batteries - 1, KODAK Ni-MH Rechargeable Battery Pack, rechargeable in the EASYSHARE Camera Dock...
... Original Factory Settings - Camera Feature Flash Quality QuickView Video Out Date/Time Date Stamp Date Format Language Factory Setting Auto Best On NTSC 01/01/2001; 0:00 On DD/MM/YYYY English Using Your Batteries m Replacement Types-your camera operates dependably, we do not recommend or support alkaline batteries. m For acceptable battery life, and to make sure your camera can use the following battery types: - 1, KODAK Lithium Battery, KCRV3 * - 2, 1.5 volt AA Lithium batteries - 1, KODAK Ni-MH Rechargeable Battery Pack, rechargeable in the EASYSHARE Camera Dock...
User Manual
Page 73
... inside the camera, turn off the camera and remove the battery and MMC/SD card. Allow all components to take pictures. Carry spare batteries when using the camera again. m Clean the lens and back LCD: 1 Blow gently on the lens or LCD to the "Important Safety Instructions" booklet packed with a soft, lint-free cloth or an untreated lens-cleaning tissue. Refer to remove dust and dirt. 2 Moisten the lens or LCD by...
... inside the camera, turn off the camera and remove the battery and MMC/SD card. Allow all components to take pictures. Carry spare batteries when using the camera again. m Clean the lens and back LCD: 1 Blow gently on the lens or LCD to the "Important Safety Instructions" booklet packed with a soft, lint-free cloth or an untreated lens-cleaning tissue. Refer to remove dust and dirt. 2 Moisten the lens or LCD by...
User Manual
Page 80
..., 43 customer support numbers 56 customizing camera settings 21 D date, imprinting on pictures 28 date, setting 27 DCIM folder, MMC/SD Card 65 defaults, original settings 62 deleting from internal memory 18 from MMC/SD Card 18 last picture 13 digital pictures, using 33 digital zoom 15 display problems 47 displaying slide show 20 dock insert 2, 40 docking camera 41 downloading pictures 34, 36, 43 E EASYSHARE Camera Dock charging Battery Pack 42 docking camera 41 installing insert 40 package contents 39 power connection 40 specifications 61 70
..., 43 customer support numbers 56 customizing camera settings 21 D date, imprinting on pictures 28 date, setting 27 DCIM folder, MMC/SD Card 65 defaults, original settings 62 deleting from internal memory 18 from MMC/SD Card 18 last picture 13 digital pictures, using 33 digital zoom 15 display problems 47 displaying slide show 20 dock insert 2, 40 docking camera 41 downloading pictures 34, 36, 43 E EASYSHARE Camera Dock charging Battery Pack 42 docking camera 41 installing insert 40 package contents 39 power connection 40 specifications 61 70

User Manual
Page 81
...45 troubleshooting EASYSHARE Camera Dock 52 F fax numbers, support 55 FCC compliance 67 file names in internal memory 66 on Memory Card 66 flash auto 14 fill 14 red-eye 14 using 14 folders, MMC/SD Card 65 formatting internal memory 26 Picture Card 26 G guidelines, battery 62 H help online service 55 online, Picture Transfer 35 I included with camera 2, 40 information camera, viewing 25 insert, dock 2, 40 installing batteries 3 Battery Pack 41 MMC/SD Card 8 software 30 internal memory file name conventions 66 formatting 26 storage capacity 65 K KODAK software Camera Connection 31 getting help...
...45 troubleshooting EASYSHARE Camera Dock 52 F fax numbers, support 55 FCC compliance 67 file names in internal memory 66 on Memory Card 66 flash auto 14 fill 14 red-eye 14 using 14 folders, MMC/SD Card 65 formatting internal memory 26 Picture Card 26 G guidelines, battery 62 H help online service 55 online, Picture Transfer 35 I included with camera 2, 40 information camera, viewing 25 insert, dock 2, 40 installing batteries 3 Battery Pack 41 MMC/SD Card 8 software 30 internal memory file name conventions 66 formatting 26 storage capacity 65 K KODAK software Camera Connection 31 getting help...
User Manual
Page 84
... SD 8 Secure Digital 8 service and support fax numbers 55 Kodak web site 55 telephone numbers 56 setting clock 27 date and time 27 flash 14 language 27 picture storage location 10 setup mode, using 21 shutoff, auto 6 shutter problems 47 sleep mode 6 slide show problems 49 running 20 software getting help 55 included with camera 31 installing 30 KODAK Camera Connection 31 KODAK Picture 31 KODAK Picture Transfer 31 QUICKTIME 31 specifications camera 59 EASYSHARE Camera Dock 61 MACINTOSH system 32 WINDOWS-based system 32 status camera 7 screen icons 7 status...
... SD 8 Secure Digital 8 service and support fax numbers 55 Kodak web site 55 telephone numbers 56 setting clock 27 date and time 27 flash 14 language 27 picture storage location 10 setup mode, using 21 shutoff, auto 6 shutter problems 47 sleep mode 6 slide show problems 49 running 20 software getting help 55 included with camera 31 installing 30 KODAK Camera Connection 31 KODAK Picture 31 KODAK Picture Transfer 31 QUICKTIME 31 specifications camera 59 EASYSHARE Camera Dock 61 MACINTOSH system 32 WINDOWS-based system 32 status camera 7 screen icons 7 status...

User Manual
Page 85
... 63 transferring pictures to computer 34, 36, 43 tripod 43 troubleshooting problems camera 47 camera communications 46 camera ready light 50 EASYSHARE Camera Dock 52 LCD messages 51 MMC/SD Card 45 turning camera on and off 4 U using batteries 62 EASYSHARE Camera Dock 39 pictures on computer 33 V viewing camera information 25 viewing picture after taking 13, 17 before taking 12 from internal memory 17 on MMC/SD Card 17 W web site, Kodak 55 WINDOWS installing software 30 system requirements 32 wrist strap 3 Z zoom, digital...
... 63 transferring pictures to computer 34, 36, 43 tripod 43 troubleshooting problems camera 47 camera communications 46 camera ready light 50 EASYSHARE Camera Dock 52 LCD messages 51 MMC/SD Card 45 turning camera on and off 4 U using batteries 62 EASYSHARE Camera Dock 39 pictures on computer 33 V viewing camera information 25 viewing picture after taking 13, 17 before taking 12 from internal memory 17 on MMC/SD Card 17 W web site, Kodak 55 WINDOWS installing software 30 system requirements 32 wrist strap 3 Z zoom, digital...


