
User Manual
Page 4
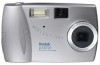
Product Overview Front View 1 2 3 9 4 8 7 5 6 1 Flash unit 2 Shutter button 3 MMC/SD card door 4 Video out port 5 USB port 6 Battery door 7 Light sensor 8 Lens 9 Viewfinder lens Bottom View 1 2 1 Dock connector door 2 Tripod mount socket ii
Product Overview Front View 1 2 3 9 4 8 7 5 6 1 Flash unit 2 Shutter button 3 MMC/SD card door 4 Video out port 5 USB port 6 Battery door 7 Light sensor 8 Lens 9 Viewfinder lens Bottom View 1 2 1 Dock connector door 2 Tripod mount socket ii

User Manual
Page 5
Table of Contents 1 Getting Started 1 What Can I Do With My Camera 1 What Can I Do With My Digital Pictures 1 Camera Package Contents 2 Attaching the Wrist Strap and Lens Cap 3 Loading the Battery 3 Turning the Camera On and Off 4 Checking the Battery Level 5 Automatic Powerdown Saves Batteries 6 Checking Camera Status 7 Status Bar Icons 7 Inserting an Optional MMC/SD Card 8 Choosing Internal...
Table of Contents 1 Getting Started 1 What Can I Do With My Camera 1 What Can I Do With My Digital Pictures 1 Camera Package Contents 2 Attaching the Wrist Strap and Lens Cap 3 Loading the Battery 3 Turning the Camera On and Off 4 Checking the Battery Level 5 Automatic Powerdown Saves Batteries 6 Checking Camera Status 7 Status Bar Icons 7 Inserting an Optional MMC/SD Card 8 Choosing Internal...

User Manual
Page 8
.... 36 Printing Your Pictures 37 From KODAK Picture Software 37 From an MMC/SD Card 37 7 Using the EASYSHARE Camera Dock 39 EASYSHARE Camera Dock Package Contents 39 Installing the Dock Insert 40 Connecting the EASYSHARE Camera Dock 40 Installing the Battery Pack in the Camera 41 Docking the Camera 41 Charging the Battery Pack 42 Transferring Pictures 43 Using a Tripod...
.... 36 Printing Your Pictures 37 From KODAK Picture Software 37 From an MMC/SD Card 37 7 Using the EASYSHARE Camera Dock 39 EASYSHARE Camera Dock Package Contents 39 Installing the Dock Insert 40 Connecting the EASYSHARE Camera Dock 40 Installing the Battery Pack in the Camera 41 Docking the Camera 41 Charging the Battery Pack 42 Transferring Pictures 43 Using a Tripod...

User Manual
Page 9
Telephone Numbers 56 10 Appendix 59 DX3700 Camera Specifications 59 EASYSHARE Camera Dock Specifications 61 Original Factory Settings - Camera 62 Using Your Batteries 62 Tips, Safety, Maintenance 63 Camera Accessories 64 Picture Storage Capacities 65 Locating Pictures on an MMC/SD Card 65 Picture File Naming Conventions 66 File Naming Conventions on an MMC/SD card ........66 File Naming Conventions in Internal Memory............66 File Naming Conventions After a Copy 67 Regulatory Information 67 FCC Compliance and Advisory 67 Canadian DOC Statement 68 vii
Telephone Numbers 56 10 Appendix 59 DX3700 Camera Specifications 59 EASYSHARE Camera Dock Specifications 61 Original Factory Settings - Camera 62 Using Your Batteries 62 Tips, Safety, Maintenance 63 Camera Accessories 64 Picture Storage Capacities 65 Locating Pictures on an MMC/SD Card 65 Picture File Naming Conventions 66 File Naming Conventions on an MMC/SD card ........66 File Naming Conventions in Internal Memory............66 File Naming Conventions After a Copy 67 Regulatory Information 67 FCC Compliance and Advisory 67 Canadian DOC Statement 68 vii
User Manual
Page 12
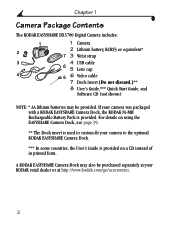
.... ** The Dock insert is used to custom-fit your camera was packaged with a KODAK EASYSHARE Camera Dock, the KODAK Ni-MH Rechargeable Battery Pack is provided. A KODAK EASYSHARE Camera Dock may be purchased separately at your KODAK retail dealer or at http://www.kodak.com/go/accessories. 2 Chapter 1 Camera Package Contents The KODAK EASYSHARE DX3700 Digital Camera includes: 1 2 3 4 1 Camera 2 Lithium battery, KCRV3 or equivalent* 7 3 Wrist strap 4 USB cable 6 5 Lens...
.... ** The Dock insert is used to custom-fit your camera was packaged with a KODAK EASYSHARE Camera Dock, the KODAK Ni-MH Rechargeable Battery Pack is provided. A KODAK EASYSHARE Camera Dock may be purchased separately at your KODAK retail dealer or at http://www.kodak.com/go/accessories. 2 Chapter 1 Camera Package Contents The KODAK EASYSHARE DX3700 Digital Camera includes: 1 2 3 4 1 Camera 2 Lithium battery, KCRV3 or equivalent* 7 3 Wrist strap 4 USB cable 6 5 Lens...

User Manual
Page 13
... after Date/Time are set (page 27), the camera will retain the settings for the types of batteries you can use alkaline batteries. Thread the lens cap string through the loop in your camera was packaged with a KODAK EASYSHARE Camera Dock, the KODAK Ni-MH Rechargeable Battery Pack is included.* 1 Open the battery door. 2 Insert the battery as shown. 3 Close the...
... after Date/Time are set (page 27), the camera will retain the settings for the types of batteries you can use alkaline batteries. Thread the lens cap string through the loop in your camera was packaged with a KODAK EASYSHARE Camera Dock, the KODAK Ni-MH Rechargeable Battery Pack is included.* 1 Open the battery door. 2 Insert the battery as shown. 3 Close the...

User Manual
Page 14
The ready light glows orange while the camera performs a self-check. In Capture mode, the status bar is set . (See page 27.) If the batteries are in process. NOTE: The first time the camera is ready to be set to Capture ) the camera is turned on, the Language and Date/Time need to ...take pictures. The camera completes any Save, Delete, or Copy operations that are removed for...
The ready light glows orange while the camera performs a self-check. In Capture mode, the status bar is set . (See page 27.) If the batteries are in process. NOTE: The first time the camera is ready to be set to Capture ) the camera is turned on, the Language and Date/Time need to ...take pictures. The camera completes any Save, Delete, or Copy operations that are removed for...

User Manual
Page 15
... flash NOTE: If you are too weak to be replaced or recharged soon. When the batteries are exhausted, the ready light blinks red for constant Battery Pack charging. For details on using a KODAK EASYSHARE Camera Dock, keep your pictures on battery usage, see page 39. 5 Chapter 1 Checking the Battery Level Check the battery power level before taking pictures.
... flash NOTE: If you are too weak to be replaced or recharged soon. When the batteries are exhausted, the ready light blinks red for constant Battery Pack charging. For details on using a KODAK EASYSHARE Camera Dock, keep your pictures on battery usage, see page 39. 5 Chapter 1 Checking the Battery Level Check the battery power level before taking pictures.

User Manual
Page 16
LCD turns off after 20 camera turns off after 1 minute; Mode When Using Batteries When Docked Capture LCD turns off after 5 minutes minutes; camera remains on Review Camera turns off after 5 minutes Setup Camera turns off after 5 minutes Camera remains on (unless in slide show) PC Connect Camera turns off the LCD or camera power when the camera is inactive. Chapter 1 Automatic Powerdown Saves Batteries The powerdown feature extends battery life by turning off after 5 minutes 6
LCD turns off after 20 camera turns off after 1 minute; Mode When Using Batteries When Docked Capture LCD turns off after 5 minutes minutes; camera remains on Review Camera turns off after 5 minutes Setup Camera turns off after 5 minutes Camera remains on (unless in slide show) PC Connect Camera turns off the LCD or camera power when the camera is inactive. Chapter 1 Automatic Powerdown Saves Batteries The powerdown feature extends battery life by turning off after 5 minutes 6

User Manual
Page 17
The current camera status icons are active. 1 Slide the Mode selector to check which camera settings are briefly displayed on the 4-way controller. Status Bar Icons Auto Fill Red-eye Off Flash Best Better Good Quality Pictures remaining Date stamp Full battery Low battery Exhausted battery (blinking) 7 Chapter 1 Checking Camera Status In Capture mode, press the button on the 4-way controller at any time to Capture and turn the camera on. 2 Press the button on the LCD. If an icon is not displayed, that camera feature is not currently activated.
The current camera status icons are active. 1 Slide the Mode selector to check which camera settings are briefly displayed on the 4-way controller. Status Bar Icons Auto Fill Red-eye Off Flash Best Better Good Quality Pictures remaining Date stamp Full battery Low battery Exhausted battery (blinking) 7 Chapter 1 Checking Camera Status In Capture mode, press the button on the 4-way controller at any time to Capture and turn the camera on. 2 Press the button on the LCD. If an icon is not displayed, that camera feature is not currently activated.

User Manual
Page 27
... the buttons to scroll forward or backward through the pictures. 3 To exit Review mode, slide the Mode selector to Review . If a card is present, the camera accesses internal memory. The icons displayed with the pictures stored in the LCD Mode Selector 1 Slide the Mode selector to Capture or Setup . Chapter 3 3 Reviewing... display and work with the picture indicate the applied features: Internal memory MMC/SD card Print order Frame number Picture Location Best Better Good/2X Digital Zoom Quality Full battery Low battery Exhausted battery 17
... the buttons to scroll forward or backward through the pictures. 3 To exit Review mode, slide the Mode selector to Review . If a card is present, the camera accesses internal memory. The icons displayed with the pictures stored in the LCD Mode Selector 1 Slide the Mode selector to Capture or Setup . Chapter 3 3 Reviewing... display and work with the picture indicate the applied features: Internal memory MMC/SD card Print order Frame number Picture Location Best Better Good/2X Digital Zoom Quality Full battery Low battery Exhausted battery 17
User Manual
Page 49
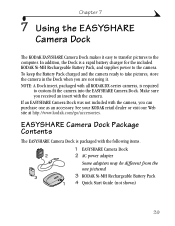
...EASYSHARE Camera Dock Package Contents The EASYSHARE Camera Dock is a rapid battery charger for the included KODAK Ni-MH Rechargeable Battery Pack, and supplies power to custom-fit the camera into the EASYSHARE Camera Dock. NOTE: A Dock insert, packaged with all KODAK DX-series cameras, is required to the camera. See your KODAK...from the one as an accessory. Chapter 7 7 Using the EASYSHARE Camera Dock The KODAK EASYSHARE Camera Dock makes it . To keep the Battery Pack charged and the camera ready to take pictures, store the camera in the Dock when you are not using it easy to ...
...EASYSHARE Camera Dock Package Contents The EASYSHARE Camera Dock is a rapid battery charger for the included KODAK Ni-MH Rechargeable Battery Pack, and supplies power to custom-fit the camera into the EASYSHARE Camera Dock. NOTE: A Dock insert, packaged with all KODAK DX-series cameras, is required to the camera. See your KODAK...from the one as an accessory. Chapter 7 7 Using the EASYSHARE Camera Dock The KODAK EASYSHARE Camera Dock makes it . To keep the Battery Pack charged and the camera ready to take pictures, store the camera in the Dock when you are not using it easy to ...

User Manual
Page 50
...EASYSHARE Camera Dock connected for charging the Battery Pack and providing power to the EASYSHARE Camera Dock. 1 Place the front tabs on the back of the Dock. 2 3 3 Plug the AC adapter (included with a Dock insert, which is used to custom-fit the camera to the camera. 40 Connecting the EASYSHARE Camera... slots in the EASYSHARE Camera Dock cavity. 2 Fit the insert down into the cavity and snap the insert into a power outlet. Then, remove the camera from the KODAK Picture Software CD (see page 29). Chapter 7 Installing the Dock Insert KODAK DX-series cameras are packaged with the...
...EASYSHARE Camera Dock connected for charging the Battery Pack and providing power to the EASYSHARE Camera Dock. 1 Place the front tabs on the back of the Dock. 2 3 3 Plug the AC adapter (included with a Dock insert, which is used to custom-fit the camera to the camera. 40 Connecting the EASYSHARE Camera... slots in the EASYSHARE Camera Dock cavity. 2 Fit the insert down into the cavity and snap the insert into a power outlet. Then, remove the camera from the KODAK Picture Software CD (see page 29). Chapter 7 Installing the Dock Insert KODAK DX-series cameras are packaged with the...

User Manual
Page 51
... are ready to transfer pictures from the camera to the computer, or charge the Battery Pack, connect the camera to the EASYSHARE Camera Dock by placing (docking) the camera in the Dock. 1 Turn the camera off. 2 On the camera bottom, slide the Dock Connection Door until it and try again. If the Battery Pack does not easily install, reposition...
... are ready to transfer pictures from the camera to the computer, or charge the Battery Pack, connect the camera to the EASYSHARE Camera Dock by placing (docking) the camera in the Dock. 1 Turn the camera off. 2 On the camera bottom, slide the Dock Connection Door until it and try again. If the Battery Pack does not easily install, reposition...

User Manual
Page 52
...powered by the Dock. NOTE: The EASYSHARE Camera Dock only charges the provided Ni-MH Rechargeable Battery Pack. The Dock locator pin fits into the camera tripod socket. m Charging stops if you place the camera in the Dock with any other type of batteries, rechargeable or not, no red light... the camera on. NOTE: If the Battery Pack requires charging, the Dock light turns red and charging begins. Chapter 7 3 Place the camera in the Dock, and push down to use. 1 Turn the camera off. 2 Make sure the Battery Pack is installed in the camera. 3 Dock the camera in the EASYSHARE Camera Dock ...
...powered by the Dock. NOTE: The EASYSHARE Camera Dock only charges the provided Ni-MH Rechargeable Battery Pack. The Dock locator pin fits into the camera tripod socket. m Charging stops if you place the camera in the Dock with any other type of batteries, rechargeable or not, no red light... the camera on. NOTE: If the Battery Pack requires charging, the Dock light turns red and charging begins. Chapter 7 3 Place the camera in the Dock, and push down to use. 1 Turn the camera off. 2 Make sure the Battery Pack is installed in the camera. 3 Dock the camera in the EASYSHARE Camera Dock ...

User Manual
Page 53
... the green light is complete, the Dock monitors battery power and charges whenever necessary. You can work with pictures on the bottom of the camera. Chapter 7 Transferring Pictures To transfer pictures from the camera to the computer: 1 Dock the camera in the EASYSHARE Camera Dock. Tripod socket 43 m KODAK Picture Transfer Software automatically opens on the computer...
... the green light is complete, the Dock monitors battery power and charges whenever necessary. You can work with pictures on the bottom of the camera. Chapter 7 Transferring Pictures To transfer pictures from the camera to the computer: 1 Dock the camera in the EASYSHARE Camera Dock. Tripod socket 43 m KODAK Picture Transfer Software automatically opens on the computer...

User Manual
Page 56
.... USB cable is not installed. Reconnect cable to save battery life. Install the software (page 29). There is off guide to disable this feature. See computer. Close all your camera and try again. Getting Started: Connect the Camera to http://www.kodak.com and click Service and Support. constantly. 46 Or, go to Your...
.... USB cable is not installed. Reconnect cable to save battery life. Install the software (page 29). There is off guide to disable this feature. See computer. Close all your camera and try again. Getting Started: Connect the Camera to http://www.kodak.com and click Service and Support. constantly. 46 Or, go to Your...

User Manual
Page 57
...available memory. Picture is not behind the subject. camera and subject. The subject is in the viewfinder. viewfinder. Camera does not Battery is exhausted or Replace or reinstall the turn on . Chapter 8 Camera Problem Cause Solution Shutter button does Camera is not turned on . light is too dark.... not Turn the flash on not work. (page 4). picture. Part of Change your internal memory is blinking. batteries (page 3). 47 The camera is Wait until the light stops processing a picture, the blinking, then take another ready light is full. Turn the...
...available memory. Picture is not behind the subject. camera and subject. The subject is in the viewfinder. viewfinder. Camera does not Battery is exhausted or Replace or reinstall the turn on . Chapter 8 Camera Problem Cause Solution Shutter button does Camera is not turned on . light is too dark.... not Turn the flash on not work. (page 4). picture. Part of Change your internal memory is blinking. batteries (page 3). 47 The camera is Wait until the light stops processing a picture, the blinking, then take another ready light is full. Turn the...

User Manual
Page 60
.... when the light stops blinking and glows green. 50 Ready light glows steady red. Picture is not charged. and recompose the picture. Camera's internal Transfer pictures to the camera. Wait. Replace the batteries (page 3) or recharge the Battery Pack. Ready light blinks green. Resume picture taking processed and saved when the light stops blinking...
.... when the light stops blinking and glows green. 50 Ready light glows steady red. Picture is not charged. and recompose the picture. Camera's internal Transfer pictures to the camera. Wait. Replace the batteries (page 3) or recharge the Battery Pack. Ready light blinks green. Resume picture taking processed and saved when the light stops blinking...

User Manual
Page 63
Reinstall the Battery Pack (page 41). The camera and Slowly return the camera and Battery Pack have Battery Pack to room been exposed to temperature. EASYSHARE Camera Dock is installed incorrectly. The Battery Pack Check for damage. The EASYSHARE Insert the Dock insert correctly Camera Dock (page 40). The camera and EASYSHARE Camera Dock are damaged. Incorrect battery Charge only a rechargeable type battery. insert not properly...
Reinstall the Battery Pack (page 41). The camera and Slowly return the camera and Battery Pack have Battery Pack to room been exposed to temperature. EASYSHARE Camera Dock is installed incorrectly. The Battery Pack Check for damage. The EASYSHARE Insert the Dock insert correctly Camera Dock (page 40). The camera and EASYSHARE Camera Dock are damaged. Incorrect battery Charge only a rechargeable type battery. insert not properly...


