
Owners Manual
Page 1
Please read this manual carefully before operating your set and retain it for future reference. LED LCD MONITOR MODEL 22MK600M 24MK600M 27MK600M 27MK60TM www.lg.com OWNER'S MANUAL LED LCD Monitor (LED Monitor*) *LG LED Monitors are LCD Monitors with LED Backlighting.
Please read this manual carefully before operating your set and retain it for future reference. LED LCD MONITOR MODEL 22MK600M 24MK600M 27MK600M 27MK60TM www.lg.com OWNER'S MANUAL LED LCD Monitor (LED Monitor*) *LG LED Monitors are LCD Monitors with LED Backlighting.

Owners Manual
Page 2
...3 ASSEMBLING AND PREPARING-- 4 --Product Components 4 --Supported Drivers and Software 5 --Component and Button Description-------- 6 How to Use the Joystick Button Input Connector --Moving and Lifting the Monitor 8 --Setting up the Monitor set 9 Assembling the Stand Mounting on a table Mounting on a wall USING THE MONITOR SET------- 14 --Connecting to a PC 14 D-SUB connection HDMI connection --Connecting to AV Devices 15 HDMI connection --Connecting Peripherals 15 Connecting Headphones CUSTOMIZING SETTINGS------- 16 TROUBLESHOOTING 21 SPECIFICATIONS 22 --Preset Modes (Resolution 28
...3 ASSEMBLING AND PREPARING-- 4 --Product Components 4 --Supported Drivers and Software 5 --Component and Button Description-------- 6 How to Use the Joystick Button Input Connector --Moving and Lifting the Monitor 8 --Setting up the Monitor set 9 Assembling the Stand Mounting on a table Mounting on a wall USING THE MONITOR SET------- 14 --Connecting to a PC 14 D-SUB connection HDMI connection --Connecting to AV Devices 15 HDMI connection --Connecting Peripherals 15 Connecting Headphones CUSTOMIZING SETTINGS------- 16 TROUBLESHOOTING 21 SPECIFICATIONS 22 --Preset Modes (Resolution 28
Owners Manual
Page 5
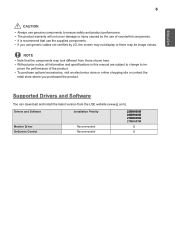
... the use the supplied components. Supported Drivers and Software You can download and install the latest version from those shown here. Drivers and Software Monitor Driver OnScreen Control Installation Priority Recommended Recommended 22MK600M 24MK600M 27MK600M 27MK60TM O O NOTE yyNote that use of the product. yyIt is recommend that the components may be image noises. yyThe product warranty will not cover damage or injury caused by LG, the screen may not display...
... the use the supplied components. Supported Drivers and Software You can download and install the latest version from those shown here. Drivers and Software Monitor Driver OnScreen Control Installation Priority Recommended Recommended 22MK600M 24MK600M 27MK600M 27MK60TM O O NOTE yyNote that use of the product. yyIt is recommend that the components may be image noises. yyThe product warranty will not cover damage or injury caused by LG, the screen may not display...

Owners Manual
Page 6
... Button How to Use the Joystick Button You can control the volume by moving the joystick button left/right. (for HDMI only) NOTE yyThe joystick button is located at the bottom of the monitor by pressing the joystick button or moving it left/right with your finger to turn on Press the joystick button once with your finger. Basic Functions Power on the monitor. Power...
... Button How to Use the Joystick Button You can control the volume by moving the joystick button left/right. (for HDMI only) NOTE yyThe joystick button is located at the bottom of the monitor by pressing the joystick button or moving it left/right with your finger to turn on Press the joystick button once with your finger. Basic Functions Power on the monitor. Power...

Owners Manual
Page 11
There is risk of the monitor to turn on a table. Leave a 100 mm (3.94 inches) (minimum) space from the wall for proper ventilation. 100 mm (3.94 inches) 100 mm (3.94 inches) 100 mm (3.94 inches) 100 mm (3.94 inches) 3 Press the joystick button on the bottom of electric shock. 2 Connect the AC-DC Adapter and Power Cord to moving or installing the monitor. or CAUTION yyUnplug the power cord prior to a wall outlet. ENEGNLGISH 11 Mounting on a table 1 Lift and tilt the Monitor set into its upright position on the monitor.
There is risk of the monitor to turn on a table. Leave a 100 mm (3.94 inches) (minimum) space from the wall for proper ventilation. 100 mm (3.94 inches) 100 mm (3.94 inches) 100 mm (3.94 inches) 100 mm (3.94 inches) 3 Press the joystick button on the bottom of electric shock. 2 Connect the AC-DC Adapter and Power Cord to moving or installing the monitor. or CAUTION yyUnplug the power cord prior to a wall outlet. ENEGNLGISH 11 Mounting on a table 1 Lift and tilt the Monitor set into its upright position on the monitor.
Owners Manual
Page 12
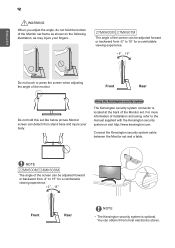
... backward from stand base and injure your body. ENEGNLGISH 12 WARNING When you adjust the angle, do not hold this set and a table. Connect the Kensington security system cable between the Monitor set like below picture.Monitor screen can be adjusted forward or backward from most electronics stores. NOTE 22MK600M 24MK600M The angle of the screen can obtain it from -2° to the manual supplied with...
... backward from stand base and injure your body. ENEGNLGISH 12 WARNING When you adjust the angle, do not hold this set and a table. Connect the Kensington security system cable between the Monitor set like below picture.Monitor screen can be adjusted forward or backward from most electronics stores. NOTE 22MK600M 24MK600M The angle of the screen can obtain it from -2° to the manual supplied with...
Owners Manual
Page 13
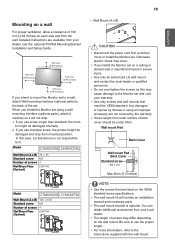
... install the Monitor set . Be sure to the instructions supplied with the wall mount. Mounting on a wall For proper ventilation, allow a clearance of 100 mm (3.94 inches) on each side and from your dealer, see the optional Tilt Wall Mounting Bracket Installation and Setup Guide. 100 mm (3.94 inches) 100 mm (3.94 inches) 100 mm (3.94 inches) 100 mm (3.94 inches) If you intend to mount the Monitor set to a wall, attach Wall mounting interface (optional parts...
... install the Monitor set . Be sure to the instructions supplied with the wall mount. Mounting on a wall For proper ventilation, allow a clearance of 100 mm (3.94 inches) on each side and from your dealer, see the optional Tilt Wall Mounting Bracket Installation and Setup Guide. 100 mm (3.94 inches) 100 mm (3.94 inches) 100 mm (3.94 inches) 100 mm (3.94 inches) If you intend to mount the Monitor set to a wall, attach Wall mounting interface (optional parts...
Owners Manual
Page 14
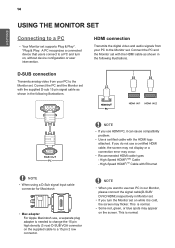
... illustrations. HDMI connection Transmits the digital video and audio signals from your PC to a PC and turn the Monitor set with the HDMI logo attached. HDMI IN 1 HDMI IN 2 NOTE yyWhen using a D-Sub signal input cable connector for Macintosh yyMac adapter For Apple Macintosh use two PC in our Monitor, please connect the signal cable(D-SUB/ DVI-D/HDMI) respectively in Monitor set supports Plug & Play*. *Plug & Play: A PC recognizes a connected device that users connect to the Monitor set. This is normal. yySome red, green, or blue spots may flicker.
... illustrations. HDMI connection Transmits the digital video and audio signals from your PC to a PC and turn the Monitor set with the HDMI logo attached. HDMI IN 1 HDMI IN 2 NOTE yyWhen using a D-Sub signal input cable connector for Macintosh yyMac adapter For Apple Macintosh use two PC in our Monitor, please connect the signal cable(D-SUB/ DVI-D/HDMI) respectively in Monitor set supports Plug & Play*. *Plug & Play: A PC recognizes a connected device that users connect to the Monitor set. This is normal. yySome red, green, or blue spots may flicker.
Owners Manual
Page 15
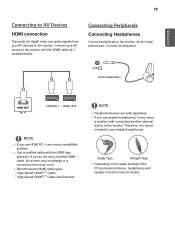
... you use a certified HDMI cable, the screen may not display or a connection error may cause a problem with connecting another external device to the monitor. If you use straight headphones. Angle Type Straight Type yyDepending on the audio settings of the PC and external device, headphones and speaker functions may be limited. Therefore, it is recommended to use HDMI PC, it may occur. yyRecommended HDMI cable types - Connect your AV...
... you use a certified HDMI cable, the screen may not display or a connection error may cause a problem with connecting another external device to the monitor. If you use straight headphones. Angle Type Straight Type yyDepending on the audio settings of the PC and external device, headphones and speaker functions may be limited. Therefore, it is recommended to use HDMI PC, it may occur. yyRecommended HDMI cable types - Connect your AV...
Owners Manual
Page 16
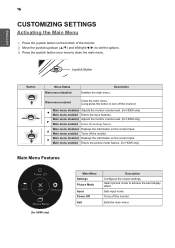
... the main menu. Main menu disabled Adjusts the monitor volume level. (for HDMI only) Main Menu Picture MoSdeettings Picture Mode Picture Mode PicturePMoidce ture Mode Input Power Off Exit Description Configures the screen settings. Turns off the monitor) Main menu disabled Adjusts the monitor volume level. (for HDMI only) ◄ Main menu enabled Enters the input features. Main menu disabled Displays the information on the current input. ▲ Main menu enabled Turns off the monitor. Sets input mode. Main menu enabled Close the main menu. (Long press the button to turn off...
... the main menu. Main menu disabled Adjusts the monitor volume level. (for HDMI only) Main Menu Picture MoSdeettings Picture Mode Picture Mode PicturePMoidce ture Mode Input Power Off Exit Description Configures the screen settings. Turns off the monitor) Main menu disabled Adjusts the monitor volume level. (for HDMI only) ◄ Main menu enabled Enters the input features. Main menu disabled Displays the information on the current input. ▲ Main menu enabled Turns off the monitor. Sets input mode. Main menu enabled Close the main menu. (Long press the button to turn off...
Owners Manual
Page 17
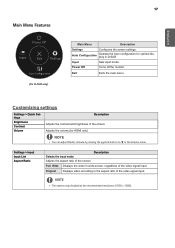
... video signal input. Full Wide Displays the video in wide-screen, regardless of the screen. Original Displays video according to ▼ in D-SUB. Adjusts the volume.(for HDMI only) NOTE yy You can adjust Mute/ Unmute by moving the joystick button to the aspect ratio of the screen. Auto Configuration Operate the Auto configuration for D-SUB only) Main Menu Description Settings Configures the screen settings. Customizing settings Settings > Quick Settings Brightness Contrast Volume Description Adjusts the contrast and brightness of the video signal input. Power Off Turns...
... video signal input. Full Wide Displays the video in wide-screen, regardless of the screen. Original Displays video according to ▼ in D-SUB. Adjusts the volume.(for HDMI only) NOTE yy You can adjust Mute/ Unmute by moving the joystick button to the aspect ratio of the screen. Auto Configuration Operate the Auto configuration for D-SUB only) Main Menu Description Settings Configures the screen settings. Customizing settings Settings > Quick Settings Brightness Contrast Volume Description Adjusts the contrast and brightness of the video signal input. Power Off Turns...
Owners Manual
Page 18
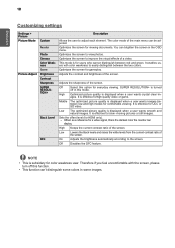
... colors in the OSD menu. Middle The optimized picture quality is effective for a video signal, this is turned off this option for comfortable viewing. y yThis function can be adjusted. It enables users with the screen, please turn off in this mode. It is displayed when a user wants images between low and high modes for everyday viewing. High Keeps the current contrast ratio of the screen. Optimizes the screen to the screen. High Optimized picture quality is for HDMI...
... colors in the OSD menu. Middle The optimized picture quality is effective for a video signal, this is turned off this option for comfortable viewing. y yThis function can be adjusted. It enables users with the screen, please turn off in this mode. It is displayed when a user wants images between low and high modes for everyday viewing. High Keeps the current contrast ratio of the screen. Optimizes the screen to the screen. High Optimized picture quality is for HDMI...
Owners Manual
Page 19
... the screen resolution on your (D-SUB only) computer is necessary. Users can customize the picture color using Red, Green, and Blue colors. y yWhen the monitor is off . Increasing the Black Stabilizer value brightens the low gray level area on the screen. (You can set to the default settings. Mode 3 wise, the lower the gamma value, the lighter the image becomes. CAUTION y ySupported Interface: HDMI. Warm: Sets the screen color to remove any vertical bars...
... the screen resolution on your (D-SUB only) computer is necessary. Users can customize the picture color using Red, Green, and Blue colors. y yWhen the monitor is off . Increasing the Black Stabilizer value brightens the low gray level area on the screen. (You can set to the default settings. Mode 3 wise, the lower the gamma value, the lighter the image becomes. CAUTION y ySupported Interface: HDMI. Warm: Sets the screen color to remove any vertical bars...

Owners Manual
Page 20
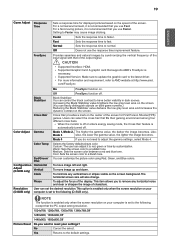
The monitor will be shown the Model, Serial Number, Total Power On Time, Resolution. NOTE yy All function except for the OSD Lock mode, brightness, Contrast, Input, Information and Volume are displayed. Yes Returns to standby mode after a certain period. yy If you want to reset your settings? Low Saves energy using the high-efficiency SMART ENERGY SAVING feature. 20 ENEGNLGISH Customizing settings Settings > General Language SMART ENERGY SAVING Automatic Standby OSD Lock Information Reset Description To choose...
The monitor will be shown the Model, Serial Number, Total Power On Time, Resolution. NOTE yy All function except for the OSD Lock mode, brightness, Contrast, Input, Information and Volume are displayed. Yes Returns to standby mode after a certain period. yy If you want to reset your settings? Low Saves energy using the high-efficiency SMART ENERGY SAVING feature. 20 ENEGNLGISH Customizing settings Settings > General Language SMART ENERGY SAVING Automatic Standby OSD Lock Information Reset Description To choose...
Owners Manual
Page 21
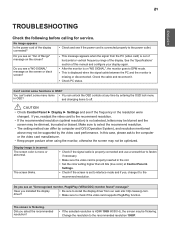
... the monitor is out of horizontal or vertical frequency range of Range" message on the screen or black screen? yy Check PC status. and changing items to install the display driver from the PC (video card) is missing or disconnected. The screen blinks. Have you select the recommended resolution? No image appears Is the power cord of this case, please ask to the recommend resolution. If yes, readjust the video card to check if the video card supports Plug&Play...
... the monitor is out of horizontal or vertical frequency range of Range" message on the screen or black screen? yy Check PC status. and changing items to install the display driver from the PC (video card) is missing or disconnected. The screen blinks. Have you select the recommended resolution? No image appears Is the power cord of this case, please ask to the recommend resolution. If yes, readjust the video card to check if the video card supports Plug&Play...

Owners Manual
Page 22
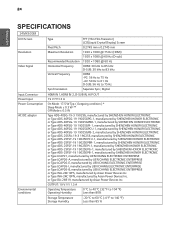
22 ENEGNLGISH SPECIFICATIONS 22MK600M LCD Screen Resolution Video Signal Type Pixel Pitch Maximum Resolution Recommended Resolution Horizontal Frequency Vertical Frequency Synchronization TFT (Thin Film Transistor) LCD(Liquid Crystal Display) Screen 0.24795 mm x 0.24795 mm 1920 x 1080 @ 75 Hz (HDMI) 1920 x 1080 @ 60 Hz (D-sub) 1920 × 1080 @ 60 Hz HDMI: 30 kHz to 85 kHz D-SUB: 30 kHz to 83 kHz HDMI -PC: 56 Hz to 75 Hz -AV: 50 Hz...
22 ENEGNLGISH SPECIFICATIONS 22MK600M LCD Screen Resolution Video Signal Type Pixel Pitch Maximum Resolution Recommended Resolution Horizontal Frequency Vertical Frequency Synchronization TFT (Thin Film Transistor) LCD(Liquid Crystal Display) Screen 0.24795 mm x 0.24795 mm 1920 x 1080 @ 75 Hz (HDMI) 1920 x 1080 @ 60 Hz (D-sub) 1920 × 1080 @ 60 Hz HDMI: 30 kHz to 85 kHz D-SUB: 30 kHz to 83 kHz HDMI -PC: 56 Hz to 75 Hz -AV: 50 Hz...

Owners Manual
Page 23
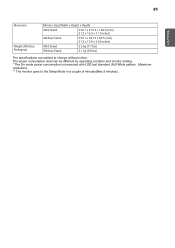
... and monitor setting. * The On mode power consumption is measured with LGE test standard (Full White pattern , Maximum resolution). ** The monitor goes to change without notice. 23 ENEGNLGISH Dimension Monitor Size (Width x Height x Depth) With Stand 488.7 x 386.7 x 182.0 (mm) 19.2 x 15.2 x 7.1 (inches) Without Stand 488.7 x 293.0 x 66.8 (mm) 19.2 x 11.5 x 2.6 (inches) Weight (Without Packaging) With Stand Without Stand 2.7 kg (5.9 lbs) 2.3 kg (5.0 lbs) The specifications are subject to the Sleep Mode...
... and monitor setting. * The On mode power consumption is measured with LGE test standard (Full White pattern , Maximum resolution). ** The monitor goes to change without notice. 23 ENEGNLGISH Dimension Monitor Size (Width x Height x Depth) With Stand 488.7 x 386.7 x 182.0 (mm) 19.2 x 15.2 x 7.1 (inches) Without Stand 488.7 x 293.0 x 66.8 (mm) 19.2 x 11.5 x 2.6 (inches) Weight (Without Packaging) With Stand Without Stand 2.7 kg (5.9 lbs) 2.3 kg (5.0 lbs) The specifications are subject to the Sleep Mode...
Owners Manual
Page 24
24 ENEGNLGISH SPECIFICATIONS 24MK600M LCD Screen Resolution Video Signal Type Pixel Pitch Maximum Resolution Recommended Resolution Horizontal Frequency Vertical Frequency Synchronization TFT (Thin Film Transistor) LCD(Liquid Crystal Display) Screen 0.2745 mm x 0.2745 mm 1920 x 1080 @ 75 Hz (HDMI) 1920 x 1080 @ 60 Hz (D-sub) 1920 × 1080 @ 60 Hz HDMI: 30 kHz to 85 kHz D-SUB: 30 kHz to 83 kHz HDMI -PC: 56 Hz to 75 Hz -AV: 50 Hz to...
24 ENEGNLGISH SPECIFICATIONS 24MK600M LCD Screen Resolution Video Signal Type Pixel Pitch Maximum Resolution Recommended Resolution Horizontal Frequency Vertical Frequency Synchronization TFT (Thin Film Transistor) LCD(Liquid Crystal Display) Screen 0.2745 mm x 0.2745 mm 1920 x 1080 @ 75 Hz (HDMI) 1920 x 1080 @ 60 Hz (D-sub) 1920 × 1080 @ 60 Hz HDMI: 30 kHz to 85 kHz D-SUB: 30 kHz to 83 kHz HDMI -PC: 56 Hz to 75 Hz -AV: 50 Hz to...
Owners Manual
Page 25
....2 x 16.3 x 7.1 (inches) Without Stand 539.1 x 321.5 x 66.5 (mm) 21.2 x 12.6 x 2.6 (inches) With Stand 3.5 kg (7.7 lbs) Without Stand 3.1 kg (6.8 lbs) The specifications are subject to the Sleep Mode in a couple of minutes(Max 5 minutes). The power consumption level can be different by operating condition and monitor setting. * The On mode power consumption is measured with LGE test standard (Full White pattern , Maximum resolution). ** The monitor goes to change without...
....2 x 16.3 x 7.1 (inches) Without Stand 539.1 x 321.5 x 66.5 (mm) 21.2 x 12.6 x 2.6 (inches) With Stand 3.5 kg (7.7 lbs) Without Stand 3.1 kg (6.8 lbs) The specifications are subject to the Sleep Mode in a couple of minutes(Max 5 minutes). The power consumption level can be different by operating condition and monitor setting. * The On mode power consumption is measured with LGE test standard (Full White pattern , Maximum resolution). ** The monitor goes to change without...

Owners Manual
Page 27
....8 x 8.2 (inches) Without Stand 611.2 x 362.6 x 72.7 (mm) 24.0 x 14.2 x 2.8 (inches) With Stand 4.8 kg (10.5 lbs) Without Stand 4.3 kg (9.4 lbs) The specifications are subject to the Sleep Mode in a couple of minutes(Max 5 minutes). The power consumption level can be different by operating condition and monitor setting. * The On mode power consumption is measured with LGE test standard (Full White pattern , Maximum resolution). ** The monitor goes to change without...
....8 x 8.2 (inches) Without Stand 611.2 x 362.6 x 72.7 (mm) 24.0 x 14.2 x 2.8 (inches) With Stand 4.8 kg (10.5 lbs) Without Stand 4.3 kg (9.4 lbs) The specifications are subject to the Sleep Mode in a couple of minutes(Max 5 minutes). The power consumption level can be different by operating condition and monitor setting. * The On mode power consumption is measured with LGE test standard (Full White pattern , Maximum resolution). ** The monitor goes to change without...


