Owners Manual
Page 1
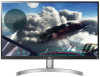
Please read the safety information carefully before using the product. IPS LED Monitor (LED Monitor) Model List 27UK650 27UK600 www.lg.com Owner's Manual IPS LED MONITOR (LED MONITOR*) *LG LED Monitors are LCD Monitors with LED Backlighting.
Please read the safety information carefully before using the product. IPS LED Monitor (LED Monitor) Model List 27UK650 27UK600 www.lg.com Owner's Manual IPS LED MONITOR (LED MONITOR*) *LG LED Monitors are LCD Monitors with LED Backlighting.
Owners Manual
Page 2
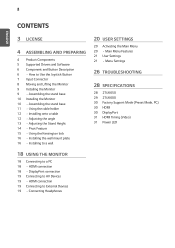
... cable holder 12 - Main Menu Features 21 User Settings 21 - Menu Settings 26 TROUBLESHOOTING 28 SPECIFICATIONS 28 27UK650 29 27UK600 30 Factory Support Mode (Preset Mode, PC) 30 HDMI 30 DisplayPort 31 HDMI Timing (Video) 31 Power LED 18 USING THE MONITOR 18 Connecting to AV Devices 19 - DisplayPort connection 19 Connecting to a PC 18 - Connecting Headphones Assembling the stand base 10 Installing the Monitor 10 - Installing to External Devices 19 - HDMI connection 19 Connecting to a wall 20 USER SETTINGS 20 Activating the Main Menu 20 - HDMI connection 18 - Assembling...
... cable holder 12 - Main Menu Features 21 User Settings 21 - Menu Settings 26 TROUBLESHOOTING 28 SPECIFICATIONS 28 27UK650 29 27UK600 30 Factory Support Mode (Preset Mode, PC) 30 HDMI 30 DisplayPort 31 HDMI Timing (Video) 31 Power LED 18 USING THE MONITOR 18 Connecting to AV Devices 19 - DisplayPort connection 19 Connecting to a PC 18 - Connecting Headphones Assembling the stand base 10 Installing the Monitor 10 - Installing to External Devices 19 - HDMI connection 19 Connecting to a wall 20 USER SETTINGS 20 Activating the Main Menu 20 - HDMI connection 18 - Assembling...
Owners Manual
Page 5
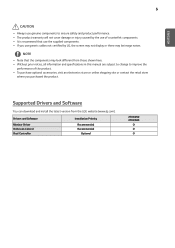
... information and specifications in this manual are subject to change to ensure safety and product performance. y yThe product warranty will not cover damage or injury caused by LG, the screen may not display or there may look different from the LGE website (www.lg.com). Drivers and Software Monitor Driver OnScreen Control Dual Controller Installation Priority Recommended Recommended Optional 27UK650 27UK600 O O O Supported Drivers and Software You can download and install the...
... information and specifications in this manual are subject to change to ensure safety and product performance. y yThe product warranty will not cover damage or injury caused by LG, the screen may not display or there may look different from the LGE website (www.lg.com). Drivers and Software Monitor Driver OnScreen Control Dual Controller Installation Priority Recommended Recommended Optional 27UK650 27UK600 O O O Supported Drivers and Software You can download and install the...

Owners Manual
Page 6
NOTE y y The joystick button is off the monitor. ◄/► Volume Control You can control the volume by pressing the joystick button or moving the joystick button left/right. 6 Component and Button Description 27UK650 27UK600 ENEGNLGISH Joystick Button Power LED y yOn: power is on y yOff: power is located at the bottom of the monitor by moving it left/right with your finger to turn on the monitor. Power off Press...
NOTE y y The joystick button is off the monitor. ◄/► Volume Control You can control the volume by pressing the joystick button or moving the joystick button left/right. 6 Component and Button Description 27UK650 27UK600 ENEGNLGISH Joystick Button Power LED y yOn: power is on y yOff: power is located at the bottom of the monitor by moving it left/right with your finger to turn on the monitor. Power off Press...

Owners Manual
Page 13
ENEGNLGISH 13 WARNING y yTo avoid injury to the fingers when adjusting the screen, do not hold the lower part of the monitor's frame as illustrated below. 27UK650 Adjusting the Stand Height 27UK650 1 Handle the monitor with both hands for safety. 27UK600 27UK600 2 The height can be adjusted up to 110.0 mm(4.33 inches). 110.0 mm(4.33 inches) y yBe careful not to touch or press the screen area when adjusting the angle of the monitor. 27UK650 WARNING 27UK650 27UK600 y yDo not put your fingers or hand between the screen and the base (chassis) when adjusting the screen's height. 27UK600
ENEGNLGISH 13 WARNING y yTo avoid injury to the fingers when adjusting the screen, do not hold the lower part of the monitor's frame as illustrated below. 27UK650 Adjusting the Stand Height 27UK650 1 Handle the monitor with both hands for safety. 27UK600 27UK600 2 The height can be adjusted up to 110.0 mm(4.33 inches). 110.0 mm(4.33 inches) y yBe careful not to touch or press the screen area when adjusting the angle of the monitor. 27UK650 WARNING 27UK650 27UK600 y yDo not put your fingers or hand between the screen and the base (chassis) when adjusting the screen's height. 27UK600
Owners Manual
Page 14
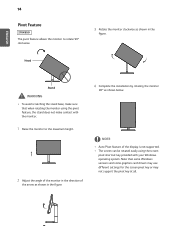
...° clockwise. 27UK600 Head 3 Rotate the monitor clockwise as shown below. Stand WARNING y yTo avoid scratching the stand base, make sure that some Windows versions and some graphics card drivers may use different settings for the screen pivot key or may not support the pivot key at all. ENEGNLGISH 14 Pivot Feature 27UK650 The pivot feature allows the monitor to the maximum height. 2 Adjust the angle...
...° clockwise. 27UK600 Head 3 Rotate the monitor clockwise as shown below. Stand WARNING y yTo avoid scratching the stand base, make sure that some Windows versions and some graphics card drivers may use different settings for the screen pivot key or may not support the pivot key at all. ENEGNLGISH 14 Pivot Feature 27UK650 The pivot feature allows the monitor to the maximum height. 2 Adjust the angle...
Owners Manual
Page 15
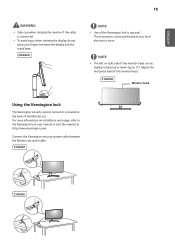
... electronics store. Adjust the horizontal level of the Monitor set and a table. 27UK650 27UK600 Connect the Kensington security system cable between the display and the stand base. 27UK650 27UK600 NOTE y yUse of the monitor head can be slightly rotated up or down (up to the Kensington lock user manual or visit the website at the back of the monitor head. 27UK650 Monitor head Using the Kensington lock The Kensington...
... electronics store. Adjust the horizontal level of the Monitor set and a table. 27UK650 27UK600 Connect the Kensington security system cable between the display and the stand base. 27UK650 27UK600 NOTE y yUse of the monitor head can be slightly rotated up or down (up to the Kensington lock user manual or visit the website at the back of the monitor head. 27UK650 Monitor head Using the Kensington lock The Kensington...

Owners Manual
Page 16
... the wall mount plate's installation guide. tor using a screwdriver. Installing to a wall Install the monitor at least 100 mm (3.94 inches) away from scratches, cover the surface with a soft cloth. 2 Place the wall mount plate onto the monitor and align it . 27UK650 27UK600 Wall Mount (A x B) Standard screw Number of the standard wall mount plate or compatible device. 1 Place the screen face down. Detailed installation instructions can damage the monitor's screen. 16 ENEGNLGISH Installing the wall mount plate This monitor supports the specification of screws Wall Mount...
... the wall mount plate's installation guide. tor using a screwdriver. Installing to a wall Install the monitor at least 100 mm (3.94 inches) away from scratches, cover the surface with a soft cloth. 2 Place the wall mount plate onto the monitor and align it . 27UK650 27UK600 Wall Mount (A x B) Standard screw Number of the standard wall mount plate or compatible device. 1 Place the screen face down. Detailed installation instructions can damage the monitor's screen. 16 ENEGNLGISH Installing the wall mount plate This monitor supports the specification of screws Wall Mount...
Owners Manual
Page 18
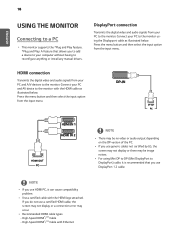
... to reconfigure anything or install any manual drivers. ENEGNLGISH 18 USING THE MONITOR Connecting to a PC y yThis monitor supports the *Plug and Play feature. *Plug and Play: A feature that you use HDMI PC, it can cause compatibility problem. DisplayPort connection Transmits the digital video and audio signals from the input menu. Connect your PC to the monitor. y y For using the Displayport cable as illustrated below . High-Speed HDMI®/TM Cable - Press the menu button and then select the...
... to reconfigure anything or install any manual drivers. ENEGNLGISH 18 USING THE MONITOR Connecting to a PC y yThis monitor supports the *Plug and Play feature. *Plug and Play: A feature that you use HDMI PC, it can cause compatibility problem. DisplayPort connection Transmits the digital video and audio signals from the input menu. Connect your PC to the monitor. y y For using the Displayport cable as illustrated below . High-Speed HDMI®/TM Cable - Press the menu button and then select the...
Owners Manual
Page 20
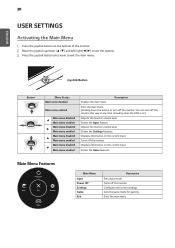
.../down the button to exit the main menu. Adjusts the monitor volume level. Displays information on .) Adjusts the monitor volume level. Turns off the monitor. Exits the main menu. You can turn off the monitor. Main Menu Features Power Off Power Off Input Input Input Input Exit Exit Power Off Settings Settings Game Exit Game Power Off Settings Game Exit Settings Main Menu Input Power Off Settings Game Exit Description Sets input mode. Configures the screen settings. Sets the game mode for gaming. Displays information on the current input. Description...
.../down the button to exit the main menu. Adjusts the monitor volume level. Displays information on .) Adjusts the monitor volume level. Turns off the monitor. Exits the main menu. You can turn off the monitor. Main Menu Features Power Off Power Off Input Input Input Input Exit Exit Power Off Settings Settings Game Exit Game Power Off Settings Game Exit Settings Main Menu Input Power Off Settings Game Exit Description Sets input mode. Configures the screen settings. Sets the game mode for gaming. Displays information on the current input. Description...
Owners Manual
Page 21
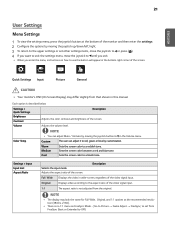
... the screen. Warm Medium Cool Sets the screen color to a bluish tone. Settings > Input Input List Aspect Ratio Selects the input mode. ENEGNLGISH 21 User Settings Menu Settings 1 To view the settings menu, press the joystick button at the recommended resolution (3840 x 2160). Sets the screen color between a red and blue tone. Description Full Wide Displays the video in the Volume menu. Adjusts the volume level. Original Displays video according to ▼in wide-screen, regardless of the video signal input. 1:1 The aspect ratio is not adjusted from...
... the screen. Warm Medium Cool Sets the screen color to a bluish tone. Settings > Input Input List Aspect Ratio Selects the input mode. ENEGNLGISH 21 User Settings Menu Settings 1 To view the settings menu, press the joystick button at the recommended resolution (3840 x 2160). Sets the screen color between a red and blue tone. Description Full Wide Displays the video in the Volume menu. Adjusts the volume level. Original Displays video according to ▼in wide-screen, regardless of the video signal input. 1:1 The aspect ratio is not adjusted from...

Owners Manual
Page 22
... cracking may occur when changing the monitor input or power on SDR(Non-HDR) signal. RTS Game This mode is changed, the screen may not be adjusted. SMPTE-C A standard TV NTSC color space for RTS Game. HDR Effect Optimizes the screen for working in the OSD menu. Dark Room 1 This mode adjusts the brightness to the optimal level for high dynamic range. FPS Game 2 It has a higher Black Stabilizer value than...
... cracking may occur when changing the monitor input or power on SDR(Non-HDR) signal. RTS Game This mode is changed, the screen may not be adjusted. SMPTE-C A standard TV NTSC color space for RTS Game. HDR Effect Optimizes the screen for working in the OSD menu. Dark Room 1 This mode adjusts the brightness to the optimal level for high dynamic range. FPS Game 2 It has a higher Black Stabilizer value than...
Owners Manual
Page 23
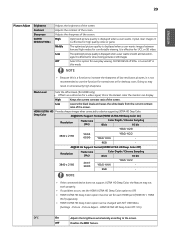
...- Picture Adjust - HDMI ULTRA HD Deep Color Off / On) DFC On Adjusts the brightness automatically according to a device supporting ULTRA HD Deep Color. Doing so may not work properly. Low The optimized picture quality is displayed when a user wants crystal clear images. y y HDMI ULTRA HD Deep Color option must be changed with SET OSD Menu. (Settings - y y HDMI ULTRA HD Deep Color option can display. Off Disables the DFC feature. 23 ENEGNLGISH Picture Adjust Brightness Contrast Sharpness SUPER RESOLUTION+ Adjusts the brightness of...
...- Picture Adjust - HDMI ULTRA HD Deep Color Off / On) DFC On Adjusts the brightness automatically according to a device supporting ULTRA HD Deep Color. Doing so may not work properly. Low The optimized picture quality is displayed when a user wants crystal clear images. y y HDMI ULTRA HD Deep Color option must be changed with SET OSD Menu. (Settings - y y HDMI ULTRA HD Deep Color option can display. Off Disables the DFC feature. 23 ENEGNLGISH Picture Adjust Brightness Contrast Sharpness SUPER RESOLUTION+ Adjusts the brightness of...
Owners Manual
Page 24
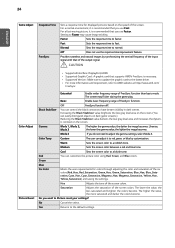
... the image becomes. Green Blue Six Color Meets the user requirements for displayed pictures based on the screen. Do you do not need to a reddish tone. For a fast-moving picture, it is necessary. Normal Sets the response time to red, green, or blue by synchronizing the vertical frequency of the input signal with that you use the response time improvement feature. Color Temp Custom The user can control the black contrast to the latest driver. Red You...
... the image becomes. Green Blue Six Color Meets the user requirements for displayed pictures based on the screen. Do you do not need to a reddish tone. For a fast-moving picture, it is necessary. Normal Sets the response time to red, green, or blue by synchronizing the vertical frequency of the input signal with that you use the response time improvement feature. Color Temp Custom The user can control the black contrast to the latest driver. Red You...
Owners Manual
Page 25
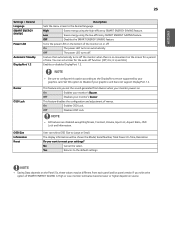
... 8 H) Enables or disables DisplayPort 1.2. Off Disables your graphics card does not support DisplayPort 1.2. This feature disables the configuration and adjustment of the monitor on source. NOTE y y Saving Data depends on automatically. Off Disables OSD Lock. Do you set a timer for a period of time. ENEGNLGISH 25 Settings > General Language SMART ENERGY SAVING Power LED Automatic Standby DisplayPort 1.2 Buzzer OSD Lock OSD Size Information Reset Description Sets the menu screen to the default settings. Off Disables the SMART ENERGY SAVING feature. NOTE...
... 8 H) Enables or disables DisplayPort 1.2. Off Disables your graphics card does not support DisplayPort 1.2. This feature disables the configuration and adjustment of the monitor on source. NOTE y y Saving Data depends on automatically. Off Disables OSD Lock. Do you set a timer for a period of time. ENEGNLGISH 25 Settings > General Language SMART ENERGY SAVING Power LED Automatic Standby DisplayPort 1.2 Buzzer OSD Lock OSD Size Information Reset Description Sets the menu screen to the default settings. Off Disables the SMART ENERGY SAVING feature. NOTE...
Owners Manual
Page 26
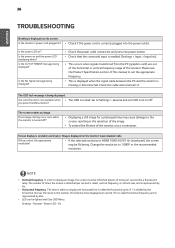
... Menu button? y yIf the selected resolution is locked. Settings - Is the power LED on and the power LED displaying white? y yThis is displayed when the signal cable between the PC and the monitor is being displayed. The OSD lock message is missing or disconnected. Does image sticking occur even when the monitor is the number of horizontal lines displayed per second. Change the resolution to display one horizontal line is called vertical frequency, or refresh rate, and is enabled (Settings > Input > Input list). NOTE y y Vertical frequency...
... Menu button? y yIf the selected resolution is locked. Settings - Is the power LED on and the power LED displaying white? y yThis is displayed when the signal cable between the PC and the monitor is being displayed. The OSD lock message is missing or disconnected. Does image sticking occur even when the monitor is the number of horizontal lines displayed per second. Change the resolution to display one horizontal line is called vertical frequency, or refresh rate, and is enabled (Settings > Input > Input list). NOTE y y Vertical frequency...
Owners Manual
Page 27
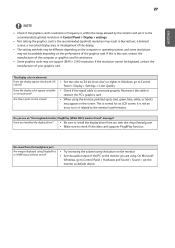
... display. y yCheck if the signal cable is it to install the display driver from the headphone port. y yBe sure to the recommended (optimal) resolution in blurred text, a dimmed screen, a truncated display area, or misalignment of the PC to Control Panel > Display > Settings > Color Quality. Does the display color appear unstable or monochrome? Are images displayed using . y ySome graphics cards may result in Control Panel > Display > settings. On Microsoft Windows, go to the monitor you are using DisplayPort or HDMI input without sound...
... display. y yCheck if the signal cable is it to install the display driver from the headphone port. y yBe sure to the recommended (optimal) resolution in blurred text, a dimmed screen, a truncated display area, or misalignment of the PC to Control Panel > Display > Settings > Color Quality. Does the display color appear unstable or monochrome? Are images displayed using . y ySome graphics cards may result in Control Panel > Display > settings. On Microsoft Windows, go to the monitor you are using DisplayPort or HDMI input without sound...
Owners Manual
Page 28
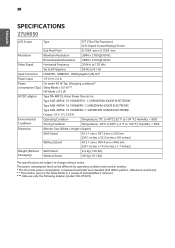
28 ENEGNLGISH SPECIFICATIONS 27UK650 LCD Screen Type TFT (Thin Film Transistor) LCD (Liquid Crystal Display) Screen Sub Pixel Pitch 0.1554 mm x 0.1554 mm Resolution Maximum Resolution 3840 x 2160 @ 60 Hz Recommended Resolution 3840 x 2160 @ 60 Hz Video Signal Horizontal Frequency 30 kHz to 135 kHz Vertical Frequency 56 Hz to change without notice. Humidity: < 85% Dimension Monitor Size (Width x Height x Depth) With Stand 613.1 mm x 567.3 mm x 230 mm (24.1 inches x 22.3 inches x 9.0 inches) Without Stand 613...
28 ENEGNLGISH SPECIFICATIONS 27UK650 LCD Screen Type TFT (Thin Film Transistor) LCD (Liquid Crystal Display) Screen Sub Pixel Pitch 0.1554 mm x 0.1554 mm Resolution Maximum Resolution 3840 x 2160 @ 60 Hz Recommended Resolution 3840 x 2160 @ 60 Hz Video Signal Horizontal Frequency 30 kHz to 135 kHz Vertical Frequency 56 Hz to change without notice. Humidity: < 85% Dimension Monitor Size (Width x Height x Depth) With Stand 613.1 mm x 567.3 mm x 230 mm (24.1 inches x 22.3 inches x 9.0 inches) Without Stand 613...
Owners Manual
Page 29
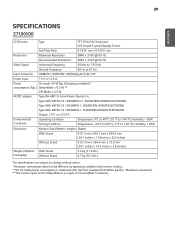
...). 29 ENEGNLGISH SPECIFICATIONS 27UK600 LCD Screen Type TFT (Thin Film Transistor) LCD (Liquid Crystal Display) Screen Sub Pixel Pitch 0.1554 mm x 0.1554 mm Resolution Maximum Resolution 3840 x 2160 @ 60 Hz Recommended Resolution 3840 x 2160 @ 60 Hz Video Signal Horizontal Frequency 30 kHz to 135 kHz Vertical Frequency 56 Hz to 61 Hz Input Connector HDMI IN1, HDMI IN2 , DP(DisplayPort) IN, H/P Power input 19 V 2.4 A Power On mode: 45 W Typ. (Outgoing condition)* consumption (Typ.) Sleep Mode ≤ 0.5 W ** Off Mode ≤...
...). 29 ENEGNLGISH SPECIFICATIONS 27UK600 LCD Screen Type TFT (Thin Film Transistor) LCD (Liquid Crystal Display) Screen Sub Pixel Pitch 0.1554 mm x 0.1554 mm Resolution Maximum Resolution 3840 x 2160 @ 60 Hz Recommended Resolution 3840 x 2160 @ 60 Hz Video Signal Horizontal Frequency 30 kHz to 135 kHz Vertical Frequency 56 Hz to 61 Hz Input Connector HDMI IN1, HDMI IN2 , DP(DisplayPort) IN, H/P Power input 19 V 2.4 A Power On mode: 45 W Typ. (Outgoing condition)* consumption (Typ.) Sleep Mode ≤ 0.5 W ** Off Mode ≤...
Specification
Page 1
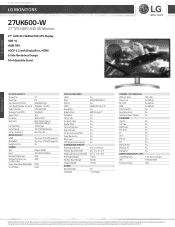
... services may require Internet access. KEY FEATURES HOME ENTERTAINMENT LG MONITORS 27UK600-W 27" IPS HDR UHD 4K Monitor 27" UHD 4K (3840x2160) IPS Display HDR 10 sRGB 99% HDCP 2.2 with DisplayPort, HDMI 3-Side Borderless Design Tilt Adjustable Stand PICTURE QUALITY Screen Size Panel Type Color Gamut (CIE1931) Color Depth(Number of Colors) Pixel Pitch(mm) Response Time (GTG) Aspect Ratio Resolution Brightness Contrast Ratio Viewing Angle Surface Treatment INPUT/OUTPUT HDMI DisplayPort Headphone Out POWER Type Input...
... services may require Internet access. KEY FEATURES HOME ENTERTAINMENT LG MONITORS 27UK600-W 27" IPS HDR UHD 4K Monitor 27" UHD 4K (3840x2160) IPS Display HDR 10 sRGB 99% HDCP 2.2 with DisplayPort, HDMI 3-Side Borderless Design Tilt Adjustable Stand PICTURE QUALITY Screen Size Panel Type Color Gamut (CIE1931) Color Depth(Number of Colors) Pixel Pitch(mm) Response Time (GTG) Aspect Ratio Resolution Brightness Contrast Ratio Viewing Angle Surface Treatment INPUT/OUTPUT HDMI DisplayPort Headphone Out POWER Type Input...


