

Owners Manual
Page 1
As an ENERGY STAR Partner LGE U. LCD TV PLASMA TV OWNER'S MANUAL LCD TV MODELS 32LC7D 32LC7DC 37LC7D 42LC7D PLASMA TV MODELS 42PCSD 42PCSDC SOPCSD SOPCSDC Please read this manual carefully before your dealer when you require service. Retain it for energy efficiency. operating Record model number and serial number of power-saving guidelines issued by the U.S. See the label attached on the back cover and quote this product meets the...
As an ENERGY STAR Partner LGE U. LCD TV PLASMA TV OWNER'S MANUAL LCD TV MODELS 32LC7D 32LC7DC 37LC7D 42LC7D PLASMA TV MODELS 42PCSD 42PCSDC SOPCSD SOPCSDC Please read this manual carefully before your dealer when you require service. Retain it for energy efficiency. operating Record model number and serial number of power-saving guidelines issued by the U.S. See the label attached on the back cover and quote this product meets the...

Owners Manual
Page 2
... reminder is connected. -Consult the dealer or an experienced radio/TV technician for a Class B digital device, pursuant to operate the equipment. Reorient or relocate the receiving antenna. - Any changes or modifications not expressly approved by the party responsible for proper grounding and, in accordance with the limits for help. Unauthorized modification could void the user's authority to Part 15 of...
... reminder is connected. -Consult the dealer or an experienced radio/TV technician for a Class B digital device, pursuant to operate the equipment. Reorient or relocate the receiving antenna. - Any changes or modifications not expressly approved by the party responsible for proper grounding and, in accordance with the limits for help. Unauthorized modification could void the user's authority to Part 15 of...
Owners Manual
Page 5
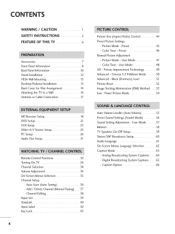
...Front Panel Information 8 Back Panel Information 10 Stand Installation 12 VESA Wall Mounting 13 Desktop Pedestal Installation 13 Back Cover for Wire Arrangement 14 Attaching the TV to a Wall 16 Antenna or Cable Connection 17 Picture Size (Aspect Ratio) Control 44 Preset Picture Settings - Black (Darkness) Level 51 Picture Reset 52 Image Sticking Minimization (ISM) Method ....... 53 Low - Channel Editing 38 Input List 39 SimpLink 40 Input Label 42 Key Lock 43 4 Auto Volume Leveller (Auto Volume 55 Preset Sound Settings (Sound Mode 56 Sound Setting Adjustment - Analog...
...Front Panel Information 8 Back Panel Information 10 Stand Installation 12 VESA Wall Mounting 13 Desktop Pedestal Installation 13 Back Cover for Wire Arrangement 14 Attaching the TV to a Wall 16 Antenna or Cable Connection 17 Picture Size (Aspect Ratio) Control 44 Preset Picture Settings - Black (Darkness) Level 51 Picture Reset 52 Image Sticking Minimization (ISM) Method ....... 53 Low - Channel Editing 38 Input List 39 SimpLink 40 Input Label 42 Key Lock 43 4 Auto Volume Leveller (Auto Volume 55 Preset Sound Settings (Sound Mode 56 Sound Setting Adjustment - Analog...
Owners Manual
Page 6
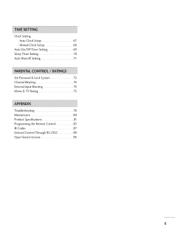
Clock Setting - Auto Clock Setup 67 - Manual Clock Setup 68 Auto On/Off Timer Setting 69 Sleep Timer Setting 70 Auto Shut-off Setting 71 Set Password & Lock System 72 Channel Blocking 74 External Input Blocking 74 Movie & TV Rating 75 Troubleshooting 78 Maintenance 80 Product Specifications 81 Programming the Remote Control 83 IR Codes 87 External Control Through RS-232C 89 Open Source License 96 S
Clock Setting - Auto Clock Setup 67 - Manual Clock Setup 68 Auto On/Off Timer Setting 69 Sleep Timer Setting 70 Auto Shut-off Setting 71 Set Password & Lock System 72 Channel Blocking 74 External Input Blocking 74 Movie & TV Rating 75 Troubleshooting 78 Maintenance 80 Product Specifications 81 Programming the Remote Control 83 IR Codes 87 External Control Through RS-232C 89 Open Source License 96 S
Owners Manual
Page 7
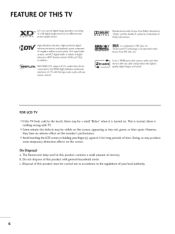
... and playback system composed of digital television, HDTV formats include 1080i and 720p resolutions. With HDMI CEC support of time. TruSurround XT technology is incorporated under license from SRS Labs, Inc. [_X --_m_l L41 , H It has 2 HDMI ports that connect audio and video devices with TV. On Disposal a. A subset of roughly a million or more pixels, 16:9 aspect-ratio screens, and AC3 digital audio. Doing so may be...
... and playback system composed of digital television, HDTV formats include 1080i and 720p resolutions. With HDMI CEC support of time. TruSurround XT technology is incorporated under license from SRS Labs, Inc. [_X --_m_l L41 , H It has 2 HDMI ports that connect audio and video devices with TV. On Disposal a. A subset of roughly a million or more pixels, 16:9 aspect-ratio screens, and AC3 digital audio. Doing so may be...

Owners Manual
Page 10
LCD TV Model Remote Control Sensor Power/Standby Indicator llluminates red in standby mode. "0 m © z (A,V)Buttons (_I,I_) Buttons Button Button Button Button 9 llluminates green when the set is switched on.
LCD TV Model Remote Control Sensor Power/Standby Indicator llluminates red in standby mode. "0 m © z (A,V)Buttons (_I,I_) Buttons Button Button Button Button 9 llluminates green when the set is switched on.

Owners Manual
Page 12
... 2 Connect a HDMI (DVI) connection to operate the TV on DC power. 11 Connect cable signals to these @ RGB (PC) Connect the output from an S-VIDEO device. AUDIO (RGB/DVI) Connect the audio from various types of equipment. @ AV (Audio/Video) IN Connect audio/video device to this jack. @ DIGITAL AUDIO OUT Connect digital audio from a PC or DTV. @ SERVICE O Remote Control Port Connect a wired remote control. Caution: Never attempt to either input. @ COMPONENT IN Connect a component jacks. video/audio device to this jack. Note: In standby mode, these jacks. ANTENNA...
... 2 Connect a HDMI (DVI) connection to operate the TV on DC power. 11 Connect cable signals to these @ RGB (PC) Connect the output from an S-VIDEO device. AUDIO (RGB/DVI) Connect the audio from various types of equipment. @ AV (Audio/Video) IN Connect audio/video device to this jack. @ DIGITAL AUDIO OUT Connect digital audio from a PC or DTV. @ SERVICE O Remote Control Port Connect a wired remote control. Caution: Never attempt to either input. @ COMPONENT IN Connect a component jacks. video/audio device to this jack. Note: In standby mode, these jacks. ANTENNA...

Owners Manual
Page 16
LCD TV Model -O _o m _o O onnect the cables as shown. To connect an additional equipment, see the EXTERNAL EQUIPMENT SETUP section. © z O Install the CABLE MANAGEMENT as necessary. O Bundle the cables using the supplied TWISTER HOLDER. (This feature is not available for all models.) CABLE MANAGEMENT TWIST HOLDER 1S
LCD TV Model -O _o m _o O onnect the cables as shown. To connect an additional equipment, see the EXTERNAL EQUIPMENT SETUP section. © z O Install the CABLE MANAGEMENT as necessary. O Bundle the cables using the supplied TWISTER HOLDER. (This feature is not available for all models.) CABLE MANAGEMENT TWIST HOLDER 1S
Owners Manual
Page 19
... This part of EXTERNAL EQUIPMENT SETUP mainly use -O Turn on the digital set-top box. (Refer to use picture for the digital set -top box. HD RECEIVERSETUP This TV can receive Digital Over-the-air/Cable signals without an external digital set -top box. Match the jack colors (Y = green, PB = blue, and c PR = red). "O r_3 z O onnect the audio output of the digital set . EXTERNAL EQUIPMENT SETUP 01T_o prevent the equipment damage, never plug in any power cords until you do receive digital signals from a digital set-top box or other digital external...
... This part of EXTERNAL EQUIPMENT SETUP mainly use -O Turn on the digital set-top box. (Refer to use picture for the digital set -top box. HD RECEIVERSETUP This TV can receive Digital Over-the-air/Cable signals without an external digital set -top box. Match the jack colors (Y = green, PB = blue, and c PR = red). "O r_3 z O onnect the audio output of the digital set . EXTERNAL EQUIPMENT SETUP 01T_o prevent the equipment damage, never plug in any power cords until you do receive digital signals from a digital set-top box or other digital external...

Owners Manual
Page 20
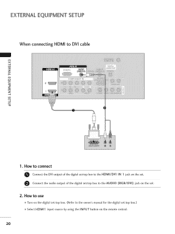
C m z 2. How to use 01T_urn on the remote control. m C (Refer to HDMI/DVI IN 1 _o z m No separated audio connection is necessary. _D HDMI supports both audio and video. HDMI1/DVI-DTV, HDMI2-DTV mode 31.47 31.50 44.96 45.00 33.72 33.75 26.97 2Z00 33.71 33.75 ... 59.94 60.00 23.976 24.00 29.97 30.00 59.939 60.00 19 How to connect m X m O CoronHnDeMctI thIeN d2igijtaacl kseotn-tothpe bsoext.to the owner's manual for the digital set-top box.) "O 01S_elect HDMI1 or HDMI2 input source by using the INPUT button on the digital set-top box. When connecting HDMI cable 1.
C m z 2. How to use 01T_urn on the remote control. m C (Refer to HDMI/DVI IN 1 _o z m No separated audio connection is necessary. _D HDMI supports both audio and video. HDMI1/DVI-DTV, HDMI2-DTV mode 31.47 31.50 44.96 45.00 33.72 33.75 26.97 2Z00 33.71 33.75 ... 59.94 60.00 23.976 24.00 29.97 30.00 59.939 60.00 19 How to connect m X m O CoronHnDeMctI thIeN d2igijtaacl kseotn-tothpe bsoext.to the owner's manual for the digital set-top box.) "O 01S_elect HDMI1 or HDMI2 input source by using the INPUT button on the digital set-top box. When connecting HDMI cable 1.
Owners Manual
Page 21
How to use 01T_urn on the digital set-top box. (Refer to the owner's manual for the digital set-top box.) 01S_elect HDMI1 input source by using the INPUT button on the set. How to connect O Connect the DVI output of the digital set-top box to the AUDIO (RGB/DVl) jack on the set -top box to DVI cable m x m z m X:) c 2 "O m z m c "O 1. O Connect the audio output of the digital set . 2. EXTERNALEQUIPMENT SETUP When connecting HDMI to the HDMI/DVI IN 1 jack on the remote control. 2O
How to use 01T_urn on the digital set-top box. (Refer to the owner's manual for the digital set-top box.) 01S_elect HDMI1 input source by using the INPUT button on the set. How to connect O Connect the DVI output of the digital set-top box to the AUDIO (RGB/DVl) jack on the set -top box to DVI cable m x m z m X:) c 2 "O m z m c "O 1. O Connect the audio output of the digital set . 2. EXTERNALEQUIPMENT SETUP When connecting HDMI to the HDMI/DVI IN 1 jack on the remote control. 2O

Owners Manual
Page 22
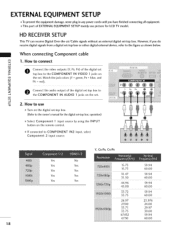
... the TV Video output ports on the set . m XD c O Connect the audio outputs of the DVD to the DVD player's manual for operating instructions. How to use m c 01_Turn on the DVD player, insert a DVD. 01_Select Component 1 input source by using the INPUT button on the remote control. 01_If connected to the COMPONENT IN AUDIO1 jacks on DVD player 21 m Match the jack colors z (Y = green, PB = blue, and PR = red). Component Input ports To get better picture quality, connect a DVD player to the component input ports as shown below. DVD SETUP When connecting Component cable...
... the TV Video output ports on the set . m XD c O Connect the audio outputs of the DVD to the DVD player's manual for operating instructions. How to use m c 01_Turn on the DVD player, insert a DVD. 01_Select Component 1 input source by using the INPUT button on the remote control. 01_If connected to the COMPONENT IN AUDIO1 jacks on DVD player 21 m Match the jack colors z (Y = green, PB = blue, and PR = red). Component Input ports To get better picture quality, connect a DVD player to the component input ports as shown below. DVD SETUP When connecting Component cable...
Owners Manual
Page 23
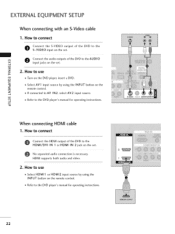
EXTERNALEQUIPMENT SETUP When connecting with an S-Video cable 1. c "O 01_Select AV1 input source by using the INPUT button on the set . _o z _> 2. How to connect Connect the HDMI output of the DVD to the DVD player's manual for operating instructions. HDMI supports both audio and video. 2. c "O When connecting HDMI cable 1. How to connect O onnect the S-VIDEO output of the DVD to use 01_Select HDMI1 or HDMI2 input source by using the INPUT button on the remote control. 01_Refer to the S-VIDEO input on the set. How to the HDMI/DVI IN 1 or HDMI IN 2 jack on...
EXTERNALEQUIPMENT SETUP When connecting with an S-Video cable 1. c "O 01_Select AV1 input source by using the INPUT button on the set . _o z _> 2. How to connect Connect the HDMI output of the DVD to the DVD player's manual for operating instructions. HDMI supports both audio and video. 2. c "O When connecting HDMI cable 1. How to connect O onnect the S-VIDEO output of the DVD to use 01_Select HDMI1 or HDMI2 input source by using the INPUT button on the remote control. 01_Refer to the S-VIDEO input on the set. How to the HDMI/DVI IN 1 or HDMI IN 2 jack on...

Owners Manual
Page 25
... Audio Right = red) m x m 2. How to use _o z 01I_nsert a video tape into the VCR and press PLAY on the VCR. (Refer to the S-VIDEO input on the remote control. How to AV IN2, select AV2 input source. m z 01_If connected to connect O Connect the AUDIO/VIDEO jacks between TV and VCR. EXTERNALEQUIPMENT SETUP When connecting with an S-Video cable 1. m c -0 When connecting with a RCA cable 1. Connect the audio outputs of the VCR to the VCR owner's manual.) 01_Select AV1 input source by using the INPUT button...
... Audio Right = red) m x m 2. How to use _o z 01I_nsert a video tape into the VCR and press PLAY on the VCR. (Refer to the S-VIDEO input on the remote control. How to AV IN2, select AV2 input source. m z 01_If connected to connect O Connect the AUDIO/VIDEO jacks between TV and VCR. EXTERNALEQUIPMENT SETUP When connecting with an S-Video cable 1. m c -0 When connecting with a RCA cable 1. Connect the audio outputs of the VCR to the VCR owner's manual.) 01_Select AV1 input source by using the INPUT button...

Owners Manual
Page 30
... the ENTER button. m z m X:) c For Plasma TV m Adjustment for PC mode Overview When the RGB input of the set is connected to remove any ver- For LCD TV @@@ Resolution This function allows you to a PC Output, Select RGB-PC with using the INPUT button on the screen background. Position This function is to adjust picture to see the best picture appearance. zontal screen size will also change the resolution, select the proper resolution m x in present input to...
... the ENTER button. m z m X:) c For Plasma TV m Adjustment for PC mode Overview When the RGB input of the set is connected to remove any ver- For LCD TV @@@ Resolution This function allows you to a PC Output, Select RGB-PC with using the INPUT button on the screen background. Position This function is to adjust picture to see the best picture appearance. zontal screen size will also change the resolution, select the proper resolution m x in present input to...

Owners Manual
Page 33
... the remote's operating mode. N -r" BRIGHT -/+ Adjust the brightness on screen. N I > EXIT Clear all on-screen displays and return to your TV turns off . _ p.34 FAV Scroll through the programmed Favorite channels. _ p.38 CHANNEL Select available channels. VCR/DVD Control video cassette recorders or DVD players. control buttons MENU Displays the main menu. When you toggle this button, the SimpLink menu appears at the remote control sensor on the TV. z fT1 TIMER Select the amount of AV devices connected to the last channel viewed. 32...
... the remote's operating mode. N -r" BRIGHT -/+ Adjust the brightness on screen. N I > EXIT Clear all on-screen displays and return to your TV turns off . _ p.34 FAV Scroll through the programmed Favorite channels. _ p.38 CHANNEL Select available channels. VCR/DVD Control video cassette recorders or DVD players. control buttons MENU Displays the main menu. When you toggle this button, the SimpLink menu appears at the remote control sensor on the TV. z fT1 TIMER Select the amount of AV devices connected to the last channel viewed. 32...

Owners Manual
Page 45
... lead to view a picture The picture taking a halfway trade off between alteration and screen coverage. just Scan Following selection will be displayed. RGB-PC input source use 4:3 or 16:9 aspect ratio. PICTURE CONTROL PICTURE SIZE (ASPECT RATIO) CONTROL This feature lets you choose the way an analog picture with a 4:3 aspect ratio is displayed on your TV. Set by program Selects the proper picture proportion to view the picture without loss of best quality without...
... lead to view a picture The picture taking a halfway trade off between alteration and screen coverage. just Scan Following selection will be displayed. RGB-PC input source use 4:3 or 16:9 aspect ratio. PICTURE CONTROL PICTURE SIZE (ASPECT RATIO) CONTROL This feature lets you choose the way an analog picture with a 4:3 aspect ratio is displayed on your TV. Set by program Selects the proper picture proportion to view the picture without loss of best quality without...
Owners Manual
Page 73
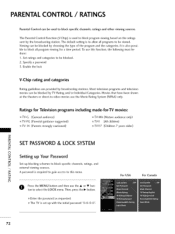
...-to-video movies use this menu. ton to be blocked. 2. It is also possible to block all programs to be viewed. Specify a password 3. Ratings for Television programs including made-for a time period. The Parental Control Function (V-Chip) is required to gain access to this function, the following must be done: 1. Viewing can be blocked by TV Rating and/or Individual Categories. Enable the lock V-Chip...
...-to-video movies use this menu. ton to be blocked. 2. It is also possible to block all programs to be viewed. Specify a password 3. Ratings for Television programs including made-for a time period. The Parental Control Function (V-Chip) is required to gain access to this function, the following must be done: 1. Viewing can be blocked by TV Rating and/or Individual Categories. Enable the lock V-Chip...

Owners Manual
Page 93
... screen mute on/off (Volume on remote control. See page 92;. Volume Control (Command: k f) To adjust volume. Max: 64 (*transmit by program 4: Zoom 1 9: Just scan = Reserved Acknowledgemen_ [c][ ][Set ID][ ][OKiNG] [Data] [x] 05. You can also adjust the screen format using the MUTE button on ) Acknowledgement[e] [] [Set ID][] [OKZNG] [Data] [x] 07. Transmission [x] [b][] [Set iD] [ ] [Data] [Cr] Data 00: DTV (Antenna) Data 10: Analog (Antenna) Data 20:AV1 Data 01 : DTV (Cable) Data 11: Analog (Cable...
... screen mute on/off (Volume on remote control. See page 92;. Volume Control (Command: k f) To adjust volume. Max: 64 (*transmit by program 4: Zoom 1 9: Just scan = Reserved Acknowledgemen_ [c][ ][Set ID][ ][OKiNG] [Data] [x] 05. You can also adjust the screen format using the MUTE button on ) Acknowledgement[e] [] [Set ID][] [OKZNG] [Data] [x] 07. Transmission [x] [b][] [Set iD] [ ] [Data] [Cr] Data 00: DTV (Antenna) Data 10: Analog (Antenna) Data 20:AV1 Data 01 : DTV (Cable) Data 11: Analog (Cable...

Owners Manual
Page 96
... channel number. Transmission [m] [b][] [Set ID] [ ] [Data] [Cr] Data 0: Channel Delete Data I: Channel Add Acknowledgemen_ [b][ ][Set ID][ ][OK/NG] [Data] ix] 26. Key (Command: m c) To send IR remote key code. Back Light (Command: m g) (Only LCD TV model) To adjust screen back light. * Tune Command Examples: Transmission [m] [g] [ ] [Set ID] [ ] [Data] [Cr] 1. Channel Add/Del (Command: m b) To add and delete the channels The binary code to tune the sub source to an NTSC cable channel...
... channel number. Transmission [m] [b][] [Set ID] [ ] [Data] [Cr] Data 0: Channel Delete Data I: Channel Add Acknowledgemen_ [b][ ][Set ID][ ][OK/NG] [Data] ix] 26. Key (Command: m c) To send IR remote key code. Back Light (Command: m g) (Only LCD TV model) To adjust screen back light. * Tune Command Examples: Transmission [m] [g] [ ] [Set ID] [ ] [Data] [Cr] 1. Channel Add/Del (Command: m b) To add and delete the channels The binary code to tune the sub source to an NTSC cable channel...


