
Owners Manual
Page 2
... the instructions, may cause harmful interference to radio communications. However, there is no guarantee that to radio or television reception, which the receiver is connected. -Consult the dealer or an experienced radio/TV technician for help. If this equipment does cause harmful interference to which can radiate radio frequency energy and, if not installed and used in a particular installation. Connect...
... the instructions, may cause harmful interference to radio communications. However, there is no guarantee that to radio or television reception, which the receiver is connected. -Consult the dealer or an experienced radio/TV technician for help. If this equipment does cause harmful interference to which can radiate radio frequency energy and, if not installed and used in a particular installation. Connect...
Owners Manual
Page 4
... the TV to install the TV by an authorized servicer. that is recommend that you connect the earth ground wire to plugs, wall outlets, and the point where the cord exits the appliance. let). The plug must be certain. SAFETY INSTRUCTIONS Na ethvuenr dteoruchor tlhigishtinagppasratoturms . or antenna during 0 When mounting a TV on the wall, make the TV with an exact replacement part by the hanging power and signal cables on...
... the TV to install the TV by an authorized servicer. that is recommend that you connect the earth ground wire to plugs, wall outlets, and the point where the cord exits the appliance. let). The plug must be certain. SAFETY INSTRUCTIONS Na ethvuenr dteoruchor tlhigishtinagppasratoturms . or antenna during 0 When mounting a TV on the wall, make the TV with an exact replacement part by the hanging power and signal cables on...

Owners Manual
Page 5
... ventilation. Be sure the antenna system is turned off, unplugged and all cables have been removed. Do not cover the product with cloth or other odors coming from the TV or hear strange sounds, unplug the power cord contact an authorized service center. @ Do not press strongly upon the panel with a soft cloth to the National Electrical Code, ANSl/NFPA 70...
... ventilation. Be sure the antenna system is turned off, unplugged and all cables have been removed. Do not cover the product with cloth or other odors coming from the TV or hear strange sounds, unplug the power cord contact an authorized service center. @ Do not press strongly upon the panel with a soft cloth to the National Electrical Code, ANSl/NFPA 70...

Owners Manual
Page 6
... Panel Information 11 Stand Instruction 12 VESA Wall Mounting 13 Cable Management 14 Desktop Pedestal Installation 15 Swivel Stand 15 Attaching the TV to a Desk 15 Securing the TV to the wall to prevent falling when the TV is used on a stand 16 Antenna or Cable Connection 17 HD Receiver Setup 18 DVD Setup 21 VCR Setup 23 Other A/V Source Setup 25 PC Setup 26 USB Connection 32 Audio Out Connection 33 Remote Control Functions 34 Turning On the TV 36 Channel Selection 36 Volume Adjustment 36 Quick Menu...
... Panel Information 11 Stand Instruction 12 VESA Wall Mounting 13 Cable Management 14 Desktop Pedestal Installation 15 Swivel Stand 15 Attaching the TV to a Desk 15 Securing the TV to the wall to prevent falling when the TV is used on a stand 16 Antenna or Cable Connection 17 HD Receiver Setup 18 DVD Setup 21 VCR Setup 23 Other A/V Source Setup 25 PC Setup 26 USB Connection 32 Audio Out Connection 33 Remote Control Functions 34 Turning On the TV 36 Channel Selection 36 Volume Adjustment 36 Quick Menu...
Owners Manual
Page 7
...& Lock System 86 Channel Blocking 89 Movie & TV Rating 90 Downloadable Rating 95 External Input Blocking 96 Key lock 97 7 Caption Option 80 Troubleshooting 98 Maintenance 100 Product Specifications 101 Programming the Remote Control 102 IR Codes 105 External Control Through RS-232C 107 Clock Setting - Auto Clock Setup 81 - Auto Volume Leveler (Auto Volume 68 Preset Sound Settings (Sound Mode 69 Sound Setting Adjustment - Analog Broadcasting System Captions ....... 78 - User Mode 70 Clear Voice 71 Balance 72 TV Speakers On/Off Setup 73 Audio Reset 74...
...& Lock System 86 Channel Blocking 89 Movie & TV Rating 90 Downloadable Rating 95 External Input Blocking 96 Key lock 97 7 Caption Option 80 Troubleshooting 98 Maintenance 100 Product Specifications 101 Programming the Remote Control 102 IR Codes 105 External Control Through RS-232C 107 Clock Setting - Auto Clock Setup 81 - Auto Volume Leveler (Auto Volume 68 Preset Sound Settings (Sound Mode 69 Sound Setting Adjustment - Analog Broadcasting System Captions ....... 78 - User Mode 70 Clear Voice 71 Balance 72 TV Speakers On/Off Setup 73 Audio Reset 74...

Owners Manual
Page 11
... mode, these ports do not work. @ AUDIO OUT Analog audio output for use with AC power. O ANTENNA/CABLE IN Connect over-the air signals to DVl cable (not included). @ COMPONENT IN Analog Connection. Doesn't support 480i. Supports standard definition video only (480i). @ USB INPUT Used for audio. @ RGB (PC) Analog PC Connection. BACK PANELINFORMATION ""_Image shown may differ from your TV. Connect cable signals to operate the TV on DC power. Supports HD video and Digital audio. definition video only (480i). Caution: Never attempt to this jack. Uses a red...
... mode, these ports do not work. @ AUDIO OUT Analog audio output for use with AC power. O ANTENNA/CABLE IN Connect over-the air signals to DVl cable (not included). @ COMPONENT IN Analog Connection. Doesn't support 480i. Supports standard definition video only (480i). @ USB INPUT Used for audio. @ RGB (PC) Analog PC Connection. BACK PANELINFORMATION ""_Image shown may differ from your TV. Connect cable signals to operate the TV on DC power. Supports HD video and Digital audio. definition video only (480i). Caution: Never attempt to this jack. Uses a red...

Owners Manual
Page 14
PROTECTIVE BRACKET (This feature is not available for all models.) O Install the CABLE MANAGEMENT CLIP as shown. CABLE MANAGEMENT CLIP O ut the cables inside the CABLE MANAGEMENT CLIP and snap it closed. 14 Secure the power cable with the PROTECTIVE BRACKET and the screw as shown. It will help prevent the power cable from your TV. "O rtl 0 Connect the cables as necessary. © To connect additional equipment, see the z EXTERNAL EQUIPMENT SETUP section. PREPARATION CABLE MANAGEMENT ,,,IImage shown may differ from being removed by accident.
PROTECTIVE BRACKET (This feature is not available for all models.) O Install the CABLE MANAGEMENT CLIP as shown. CABLE MANAGEMENT CLIP O ut the cables inside the CABLE MANAGEMENT CLIP and snap it closed. 14 Secure the power cable with the PROTECTIVE BRACKET and the screw as shown. It will help prevent the power cable from your TV. "O rtl 0 Connect the cables as necessary. © To connect additional equipment, see the z EXTERNAL EQUIPMENT SETUP section. PREPARATION CABLE MANAGEMENT ,,,IImage shown may differ from being removed by accident.
Owners Manual
Page 18
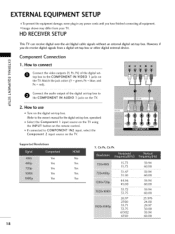
How to the COMPONENT IN VIDEO 1 jacks on x:) C the TV. HD RECEIVERSETUP This TV can receive digital over-the-air/digital cable signals without an external digital set -top box to the COMPONENT IN AUDIO 1 jacks on the digital set-top box. (Referto the owner'smanualfor the digital set-top box. top box to use 01T_urn on the TV. C 2. Component Connection m X 1. Match the jack colors (Y = green, PB = blue, and PR = red). operation) 0_Select the Component 1 input source on the TV using the INPUT button on the TV. VIDEO _ L AUDIO Supported Resolutions Y, CB/PB, CR...
How to the COMPONENT IN VIDEO 1 jacks on x:) C the TV. HD RECEIVERSETUP This TV can receive digital over-the-air/digital cable signals without an external digital set -top box to the COMPONENT IN AUDIO 1 jacks on the digital set-top box. (Referto the owner'smanualfor the digital set-top box. top box to use 01T_urn on the TV. C 2. Component Connection m X 1. Match the jack colors (Y = green, PB = blue, and PR = red). operation) 0_Select the Component 1 input source on the TV using the INPUT button on the TV. VIDEO _ L AUDIO Supported Resolutions Y, CB/PB, CR...
Owners Manual
Page 19
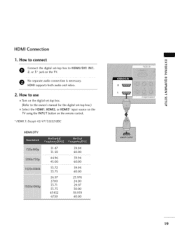
HDMI Connection 1. How to HDMI/DVI IN1, z m _0 O No separate audio connection is necessary. C HDMI supports both audio and video. How to connect m X ,-I C (Refer to the owner's manual for the digital set-top box.) 01_Select the HDMI1, HDMI2, or HDMI5 _ input source on the TV using the INPUT button on the digital set-top box. ,-I m O 2,ononr e3ct* tjahcek doignittahlesTeVt-t.op box to use ,-I m 01T_urn on the remote control. * HDMI 3: Except 42/47/52LGSODC HDMI-DTV 31.47 31.50 44.96 45...
HDMI Connection 1. How to HDMI/DVI IN1, z m _0 O No separate audio connection is necessary. C HDMI supports both audio and video. How to connect m X ,-I C (Refer to the owner's manual for the digital set-top box.) 01_Select the HDMI1, HDMI2, or HDMI5 _ input source on the TV using the INPUT button on the digital set-top box. ,-I m O 2,ononr e3ct* tjahcek doignittahlesTeVt-t.op box to use ,-I m 01T_urn on the remote control. * HDMI 3: Except 42/47/52LGSODC HDMI-DTV 31.47 31.50 44.96 45...
Owners Manual
Page 22
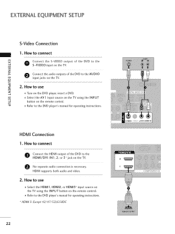
... the HDMI/DVI IN1,2, or 3* jack on the TV. How to connect m x O onnect the S-VIDEO output of the DVD to the DVD player's manual for operating instructions. * HDMI 3: Except 42/47/32LG30DC 22 c "O Refer to the S-VIDEO input on the TV. HDMI Connection 1. HDMI supports both audio and video. 2. How to use z Turn on the remote control. O No separate audio connection is necessary. How to use 01_Select the HDMI1, HDMI2, or HDMI3 _ input source on the TV using the INPUT button on the DVD player, insert a DVD. EXTERNALEQUIPMENT SETUP S-Video Connection 1.
... the HDMI/DVI IN1,2, or 3* jack on the TV. How to connect m x O onnect the S-VIDEO output of the DVD to the DVD player's manual for operating instructions. * HDMI 3: Except 42/47/32LG30DC 22 c "O Refer to the S-VIDEO input on the TV. HDMI Connection 1. HDMI supports both audio and video. 2. How to use z Turn on the remote control. O No separate audio connection is necessary. How to use 01_Select the HDMI1, HDMI2, or HDMI3 _ input source on the TV using the INPUT button on the DVD player, insert a DVD. EXTERNALEQUIPMENT SETUP S-Video Connection 1.

Owners Manual
Page 26
... c O onnect the PC audio output to HDMI Connection I. z 2. O onnect the PC audio output to the HDMI/DVI IN 1,2, or 3" jack on the TV. How to the TV's settings. Select the HDMII, HDMI2, or HDMI3* input source on the TV using the INPUT button on the remote control. EXTERNALEQUIPMENT SETUP PC SETUP This TV provides Plug and Play capability, meaning that the PC adjusts automatically to use Turn on the PC and the TV. How to connect m x z O (PoCn)necjat...
... c O onnect the PC audio output to HDMI Connection I. z 2. O onnect the PC audio output to the HDMI/DVI IN 1,2, or 3" jack on the TV. How to the TV's settings. Select the HDMII, HDMI2, or HDMI3* input source on the TV using the INPUT button on the remote control. EXTERNALEQUIPMENT SETUP PC SETUP This TV provides Plug and Play capability, meaning that the PC adjusts automatically to use Turn on the PC and the TV. How to connect m x z O (PoCn)necjat...

Owners Manual
Page 34
.../DVD/VCR Select the remote operating mode: TV, STB, DVD, or VCR. POWER Turns your TV or any other programmed equipment on or __ off . _ p.36 © CHANNEL Select available channels. USB menu (Photo List and Music List.) the SIMPLINK compatible devices. _ii! z Clear all on the mode. MUTE FLASHBK Tune to enter a program number for multiple program channels such as 2-1,2-2, etc. ...... VCR/DVD, USB, SIMPLINK Control buttons o Control Control Q Control video cassette recorders or DVD players. Q.MENU Select the desired quick menu source. _ p.37 _h I > z z VOLUME...
.../DVD/VCR Select the remote operating mode: TV, STB, DVD, or VCR. POWER Turns your TV or any other programmed equipment on or __ off . _ p.36 © CHANNEL Select available channels. USB menu (Photo List and Music List.) the SIMPLINK compatible devices. _ii! z Clear all on the mode. MUTE FLASHBK Tune to enter a program number for multiple program channels such as 2-1,2-2, etc. ...... VCR/DVD, USB, SIMPLINK Control buttons o Control Control Q Control video cassette recorders or DVD players. Q.MENU Select the desired quick menu source. _ p.37 _h I > z z VOLUME...

Owners Manual
Page 36
.... VOLUMEADJUSTMENT Adjust the volume to adjust the volume. If you want to , even if the power cord is out. You can cancel the Mute function by using the TV, press the POWER button on the remote control. 01T_his TV is programmed to remember which power state it was last set to switch the sound off, press the MUTE button. WATCHING TV / CHANNEL CONTROL TURNING ON THE TV @ First, connect power cord correctly. "-r" z When finished using the INPUT button on the remote control.
.... VOLUMEADJUSTMENT Adjust the volume to adjust the volume. If you want to , even if the power cord is out. You can cancel the Mute function by using the TV, press the POWER button on the remote control. 01T_his TV is programmed to remember which power state it was last set to switch the sound off, press the MUTE button. WATCHING TV / CHANNEL CONTROL TURNING ON THE TV @ First, connect power cord correctly. "-r" z When finished using the INPUT button on the remote control.
Owners Manual
Page 37
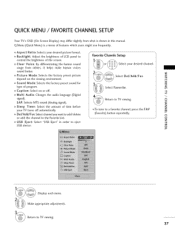
... Audio: Changes the audio language (Digital signal). SAP: Selects MTS sound (Analog signal). N I > Sleep Timer: Select the amount of time before z your desired picture format. Return to control the brightness of LCD panel to TV viewing. 37 Backlight: Adjust the brightness of the screen. Return to the Favorite List. 0 Z USB Eject: Select "USB Eject" in this manual. QUICK MENU / FAVORITECHANNEL SETUP Your TV's OSD (On Screen Display) may differ slightly from others, it helps make human voices sound better. N Sound Mode: Selects the factory preset sound...
... Audio: Changes the audio language (Digital signal). SAP: Selects MTS sound (Analog signal). N I > Sleep Timer: Select the amount of time before z your desired picture format. Return to control the brightness of LCD panel to TV viewing. 37 Backlight: Adjust the brightness of the screen. Return to the Favorite List. 0 Z USB Eject: Select "USB Eject" in this manual. QUICK MENU / FAVORITECHANNEL SETUP Your TV's OSD (On Screen Display) may differ slightly from others, it helps make human voices sound better. N Sound Mode: Selects the factory preset sound...

Owners Manual
Page 38
... Home Mode. Z © Step3. Option Setting Select OSD Language Setting or Audio Language Setting. Step2. Start Auto Tuning. It will automatically return to preset in-store mode after 5 minutes. We recommend setting the TV to easily set the essential items for viewing the TV for the first time when purchasing the TV. ii!i!i!i!i!i!i!i!i!i!i!i!i!i!i!i!i!i!i!i!i!i!i!i!i!i!i!i!i!i!i!i!i!i!i!i!i!i!i!i!i 38 WATCHING TV / CHANNEL CONTROL INITIAL SETTING This Function guides the user to "Home" mode for the best picture in...
... Home Mode. Z © Step3. Option Setting Select OSD Language Setting or Audio Language Setting. Step2. Start Auto Tuning. It will automatically return to preset in-store mode after 5 minutes. We recommend setting the TV to easily set the essential items for viewing the TV for the first time when purchasing the TV. ii!i!i!i!i!i!i!i!i!i!i!i!i!i!i!i!i!i!i!i!i!i!i!i!i!i!i!i!i!i!i!i!i!i!i!i!i!i!i!i!i 38 WATCHING TV / CHANNEL CONTROL INITIAL SETTING This Function guides the user to "Home" mode for the best picture in...

Owners Manual
Page 40
Select Auto Tuning. Select Yes. Return to Auto Tuning menu if the Lock System is required to gain access to the previous menu. Run Auto tuning. Run Auto Tuning again after any Antenna/Cable connection changes. Return to TV viewing. 01A_ password is turned on the channel list. z < N -r" > Z Z r_l N © Z © Select CHANNEL. WATCHING TV / CHANNEL CONTROL CHANNELSETUP Auto Scan (Auto Tuning) Automatically finds all channels available through antenna or cable inputs, and stores them in memory on . 4O
Select Auto Tuning. Select Yes. Return to Auto Tuning menu if the Lock System is required to gain access to the previous menu. Run Auto tuning. Run Auto Tuning again after any Antenna/Cable connection changes. Return to TV viewing. 01A_ password is turned on the channel list. z < N -r" > Z Z r_l N © Z © Select CHANNEL. WATCHING TV / CHANNEL CONTROL CHANNELSETUP Auto Scan (Auto Tuning) Automatically finds all channels available through antenna or cable inputs, and stores them in memory on . 4O

Owners Manual
Page 44
... to TV viewing. z < N "1- Select the source. On", popup menu for each input source when it's not in use. Select the label. Select the label. Return to the previous menu. If selecting Yes, you can set a label for HDMI input will not be displayed. 44 When new external device is connected, this popup menu is displayed automatically. But, when selecting "SlMPLINK - Return to appreciate. WATCHING TV / CHANNEL CONTROL INPUT LABEL You...
... to TV viewing. z < N "1- Select the source. On", popup menu for each input source when it's not in use. Select the label. Select the label. Return to the previous menu. If selecting Yes, you can set a label for HDMI input will not be displayed. 44 When new external device is connected, this popup menu is displayed automatically. But, when selecting "SlMPLINK - Return to appreciate. WATCHING TV / CHANNEL CONTROL INPUT LABEL You...
Owners Manual
Page 86
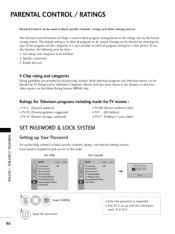
... set up blocking schemes to block specific channels, ratings, and external viewing sources. Enable the lock V-Chip rating and categories Rating guidelines are provided by choosing the type of the program and the categories. Input the password. 86 0_Enter the password as requested. 0_The TV is used to block specific channels, ratings and other viewing sources. Viewing can be blocked by broadcasting stations. PARENTALCONTROL / RATINGS Parental Control can be used to block program viewing based...
... set up blocking schemes to block specific channels, ratings, and external viewing sources. Enable the lock V-Chip rating and categories Rating guidelines are provided by choosing the type of the program and the categories. Input the password. 86 0_Enter the password as requested. 0_The TV is used to block specific channels, ratings and other viewing sources. Viewing can be blocked by broadcasting stations. PARENTALCONTROL / RATINGS Parental Control can be used to block program viewing based...

Owners Manual
Page 98
... sources of the antenna). Station signal is weak, reorient antenna to -). to receive weaker station. Is the sleep timer set : TV, VCR etc. Check the power control settings. Station or cable product experiencing problems, tune to another channel. Check your service center, if the picture has not appeared after five minutes. The HDMI cables don't support HDMI version 1.3, it cause flickers or no screen display. The problem may be with the broadcast. Are the video cables installed...
... sources of the antenna). Station signal is weak, reorient antenna to -). to receive weaker station. Is the sleep timer set : TV, VCR etc. Check the power control settings. Station or cable product experiencing problems, tune to another channel. Check your service center, if the picture has not appeared after five minutes. The HDMI cables don't support HDMI version 1.3, it cause flickers or no screen display. The problem may be with the broadcast. Are the video cables installed...

Owners Manual
Page 110
... this model, TV will send the Acknowledge after power on remote control. Aspect Ratio (Command: k c) To adjust the screen format. Transmission [k] [d][ ][Set ID][ ][Data] [Cr] .... Volume Control (Command: k f) To adjust volume. You can also adjust contrast in the PICTURE menu. Acknowledgement[f] [] [Set ID] [] [OKiNG] [Data] [x] 07. Contrast (Command: k g) To adjust screen contrast. You can also adjust volume with the volume buttons on processing completion. Brightness (Command: k h) To adjust screen brightness. Input Select (Command: x b) To select input source for TV...
... this model, TV will send the Acknowledge after power on remote control. Aspect Ratio (Command: k c) To adjust the screen format. Transmission [k] [d][ ][Set ID][ ][Data] [Cr] .... Volume Control (Command: k f) To adjust volume. You can also adjust contrast in the PICTURE menu. Acknowledgement[f] [] [Set ID] [] [OKiNG] [Data] [x] 07. Contrast (Command: k g) To adjust screen contrast. You can also adjust volume with the volume buttons on processing completion. Brightness (Command: k h) To adjust screen brightness. Input Select (Command: x b) To select input source for TV...


