Owner's Manual (English)
Page 3
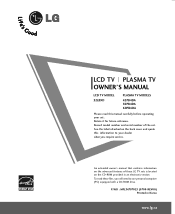
... CD-ROM provided in Korea www.lg.ca P/NO : MFL34797023 (0709-REV00) Printed in an electronic version. To read this information to your set . LCD TV PLASMA TV OWNER'S MANUAL LCD TV MODEL 32LB9D PLASMA TV MODELS 42PB4DA 50PB4DA 60PB4DA Please read these LG TV sets is located on the back cover and quote this manual carefully before operating your dealer when you will need to use personal computer (PC) equipped with...
... CD-ROM provided in Korea www.lg.ca P/NO : MFL34797023 (0709-REV00) Printed in an electronic version. To read this information to your set . LCD TV PLASMA TV OWNER'S MANUAL LCD TV MODEL 32LB9D PLASMA TV MODELS 42PB4DA 50PB4DA 60PB4DA Please read these LG TV sets is located on the back cover and quote this manual carefully before operating your dealer when you will need to use personal computer (PC) equipped with...

Owner's Manual (English)
Page 4
... interference to which the receiver is connected. - The lightning flash with the limits for help. CAUTION Do not attempt to modify this product to Part 15 of important operating and maintenance (servicing) instructions in particular, specifies that to radio or television reception, which can radiate radio frequency energy and, if not installed and used in a particular installation. If this product...
... interference to which the receiver is connected. - The lightning flash with the limits for help. CAUTION Do not attempt to modify this product to Part 15 of important operating and maintenance (servicing) instructions in particular, specifies that to radio or television reception, which can radiate radio frequency energy and, if not installed and used in a particular installation. If this product...

Owner's Manual (English)
Page 6
... cords, frayed power cords, or damaged or cracked wire insulation are not possible, have fallen into the product, and do not expose this owner's manual to qualified service personnel. When a cart is the disconnecting device. Any of fire or electric shock, do not drop onto the screen with the apparatus. SAFETY INSTRUCTIONS 9 Use only with the cart, stand, tripod, bracket, or table specified...
... cords, frayed power cords, or damaged or cracked wire insulation are not possible, have fallen into the product, and do not expose this owner's manual to qualified service personnel. When a cart is the disconnecting device. Any of fire or electric shock, do not drop onto the screen with the apparatus. SAFETY INSTRUCTIONS 9 Use only with the cart, stand, tripod, bracket, or table specified...
Owner's Manual (English)
Page 7
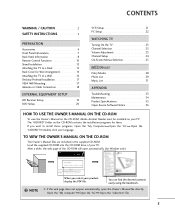
... Pedestal Installation 17 VESA Wall Mounting 17 Antenna or Cable Connection 18 EXTERNAL EQUIPMENT SETUP HD Receiver Setup 19 DVD Setup 20 VCR Setup 21 PC Setup 22 WATCHING TV Turning On the TV 23 Channel Selection 23 Volume Adjustment 23 Channel Setup 24 On-Screen Menus Selection 25 MEDIAHOST MEDIA Entry Modes 28 HOST Photo List 29 Music List 31 APPENDIX Troubleshooting 33 Maintenance 34 Product Specifications 35 Open Source Software Notice 36 HOW TO USE THE OWNER'S MANUAL ON THE CD-ROM To view the Owner's Manual...
... Pedestal Installation 17 VESA Wall Mounting 17 Antenna or Cable Connection 18 EXTERNAL EQUIPMENT SETUP HD Receiver Setup 19 DVD Setup 20 VCR Setup 21 PC Setup 22 WATCHING TV Turning On the TV 23 Channel Selection 23 Volume Adjustment 23 Channel Setup 24 On-Screen Menus Selection 25 MEDIAHOST MEDIA Entry Modes 28 HOST Photo List 29 Music List 31 APPENDIX Troubleshooting 33 Maintenance 34 Product Specifications 35 Open Source Software Notice 36 HOW TO USE THE OWNER'S MANUAL ON THE CD-ROM To view the Owner's Manual...
Owner's Manual (English)
Page 8
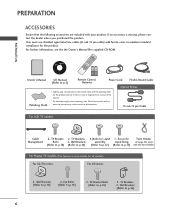
... information, see the the Owner's ManualTVINPUT files supplied CD-ROM. Please be cautions of the exterior. * Do not wipe roughly when removing stain. TV Bracket Bolts (Refer to p.16) 2- User must use shielded signal interface cables (D-sub 15 pin cable) with ferrite cores to p.16) 4-Bolts for the product. MENU TV INPUT MEDIA HOST BACK C AUTO DEMO APM M/C EJECT TIMER RATIO SIMPLINK STB BRIGHT - TV Brackets, Bolts 2- For Plasma TV models (This feature is missing...
... information, see the the Owner's ManualTVINPUT files supplied CD-ROM. Please be cautions of the exterior. * Do not wipe roughly when removing stain. TV Bracket Bolts (Refer to p.16) 2- User must use shielded signal interface cables (D-sub 15 pin cable) with ferrite cores to p.16) 4-Bolts for the product. MENU TV INPUT MEDIA HOST BACK C AUTO DEMO APM M/C EJECT TIMER RATIO SIMPLINK STB BRIGHT - TV Brackets, Bolts 2- For Plasma TV models (This feature is missing...
Owner's Manual (English)
Page 9
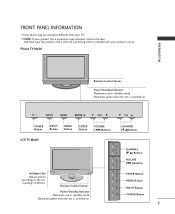
... green when the set is switched on . INPUT MENU ENTER VOL CH INPUT MENU ENTER VOL CH POWER Button INPUT Button MENU Button ENTER Button VOLUME (F,G)Buttons LCD TV Model VOL CH CH CHANNEL (E,D)Buttons CHANNEL (E,D) Buttons VOLUME (F,G) Buttons VOL ENTER MENU INPUT ENTER MENU INPUT Intelligent Eye Adjusts picture according to the surrounding conditions. Remote Control Sensor Power/Standby Indicator Illuminates red in standby mode. I Here shown may be somewhat different from your product has a protection tape attached, remove the tape. Plasma TV Model...
... green when the set is switched on . INPUT MENU ENTER VOL CH INPUT MENU ENTER VOL CH POWER Button INPUT Button MENU Button ENTER Button VOLUME (F,G)Buttons LCD TV Model VOL CH CH CHANNEL (E,D)Buttons CHANNEL (E,D) Buttons VOLUME (F,G) Buttons VOL ENTER MENU INPUT ENTER MENU INPUT Intelligent Eye Adjusts picture according to the surrounding conditions. Remote Control Sensor Power/Standby Indicator Illuminates red in standby mode. I Here shown may be somewhat different from your product has a protection tape attached, remove the tape. Plasma TV Model...

Owner's Manual (English)
Page 11
.... 6 ANTENNA/CABLE IN Connect over-the air signals to this jack. 7 DIGITAL AUDIO OUT Connect digital audio to various types of equipment. 9 AV (Audio/Video) IN 1/2 Connect audio/video output from a PC or DTV. 4 REMOTE CONTROL PORT Connect your wired remote control. 5 RS-232C IN (CONTROL & SERVICE) PORT Connect to the 1, 2 or 3 port with AC power. S-VIDEO Connect S-Video out from a PC. Note: In standby mode, these jacks. 3 RGB (PC) Connect the output from an S-VIDEO device. 10 USB INPUT 11 Power Cord Socket For operation with a DVI to HDMI cable. 2 COMPONENT...
.... 6 ANTENNA/CABLE IN Connect over-the air signals to this jack. 7 DIGITAL AUDIO OUT Connect digital audio to various types of equipment. 9 AV (Audio/Video) IN 1/2 Connect audio/video output from a PC or DTV. 4 REMOTE CONTROL PORT Connect your wired remote control. 5 RS-232C IN (CONTROL & SERVICE) PORT Connect to the 1, 2 or 3 port with AC power. S-VIDEO Connect S-Video out from a PC. Note: In standby mode, these jacks. 3 RGB (PC) Connect the output from an S-VIDEO device. 10 USB INPUT 11 Power Cord Socket For operation with a DVI to HDMI cable. 2 COMPONENT...

Owner's Manual (English)
Page 12
... CC AUTO DEMO M/C EJECT 10 VOLUME UP Increase/decrease the sound level. /DOWN MUTE Switch the sound on screen. TV INPUT STB MEDIA HOST BRIGHT - BRIGHT +/- EXIT Clear all on-screen displays and return to your TV turns off . Adjust brightness on or off automatically. TIMER Select the amount of AV devices connected to enter a program number for multiple program channels such as 2-1, 2-2, etc. CHANNEL UP/DOWN Select available channels. buttons MEDIAHOST VCR/DVD Control video cassette...
... CC AUTO DEMO M/C EJECT 10 VOLUME UP Increase/decrease the sound level. /DOWN MUTE Switch the sound on screen. TV INPUT STB MEDIA HOST BRIGHT - BRIGHT +/- EXIT Clear all on-screen displays and return to your TV turns off . Adjust brightness on or off automatically. TIMER Select the amount of AV devices connected to enter a program number for multiple program channels such as 2-1, 2-2, etc. CHANNEL UP/DOWN Select available channels. buttons MEDIAHOST VCR/DVD Control video cassette...
Owner's Manual (English)
Page 13
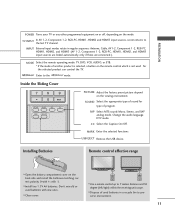
.... Installing Batteries Remote control effective range I Close cover. MODE Select the remote operating mode: TV, DVD, VCR, AUDIO, or STB. * If the mode of program. MEDIAHOST Inside the Sliding Cover BACK PICTURE Adjust the factory preset picture depend on the mode. MEDIA HOST STB MEDIA HOST PREPARATION POWER Turns your TV or any other programmed equipment on or off, depending on the viewing environment. TV INPUT In AV 1-2, Component 1-2, RGB-PC, HDMI1, HDMI2 and HDMI3 input sources, screen returns...
.... Installing Batteries Remote control effective range I Close cover. MODE Select the remote operating mode: TV, DVD, VCR, AUDIO, or STB. * If the mode of program. MEDIAHOST Inside the Sliding Cover BACK PICTURE Adjust the factory preset picture depend on the mode. MEDIA HOST STB MEDIA HOST PREPARATION POWER Turns your TV or any other programmed equipment on or off, depending on the viewing environment. TV INPUT In AV 1-2, Component 1-2, RGB-PC, HDMI1, HDMI2 and HDMI3 input sources, screen returns...
Owner's Manual (English)
Page 19
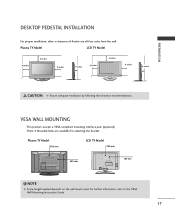
... refer to the VESA Wall Mounting Instruction Guide. ( ) ( ) 17 NOTE G Screw length needed depends on all four sides from the wall. Plasma TV Model LCD TV Model 4 inches 4 inches 4 inches 4 inches 4 inches 4 inches 4 inches 4 inches CAUTION G Ensure adequate ventilation by following the clearance recommendations. PREPARATION DESKTOP PEDESTAL INSTALLATION For proper ventilation, allow a clearance of 4inches on the wall mount used. Plasma TV Model 600 mm LCD TV Model 200 mm 400 mm 100 mm R R ! VESA WALL MOUNTING This product accepts a VESA-compliant mounting interface pad...
... refer to the VESA Wall Mounting Instruction Guide. ( ) ( ) 17 NOTE G Screw length needed depends on all four sides from the wall. Plasma TV Model LCD TV Model 4 inches 4 inches 4 inches 4 inches 4 inches 4 inches 4 inches 4 inches CAUTION G Ensure adequate ventilation by following the clearance recommendations. PREPARATION DESKTOP PEDESTAL INSTALLATION For proper ventilation, allow a clearance of 4inches on the wall mount used. Plasma TV Model 600 mm LCD TV Model 200 mm 400 mm 100 mm R R ! VESA WALL MOUNTING This product accepts a VESA-compliant mounting interface pad...
Owner's Manual (English)
Page 21
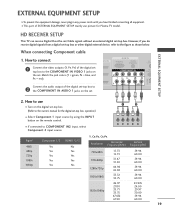
... AUDIO ( ) Connect the audio output of EXTERNAL EQUIPMENT SETUP mainly use I Turn on the remote control. How to use picture for the digital set-top box. I This part of the digital set-top box to 2 the COMPONENT IN AUDIO 1 jacks on the set. I If connected to COMPONENT IN2 input, select Component 2 input source. Match the jack colors (Y = green, PB = blue, and PR = red). operation) 1 2 I Select Component 1 input source by using the INPUT button on the digital set-top box. (Refer to the owner's manual for Plasma TV model. When connecting Component cable 1. EXTERNAL...
... AUDIO ( ) Connect the audio output of EXTERNAL EQUIPMENT SETUP mainly use I Turn on the remote control. How to use picture for the digital set-top box. I This part of the digital set-top box to 2 the COMPONENT IN AUDIO 1 jacks on the set. I If connected to COMPONENT IN2 input, select Component 2 input source. Match the jack colors (Y = green, PB = blue, and PR = red). operation) 1 2 I Select Component 1 input source by using the INPUT button on the digital set-top box. (Refer to the owner's manual for Plasma TV model. When connecting Component cable 1. EXTERNAL...
Owner's Manual (English)
Page 22
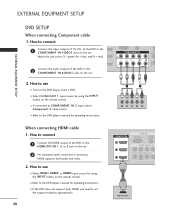
... DVD does not support Auto HDMI, you need to the HDMI/DVI IN 1, 2, or 3 jack on the remote control. I supports both audio and video. 2. How to the DVD player's manual for operating instructions. How to connect 1 Connect the video outputs (Y, PB, PR) of the DVD to the COMPONENT IN AUDIO1 jacks on the remote control. EXTERNAL EQUIPMENT SETUP DVD SETUP When connecting Component cable 1. I Select HDMI1, HDMI2, or HDMI3 input source by using the INPUT button on the set . 2 No separated audio connection is necessary. EXTERNAL EQUIPMENT SETUP 2 Connect the audio outputs...
... DVD does not support Auto HDMI, you need to the HDMI/DVI IN 1, 2, or 3 jack on the remote control. I supports both audio and video. 2. How to the DVD player's manual for operating instructions. How to connect 1 Connect the video outputs (Y, PB, PR) of the DVD to the COMPONENT IN AUDIO1 jacks on the remote control. EXTERNAL EQUIPMENT SETUP DVD SETUP When connecting Component cable 1. I Select HDMI1, HDMI2, or HDMI3 input source by using the INPUT button on the set . 2 No separated audio connection is necessary. EXTERNAL EQUIPMENT SETUP 2 Connect the audio outputs...
Owner's Manual (English)
Page 23
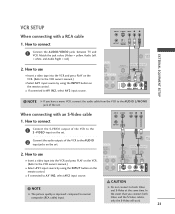
... S-Video cables, only the S-Video will work. 21 CAUTION G Do not connect to the AUDIO L/MONO jack of the VCR to the VCR owner's manual.) I Select A V 1 input source by using the INPUT button on the remote control. Match the jack colors (Video = yellow, Audio Left = white, and Audio Right = red) 2. How to connect 1 Connect the S-VIDEO output of the set . 2. AUDIO GB/DVI) NT IN AUDIO ANT CAB 1 REMOTE DIGITAL A2UDIO OUT CONTROL IN OPTICAL COAXIAL ( ) RS-232C IN (CONTROL & SERVICE) AUDIO OUT S-VIDEO AV IN 1 AUDIO VIDEO (MONO...
... S-Video cables, only the S-Video will work. 21 CAUTION G Do not connect to the AUDIO L/MONO jack of the VCR to the VCR owner's manual.) I Select A V 1 input source by using the INPUT button on the remote control. Match the jack colors (Video = yellow, Audio Left = white, and Audio Right = red) 2. How to connect 1 Connect the S-VIDEO output of the set . 2. AUDIO GB/DVI) NT IN AUDIO ANT CAB 1 REMOTE DIGITAL A2UDIO OUT CONTROL IN OPTICAL COAXIAL ( ) RS-232C IN (CONTROL & SERVICE) AUDIO OUT S-VIDEO AV IN 1 AUDIO VIDEO (MONO...
Owner's Manual (English)
Page 24
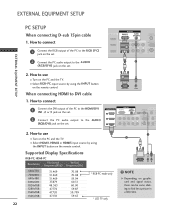
.../DVI) COMPONENT IN 2 REMOTE CONTROL IN RS-232C (CONTROL & SE S-VIDEO 1 VIDEO AUDIO V ( ) 1 2 ( ) EXTERNAL EQUIPMENT SETUP 2. How to connect RGB OUTPUT AUDIO 1 Connect the DVI output of the PC to the RG B (P C) jack on the set. 2 Connect the PC audio output to the AUDIO (RGB/DVI) jack on the set . NOTE G Depending on the PC and the TV. When connecting HDMI to use I Select RGB-PC input source by using the INPUT button on the PC and the TV. I Turn on graphic card and signal...
.../DVI) COMPONENT IN 2 REMOTE CONTROL IN RS-232C (CONTROL & SE S-VIDEO 1 VIDEO AUDIO V ( ) 1 2 ( ) EXTERNAL EQUIPMENT SETUP 2. How to connect RGB OUTPUT AUDIO 1 Connect the DVI output of the PC to the RG B (P C) jack on the set. 2 Connect the PC audio output to the AUDIO (RGB/DVI) jack on the set . NOTE G Depending on the PC and the TV. When connecting HDMI to use I Select RGB-PC input source by using the INPUT button on the PC and the TV. I Turn on graphic card and signal...
Owner's Manual (English)
Page 25
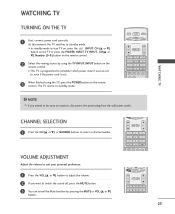
... TV switches to standby mode. CHANNEL SELECTION 1 Press the CH (D or E) or NUMBER buttonsTVtINoPUT select a channel number. WATCHING TV TV INPUT STB MEDIA HOST TURNING ON THE TV TV INPUT INPUT 1 First, connect power cord correctly. NOTE BACK PICTURE SOUND SAP CC MARK USB EJECT G If you want to be away on the remote control. STB MEDIA HOST VOLUME ADJUSTMENT Adjust the volume to suit your personal preference. 1 Press the VOL (D or E) button to adjust the volume. 2 If you intend to switch the sound off...
... TV switches to standby mode. CHANNEL SELECTION 1 Press the CH (D or E) or NUMBER buttonsTVtINoPUT select a channel number. WATCHING TV TV INPUT STB MEDIA HOST TURNING ON THE TV TV INPUT INPUT 1 First, connect power cord correctly. NOTE BACK PICTURE SOUND SAP CC MARK USB EJECT G If you want to be away on the remote control. STB MEDIA HOST VOLUME ADJUSTMENT Adjust the volume to suit your personal preference. 1 Press the VOL (D or E) button to adjust the volume. 2 If you intend to switch the sound off...

Owner's Manual (English)
Page 26
... the Lock System is required to gain access to stop the current scan and start ANALOG ANTENNA channel scan. A password is turned on the channel list. TV INPUT STB MEDIA HOST BRIGHT - Auto Tuning Manual Tuning Channel Edit BACK PICTURE SOUND SAP CC MARK USB EJECT 2 Press the G button and theBAnCK use D or E button to the Auto Tuning screen. ! Selection ( G oDrTV C)hl.e2a3ds you to select the SETUP menu. NOTE 2 DTV (Digital DTV antenna) TV (Analog TV antenna) CADTV (Digital CADTV cable...
... the Lock System is required to gain access to stop the current scan and start ANALOG ANTENNA channel scan. A password is turned on the channel list. TV INPUT STB MEDIA HOST BRIGHT - Auto Tuning Manual Tuning Channel Edit BACK PICTURE SOUND SAP CC MARK USB EJECT 2 Press the G button and theBAnCK use D or E button to the Auto Tuning screen. ! Selection ( G oDrTV C)hl.e2a3ds you to select the SETUP menu. NOTE 2 DTV (Digital DTV antenna) TV (Analog TV antenna) CADTV (Digital CADTV cable...
Owner's Manual (English)
Page 27
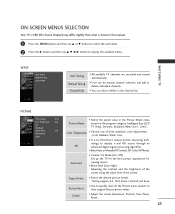
... desired picture format. : Set by program, 4:3, 16:9, Zoom1, Zoom2, Just Scan. Picture Reset I You can do manual channel selection and add or delete individual channels. I Use to quickly reset all the Picture menu options to display a real HD source through an XD advanced digital signal processing algorithm. Aspect Ratio I Select Auto or Manual (XD Contrast, XD Color, XD Noise). Advanced I All available TV channels are searched and stored automatically. I It is shown in the Picture Mode menu based...
... desired picture format. : Set by program, 4:3, 16:9, Zoom1, Zoom2, Just Scan. Picture Reset I You can do manual channel selection and add or delete individual channels. I Use to quickly reset all the Picture menu options to display a real HD source through an XD advanced digital signal processing algorithm. Aspect Ratio I Select Auto or Manual (XD Contrast, XD Color, XD Noise). Advanced I All available TV channels are searched and stored automatically. I It is shown in the Picture Mode menu based...

Owner's Manual (English)
Page 29
... input source. Downloadable I This function may become disabled. I Control and play other AV devices connected to prevent unauthorized viewing by locking out the front panel controls. I Selecting canadian english language rating system. TV Rating-English I Reduces the plasma display power consumption. I Set a label to view. Block Channel I Select a channel number that you have hooked up. 27 I Digital: Service1~ Service6 I Digital Option: Customize the DTV/CADTV captions that appear on your desired language for digital channel signal. WATCHING TV...
... input source. Downloadable I This function may become disabled. I Control and play other AV devices connected to prevent unauthorized viewing by locking out the front panel controls. I Selecting canadian english language rating system. TV Rating-English I Reduces the plasma display power consumption. I Set a label to view. Block Channel I Select a channel number that you have hooked up. 27 I Digital: Service1~ Service6 I Digital Option: Customize the DTV/CADTV captions that appear on your desired language for digital channel signal. WATCHING TV...

Owner's Manual (English)
Page 30
NOTE G Press the USB EJECT button of remote control before removing the USB device. G If the USB storage device is connected through a USB hub, the device is recognizable. G Please do not turn off the TV or unplug the USB device when the connected USB storage device is working. In case of a storage device formatted as a different utility program which uses its own driver may not be supported or operated smoothly. If...
NOTE G Press the USB EJECT button of remote control before removing the USB device. G If the USB storage device is connected through a USB hub, the device is recognizable. G Please do not turn off the TV or unplug the USB device when the connected USB storage device is working. In case of a storage device formatted as a different utility program which uses its own driver may not be supported or operated smoothly. If...

Owner's Manual (English)
Page 35
... the video cables installed properly? I Keep a sufficient distance between the product and the remote control causing obstruction. Power interrupted. APPENDIX The video function does not work normally. I Ensure that the batteries are pointing the remote control directly at the TV. The problem may be with correct polarity (+ to another channel. I Test the wall power outlet, plug another channel. I Check your service center, if the picture has not appeared after switching...
... the video cables installed properly? I Keep a sufficient distance between the product and the remote control causing obstruction. Power interrupted. APPENDIX The video function does not work normally. I Ensure that the batteries are pointing the remote control directly at the TV. The problem may be with correct polarity (+ to another channel. I Test the wall power outlet, plug another channel. I Check your service center, if the picture has not appeared after switching...


