
Owners Manual
Page 4
... or objects have the cord replaced with liquids, such as being _visted, kinked, pinched, closed in electric shock or fire. an authorized servicer. Overloaded wall outlets, loose or damaged wall outlets, extension cords, frayed power cords, or damaged or cracked wire insulation are dangerous. O Use only with the carl stand, tdpod, bracket, or table specified by _ ISCONNECTING DEVICE FROM MAINS Mains plug is the disconnecting...
... or objects have the cord replaced with liquids, such as being _visted, kinked, pinched, closed in electric shock or fire. an authorized servicer. Overloaded wall outlets, loose or damaged wall outlets, extension cords, frayed power cords, or damaged or cracked wire insulation are dangerous. O Use only with the carl stand, tdpod, bracket, or table specified by _ ISCONNECTING DEVICE FROM MAINS Mains plug is the disconnecting...

Owners Manual
Page 5
... Initial Channel Search (EZ Scan 37 Channel Selection 38 Volume Adjustment 38 4 Panel Menu - Adjusting Main and Sub Pi_ure Sizes for PIP/Twin Picture 59 - Using TV Guide TV Guide On Screen _uFeature Overview - Watching PIP/POP/Twin Picture 58 - Moving the PIP Sub Picture 59 - Main Services Listings I Search Schedule I SAFETY INSTRUCTIONS 2-3 N O Z -4 TV Guide On Screen rMNotices for PIP 59 - Selecting an Input Signal Source for Twin Picture 60 - CONTENTS WARNING / CAUTION I Setup - TV Program Selection for U.S.A. / m z Digital Cable...
... Initial Channel Search (EZ Scan 37 Channel Selection 38 Volume Adjustment 38 4 Panel Menu - Adjusting Main and Sub Pi_ure Sizes for PIP/Twin Picture 59 - Using TV Guide TV Guide On Screen _uFeature Overview - Watching PIP/POP/Twin Picture 58 - Moving the PIP Sub Picture 59 - Main Services Listings I Search Schedule I SAFETY INSTRUCTIONS 2-3 N O Z -4 TV Guide On Screen rMNotices for PIP 59 - Selecting an Input Signal Source for Twin Picture 60 - CONTENTS WARNING / CAUTION I Setup - TV Program Selection for U.S.A. / m z Digital Cable...

Owners Manual
Page 6
...Main Picture Source Selection 67 Input Label 68 Video Adiustment Auto Picture Control (EZ Picture) ......... 69 Adaptive Picture Mode (APM 70 Manual Picture Control (EZ Picture-User Option 7] Color Temperature Control 72-73 o Auto Color Temperature Control 72 - for CANADA only 05 Input Block 106 CableCARD TM Function Cable Menu Options 107 Scrambled channel 108 Cable Channel List 109 Emergency Message Alert 109 External Control Device Setup IR Codes 110-116 117-118 Programming the Remote Control 9 Programming Codes 120-122 Troubleshooting...
...Main Picture Source Selection 67 Input Label 68 Video Adiustment Auto Picture Control (EZ Picture) ......... 69 Adaptive Picture Mode (APM 70 Manual Picture Control (EZ Picture-User Option 7] Color Temperature Control 72-73 o Auto Color Temperature Control 72 - for CANADA only 05 Input Block 106 CableCARD TM Function Cable Menu Options 107 Scrambled channel 108 Cable Channel List 109 Emergency Message Alert 109 External Control Device Setup IR Codes 110-116 117-118 Programming the Remote Control 9 Programming Codes 120-122 Troubleshooting...

Owners Manual
Page 7
... 160 degrees. The Plasma TV can be exchanged or returned. Using plasma is the best way to achieve flat panel displays with phosphors in other Plasma TV manufacturers' products. These phosphors are easily viewable. The tiny dots appearing does not mean that are the same types used to produce colored light (red, green, or blue). pixe[ to react with excellent image quality and large screen sizes that this product...
... 160 degrees. The Plasma TV can be exchanged or returned. Using plasma is the best way to achieve flat panel displays with phosphors in other Plasma TV manufacturers' products. These phosphors are easily viewable. The tiny dots appearing does not mean that are the same types used to produce colored light (red, green, or blue). pixe[ to react with excellent image quality and large screen sizes that this product...

Owners Manual
Page 11
Front Panel Controls O C 8 Z iiiiiii__iii_iiiii_ii_ i_ii__iiiiiiiiiiiii!i Remote Control Sensor Power Standby Indicator llIuminates red in standby mode. When the TV is turned on, the indicator blinks white and then illuminates white before the picture is displayed. POWER gutton iTV GUIDE Button INPUT Button [MENU [Button VOLUME CHANNEL (V,A)Buttons I0 CONTROLS Here shown may be somewhat different from your TV.
Front Panel Controls O C 8 Z iiiiiii__iii_iiiii_ii_ i_ii__iiiiiiiiiiiii!i Remote Control Sensor Power Standby Indicator llIuminates red in standby mode. When the TV is turned on, the indicator blinks white and then illuminates white before the picture is displayed. POWER gutton iTV GUIDE Button INPUT Button [MENU [Button VOLUME CHANNEL (V,A)Buttons I0 CONTROLS Here shown may be somewhat different from your TV.

Owners Manual
Page 12
... jack. @ RGB/AUDIO IN Connect the monitor output appropriate input port. S VIDEO input Provides be_er picture quality than the video input. z -4 AUDIO Input O Connections are available for CableCARD _ Cable Service Provider. Or DVl(VlDEO)signal to the 1 (DVI) port with AC power, Caution: Never a_empt to HDMI cable. CONNECTION OPTIONS Back ConneXion Panel CableCARD '_ Used for listening to stereo sound from an external device, C N VIDEO Input -4 Connects the video signal from a PC to the @ Remote Control Port Connect your wired remote control, @ Power Cord Socket For...
... jack. @ RGB/AUDIO IN Connect the monitor output appropriate input port. S VIDEO input Provides be_er picture quality than the video input. z -4 AUDIO Input O Connections are available for CableCARD _ Cable Service Provider. Or DVl(VlDEO)signal to the 1 (DVI) port with AC power, Caution: Never a_empt to HDMI cable. CONNECTION OPTIONS Back ConneXion Panel CableCARD '_ Used for listening to stereo sound from an external device, C N VIDEO Input -4 Connects the video signal from a PC to the @ Remote Control Port Connect your wired remote control, @ Power Cord Socket For...

Owners Manual
Page 13
... TV Guide On Screen system. Enters or exits a Panel Menu in 24 hour increments. VCR/DVD control bu_ons DAY+/DA% Control video cassette recorders or DVD players. THUMBSTICK (Up/Down/Left Right/ENTER) Navigate the on -screen displays and return to enter a program number for multiple program channels such as 2-1,2-2, etc. INFO Display information at the remote control sensor on or off. _ p.38 FAV Scroll through the programmed Favorite channels. CC Select a closed caption...
... TV Guide On Screen system. Enters or exits a Panel Menu in 24 hour increments. VCR/DVD control bu_ons DAY+/DA% Control video cassette recorders or DVD players. THUMBSTICK (Up/Down/Left Right/ENTER) Navigate the on -screen displays and return to enter a program number for multiple program channels such as 2-1,2-2, etc. INFO Display information at the remote control sensor on or off. _ p.38 FAV Scroll through the programmed Favorite channels. CC Select a closed caption...

Owners Manual
Page 14
... the screen. _ p,70 -- p,34 PiP CH-/PiP PiP CH+ Switches the sub picture PIR POR Twin picture or off automatically. @ p.90 APM Compare the Daylight, Normal, Night Time and User1 (or2) on the mode. matica[ly, only if these are linked auto- z INPUT External input modes rotate in PC mode. POWER Turns your TV turns off mode. @ p.58-61 Changes the PiP channel. _ p.59 PiP iNPUT Select the connected sub°picture. _ p,59 input source for type of program, _ p.80...
... the screen. _ p,70 -- p,34 PiP CH-/PiP PiP CH+ Switches the sub picture PIR POR Twin picture or off automatically. @ p.90 APM Compare the Daylight, Normal, Night Time and User1 (or2) on the mode. matica[ly, only if these are linked auto- z INPUT External input modes rotate in PC mode. POWER Turns your TV turns off mode. @ p.58-61 Changes the PiP channel. _ p.59 PiP iNPUT Select the connected sub°picture. _ p,59 input source for type of program, _ p.80...
Owners Manual
Page 19
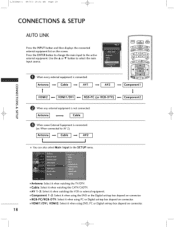
... or external equipment. Use the A or Y button to the active external equipment. Antennal 1 _ ! O, When every external equipment is connected: t_ [Antenna ] --[ Cable ] --[ AVi ] --[ I AV2 I You can also select Main Input in the SETUP menu. Press the ENTER button to change the main input to select the main input source. t,_.51.2Deno,_! 06/9/2 10:21 _ Page "18 CONNECTIONS & SETUP AUTO UNK Press the iNPUT button and then displays the connected external equipment list on connector. Cable I _ I AV2...
... or external equipment. Use the A or Y button to the active external equipment. Antennal 1 _ ! O, When every external equipment is connected: t_ [Antenna ] --[ Cable ] --[ AVi ] --[ I AV2 I You can also select Main Input in the SETUP menu. Press the ENTER button to change the main input to select the main input source. t,_.51.2Deno,_! 06/9/2 10:21 _ Page "18 CONNECTIONS & SETUP AUTO UNK Press the iNPUT button and then displays the connected external equipment list on connector. Cable I _ I AV2...
Owners Manual
Page 22
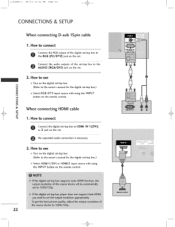
... IN VIDEO 1 jacks Z on the remote control. blue, and PR -- How to use Turn on the set -top box. (Refer to COMPONENT IN2 input, select COMPONENT 2 input source. If connected to the owner's manual for Digital Contents When connecting Component cab[e to connect N Connect the video outputs (Y, Ps, PR) of the digital set . Match the iack colors m t_ (Y -- However, if you to the figure as This TV supports HDCP (High-bandwidth (480p,720p, 10801). green, PB...
... IN VIDEO 1 jacks Z on the remote control. blue, and PR -- How to use Turn on the set -top box. (Refer to COMPONENT IN2 input, select COMPONENT 2 input source. If connected to the owner's manual for Digital Contents When connecting Component cab[e to connect N Connect the video outputs (Y, Ps, PR) of the digital set . Match the iack colors m t_ (Y -- However, if you to the figure as This TV supports HDCP (High-bandwidth (480p,720p, 10801). green, PB...
Owners Manual
Page 23
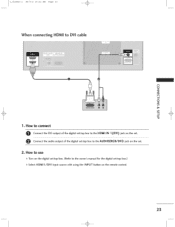
....et-top box to HDMI IN 1 (DVI) or 2 jack on the seL No separated audio connection is necessary. 2. t,_,_51.2Deno,_! 06/9/2 10:21 _ Page 22 CONNECTIONS & SETUP When connecting D-sub 15pin cable 1. Z When connecting HDMI cable m c 1. How to connect O onnect the digital set -top box.) Select HDMII/DVI or HDMI2 input source with using the INPUT button on the remote control. How to use Turn on the digital set-top box. (Refer to the owner's manual for the digital set -top box to the...
....et-top box to HDMI IN 1 (DVI) or 2 jack on the seL No separated audio connection is necessary. 2. t,_,_51.2Deno,_! 06/9/2 10:21 _ Page 22 CONNECTIONS & SETUP When connecting D-sub 15pin cable 1. Z When connecting HDMI cable m c 1. How to connect O onnect the digital set -top box.) Select HDMII/DVI or HDMI2 input source with using the INPUT button on the remote control. How to use Turn on the digital set-top box. (Refer to the owner's manual for the digital set -top box to the...
Owners Manual
Page 24
How to connect O Connect the DVI output of the digital set-top box to the AUDIO(RGB/DVI) jack on the digit[ set-top box. (Refer to use Turn on the set 2. How to the owner's manual for the digital set . Connect the audio output of the digital setotop box to DVJ cable N O Z Z m t_ -4 O Z m -4 c 1. t,_,_51,2Deno,_Z 06/9/2 10:21 _ Page 23 When connecting HDM[ to the HDMI IN 1 (DVi) jack on the set -top box.) 01_Select HDM[1/DV[ input source with using the INPUT button on the remote control. 23
How to connect O Connect the DVI output of the digital set-top box to the AUDIO(RGB/DVI) jack on the digit[ set-top box. (Refer to use Turn on the set 2. How to the owner's manual for the digital set . Connect the audio output of the digital setotop box to DVJ cable N O Z Z m t_ -4 O Z m -4 c 1. t,_,_51,2Deno,_Z 06/9/2 10:21 _ Page 23 When connecting HDM[ to the HDMI IN 1 (DVi) jack on the set -top box.) 01_Select HDM[1/DV[ input source with using the INPUT button on the remote control. 23
Owners Manual
Page 25
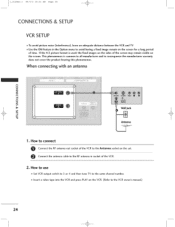
... 24 CONNECTIONS & SETUP VCR SETUP To avoid picture noise (interference), leave an adequate distance between the VCR and TV Use the ISM feature in consequence the manufactures warranty does not cover the product bearing this phenomenon. Connect the antenna cable to the same channel number. How to use Set VCR output switch to 3 or 4 and then tune TV to the RF antenna in socket of time. Insert a video tape...
... 24 CONNECTIONS & SETUP VCR SETUP To avoid picture noise (interference), leave an adequate distance between the VCR and TV Use the ISM feature in consequence the manufactures warranty does not cover the product bearing this phenomenon. Connect the antenna cable to the same channel number. How to use Set VCR output switch to 3 or 4 and then tune TV to the RF antenna in socket of time. Insert a video tape...

Owners Manual
Page 30
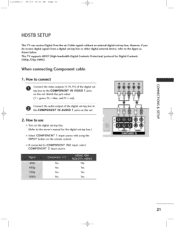
... DVD SETUP When connecting Component 1. O Connect the audio outputs of the DVD to use Turn on the set. 2. I Component ports on the TV Video output ports on the remote control. H_ to the COMPONENT IN AUDIO1 iacks on the DVD player', insert a DVD. Component Input ports To get better picture quality, connect a DVD player to Match the jack colors (Y _ green, PB _ blue, and PR _ red). Select COMPONENT 1 input source with using the INPUT button on DVD player 29 to the component input ports as shown below. How to the DVD player's manual...
... DVD SETUP When connecting Component 1. O Connect the audio outputs of the DVD to use Turn on the set. 2. I Component ports on the TV Video output ports on the remote control. H_ to the COMPONENT IN AUDIO1 iacks on the DVD player', insert a DVD. Component Input ports To get better picture quality, connect a DVD player to Match the jack colors (Y _ green, PB _ blue, and PR _ red). Select COMPONENT 1 input source with using the INPUT button on DVD player 29 to the component input ports as shown below. How to the DVD player's manual...

Owners Manual
Page 32
... Plug and Play capability, meaning that the PC adjusts automatically to the AUDIO 2. The TV perceives 640x480, 60Hz as DTV 480p based on the PC and the set . When connecting D-sub 1Spin cable 1. to the TV's settings. Select RGB-PC input source in main input option of SETUP menu. (_ p.67) Once you select RGB-PC in main input option of the PC to use Turn on the PC graphic card...
... Plug and Play capability, meaning that the PC adjusts automatically to the AUDIO 2. The TV perceives 640x480, 60Hz as DTV 480p based on the PC and the set . When connecting D-sub 1Spin cable 1. to the TV's settings. Select RGB-PC input source in main input option of SETUP menu. (_ p.67) Once you select RGB-PC in main input option of the PC to use Turn on the PC graphic card...

Owners Manual
Page 33
How to connect O Connect the DVI output of the PC to use Turn on the PC and the set Select HDMH/DVI input source with using the INPUT button on the remote control, 32 How to the H:DMI IN 1 (DVI) jack on the set. O Connect the PC audio output to DVI cable N O Z Z m N -4 Z m -4 c 1. t,_,_5lr2Den°,_! 06/9/2 10:21 _ Page 32 CONNECTIONS & SETUP When connecting HDM[ to the AUDIO (RGB/DVI) jack on the set. 2.
How to connect O Connect the DVI output of the PC to use Turn on the PC and the set Select HDMH/DVI input source with using the INPUT button on the remote control, 32 How to the H:DMI IN 1 (DVI) jack on the set. O Connect the PC audio output to DVI cable N O Z Z m N -4 Z m -4 c 1. t,_,_5lr2Den°,_! 06/9/2 10:21 _ Page 32 CONNECTIONS & SETUP When connecting HDM[ to the AUDIO (RGB/DVI) jack on the set. 2.

Owners Manual
Page 41
You input numbers by using the A or Y button to display a num_ C_ beg and then the _1 or _ button to move to another field. O Screen 3: Do you have Cable Service connected? [f you select Yes, you see the ZIP Code screen. O Screen 2: Enter ZIP or Postal Code Option 1 if you selected USA in Screen |, you the location of your TV. O Z Option 2 m m If you selected Canada in Screen ], you see Screen 4. t,_,_5lr2Den...
You input numbers by using the A or Y button to display a num_ C_ beg and then the _1 or _ button to move to another field. O Screen 3: Do you have Cable Service connected? [f you select Yes, you see the ZIP Code screen. O Screen 2: Enter ZIP or Postal Code Option 1 if you selected USA in Screen |, you the location of your TV. O Z Option 2 m m If you selected Canada in Screen ], you see Screen 4. t,_,_5lr2Den...

Owners Manual
Page 115
... Video menu, Tr_nmis_i,:m [k][k][ _[Set ID][ ][Data][Cr] Data Min: 0 _ Max: 64 *Refer to 'Real data mapping] '. _' p.'V_3, Ackr_dedg_ment [t] [ ] [Set [D] [ ] [OK/NG] [Data] [×] 19, Color Temperature (Command2:u) TO adjust color temperature. You can also control the PIP/POP/Twin picture using the P{P Button on the remote control. A&owledge_ent [vJ[ ] [Set [D] [ I D bck the remote control and the front panel controls on the set, rr_.,s_s_i.,r[,k[[mt[ [SetlD][ ]IDa@ Data O: Lock off Data 1: Lock...
... Video menu, Tr_nmis_i,:m [k][k][ _[Set ID][ ][Data][Cr] Data Min: 0 _ Max: 64 *Refer to 'Real data mapping] '. _' p.'V_3, Ackr_dedg_ment [t] [ ] [Set [D] [ ] [OK/NG] [Data] [×] 19, Color Temperature (Command2:u) TO adjust color temperature. You can also control the PIP/POP/Twin picture using the P{P Button on the remote control. A&owledge_ent [vJ[ ] [Set [D] [ I D bck the remote control and the front panel controls on the set, rr_.,s_s_i.,r[,k[[mt[ [SetlD][ ]IDa@ Data O: Lock off Data 1: Lock...
Owners Manual
Page 124
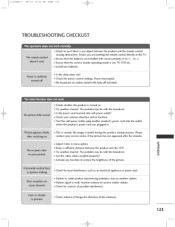
...,2Den,,,_2 06/5/2 10:22 _ Page 123 TROUBLESHOOTING CHECKLIST Check to receive weaker station. Station signal is weak, reorient antenna to see if there is the sleep timer set : TV, VCR etc. Check your service center, if the picture has not appeared after five minutes_ Adjust Color in . Test the wall power outlet, plug another channel The problem may be with correct polarity (+ to another station...
...,2Den,,,_2 06/5/2 10:22 _ Page 123 TROUBLESHOOTING CHECKLIST Check to receive weaker station. Station signal is weak, reorient antenna to see if there is the sleep timer set : TV, VCR etc. Check your service center, if the picture has not appeared after five minutes_ Adjust Color in . Test the wall power outlet, plug another channel The problem may be with correct polarity (+ to another station...

Owners Manual
Page 126
.... ,,,,H,, _h[ _ht the show is listed as a Reminder. - If you should begin to receive updated program listings within 24 hours. Ve ri fy t h e A uto oTune o ptio n rea d s Yes. Press the MENU button on the remote. - Verify Setup information under the Setup menu. You should - Check the connections between the TV, cable, antenna. - if the message _No data for Auto-Tune. If this screen" is still displayed after a successful...
.... ,,,,H,, _h[ _ht the show is listed as a Reminder. - If you should begin to receive updated program listings within 24 hours. Ve ri fy t h e A uto oTune o ptio n rea d s Yes. Press the MENU button on the remote. - Verify Setup information under the Setup menu. You should - Check the connections between the TV, cable, antenna. - if the message _No data for Auto-Tune. If this screen" is still displayed after a successful...


