
Owner's Manual (English)
Page 4
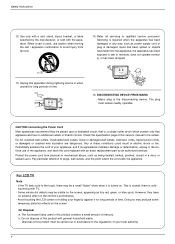
... long periods of this owner's manual to plugs, wall outlets, and the point where the cord exits the appliance. However, they be visible on the monitor's performance. - Servicing is turned on the screen. Refer all servicing to avoid injury from physical or mechanical abuse, such as power supply cord or plug is noth- Safety Instructions 12. Use only with TV. - CAUTION concerning the Power Cord Most appliances recommend they...
... long periods of this owner's manual to plugs, wall outlets, and the point where the cord exits the appliance. However, they be visible on the monitor's performance. - Servicing is turned on the screen. Refer all servicing to avoid injury from physical or mechanical abuse, such as power supply cord or plug is noth- Safety Instructions 12. Use only with TV. - CAUTION concerning the Power Cord Most appliances recommend they...

Owner's Manual (English)
Page 5
... Installation Basic Connection Antenna or Cable Connection VCR Setup External AV Source Setup DVD Setup HDSTB Setup Monitor Out Setup Digital Audio Output PC Setup 32 Turning on the TV 32 Volume Adjustment 32 Channel Selection 32 On Screen Menus Language Selection 33 On Screen Menus Selection and Adjustment 34 EZ Scan (Channel Search) 34 Manual Scan 35 Channel Edit 36 DTV Signal Strength 36 Input Source 37 Input Label 38 EZ Picture 38 APM (Adaptive Picture Mode) 39 Manual Picture Control (EZ Picture-Custom option) 39 Color Temperature Control 39 Video Reset...
... Installation Basic Connection Antenna or Cable Connection VCR Setup External AV Source Setup DVD Setup HDSTB Setup Monitor Out Setup Digital Audio Output PC Setup 32 Turning on the TV 32 Volume Adjustment 32 Channel Selection 32 On Screen Menus Language Selection 33 On Screen Menus Selection and Adjustment 34 EZ Scan (Channel Search) 34 Manual Scan 35 Channel Edit 36 DTV Signal Strength 36 Input Source 37 Input Label 38 EZ Picture 38 APM (Adaptive Picture Mode) 39 Manual Picture Control (EZ Picture-Custom option) 39 Color Temperature Control 39 Video Reset...
Owner's Manual (English)
Page 12
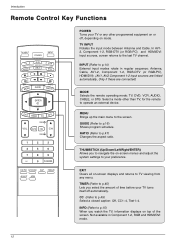
... you watch the TV, information displays on -screen displays and returns to the screen. TIMER (Refer to p.45) Lets you to navigate the on mode. Introduction Remote Control Key Functions TV INPUT POWER TV AUDIO DVD MODE CABLE INPUT VCR STB DAY MENU GUIDE DAY+ RATIO ENTER EXIT TIMER CC INFO PAGE VOL MUTE FAV CH PAGE 1 2 3 4 5 6 7 8 9 0 FLASHBK EZ PIC EZ SOUND SAP FREEZE ADJUST APM POWER Turns your TV or any menu. Select a mode other programmed equipment on...
... you watch the TV, information displays on -screen displays and returns to the screen. TIMER (Refer to p.45) Lets you to navigate the on mode. Introduction Remote Control Key Functions TV INPUT POWER TV AUDIO DVD MODE CABLE INPUT VCR STB DAY MENU GUIDE DAY+ RATIO ENTER EXIT TIMER CC INFO PAGE VOL MUTE FAV CH PAGE 1 2 3 4 5 6 7 8 9 0 FLASHBK EZ PIC EZ SOUND SAP FREEZE ADJUST APM POWER Turns your TV or any menu. Select a mode other programmed equipment on...
Owner's Manual (English)
Page 14
... Input Source in the SETUP menu. SETUP VIDEO AUDIO TIME EZ Scan Manual Scan Channel Edit DTV Signal Input Source Input Label Set ID OPTION LOCK MENU Previous Antenna Cable AV1 AV2 G Component1 Component2 RGB-PC HDMI/DVI • Antenna: Select it when watching the TV/DTV. • Cable: Select it when watching the CATV/CADTV. • AV1, AV2: Select it when using PC or Digital set -top box depend on connector. 14 ment. • Component 1-2: Select it when using a DVD or Digital set...
... Input Source in the SETUP menu. SETUP VIDEO AUDIO TIME EZ Scan Manual Scan Channel Edit DTV Signal Input Source Input Label Set ID OPTION LOCK MENU Previous Antenna Cable AV1 AV2 G Component1 Component2 RGB-PC HDMI/DVI • Antenna: Select it when watching the TV/DTV. • Cable: Select it when watching the CATV/CADTV. • AV1, AV2: Select it when using PC or Digital set -top box depend on connector. 14 ment. • Component 1-2: Select it when using a DVD or Digital set...

Owner's Manual (English)
Page 21
... AUDIO S-VIDEO AV IN 1 Analog and Digital TV signals provided on cable Cable TVS-WVIDaEOll Jack HDMI/DVI IN RF CDoIGIaTAOxLUAiTaUDlIOW(COiNrRTeSR-O2L3(&27SCE5RINVICoE) hm) R OPTICAL AUDIO L/MONO ANTENNA IN AV OUT CABLE IN VIDEO ( ) AUDIO AV IN 1 S-VIDEO RGB IN REMOTE CONTROL IN AUDIO (RGB/DVI) VIDEO AUDIO CORGMBP(POC/NDTEVN) T IN L/MONO R VIDEO Turn clockwise to tighten. For optimum picture quality, adjust antenna direction if needed. Antenna or Cable Service without a Cable Box Connection. - N 2 AV IN 2 Analog and Digital TV signals provided on cable and antenna...
... AUDIO S-VIDEO AV IN 1 Analog and Digital TV signals provided on cable Cable TVS-WVIDaEOll Jack HDMI/DVI IN RF CDoIGIaTAOxLUAiTaUDlIOW(COiNrRTeSR-O2L3(&27SCE5RINVICoE) hm) R OPTICAL AUDIO L/MONO ANTENNA IN AV OUT CABLE IN VIDEO ( ) AUDIO AV IN 1 S-VIDEO RGB IN REMOTE CONTROL IN AUDIO (RGB/DVI) VIDEO AUDIO CORGMBP(POC/NDTEVN) T IN L/MONO R VIDEO Turn clockwise to tighten. For optimum picture quality, adjust antenna direction if needed. Antenna or Cable Service without a Cable Box Connection. - N 2 AV IN 2 Analog and Digital TV signals provided on cable and antenna...

Owner's Manual (English)
Page 22
... owner's manual.) 3 Select AV1 input source using the INPUT button on the VCR. (Refer to the VCR owner's manual.) CABLE IN When connecting with an antenna ANTENNA IN CABLE IN ANTENNA IN 2 ANT IN VCR ANT OUT S-VIDEO OUT OUTPUT SWITCH 34 (R) AUDIO (L) IN VIDEO 1 1 Connect the RF antenna out socket of the VCR. 3 Set VCR output switch to 3 or 4 and then tune TV to the same channel number. 4 Insert a video tape into the VCR and press PLAY on the remote control. - VIDEO...
... owner's manual.) 3 Select AV1 input source using the INPUT button on the VCR. (Refer to the VCR owner's manual.) CABLE IN When connecting with an antenna ANTENNA IN CABLE IN ANTENNA IN 2 ANT IN VCR ANT OUT S-VIDEO OUT OUTPUT SWITCH 34 (R) AUDIO (L) IN VIDEO 1 1 Connect the RF antenna out socket of the VCR. 3 Set VCR output switch to 3 or 4 and then tune TV to the same channel number. 4 Insert a video tape into the VCR and press PLAY on the remote control. - VIDEO...
Owner's Manual (English)
Page 24
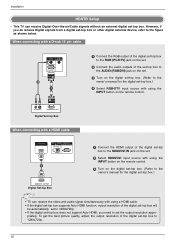
... 1 S-VIDEO VIDEO AUDIO COMPONENT IN • TV can receive the video and audio signal simultaneously by using a HDMI cable. • If the DVD supports Auto HDMI function, the DVD output resolution will be automatically set to 1280x720p. • If the DVD does not support Auto HDMI, you need to the AUDIO input jacks on the set. 3 Turn on the DVD player, insert a DVD. 4 Select AV1 input source with using the INPUT button on the remote control. 3 Refer to 1280x720p. If connected to AV IN2, select AV 2 input source. 5 Refer to the DVD player's manual...
... 1 S-VIDEO VIDEO AUDIO COMPONENT IN • TV can receive the video and audio signal simultaneously by using a HDMI cable. • If the DVD supports Auto HDMI function, the DVD output resolution will be automatically set to 1280x720p. • If the DVD does not support Auto HDMI, you need to the AUDIO input jacks on the set. 3 Turn on the DVD player, insert a DVD. 4 Select AV1 input source with using the INPUT button on the remote control. 3 Refer to 1280x720p. If connected to AV IN2, select AV 2 input source. 5 Refer to the DVD player's manual...

Owner's Manual (English)
Page 25
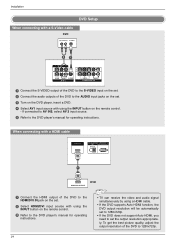
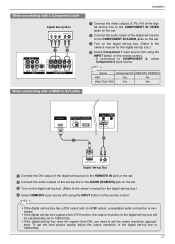
..., connect a DVD( p)layer to the DVD player's manual for operating instructions. Installation When connecting with a component cable DVD B R (R) AUDIO (L) AV OUT 1 2 VIDEO (MONO) AUDIO AV IN 1 S-VIDEO VIDEO AUDIO COMPONENT IN HDMI/DVI IN DIGITAL AUDIO RS-232C OUT (CONTROL & SE OPTICAL 1 Connect the video outputs (Y, PB, PR) of the DVD to the COMPONENT IN VIDEO jacks on the set. 2 Connect the audio outputs of the DVD to the COMPONENT IN AUDIO jacks on the set. 3 Turn on the DVD player, insert a DVD. 4 Select Component 1 input source with using the INPUT button on DVD...
..., connect a DVD( p)layer to the DVD player's manual for operating instructions. Installation When connecting with a component cable DVD B R (R) AUDIO (L) AV OUT 1 2 VIDEO (MONO) AUDIO AV IN 1 S-VIDEO VIDEO AUDIO COMPONENT IN HDMI/DVI IN DIGITAL AUDIO RS-232C OUT (CONTROL & SE OPTICAL 1 Connect the video outputs (Y, PB, PR) of the DVD to the COMPONENT IN VIDEO jacks on the set. 2 Connect the audio outputs of the DVD to the COMPONENT IN AUDIO jacks on the set. 3 Turn on the DVD player, insert a DVD. 4 Select Component 1 input source with using the INPUT button on DVD...
Owner's Manual (English)
Page 26
... signal simultaneously with using the INPUT button on the remote control. 3 Turn on the set. 2 Select HDMI/DVI input source with using a HDMI cable. • If the digital set-top box supports Auto HDMI function, output resolution of the digital set the output resolution appro- However, if you need to set -top box to AUDIO IN (RGB/DVI) REMOTE CONTROL 1280x720p. HDMI/DVI IN DIGITAL AUDIO RS-232C IN OUT (CONTROL & SERVICE) OPTICAL RGB IN REMOTE CONTROL IN AUDIO (RGB/DVI) RGB IN (PC/DTV) 26 RGB (PC/DTV) To get the best picture quality, adjust the output resolution...
... signal simultaneously with using the INPUT button on the remote control. 3 Turn on the set. 2 Select HDMI/DVI input source with using a HDMI cable. • If the digital set-top box supports Auto HDMI function, output resolution of the digital set the output resolution appro- However, if you need to set -top box to AUDIO IN (RGB/DVI) REMOTE CONTROL 1280x720p. HDMI/DVI IN DIGITAL AUDIO RS-232C IN OUT (CONTROL & SERVICE) OPTICAL RGB IN REMOTE CONTROL IN AUDIO (RGB/DVI) RGB IN (PC/DTV) 26 RGB (PC/DTV) To get the best picture quality, adjust the output resolution...
Owner's Manual (English)
Page 27
To get the best picture quality, adjust the output resolution of the digital set-top box to the COMPONENT IN VIDEO jacks on the remote control. - OPTICAL Turn on the digital set-top box. (Refer to the owner's manual for the digital RGB IN REMOTE CONTROL IN set-top box.) 4 Select HDMI/DVI inpAUuDIOt(RsGBo/DVuI) rce with using the INPUT button on the set. VIDEO AUDIO COMPONENT IN VIDEO (MONO) AUDIO AV IN 1 S-VIDEO VIDEO AUDIO COMPONENT IN Signal Component1/2 RGB-DTV, HDMI/DVI 480i Yes No 480p/720p...
To get the best picture quality, adjust the output resolution of the digital set-top box to the COMPONENT IN VIDEO jacks on the remote control. - OPTICAL Turn on the digital set-top box. (Refer to the owner's manual for the digital RGB IN REMOTE CONTROL IN set-top box.) 4 Select HDMI/DVI inpAUuDIOt(RsGBo/DVuI) rce with using the INPUT button on the set. VIDEO AUDIO COMPONENT IN VIDEO (MONO) AUDIO AV IN 1 S-VIDEO VIDEO AUDIO COMPONENT IN Signal Component1/2 RGB-DTV, HDMI/DVI 480i Yes No 480p/720p...
Owner's Manual (English)
Page 29
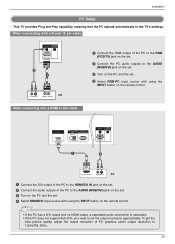
... not support Auto DVI, you need to the TV's settings. This TV provides Plug and Play capability, meaning that the PC adjusts automatically to set . 4 Select RGB-PC input source with using the INPUT button on the remote control. When connecting with a HDMI to DVI cable AUDIO RS-232C IN T (CONTROL & SERVICE) CAL AUDIO IN (RGB/DVI) REMOTE CONTROL RGB IN (PC/DTV) HDMI/DVI IN DIGITAL AUDIO RS-232C IN OUT (CONTROL&SERVICE) OPTICAL RGB IN REMOTE CONTROL IN AUDIO (RGB/DVI) RGB (PC/DTV) 1 2 DVI-PC OUTPUT (R) AUDIO (L) PC 1 Connect the DVI output of...
... not support Auto DVI, you need to the TV's settings. This TV provides Plug and Play capability, meaning that the PC adjusts automatically to set . 4 Select RGB-PC input source with using the INPUT button on the remote control. When connecting with a HDMI to DVI cable AUDIO RS-232C IN T (CONTROL & SERVICE) CAL AUDIO IN (RGB/DVI) REMOTE CONTROL RGB IN (PC/DTV) HDMI/DVI IN DIGITAL AUDIO RS-232C IN OUT (CONTROL&SERVICE) OPTICAL RGB IN REMOTE CONTROL IN AUDIO (RGB/DVI) RGB (PC/DTV) 1 2 DVI-PC OUTPUT (R) AUDIO (L) PC 1 Connect the DVI output of...
Owner's Manual (English)
Page 30
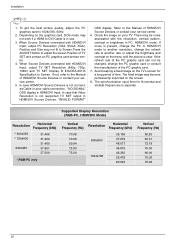
... Manual of time. Depending on the graphics card, DOS mode may be changed, change the PC or HDMI/DVI mode to another rate or adjust the brightness and contrast on the screen. 8. When Source Devices connected with the resolution, vertical pattern, contrast or brightness in use. 3. In case that Video Resolution is not connected Cable or poor cable connection, "NO SIGNAL" OSD display in HDMI/DVI Source Devices, "INVALID FORMAT" OSD display. The fixed image may not fit to Screen.Press the ADJUST button to DVI Cable...
... Manual of time. Depending on the graphics card, DOS mode may be changed, change the PC or HDMI/DVI mode to another rate or adjust the brightness and contrast on the screen. 8. When Source Devices connected with the resolution, vertical pattern, contrast or brightness in use. 3. In case that Video Resolution is not connected Cable or poor cable connection, "NO SIGNAL" OSD display in HDMI/DVI Source Devices, "INVALID FORMAT" OSD display. The fixed image may not fit to Screen.Press the ADJUST button to DVI Cable...

Owner's Manual (English)
Page 32
... by using the TV, press the POWER button on the remote control. If you intend to switch the sound off, press the MUTE button. 3. The TV reverts to adjust the volume. 2. First, connect power cord correctly. You can be shown on the remote control . 2. In standby mode to turn TV on, press the , INPUT, CH D / E button on the TV or press the POWER, TV INPUT, INPUT, CH D / E, Number (0 ~ 9) button on the screen in the selected language. 4 Press EXIT button to return to TV viewing...
... by using the TV, press the POWER button on the remote control. If you intend to switch the sound off, press the MUTE button. 3. The TV reverts to adjust the volume. 2. First, connect power cord correctly. You can be shown on the remote control . 2. In standby mode to turn TV on, press the , INPUT, CH D / E button on the TV or press the POWER, TV INPUT, INPUT, CH D / E, Number (0 ~ 9) button on the screen in the selected language. 4 Press EXIT button to return to TV viewing...

Owner's Manual (English)
Page 33
... the G button and then use D / E / F / G button to adjust the OSD screen 1. SETUP G VIDEO AUDIO TIME EZ Scan Manual Scan Channel Edit DTV Signal Input Source Input Label Set ID OPTION LOCK SETUP EZ Picture Contrast 85 VIDEO G Brightness 50 Color 50 AUDIO Sharpness 50 Tint 0 R G TIME Color Temperature OPTION Video Reset LOCK SETUP VIDEO AUDIO TIME Lock System Set Password Block Channel Movie Rating TV Rating-Children TV Rating-General Input Block OPTION LOCK G SETUP Audio Language EZ SoundRite VIDEO EZ Sound Balance 0 L R AUDIO G Treble 50 TIME Bass 50...
... the G button and then use D / E / F / G button to adjust the OSD screen 1. SETUP G VIDEO AUDIO TIME EZ Scan Manual Scan Channel Edit DTV Signal Input Source Input Label Set ID OPTION LOCK SETUP EZ Picture Contrast 85 VIDEO G Brightness 50 Color 50 AUDIO Sharpness 50 Tint 0 R G TIME Color Temperature OPTION Video Reset LOCK SETUP VIDEO AUDIO TIME Lock System Set Password Block Channel Movie Rating TV Rating-Children TV Rating-General Input Block OPTION LOCK G SETUP Audio Language EZ SoundRite VIDEO EZ Sound Balance 0 L R AUDIO G Treble 50 TIME Bass 50...

Owner's Manual (English)
Page 34
...Antenna/Cable connection changes. - Allow EZ Scan to complete the channel search cycle for the channel number. 6 Press EXIT button to return to TV viewing or press MENU button to return to the previous menu. SETUP VIDEO AUDIO TIME EZ Scan Manual Scan Channel Edit DTV Signal Input Source Input Label Set ID OPTION LOCK MENU Previous G Select channel type and RF-channel number. Automatically finds all channels available through antenna or cable inputs, and stores them in memory on . Operation Setup Menu Options EZ Scan (Channel Search) SETUP G VIDEO AUDIO TIME EZ Scan Manual Scan...
...Antenna/Cable connection changes. - Allow EZ Scan to complete the channel search cycle for the channel number. 6 Press EXIT button to return to TV viewing or press MENU button to return to the previous menu. SETUP VIDEO AUDIO TIME EZ Scan Manual Scan Channel Edit DTV Signal Input Source Input Label Set ID OPTION LOCK MENU Previous G Select channel type and RF-channel number. Automatically finds all channels available through antenna or cable inputs, and stores them in memory on . Operation Setup Menu Options EZ Scan (Channel Search) SETUP G VIDEO AUDIO TIME EZ Scan Manual Scan...
Owner's Manual (English)
Page 36
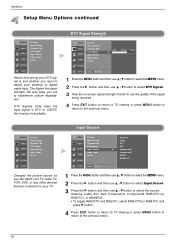
... and then use D / E button to select DTV Signal. 3 View the on-screen signal strength monitor to see the quality of the signal being received. 4 Press EXIT button to return to TV viewing or press MENU button to return to the previous menu. 36 Operation Setup Menu Options continued SETUP G VIDEO AUDIO TIME EZ Scan Manual Scan Channel Edit DTV Signal Input Source Input Label Set ID OPTION LOCK - Changes the picture source so you need to experience picture degradation. - SETUP G VIDEO AUDIO TIME EZ Scan Manual Scan Channel Edit DTV Signal Input Source Input Label Set ID OPTION...
... and then use D / E button to select DTV Signal. 3 View the on-screen signal strength monitor to see the quality of the signal being received. 4 Press EXIT button to return to TV viewing or press MENU button to return to the previous menu. 36 Operation Setup Menu Options continued SETUP G VIDEO AUDIO TIME EZ Scan Manual Scan Channel Edit DTV Signal Input Source Input Label Set ID OPTION LOCK - Changes the picture source so you need to experience picture degradation. - SETUP G VIDEO AUDIO TIME EZ Scan Manual Scan Channel Edit DTV Signal Input Source Input Label Set ID OPTION...
Owner's Manual (English)
Page 52
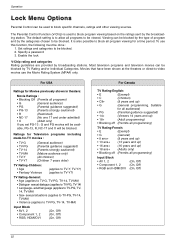
... PG movies will be blocked. Set ratings and categories to -video movies use this function, the following must be blocked by the broadcasting station. Operation Lock Menu Options Parental Control can be used to TV-PG, TV-14, TV-MA) Input Block • AV1, 2 • Component 1, 2 • RGB, HDMI/DVI (On, Off) (On, Off) (On, Off) For Canada TV Rating-English: • E (Exempt) •...
... PG movies will be blocked. Set ratings and categories to -video movies use this function, the following must be blocked by the broadcasting station. Operation Lock Menu Options Parental Control can be used to TV-PG, TV-14, TV-MA) Input Block • AV1, 2 • Component 1, 2 • RGB, HDMI/DVI (On, Off) (On, Off) (On, Off) For Canada TV Rating-English: • E (Exempt) •...
Owner's Manual (English)
Page 55
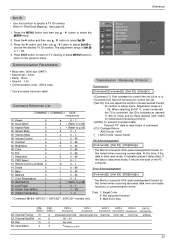
... communication errors. Color k 10. OSD Select k 13. Input Select x b *(Refer to choose the desired TV ID number. Press the G button and then use D / E button to adjust Set ID to p.59) 55 Press EXIT button to return to TV viewing or press MENU button to LOCK MENU Previous return to specify a TV ID number. - Sharpness k 12. Power k 02. Input Select k 03. Volume Mute k 06. Brightness k 09. See page 56. VIDEO AUDIO Channel Edit DTV Signal Input Source 2. Balance k 17. Color...
... communication errors. Color k 10. OSD Select k 13. Input Select x b *(Refer to choose the desired TV ID number. Press the G button and then use D / E button to adjust Set ID to p.59) 55 Press EXIT button to return to TV viewing or press MENU button to LOCK MENU Previous return to specify a TV ID number. - Sharpness k 12. Power k 02. Input Select k 03. Volume Mute k 06. Brightness k 09. See page 56. VIDEO AUDIO Channel Edit DTV Signal Input Source 2. Balance k 17. Color...

Owner's Manual (English)
Page 62
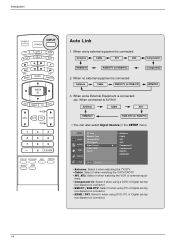
... button for 2 seconds, the button selected component lights on the remote. If not, the remote requires programming to operate the device. 2 Turn on the component to see if the component responds properly. Programming a code into a remote mode TV INPUT POWER TV AUDIO DVD MODE CABLE INPUT VCR STB DAY MENU GUIDE DAY+ RATIO ENTER EXIT TIMER CC INFO PAGE VOL MUTE FAV CH PAGE 1 2 3 4 5 6 7 8 9 0 FLASHBK EZ PIC EZ SOUND SAP FREEZE ADJUST APM 1 Test your remote control...
... button for 2 seconds, the button selected component lights on the remote. If not, the remote requires programming to operate the device. 2 Turn on the component to see if the component responds properly. Programming a code into a remote mode TV INPUT POWER TV AUDIO DVD MODE CABLE INPUT VCR STB DAY MENU GUIDE DAY+ RATIO ENTER EXIT TIMER CC INFO PAGE VOL MUTE FAV CH PAGE 1 2 3 4 5 6 7 8 9 0 FLASHBK EZ PIC EZ SOUND SAP FREEZE ADJUST APM 1 Test your remote control...

Owner's Manual (English)
Page 66
... the speakers Unusual sound from inside the product • A change in ambient humidity or temperature may be prevented. Reference The audio function does not work. Press MUTE button. • Try another channel. The problem may result in a mixture of range. No output from lightning or power surges. 66 of time you turn the power off and unplug the power cord before you will have your screen...
... the speakers Unusual sound from inside the product • A change in ambient humidity or temperature may be prevented. Reference The audio function does not work. Press MUTE button. • Try another channel. The problem may result in a mixture of range. No output from lightning or power surges. 66 of time you turn the power off and unplug the power cord before you will have your screen...


