

Owner's Manual (English)
Page 9
Introduction Connection Options (Model Name: 32/37/42LC2D**) - Here shown may be somewhat different from your TV. 37/42LC2D** 32LC2D** VIDEO AUDIO S-VIDEO L/MONO R S-VIDEO Input S-VIDEO AUDIO Input R AUDIO L/MONO VIDEO Input VIDEO AC IN AV IN 2 AV IN 2 AC IN ...AC IN AV OUT AV IN1 COMPONENT IN 1/2 AV OUT VIDEO (MONO) AUDIO AV IN 1 S-VIDEO VIDEO AUDIO COMPONENT IN HDMI / DVI IN RS-232C INPUT (Control &Service) ANTENNA IN HDMI/DVI IN DIGITAL AUDIO RS-232C IN OUT (CONTROL&SERVICE) OPTICAL CABLE IN RGB IN REMOTE CONTROL IN AUDIO (RGB/DVI...
Introduction Connection Options (Model Name: 32/37/42LC2D**) - Here shown may be somewhat different from your TV. 37/42LC2D** 32LC2D** VIDEO AUDIO S-VIDEO L/MONO R S-VIDEO Input S-VIDEO AUDIO Input R AUDIO L/MONO VIDEO Input VIDEO AC IN AV IN 2 AV IN 2 AC IN ...AC IN AV OUT AV IN1 COMPONENT IN 1/2 AV OUT VIDEO (MONO) AUDIO AV IN 1 S-VIDEO VIDEO AUDIO COMPONENT IN HDMI / DVI IN RS-232C INPUT (Control &Service) ANTENNA IN HDMI/DVI IN DIGITAL AUDIO RS-232C IN OUT (CONTROL&SERVICE) OPTICAL CABLE IN RGB IN REMOTE CONTROL IN AUDIO (RGB/DVI...

Owner's Manual (English)
Page 11
... somewhat different from your TV. Introduction Connection Options (Model Name: 42PC1D**/42PC3D**/50PC3D**) - S-VIDEO Input AUDIO Input VIDEO Input AV IN 2 S-VIDEO R AUDIO L/MONO VIDEO AV OUT AV IN1 COMPONENT IN 1/2 AV OUT VIDEO (MONO) AUDIO AV IN 1 S-VIDEO VIDEO AUDIO COMPONENT IN HDMI/DVI IN RS-232C ...INPUT (Control &Service) ANTENNA IN AC IN HDMI/DVI IN DIGITAL AUDIO RS-232C IN OUT (CONTROL&SERVICE) OPTICAL CABLE IN RGB IN REMOTE CONTROL IN AUDIO...
... somewhat different from your TV. Introduction Connection Options (Model Name: 42PC1D**/42PC3D**/50PC3D**) - S-VIDEO Input AUDIO Input VIDEO Input AV IN 2 S-VIDEO R AUDIO L/MONO VIDEO AV OUT AV IN1 COMPONENT IN 1/2 AV OUT VIDEO (MONO) AUDIO AV IN 1 S-VIDEO VIDEO AUDIO COMPONENT IN HDMI/DVI IN RS-232C ...INPUT (Control &Service) ANTENNA IN AC IN HDMI/DVI IN DIGITAL AUDIO RS-232C IN OUT (CONTROL&SERVICE) OPTICAL CABLE IN RGB IN REMOTE CONTROL IN AUDIO...
Owner's Manual (English)
Page 12
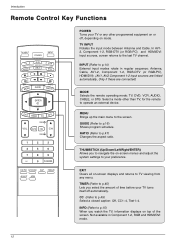
...In AV12, Component 1-2, RGB-DTV (or RGB-PC), and HDMI/DVI input sources, screen returns to p.47) Changes the aspect ratio. RATIO (Refer to the last TV channel. EXIT Clears all on top of time before your TV turns itself off , depending on or off automatically. Not available ...in regular sequence: Antenna, Cable, AV1-2, Component 1-2, RGB-DTV (or RGB-PC), HDMI/DVI). (AV1, AV2,Component 1-2 input sources are linked automatically, Only if these are connected) MODE Selects the remote operating mode: TV, DVD, VCR, AUDIO, CABLE, or STB. THUMBSTICK (Up/Down/Left/Right/ENTER) Allows...
...In AV12, Component 1-2, RGB-DTV (or RGB-PC), and HDMI/DVI input sources, screen returns to p.47) Changes the aspect ratio. RATIO (Refer to the last TV channel. EXIT Clears all on top of time before your TV turns itself off , depending on or off automatically. Not available ...in regular sequence: Antenna, Cable, AV1-2, Component 1-2, RGB-DTV (or RGB-PC), HDMI/DVI). (AV1, AV2,Component 1-2 input sources are linked automatically, Only if these are connected) MODE Selects the remote operating mode: TV, DVD, VCR, AUDIO, CABLE, or STB. THUMBSTICK (Up/Down/Left/Right/ENTER) Allows...
Owner's Manual (English)
Page 14
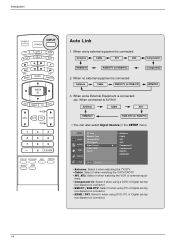
... Edit DTV Signal Input Source Input Label Set ID OPTION LOCK MENU Previous Antenna Cable AV1 AV2 G Component1 Component2 RGB-PC HDMI/DVI • Antenna: Select it when watching the TV/DTV. • Cable: Select it when watching the CATV/CADTV. • AV1, AV2: Select it when using DVD,... PC or Digital set-top box depend on connector. • HDMI / DVI: Select it when watching the VCR or external equip- ment. • Component...
... Edit DTV Signal Input Source Input Label Set ID OPTION LOCK MENU Previous Antenna Cable AV1 AV2 G Component1 Component2 RGB-PC HDMI/DVI • Antenna: Select it when watching the TV/DTV. • Cable: Select it when watching the CATV/CADTV. • AV1, AV2: Select it when using DVD,... PC or Digital set-top box depend on connector. • HDMI / DVI: Select it when watching the VCR or external equip- ment. • Component...

Owner's Manual (English)
Page 15
...use? 1. V-Chip: The program contains V-Chip information. How to select wanted Audio. This function works in Component1, Component2, RGB, and HDMI/DVI modes. Press the INFO button to select wanted Closed caption. CC Caption: The program contains one or more audio services. Press the ...CC button to show the Brief Info on the screen. 2. TV INPUT POWER TV AUDIO DVD MODE CABLE INPUT VCR STB DAY MENU GUIDE DAY+ RATIO ENTER EXIT TIMER CC ININFFOO PAGE VOL MUTE FAV CH PAGE 1 2 3 4...
...use? 1. V-Chip: The program contains V-Chip information. How to select wanted Audio. This function works in Component1, Component2, RGB, and HDMI/DVI modes. Press the INFO button to select wanted Closed caption. CC Caption: The program contains one or more audio services. Press the ...CC button to show the Brief Info on the screen. 2. TV INPUT POWER TV AUDIO DVD MODE CABLE INPUT VCR STB DAY MENU GUIDE DAY+ RATIO ENTER EXIT TIMER CC ININFFOO PAGE VOL MUTE FAV CH PAGE 1 2 3 4...

Owner's Manual (English)
Page 21
Antenna or Cable Service without a Cable Box Connection. - For optimum picture quality, adjust antenna direction if needed. Analog and Digital TV signals provided on cable Cable TVS-WVIDaEOll Jack HDMI/DVI IN RF CDoIGIaTAOxLUAiTaUDlIOW(COiNrRTeSR-O2L3(&27SCE5RINVICoE) hm) R OPTICAL AUDIO L/MONO ANTENNA IN AV OUT CABLE IN VIDEO ( ) AUDIO AV IN 1 S-VIDEO RGB IN...
Antenna or Cable Service without a Cable Box Connection. - For optimum picture quality, adjust antenna direction if needed. Analog and Digital TV signals provided on cable Cable TVS-WVIDaEOll Jack HDMI/DVI IN RF CDoIGIaTAOxLUAiTaUDlIOW(COiNrRTeSR-O2L3(&27SCE5RINVICoE) hm) R OPTICAL AUDIO L/MONO ANTENNA IN AV OUT CABLE IN VIDEO ( ) AUDIO AV IN 1 S-VIDEO RGB IN...

Owner's Manual (English)
Page 22
...the VCR owner's manual.) 3 Select AV1 input source using the INPUT button on the screen. If the 4:3 picture format is presumed that RGB and HDMI/DVI sources are connected. the fixed images on the sides of the VCR to AV IN2, select AV2 input source. It is used; If connected... If you have a mono VCR, connect the audio cable from a VCR. AV OUT 22 ( ) To avoid picture noise (interference), leave an adequate distance between TV and VCR. Installation VCR Setup - When connecting with an antenna ANTENNA IN CABLE IN ANTENNA IN 2 ANT IN VCR ANT OUT S-VIDEO OUT OUTPUT SWITCH...
...the VCR owner's manual.) 3 Select AV1 input source using the INPUT button on the screen. If the 4:3 picture format is presumed that RGB and HDMI/DVI sources are connected. the fixed images on the sides of the VCR to AV IN2, select AV2 input source. It is used; If connected... If you have a mono VCR, connect the audio cable from a VCR. AV OUT 22 ( ) To avoid picture noise (interference), leave an adequate distance between TV and VCR. Installation VCR Setup - When connecting with an antenna ANTENNA IN CABLE IN ANTENNA IN 2 ANT IN VCR ANT OUT S-VIDEO OUT OUTPUT SWITCH...

Owner's Manual (English)
Page 23
... IN 1 Connect the S-VIDEO output of the VCR to the AUDIO input jacks on the set . In the event that RGB and HDMI/DVI sources are connected. 23 Refer to both Video and the S-Video cables, only the S-Video will work. compared to normal composite ...connect to external equipment operating guide. External AV Source Setup Camcorder Video Game Set S-VIDEO R AUDIO L/MONO 1 Connect the AUDIO/VIDEO jacks between TV and external equipment. If connected to AV IN1 input, select AV1 input i.e) 32LC2D** source. 3 Operate the corresponding external equipment. If connected to...
... IN 1 Connect the S-VIDEO output of the VCR to the AUDIO input jacks on the set . In the event that RGB and HDMI/DVI sources are connected. 23 Refer to both Video and the S-Video cables, only the S-Video will work. compared to normal composite ...connect to external equipment operating guide. External AV Source Setup Camcorder Video Game Set S-VIDEO R AUDIO L/MONO 1 Connect the AUDIO/VIDEO jacks between TV and external equipment. If connected to AV IN1 input, select AV1 input i.e) 32LC2D** source. 3 Operate the corresponding external equipment. If connected to...
Owner's Manual (English)
Page 24
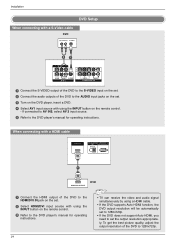
... appropriately. AV OUT 24( ) VIDEO AUDIO AV IN 1 S-VIDEO VIDEO AUDIO COMPONENT IN • TV can receive the video and audio signal simultaneously by using a HDMI cable. • If the DVD supports Auto HDMI function, the DVD output resolution will be automatically set to 1280x720p. • If the DVD does not... source with using the INPUT button on the remote control. - To get the best picture quality, adjust the output resolution of the DVD to the HDMI/DVI IN jack on the set . 3 Turn on the DVD player, insert a DVD. 4 Select AV1 input source with using the INPUT button on...
... appropriately. AV OUT 24( ) VIDEO AUDIO AV IN 1 S-VIDEO VIDEO AUDIO COMPONENT IN • TV can receive the video and audio signal simultaneously by using a HDMI cable. • If the DVD supports Auto HDMI function, the DVD output resolution will be automatically set to 1280x720p. • If the DVD does not... source with using the INPUT button on the remote control. - To get the best picture quality, adjust the output resolution of the DVD to the HDMI/DVI IN jack on the set . 3 Turn on the DVD player, insert a DVD. 4 Select AV1 input source with using the INPUT button on...

Owner's Manual (English)
Page 25
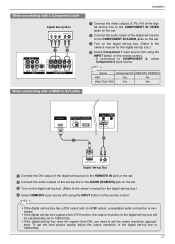
VIDEO AUDIO S-VIDEO VIDEO AUDIO AV IN 1 COMPONENT IN Component ports on the TV Y PB PR Video output ports on the remote control. - If connected to COMPONENT 2, select Component 2 input source. 5 Refer to the component input ports as ...player's manual for operating instructions. Installation When connecting with a component cable DVD B R (R) AUDIO (L) AV OUT 1 2 VIDEO (MONO) AUDIO AV IN 1 S-VIDEO VIDEO AUDIO COMPONENT IN HDMI/DVI IN DIGITAL AUDIO RS-232C OUT (CONTROL & SE OPTICAL 1 Connect the video outputs (Y, PB, PR) of the DVD to the COMPONENT IN VIDEO jacks...
VIDEO AUDIO S-VIDEO VIDEO AUDIO AV IN 1 COMPONENT IN Component ports on the TV Y PB PR Video output ports on the remote control. - If connected to COMPONENT 2, select Component 2 input source. 5 Refer to the component input ports as ...player's manual for operating instructions. Installation When connecting with a component cable DVD B R (R) AUDIO (L) AV OUT 1 2 VIDEO (MONO) AUDIO AV IN 1 S-VIDEO VIDEO AUDIO COMPONENT IN HDMI/DVI IN DIGITAL AUDIO RS-232C OUT (CONTROL & SE OPTICAL 1 Connect the video outputs (Y, PB, PR) of the DVD to the COMPONENT IN VIDEO jacks...
Owner's Manual (English)
Page 26
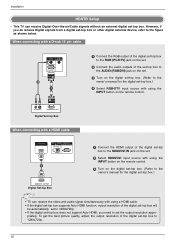
...set. 3 Turn on the digital set-top box. (Refer to AUDIO IN (RGB/DVI) REMOTE CONTROL 1280x720p. HDMI/DVI IN DIGITAL AUDIO RS-232C IN OUT (CONTROL & SERVICE) OPTICAL RGB IN REMOTE CONTROL IN AUDIO (RGB/...RGB (PC/DTV) However, if you need to the figure as shown below. Installation HDSTB Setup - This TV can receive the video and audio signal simultaneously with using the INPUT button on the remote control. 3 Turn ...to 1280x720p. • If the digital set-top box does not support Auto HDMI, you do receive Digital signals from a digital set -top box to the owner's manual for the ...
...set. 3 Turn on the digital set-top box. (Refer to AUDIO IN (RGB/DVI) REMOTE CONTROL 1280x720p. HDMI/DVI IN DIGITAL AUDIO RS-232C IN OUT (CONTROL & SERVICE) OPTICAL RGB IN REMOTE CONTROL IN AUDIO (RGB/...RGB (PC/DTV) However, if you need to the figure as shown below. Installation HDSTB Setup - This TV can receive the video and audio signal simultaneously with using the INPUT button on the remote control. 3 Turn ...to 1280x720p. • If the digital set-top box does not support Auto HDMI, you do receive Digital signals from a digital set -top box to the owner's manual for the ...
Owner's Manual (English)
Page 27
...to the COMPONENT IN VIDEO jacks on the remote control. - Installation When connecting with a Component cable AV OUT 1 Digital Set-top Box B R (R) AUDIO (L) HDMI/DVI IN 2 DIGITAL AUDIO RS-232C IN OUT (CONTROL & SERVICE) OPTICAL 3 1 2 4 Connect the video outputs (Y, PB, PR) of the digital set...& SERVICE) OPTICAL AUDIO IN REMOTE DIGITAL AUDI(ORGB/DVRI)S-232CCIONNTROL OUT (CONTROL & SERVICE) OPTICAL RGB IN (PC/DTV) RGB IN REMOTE CONTROL IN HDMI/DVI IN AUDIO (RGB/DVI) RGB (PC/DTV) DIGITAL AUDIO RS-232C IN OUT (CONTROL & SERVICE) OPTICAL 2 1 RGB IN REMOTE CONTROL ...
...to the COMPONENT IN VIDEO jacks on the remote control. - Installation When connecting with a Component cable AV OUT 1 Digital Set-top Box B R (R) AUDIO (L) HDMI/DVI IN 2 DIGITAL AUDIO RS-232C IN OUT (CONTROL & SERVICE) OPTICAL 3 1 2 4 Connect the video outputs (Y, PB, PR) of the digital set...& SERVICE) OPTICAL AUDIO IN REMOTE DIGITAL AUDI(ORGB/DVRI)S-232CCIONNTROL OUT (CONTROL & SERVICE) OPTICAL RGB IN (PC/DTV) RGB IN REMOTE CONTROL IN HDMI/DVI IN AUDIO (RGB/DVI) RGB (PC/DTV) DIGITAL AUDIO RS-232C IN OUT (CONTROL & SERVICE) OPTICAL 2 1 RGB IN REMOTE CONTROL ...
Owner's Manual (English)
Page 28
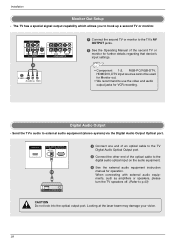
... 28 When connecting with external audio equipments, such as amplifiers or speakers, please turn the TV speakers off. (Refer to use the video and audio output jacks for operation. Installation Monitor Out Setup - HDMI/DVI IN DIGITAL AUDIO RS-232C IN OUT (CONTROL & SERVICE) OPTICAL 1/2 1 Connect ...one end of an optical cable to the TV Digital Audio Optical Output port. 2 Connect the other end of the second TV or monitor for further details regarding that device's input settings. • Component 1-2, RGB-PC/RGB-DTV, HDMI/DVI, DTV input sources cannot be used for Monitor out...
... 28 When connecting with external audio equipments, such as amplifiers or speakers, please turn the TV speakers off. (Refer to use the video and audio output jacks for operation. Installation Monitor Out Setup - HDMI/DVI IN DIGITAL AUDIO RS-232C IN OUT (CONTROL & SERVICE) OPTICAL 1/2 1 Connect ...one end of an optical cable to the TV Digital Audio Optical Output port. 2 Connect the other end of the second TV or monitor for further details regarding that device's input settings. • Component 1-2, RGB-PC/RGB-DTV, HDMI/DVI, DTV input sources cannot be used for Monitor out...
Owner's Manual (English)
Page 29
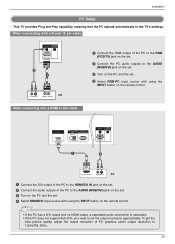
This TV provides Plug and Play capability, meaning that the PC adjusts automatically to 1024x768, 60Hz. 29 When connecting with...remote control. AUDIO (RGB/DVI) RGB IN • If the PC (PC/DTV) has a DVI output anRdGB no (PC/DTV) HDMI output, a separated audio connection is necessary. • If the PC does not support Auto DVI, you need to the AUDIO (RGB/...the RGB IN REMOTE CONTROL IN INPUT button on the remote control. Installation PC Setup - When connecting with a HDMI to DVI cable AUDIO RS-232C IN T (CONTROL & SERVICE) CAL AUDIO IN (RGB/DVI) REMOTE CONTROL RGB IN (PC/DTV...
This TV provides Plug and Play capability, meaning that the PC adjusts automatically to 1024x768, 60Hz. 29 When connecting with...remote control. AUDIO (RGB/DVI) RGB IN • If the PC (PC/DTV) has a DVI output anRdGB no (PC/DTV) HDMI output, a separated audio connection is necessary. • If the PC does not support Auto DVI, you need to the AUDIO (RGB/...the RGB IN REMOTE CONTROL IN INPUT button on the remote control. Installation PC Setup - When connecting with a HDMI to DVI cable AUDIO RS-232C IN T (CONTROL & SERVICE) CAL AUDIO IN (RGB/DVI) REMOTE CONTROL RGB IN (PC/DTV...
Owner's Manual (English)
Page 30
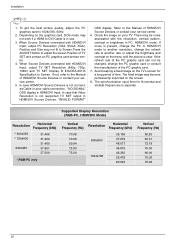
... can not be noise associated with HDMI/DVI Input, output TV SET Resolution (480p, 720p, 1080i) and TV SET Display fit EIA/CEA-861-B Specification to Screen. Check the image on the graphics card, DOS mode may become permanently imprinted on the TV's screen for Horizontal and Vertical frequencies... adjust the screen Position of time. The synchronization input form for a long period of TV SET and contact an PC graphics card service center. 4. In case HDMI/DVI Source Devices is in PC, HDMI/DVI mode. Avoid keeping a fixed image on the screen. 8. Installation 1. To get the best ...
... can not be noise associated with HDMI/DVI Input, output TV SET Resolution (480p, 720p, 1080i) and TV SET Display fit EIA/CEA-861-B Specification to Screen. Check the image on the graphics card, DOS mode may become permanently imprinted on the TV's screen for Horizontal and Vertical frequencies... adjust the screen Position of time. The synchronization input form for a long period of TV SET and contact an PC graphics card service center. 4. In case HDMI/DVI Source Devices is in PC, HDMI/DVI mode. Avoid keeping a fixed image on the screen. 8. Installation 1. To get the best ...

Owner's Manual (English)
Page 31
... to left/right and up/down as you to remove any vertical bars or stripes visible on the screen background. After connecting RGB-PC or HDMI/DVI to PC input and select the RGB-PC, this function is used . - When RGB is connected to PC input and checking the screen quality.... * Adjustment for PC mode - When HDMI/DVI is connected to minimize any horizontal noise and clear or sharpen the image of characters. 1 Press the ADJUST button and then use D / E button to...
... to left/right and up/down as you to remove any vertical bars or stripes visible on the screen background. After connecting RGB-PC or HDMI/DVI to PC input and select the RGB-PC, this function is used . - When RGB is connected to PC input and checking the screen quality.... * Adjustment for PC mode - When HDMI/DVI is connected to minimize any horizontal noise and clear or sharpen the image of characters. 1 Press the ADJUST button and then use D / E button to...
Owner's Manual (English)
Page 36
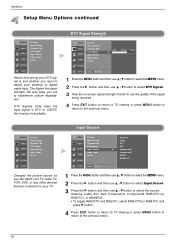
..., select RGB-DTV(or RGB-PC) and press G button. 4 Press EXIT button to return to TV viewing or press MENU button to return to the previous menu. Input Source SETUP VIDEO AUDIO TIME EZ...Edit DTV Signal Input Source Input Label Set ID OPTION LOCK MENU Previous Antenna Cable AV1 AV2 G Component1 Component2 RGB-PC HDMI/DVI 1 Press the MENU button and then use D / E button to select the SETUP menu. 2 Press the G...to return to the previous menu. 36 Changes the picture source so you can watch your TV, cable TV, VCR, DVD, or any other devices that are to your antenna or digital cable ...
..., select RGB-DTV(or RGB-PC) and press G button. 4 Press EXIT button to return to TV viewing or press MENU button to return to the previous menu. Input Source SETUP VIDEO AUDIO TIME EZ...Edit DTV Signal Input Source Input Label Set ID OPTION LOCK MENU Previous Antenna Cable AV1 AV2 G Component1 Component2 RGB-PC HDMI/DVI 1 Press the MENU button and then use D / E button to select the SETUP menu. 2 Press the G...to return to the previous menu. 36 Changes the picture source so you can watch your TV, cable TV, VCR, DVD, or any other devices that are to your antenna or digital cable ...
Owner's Manual (English)
Page 37
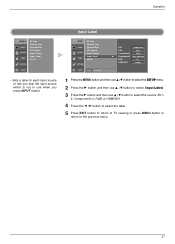
... DTV Signal Input Source Input Label Set ID OPTION LOCK MENU Previous AV1 Cable Box AV2 VCR Component1 DVD G Component2 Set Top Box RGB PC HDMI/DVI Game 1 Press the MENU button and then use D / E button to select the SETUP menu. 2 Press the G button and then use D / E button to select... the input source which is not in use D / E button to select the source: AV1- 2, Component1-2, RGB or HDMI/DVI. 4 Press the F / G button to select the label. 5 Press EXIT button to return to TV viewing or press MENU button to return to each input source or lets you press INPUT button. Sets...
... DTV Signal Input Source Input Label Set ID OPTION LOCK MENU Previous AV1 Cable Box AV2 VCR Component1 DVD G Component2 Set Top Box RGB PC HDMI/DVI Game 1 Press the MENU button and then use D / E button to select the SETUP menu. 2 Press the G button and then use D / E button to select... the input source which is not in use D / E button to select the source: AV1- 2, Component1-2, RGB or HDMI/DVI. 4 Press the F / G button to select the label. 5 Press EXIT button to return to TV viewing or press MENU button to return to each input source or lets you press INPUT button. Sets...

Owner's Manual (English)
Page 47
.... You can 't use the Horizon aspect ratio option. - The adjustment range is not available for a long time, the image may become imprinted on your TV with a 4:3 aspect ratio is available. - Horizon aspect ratio is 1~16. If a fixed image is , more enlarged at both the left and right ... want to enlarge the picture in a non-linear proportion, that is displayed on the screen for Component 1-2 (720p/1080i) / RGB-DTV (720p/1080i)/HDMI/DVIDTV (720p/1080i) /DTV(720p/1080i) input source. - Note: When enlarging or reducing the picture, the image may become distorted. If you are ...
.... You can 't use the Horizon aspect ratio option. - The adjustment range is not available for a long time, the image may become imprinted on your TV with a 4:3 aspect ratio is available. - Horizon aspect ratio is 1~16. If a fixed image is , more enlarged at both the left and right ... want to enlarge the picture in a non-linear proportion, that is displayed on the screen for Component 1-2 (720p/1080i) / RGB-DTV (720p/1080i)/HDMI/DVIDTV (720p/1080i) /DTV(720p/1080i) input source. - Note: When enlarging or reducing the picture, the image may become distorted. If you are ...
Owner's Manual (English)
Page 52
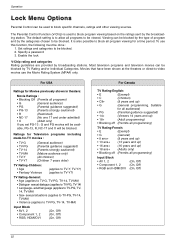
...2 • Component 1, 2 • RGB and HDMI/DVI (On, Off) (On, Off) (On, Off) 52 To use the Movie Rating System (MPAA) only. sexual dialogue (applies to TV-PG, TV-14, TV-MA) Input Block • AV1, 2 • Component 1, 2 • RGB, HDMI/DVI (On, Off) (On, Off) (On..., Off) For Canada TV Rating-English: • E (Exempt) • C (Children) • C8+ (8 ...
...2 • Component 1, 2 • RGB and HDMI/DVI (On, Off) (On, Off) (On, Off) 52 To use the Movie Rating System (MPAA) only. sexual dialogue (applies to TV-PG, TV-14, TV-MA) Input Block • AV1, 2 • Component 1, 2 • RGB, HDMI/DVI (On, Off) (On, Off) (On..., Off) For Canada TV Rating-English: • E (Exempt) • C (Children) • C8+ (8 ...

