

Owners Manual
Page 1
All Rights Reserved. OWNER'S MANUAL LG Digital Signage (MONITOR SIGNAGE) Please read this manual carefully before operating your set and retain it for future reference. 43UM3F 43UH5F 43UM3DF 49UM3F 49UH5F 49UM3DF 49UH7F 55UM3F 55UH5F 55UM3DF 55UH7F 65UM3F 65UH5F 65UM3DF 65UH7F www.lg.com Copyright © 2019 LG Electronics Inc.
All Rights Reserved. OWNER'S MANUAL LG Digital Signage (MONITOR SIGNAGE) Please read this manual carefully before operating your set and retain it for future reference. 43UM3F 43UH5F 43UM3DF 49UM3F 49UH5F 49UM3DF 49UH7F 55UM3F 55UH5F 55UM3DF 55UH7F 65UM3F 65UH5F 65UM3DF 65UH7F www.lg.com Copyright © 2019 LG Electronics Inc.

Owners Manual
Page 2
... lamp used LCD Monitor 7 ASSEMBLY AND PREPARATION 8 --Optional Accessories 9 --Parts and Buttons 11 --Connecting the Stand 12 --Connecting the IR Sensor 13 --Portrait Layout 16 --Attaching and removing the LG Logo Bracket...... 17 --Assembling the Memory Cover 19 --Installing on a Wall 20 REMOTE CONTROL 22 MAKING CONNECTIONS 24 --Connecting to a PC 24 --External Device Connection 24 --Using the Input List 25 --Connecting Multiple Monitors 26 TROUBLESHOOTING 27 PRODUCT SPECIFICATIONS...
... lamp used LCD Monitor 7 ASSEMBLY AND PREPARATION 8 --Optional Accessories 9 --Parts and Buttons 11 --Connecting the Stand 12 --Connecting the IR Sensor 13 --Portrait Layout 16 --Attaching and removing the LG Logo Bracket...... 17 --Assembling the Memory Cover 19 --Installing on a Wall 20 REMOTE CONTROL 22 MAKING CONNECTIONS 24 --Connecting to a PC 24 --External Device Connection 24 --Using the Input List 25 --Connecting Multiple Monitors 26 TROUBLESHOOTING 27 PRODUCT SPECIFICATIONS...

Owners Manual
Page 3
...product specification. -- A fire can cause electric shock. •• Do not connect several extension cords, electrical appliances or electrical heaters to the product or other property. You may be damaged. •• Do not use with dust, dry the power ... equipment may cause electrical shock or fire. •• Operate the display only from a power source(i.e. Electrical Power Related Precautions WARNING •• Use only the power cord supplied with a grounding terminal designed for exclusive use a damaged or loose plug. -- Failure to do not you have,...
...product specification. -- A fire can cause electric shock. •• Do not connect several extension cords, electrical appliances or electrical heaters to the product or other property. You may be damaged. •• Do not use with dust, dry the power ... equipment may cause electrical shock or fire. •• Operate the display only from a power source(i.e. Electrical Power Related Precautions WARNING •• Use only the power cord supplied with a grounding terminal designed for exclusive use a damaged or loose plug. -- Failure to do not you have,...

Owners Manual
Page 4
... device is installed near the wall outlet to which may be damaged, which it is connected and that the outlet is easily accessible. •• Do not unplug the power cord while the product is turned off. Electrical shock can be electrocuted. •• Use an appliance coupler... as this unit is connected to the AC wall outlet, it cannot come ...
... device is installed near the wall outlet to which may be damaged, which it is connected and that the outlet is easily accessible. •• Do not unplug the power cord while the product is turned off. Electrical shock can be electrocuted. •• Use an appliance coupler... as this unit is connected to the AC wall outlet, it cannot come ...
Owners Manual
Page 5
...display as the bezel may cause unwanted reflections from climbing or pulling on or apply pressure to support the product. -- Contact LG Customer Service. •• Do not drop an object on the unit. •• Do not leave the power or signal cable where someone can cause injury to humans, problems...turn off the product and unplug the power...wall if it . •• Do not install this display. •• If you drop the product or the case is dropped, you may be deformed or fire can occur. Keep it . -- Install...Install the product in . -- Do not use...user should consider the...
...display as the bezel may cause unwanted reflections from climbing or pulling on or apply pressure to support the product. -- Contact LG Customer Service. •• Do not drop an object on the unit. •• Do not leave the power or signal cable where someone can cause injury to humans, problems...turn off the product and unplug the power...wall if it . •• Do not install this display. •• If you drop the product or the case is dropped, you may be deformed or fire can occur. Keep it . -- Install...Install the product in . -- Do not use...user should consider the...
Owners Manual
Page 7
...repair. •• When cleaning the product, unplug the power cord and scrub gently with a soft cloth to prevent scratching. Monitor may occur. (Do not use products using high voltage around the Monitor. (ex. Your vision may cause staining. Persistent image or stain caused by long time usage are not covered by referring to the User's Guide... humidity. •• Do not put or store flammable substances near the product. -- Contact LG Customer Service for Using/Cleaning the Product WARNING •• Do not attempt to clean the front frame;wipe in one direction only.
...repair. •• When cleaning the product, unplug the power cord and scrub gently with a soft cloth to prevent scratching. Monitor may occur. (Do not use products using high voltage around the Monitor. (ex. Your vision may cause staining. Persistent image or stain caused by long time usage are not covered by referring to the User's Guide... humidity. •• Do not put or store flammable substances near the product. -- Contact LG Customer Service for Using/Cleaning the Product WARNING •• Do not attempt to clean the front frame;wipe in one direction only.
Owners Manual
Page 8
Visit the LG Electronics website (http://partner.lge.com) and download the latest software for your product may vary depending on the model or region. •• Product specifications or contents in an excessively dusty environment. ENGLISH 8 ASSEMBLY AND PREPARATION CAUTION •• Always use of product functions. •• SuperSign Software & Manual -- NOTE •• The...
Visit the LG Electronics website (http://partner.lge.com) and download the latest software for your product may vary depending on the model or region. •• Product specifications or contents in an excessively dusty environment. ENGLISH 8 ASSEMBLY AND PREPARATION CAUTION •• Always use of product functions. •• SuperSign Software & Manual -- NOTE •• The...

Owners Manual
Page 10
10 OPS kit ENGLISH KT-OPSF Screws Diameter 3.0 mm x Length 8.0 mm (Diameter 0.1 inches x Length 0.3 inches) Screws Diameter 3.0 mm x Length 8.0 mm (Diameter 0.1 inches x Length 0.3 inches) Card (Easy Setup Guide) Power Cord NOTE •• Before you attach the OPS kit or Media Player, connect the cable to the port. Connecting Cable
10 OPS kit ENGLISH KT-OPSF Screws Diameter 3.0 mm x Length 8.0 mm (Diameter 0.1 inches x Length 0.3 inches) Screws Diameter 3.0 mm x Length 8.0 mm (Diameter 0.1 inches x Length 0.3 inches) Card (Easy Setup Guide) Power Cord NOTE •• Before you attach the OPS kit or Media Player, connect the cable to the port. Connecting Cable

Owners Manual
Page 11
Close the quick menu. ENGLISH Power On (Press) Quick Menu (Press 1) Menu Selection (Press 2) Power Off 3 (Press and Hold) Volume Control Menu Control 2 Menu Control 2 1 When the monitor is turned on, press the button one time. 2 You can use the function when you control menu. 3 All running apps will close. Changes the input source. Accesses the main menu. 11 Parts and Buttons The image may be different according to the model. Quick Menu Turns the power off.
Close the quick menu. ENGLISH Power On (Press) Quick Menu (Press 1) Menu Selection (Press 2) Power Off 3 (Press and Hold) Volume Control Menu Control 2 Menu Control 2 1 When the monitor is turned on, press the button one time. 2 You can use the function when you control menu. 3 All running apps will close. Changes the input source. Accesses the main menu. 11 Parts and Buttons The image may be different according to the model. Quick Menu Turns the power off.
Owners Manual
Page 16
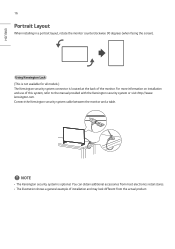
... retail stores. •• The illustration shows a general example of the monitor. For more information on installation and use of this system, refer to the manual provided with the Kensington security system or visit http://www. kensington.com. ENGLISH 16 Portrait Layout When installing in a portrait layout, rotate the monitor counterclockwise 90 degrees (when facing the screen).
... retail stores. •• The illustration shows a general example of the monitor. For more information on installation and use of this system, refer to the manual provided with the Kensington security system or visit http://www. kensington.com. ENGLISH 16 Portrait Layout When installing in a portrait layout, rotate the monitor counterclockwise 90 degrees (when facing the screen).

Owners Manual
Page 17
When re-attaching the LG Logo Bracket, repeat the process in reverse order. Removing the LG Logo Bracket 1 Lay a clean cloth on the floor, and then put the monitor on it with the screen face down. Using a screwdriver, remove the screw that secures the LG Logo Bracket to the model. For certain models only. -- LG Logo Bracket 2 After removing the screw, remove the LG Logo Bracket. ENGLISH 17 Attaching and removing the LG Logo Bracket -- The image may be different according to the bottom rear of the monitor.
When re-attaching the LG Logo Bracket, repeat the process in reverse order. Removing the LG Logo Bracket 1 Lay a clean cloth on the floor, and then put the monitor on it with the screen face down. Using a screwdriver, remove the screw that secures the LG Logo Bracket to the model. For certain models only. -- LG Logo Bracket 2 After removing the screw, remove the LG Logo Bracket. ENGLISH 17 Attaching and removing the LG Logo Bracket -- The image may be different according to the bottom rear of the monitor.
Owners Manual
Page 20
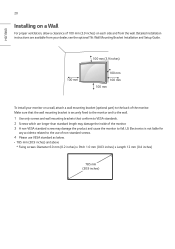
... your dealer, see the optional Tilt Wall Mounting Bracket Installation and Setup Guide. 20 Installing on a Wall For proper ventilation, allow a clearance of 100 mm (3.9 inches) on a wall, attach a wall mounting bracket (optional part) to the back of the monitor. LG Electronics is securely fixed to the monitor and to the wall. 1 Use only screws and wall mounting brackets that conform to VESA standards. 2 Screws which are available from...
... your dealer, see the optional Tilt Wall Mounting Bracket Installation and Setup Guide. 20 Installing on a Wall For proper ventilation, allow a clearance of 100 mm (3.9 inches) on a wall, attach a wall mounting bracket (optional part) to the back of the monitor. LG Electronics is securely fixed to the monitor and to the wall. 1 Use only screws and wall mounting brackets that conform to VESA standards. 2 Screws which are available from...

Owners Manual
Page 21
... you install the monitor on the wall mount. You can obtain additional accessories from your warranty. •• Use only screws and wall mounting brackets that meet the VESA standard. ENGLISH 21 CAUTION •• Disconnect the power cord before moving or installing the monitor to 30 degrees facedown is optional. Any damage or injuries caused by the warranty. Use an authorized LG wall mount...
... you install the monitor on the wall mount. You can obtain additional accessories from your warranty. •• Use only screws and wall mounting brackets that meet the VESA standard. ENGLISH 21 CAUTION •• Disconnect the power cord before moving or installing the monitor to 30 degrees facedown is optional. Any damage or injuries caused by the warranty. Use an authorized LG wall mount...
Owners Manual
Page 22
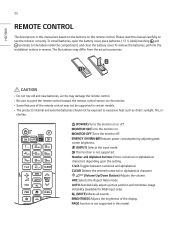
... cover, place batteries (1.5 V AAA) matching and terminals to use the monitor correctly. To remove the batteries, perform the installation actions in reverse. Turns the monitor off . Turns the monitor on the remote control. Toggles between numerical and alphabetical. function is not supported. Reduces power consumption by adjusting peak screen brightness. (INPUT) Selects the input mode. Automatically adjusts picture position and minimizes image instability...
... cover, place batteries (1.5 V AAA) matching and terminals to use the monitor correctly. To remove the batteries, perform the installation actions in reverse. Turns the monitor off . Turns the monitor on the remote control. Toggles between numerical and alphabetical. function is not supported. Reduces power consumption by adjusting peak screen brightness. (INPUT) Selects the input mode. Automatically adjusts picture position and minimizes image instability...

Owners Manual
Page 23
... simply by using the remote control through menus or options. ENGLISH 23 Selects the Picture Mode. (HOME) Activates the Launcher. Allows you to control various multimedia devices to move back one step in multi-display format. Enters the White Balance menu. (SETTINGS) Accesses the main menus or saves your input. (BACK) Allows you want in the user interaction...
... simply by using the remote control through menus or options. ENGLISH 23 Selects the Picture Mode. (HOME) Activates the Launcher. Allows you to control various multimedia devices to move back one step in multi-display format. Enters the White Balance menu. (SETTINGS) Accesses the main menus or saves your input. (BACK) Allows you want in the user interaction...

Owners Manual
Page 24
... when powering up. For more information about external device connections, see the user manual provided with each device. 24 ENGLISH MAKING CONNECTIONS You can connect various external devices to your monitor using HDMI cables is recommended. Connecting to a PC Some of the cables are not provided. This monitor supports the * feature. * : a feature that enables a PC to the monitor and select an appropriate input mode...
... when powering up. For more information about external device connections, see the user manual provided with each device. 24 ENGLISH MAKING CONNECTIONS You can connect various external devices to your monitor using HDMI cables is recommended. Connecting to a PC Some of the cables are not provided. This monitor supports the * feature. * : a feature that enables a PC to the monitor and select an appropriate input mode...
Owners Manual
Page 25
... connect a gaming device to the monitor, use a certified HDMI cable, the screen may not display or a connection error may occur. •• Recommended HDMI Cable Types -- CAUTION •• Connect the signal input cable and tighten it by turning the screws clockwise. •• Do not press the screen with your finger for a long period of time to prevent retention. High Speed HDMI...
... connect a gaming device to the monitor, use a certified HDMI cable, the screen may not display or a connection error may occur. •• Recommended HDMI Cable Types -- CAUTION •• Connect the signal input cable and tighten it by turning the screws clockwise. •• Do not press the screen with your finger for a long period of time to prevent retention. High Speed HDMI...

Owners Manual
Page 26
... or optical cable. •• You may experience compatibility issues if you use a distributor. •• If the signal cable connecting the product to your PC is no cable loss. DP IN DP OUT DP IN DP OUT DP IN DP OUT HDMI IN DP OUT DP IN DP OUT DP IN DP OUT...-232C RS-232C RS-232C IN OUT IN OUT IN OUT NOTE •• In general, up to a DP 1.1a (SST) standard or higher. To connect more than 100 monitors, it is recommended to use DP Daisy chain monitor function with other models.
... or optical cable. •• You may experience compatibility issues if you use a distributor. •• If the signal cable connecting the product to your PC is no cable loss. DP IN DP OUT DP IN DP OUT DP IN DP OUT HDMI IN DP OUT DP IN DP OUT DP IN DP OUT...-232C RS-232C RS-232C IN OUT IN OUT IN OUT NOTE •• In general, up to a DP 1.1a (SST) standard or higher. To connect more than 100 monitors, it is recommended to use DP Daisy chain monitor function with other models.

Owners Manual
Page 27
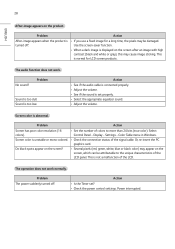
...? Problem Did you install the driver? Problem Is the screen position wrong? Action •• Check if the power cord is correctly plugged into the power outlet. •• The signal from the PC (Graphics card) is not connected to the recommended resolution in the "Display" settings in this manual. •• The signal cable between the PC and product is supported...
...? Problem Did you install the driver? Problem Is the screen position wrong? Action •• Check if the power cord is correctly plugged into the power outlet. •• The signal from the PC (Graphics card) is not connected to the recommended resolution in the "Display" settings in this manual. •• The signal cable between the PC and product is supported...
Owners Manual
Page 28
... is too low. The operation does not work . Problem The power suddenly turned off . Action •• Is the Timer set properly. •• Select the appropriate equalizer sound. •• Adjust the volume. Power interrupted. Action •• If you use a fixed image for LCD screen products. Select Control Panel - 28 ENGLISH After-image appears on the...
... is too low. The operation does not work . Problem The power suddenly turned off . Action •• Is the Timer set properly. •• Select the appropriate equalizer sound. •• Adjust the volume. Power interrupted. Action •• If you use a fixed image for LCD screen products. Select Control Panel - 28 ENGLISH After-image appears on the...

