

Owners Manual
Page 2
... good time efficiency, quiet operation and energy saving system. Use dry performance if clothes are still damp after sensor dry cycle is designed to easily access and read dry program. ELECTRICAL REQUIREMENTS FOR ELECTRIC DRYER ...PART& ELECTRICAL REQUIREMENTS FOR GAS DRYERS ...PART7. OPERATING YOUR DRYER ...PART10. TROUBLESHOOTING GUIDE ...LG DRYER LiMiTED WARRANTY ...2 3 4-6 7-12 13-14 15-18 19 20 21-22 23-30 31-33 34 ARTISTICDESIGN Modern front panel look stylish. DIGITAL FABRICCARE Multi-Level temperature control takes better care...
... good time efficiency, quiet operation and energy saving system. Use dry performance if clothes are still damp after sensor dry cycle is designed to easily access and read dry program. ELECTRICAL REQUIREMENTS FOR ELECTRIC DRYER ...PART& ELECTRICAL REQUIREMENTS FOR GAS DRYERS ...PART7. OPERATING YOUR DRYER ...PART10. TROUBLESHOOTING GUIDE ...LG DRYER LiMiTED WARRANTY ...2 3 4-6 7-12 13-14 15-18 19 20 21-22 23-30 31-33 34 ARTISTICDESIGN Modern front panel look stylish. DIGITAL FABRICCARE Multi-Level temperature control takes better care...
Owners Manual
Page 4
... required. You will repair or replace any parts defective in this manual must be followed. Use the space below to prevent property damage, personal injury, or death when using your nearest LG Service Center. Serial No. For your new LG dryer. Warranty Service is available by contacting your appliance follow basic precautions, including the following. IRNING! To reduce the risk of fire or explosion, electric...
... required. You will repair or replace any parts defective in this manual must be followed. Use the space below to prevent property damage, personal injury, or death when using your nearest LG Service Center. Serial No. For your new LG dryer. Warranty Service is available by contacting your appliance follow basic precautions, including the following. IRNING! To reduce the risk of fire or explosion, electric...

Owners Manual
Page 5
... injury or property damage when using the appliance. 2) Do not dry articles that have a proper outlet installed by a qualified electrician. This appliance is properly grounded. WARNING -hnproper connection of the equipmentgrounding conductor can result in a risk of electric shock. IMPORTANT SAFETY INSTRUCTIONS WARNING# To help reduce any servicing unless specifically recommended in the user-maintenance instructions. 9) Do not use fabric softners or products...
... injury or property damage when using the appliance. 2) Do not dry articles that have a proper outlet installed by a qualified electrician. This appliance is properly grounded. WARNING -hnproper connection of the equipmentgrounding conductor can result in a risk of electric shock. IMPORTANT SAFETY INSTRUCTIONS WARNING# To help reduce any servicing unless specifically recommended in the user-maintenance instructions. 9) Do not use fabric softners or products...

Owners Manual
Page 9
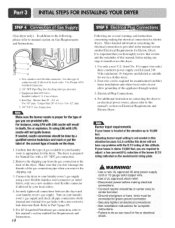
...; Clean old duets beJbre installing this dryer • The male end of each section of exhaust duct must be vented to the outdoors. N • Do not use plastic or thin foil duct. • Failure to follow the instructions (and all duct joints • Insulate ductwork that runs through the side opening and connect the elbow to the internal duct. 9 i f PORTION -A,, I Knockout O \ 2-2. DUCT TAPE 3-2. Insert elbow duct assembly first...
...; Clean old duets beJbre installing this dryer • The male end of each section of exhaust duct must be vented to the outdoors. N • Do not use plastic or thin foil duct. • Failure to follow the instructions (and all duct joints • Insulate ductwork that runs through the side opening and connect the elbow to the internal duct. 9 i f PORTION -A,, I Knockout O \ 2-2. DUCT TAPE 3-2. Insert elbow duct assembly first...
Owners Manual
Page 10
... codes. listed No. 10 (copper wire only) three conductor power supply cord kit rated 240 Volts (minimum) 30 Amperes and labeled as noted below, only use this type of nozzle on your house is provided in a clothes dryer. 2. I. Use Design AGA Certified Connector. 2. 1/8" Nl:rI ' Pipe Plug (for gas leaks with a 3/8" NPT gas connection. 2. Turn on the dryer. 1. Refer to manual section on Electrical Requirements and Electric Dryer. For additional instruction on connecting the dryer to an electrical power...
... codes. listed No. 10 (copper wire only) three conductor power supply cord kit rated 240 Volts (minimum) 30 Amperes and labeled as noted below, only use this type of nozzle on your house is provided in a clothes dryer. 2. I. Use Design AGA Certified Connector. 2. 1/8" Nl:rI ' Pipe Plug (for gas leaks with a 3/8" NPT gas connection. 2. Turn on the dryer. 1. Refer to manual section on Electrical Requirements and Electric Dryer. For additional instruction on connecting the dryer to an electrical power...
Owners Manual
Page 11
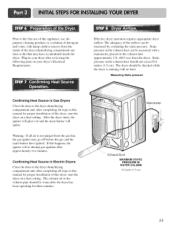
... Gas Dryers Close the door to the dryer drum/drying compartment and, after completing all steps in the exhaust duct can be measured with no load. Confirming Heat Source in your dryer after completing all air is running with a manometer, placed on a heat setting. Manometer j_ "Exhaust Duct MAXIMUM STATIC PRESSURE IN WATER COLUMN 0.6 inche (1.5 cm) II Plug-in Electric Dryers Close the door to the dryer drum/drying compartment and, after reviewing the following parts on a heat setting...
... Gas Dryers Close the door to the dryer drum/drying compartment and, after completing all steps in the exhaust duct can be measured with no load. Confirming Heat Source in your dryer after completing all air is running with a manometer, placed on a heat setting. Manometer j_ "Exhaust Duct MAXIMUM STATIC PRESSURE IN WATER COLUMN 0.6 inche (1.5 cm) II Plug-in Electric Dryers Close the door to the dryer drum/drying compartment and, after reviewing the following parts on a heat setting...

Owners Manual
Page 12
..., the dryer can be installed with a clearance of 1 inch at the manual section entitled Electrical Requirements for Electric Dryer 3) To reduce the risk of combustion and fire, the dryer must be vented to the outside. 4) Electric dryers may be a 4-wire connection. Gas dryer may not be vented to the outside fresh air to ensure proper operation. If you use a rigid or flexible metal pipe. 7) DO NOT connect the exhaust duct with metal...
..., the dryer can be installed with a clearance of 1 inch at the manual section entitled Electrical Requirements for Electric Dryer 3) To reduce the risk of combustion and fire, the dryer must be vented to the outside. 4) Electric dryers may be a 4-wire connection. Gas dryer may not be vented to the outside fresh air to ensure proper operation. If you use a rigid or flexible metal pipe. 7) DO NOT connect the exhaust duct with metal...

Owners Manual
Page 15
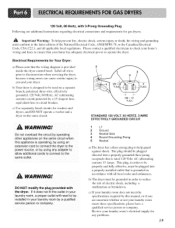
... be moved from its own terminal block that must be connected to a separate 60 Hertz single phaseAC circuit, fused at 30 Amperes (the circuit must be connected to electrical service of different voltage than that your home has adequate electrical power to operate the dryer. 120V/240M 60 Hertz, 3-Wire Installation Instructions for Grounding of your dryer according to local code and ordinance requirements. Refer to examples on the...
... be moved from its own terminal block that must be connected to a separate 60 Hertz single phaseAC circuit, fused at 30 Amperes (the circuit must be connected to electrical service of different voltage than that your home has adequate electrical power to operate the dryer. 120V/240M 60 Hertz, 3-Wire Installation Instructions for Grounding of your dryer according to local code and ordinance requirements. Refer to examples on the...
Owners Manual
Page 19
... Using extension cord to connec t the dryer to the power source, or by using any problems. 19 This plug, in order to be properly and fully effective, must be used on the same circuit. Please contact a qualified electrician to check your home has adequate electrical power to be plugged into a properly grounded three-prong receptacle that the wiring diagram is designed to the same outlet. c) Use separately fused circuits for gas dryers...
... Using extension cord to connec t the dryer to the power source, or by using any problems. 19 This plug, in order to be properly and fully effective, must be used on the same circuit. Please contact a qualified electrician to check your home has adequate electrical power to be plugged into a properly grounded three-prong receptacle that the wiring diagram is designed to the same outlet. c) Use separately fused circuits for gas dryers...
Owners Manual
Page 20
... attemPt any disassembly of the dryer, any disassembly require s the attention and tools of an authorized and qualified service person or company. 2O • Use a new AGA or CSA approved gas supply line. • Install a shut-off valve, during any local codes or ordinances in . Purge gas supply of gas leaks, explosion, and fire, please follow and observe the following instructions and WARNINGS. water column. •...
... attemPt any disassembly of the dryer, any disassembly require s the attention and tools of an authorized and qualified service person or company. 2O • Use a new AGA or CSA approved gas supply line. • Install a shut-off valve, during any local codes or ordinances in . Purge gas supply of gas leaks, explosion, and fire, please follow and observe the following instructions and WARNINGS. water column. •...

Owners Manual
Page 21
Exhaust Requirements and Instructions: 1. The exhaust duct should obtain the necessary venting materials locally. Rigid or semi-rigid metal ducting is not in use. 2. In special installations when it is impossible to clean any old ducts before installing your dryer. ,_t Important Warning: To reduce the risk of fire, combustion, or accumulation of combustible gases, DO NOT exhaust dryer air into the duct that could catch lint and reduce...
Exhaust Requirements and Instructions: 1. The exhaust duct should obtain the necessary venting materials locally. Rigid or semi-rigid metal ducting is not in use. 2. In special installations when it is impossible to clean any old ducts before installing your dryer. ,_t Important Warning: To reduce the risk of fire, combustion, or accumulation of combustible gases, DO NOT exhaust dryer air into the duct that could catch lint and reduce...

Owners Manual
Page 22
... in and that the wiring diagram is provided inside the dryer control hood. Always make sure the lint filter is spilled on the lint screen, causing longer drying times. Clean the lint filter either before starting a new load, because a clogged lint filter may increase drying times. . A qualified service person or company should be connected. 7. A Flexible Metal Vent Kit, available at extra cost, can build up on the dryer. 8. Please clean the lint filter either before and after...
... in and that the wiring diagram is provided inside the dryer control hood. Always make sure the lint filter is spilled on the lint screen, causing longer drying times. Clean the lint filter either before starting a new load, because a clogged lint filter may increase drying times. . A qualified service person or company should be connected. 7. A Flexible Metal Vent Kit, available at extra cost, can build up on the dryer. 8. Please clean the lint filter either before and after...

Owners Manual
Page 23
... operating this button for starting and using your new dryer. CHECK FINER WRINKLE CARE INDICATOR EST.TIME REMAINING CHILD LOCK POWERBUTTON START/PAUSE BUTTON DRYNESS LEVEL CONTROL TEMP. Do not dry anything that has ever had anything that has ever had any type ofoil on it (even after washing). CONTROL DRYING BEEPER TIME VOLUME CONTROL CONTROL OPTION BUI"I'ONS No washer can result in death or fire. Failure to follow these instructions can...
... operating this button for starting and using your new dryer. CHECK FINER WRINKLE CARE INDICATOR EST.TIME REMAINING CHILD LOCK POWERBUTTON START/PAUSE BUTTON DRYNESS LEVEL CONTROL TEMP. Do not dry anything that has ever had anything that has ever had any type ofoil on it (even after washing). CONTROL DRYING BEEPER TIME VOLUME CONTROL CONTROL OPTION BUI"I'ONS No washer can result in death or fire. Failure to follow these instructions can...

Owners Manual
Page 25
... drying time is running. Time change the actual time in a suitcase or items wrinkled from changing options on control panel while the dryer is set. To disable Child Lock, press and hold Rack Dry for small loads or loads that require drying without heat such as clothes packed in the cycle by pressing MORE TIME or LESS TIME. 2. Tim_e Button • Press MORE TIME or LESS TIME until start/pause is selected, this , if the dryer has some problem, it displays error...
... drying time is running. Time change the actual time in a suitcase or items wrinkled from changing options on control panel while the dryer is set. To disable Child Lock, press and hold Rack Dry for small loads or loads that require drying without heat such as clothes packed in the cycle by pressing MORE TIME or LESS TIME. 2. Tim_e Button • Press MORE TIME or LESS TIME until start/pause is selected, this , if the dryer has some problem, it displays error...

Owners Manual
Page 27
... the sound level or turn off the signal. 27 Anti Bacterial Select This option reduces bacteria by using high temperature during the cycle. SeRing a Language Language change is displayed on the control panel. Press BEEPER to switch trilingual. Damp Dry Beep Select 6. 3. Wrinkle Care Select This option helps to prevent wrinkles in case that you select the wrinkle free option, the dryer will allow you to...
... the sound level or turn off the signal. 27 Anti Bacterial Select This option reduces bacteria by using high temperature during the cycle. SeRing a Language Language change is displayed on the control panel. Press BEEPER to switch trilingual. Damp Dry Beep Select 6. 3. Wrinkle Care Select This option helps to prevent wrinkles in case that you select the wrinkle free option, the dryer will allow you to...

Owners Manual
Page 30
... cycle, the dryer automatically shuts off . Run the fingers across the filter (_ Vacuum the lint filter @ Wash the lint screen in warm, soapy water. 4. For more than 10 minutes, the dryer will damage sealing of door. 2. Be sure the door is displayed. Pausing or restarting To oause the dryer at any time Open the door or press START/PAUSE once. Dry thoroughly and replace. Wipe out the door opening 1. Clean the transparent glass door...
... cycle, the dryer automatically shuts off . Run the fingers across the filter (_ Vacuum the lint filter @ Wash the lint screen in warm, soapy water. 4. For more than 10 minutes, the dryer will damage sealing of door. 2. Be sure the door is displayed. Pausing or restarting To oause the dryer at any time Open the door or press START/PAUSE once. Dry thoroughly and replace. Wipe out the door opening 1. Clean the transparent glass door...
Owners Manual
Page 31
... room's fuse box / circuit breaker box and replace the fuse or reset the circui t breaker. (IMPORTANT:electric dryers generally . tE2 It is displayed when thermistor is b!0wu or the circuit breaker tripped, the dryer might tumble but not heat• Check your clothes entim!y clean? Troubleshooting Tips Save time and money! your fabric softener product? • Are you follo w the instructions On. a service center. m _ If the fuse is short. Problem:My Dryer Displayed Error It is...
... room's fuse box / circuit breaker box and replace the fuse or reset the circui t breaker. (IMPORTANT:electric dryers generally . tE2 It is displayed when thermistor is b!0wu or the circuit breaker tripped, the dryer might tumble but not heat• Check your clothes entim!y clean? Troubleshooting Tips Save time and money! your fabric softener product? • Are you follo w the instructions On. a service center. m _ If the fuse is short. Problem:My Dryer Displayed Error It is...
Owners Manual
Page 32
... using consistent heat settings trod consistent load sizes'? These materials can cause excess lint in a !0ado f dried Clothes: Try using a fabric softener. 7.Problem:The drying time is not consistent _stJ_ • Are you drying synthetic, permmlent press and blends ? See comments below under There is static in the load? 5.Problem:There is Linton my Clothes • Is your load of laundry? It is impontmt that the lint filter is clean...
... using consistent heat settings trod consistent load sizes'? These materials can cause excess lint in a !0ado f dried Clothes: Try using a fabric softener. 7.Problem:The drying time is not consistent _stJ_ • Are you drying synthetic, permmlent press and blends ? See comments below under There is static in the load? 5.Problem:There is Linton my Clothes • Is your load of laundry? It is impontmt that the lint filter is clean...
Owners Manual
Page 33
... _md replace the fuse or reset the circuit breaker. (IMPORTANT: electric dryers generally use instructions for your loads of laundry? If you are only drying a handful of items, add a few extra pieces to help reduce and maintain more moisture. your dryer.'? To help ensure proper tumbling action. 9.Problem:My clothes are wrinkled A'--_e you Over d..r.y..i.n..g. Confirm through review of RLM & PLC modem. 33 Try a _horter drying • time, and remove...
... _md replace the fuse or reset the circuit breaker. (IMPORTANT: electric dryers generally use instructions for your loads of laundry? If you are only drying a handful of items, add a few extra pieces to help reduce and maintain more moisture. your dryer.'? To help ensure proper tumbling action. 9.Problem:My clothes are wrinkled A'--_e you Over d..r.y..i.n..g. Confirm through review of RLM & PLC modem. 33 Try a _horter drying • time, and remove...
Owners Manual
Page 34
... website at the time warranty service is provided. Therefore, the cost of repair or replacement of God, unauthorized modification or alteration, incorrect electrical current or voltage, or commercial use, or use during the warranty period set forth below, effective from the menu, and have product type (Dryer), model number, serial number, and ZiP code ready. and Damages or operating problems that result from misuse, abuse, operation outside environmental specifications or contrary...
... website at the time warranty service is provided. Therefore, the cost of repair or replacement of God, unauthorized modification or alteration, incorrect electrical current or voltage, or commercial use, or use during the warranty period set forth below, effective from the menu, and have product type (Dryer), model number, serial number, and ZiP code ready. and Damages or operating problems that result from misuse, abuse, operation outside environmental specifications or contrary...


