Owner's Manual (English)
Page 1
... future reference. P/NO : 38289U0527F (0707-REV08) Printed in Korea LCD TV MODELS: 32LC2D 32LC2DU 37LC2D 42LC2D PLASMA TV MODELS: 42PC3D 42PC3DC 42PC3DV 50PC3D 60PC1D 60PC1DC OWNER'S MANUAL Internet Home Page : http://www.lge.com http://www.lg.ca http://www.lgcommercial.com ENERGYSTAR is a set of the set . As an ENERGY STAR Partner LGE U. Record model number and serial number of power-saving guidelines issued by the U.S.
... future reference. P/NO : 38289U0527F (0707-REV08) Printed in Korea LCD TV MODELS: 32LC2D 32LC2DU 37LC2D 42LC2D PLASMA TV MODELS: 42PC3D 42PC3DC 42PC3DV 50PC3D 60PC1D 60PC1DC OWNER'S MANUAL Internet Home Page : http://www.lge.com http://www.lg.ca http://www.lgcommercial.com ENERGYSTAR is a set of the set . As an ENERGY STAR Partner LGE U. Record model number and serial number of power-saving guidelines issued by the U.S.

Owner's Manual (English)
Page 4
... red, green, or blue spots. Unplug this apparatus during lightning storms or when unused for long periods of this product with a cart, stand, tripod, bracket, or table specified by an authorized servicer. CAUTION concerning the Power Cord Most appliances recommend they have no additional outlets or branch circuits. that is used in electric shock or fire. Check the specification page of time...
... red, green, or blue spots. Unplug this apparatus during lightning storms or when unused for long periods of this product with a cart, stand, tripod, bracket, or table specified by an authorized servicer. CAUTION concerning the Power Cord Most appliances recommend they have no additional outlets or branch circuits. that is used in electric shock or fire. Check the specification page of time...

Owner's Manual (English)
Page 5
... Source Setup DVD Setup HDSTB Setup AV Out Setup Digital Audio Output PC Setup 29 29 29 29 30 31 31 32 33 33 34 35 35~36 37 38 39 40 41 41~42 43 43 Turning on the TV Volume Adjustment Channel Selection On Screen Menus Language Selection On Screen Menus Selection and Adjustment EZ Scan (Channel Search) Manual Scan Channel Edit DTV Signal Strength Input Source Input Label Auto Picture Control(EZ Picture) Color Temperature Control XD Advanced-Cinema 3:2 Mode / Black Level Video Reset Audio Language Auto Sound Control...
... Source Setup DVD Setup HDSTB Setup AV Out Setup Digital Audio Output PC Setup 29 29 29 29 30 31 31 32 33 33 34 35 35~36 37 38 39 40 41 41~42 43 43 Turning on the TV Volume Adjustment Channel Selection On Screen Menus Language Selection On Screen Menus Selection and Adjustment EZ Scan (Channel Search) Manual Scan Channel Edit DTV Signal Strength Input Source Input Label Auto Picture Control(EZ Picture) Color Temperature Control XD Advanced-Cinema 3:2 Mode / Black Level Video Reset Audio Language Auto Sound Control...

Owner's Manual (English)
Page 11
...Connect a second TV or monitor. 3 AV (Audio/Video) IN 1 Connect audio/video output from a PC to the appropriate input port. 9 RS-232C IN (CONTROL & SERVICE) PORT Connect to the RS-232C port on DC power. 6 HDMI IN Connect a HDMI signal to these ports do not work. 8 Remote Control Port Connect your TV. Note: In standby mode, these jacks. S-VIDEO Input Provides better picture quality than the video input. Connect cable signals to this jack. 5 DIGITAL AUDIO OUT Connect digital audio from an S-VIDEO device. 4 ANTENNA/CABLE IN Connect over-the air signals to this jack. S-VIDEO Connect...
...Connect a second TV or monitor. 3 AV (Audio/Video) IN 1 Connect audio/video output from a PC to the appropriate input port. 9 RS-232C IN (CONTROL & SERVICE) PORT Connect to the RS-232C port on DC power. 6 HDMI IN Connect a HDMI signal to these ports do not work. 8 Remote Control Port Connect your TV. Note: In standby mode, these jacks. S-VIDEO Input Provides better picture quality than the video input. Connect cable signals to this jack. 5 DIGITAL AUDIO OUT Connect digital audio from an S-VIDEO device. 4 ANTENNA/CABLE IN Connect over-the air signals to this jack. S-VIDEO Connect...

Owner's Manual (English)
Page 19
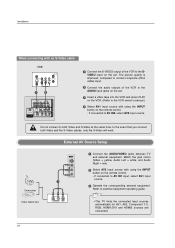
... & SERVICE) AUDIO IN REMOTE (RGB/DVI) CONTROL IN HDMI / DVI IN ANTENNA/ CABLE IN RS-232C IN When connecting with a (CONTROL&SERVICE) RCA cable 1 Connect the RF antenna out socket of the VCR. 3 Set VCR output switch to 3 or 4 and then tune TV to the same channel number. 4 Insert a video tape into the VCR and press PLAY on the VCR. (Refer to the VCR owner's manual.) VCR ANT IN OUT S-VIDEO (R) AUDIO (L) VIDEO OUTPUT SWITCH IN 34 VIDEO AUDIO ANT OUT 1 OPTICAL DIGITAL AUDIO ( ) VIDEOS-VIDEO VIDEOAUDIO AUDIO...
... & SERVICE) AUDIO IN REMOTE (RGB/DVI) CONTROL IN HDMI / DVI IN ANTENNA/ CABLE IN RS-232C IN When connecting with a (CONTROL&SERVICE) RCA cable 1 Connect the RF antenna out socket of the VCR. 3 Set VCR output switch to 3 or 4 and then tune TV to the same channel number. 4 Insert a video tape into the VCR and press PLAY on the VCR. (Refer to the VCR owner's manual.) VCR ANT IN OUT S-VIDEO (R) AUDIO (L) VIDEO OUTPUT SWITCH IN 34 VIDEO AUDIO ANT OUT 1 OPTICAL DIGITAL AUDIO ( ) VIDEOS-VIDEO VIDEOAUDIO AUDIO...
Owner's Manual (English)
Page 20
... Video Game Set 1 L AUDIO R VIDEO 1 Connect the AUDIO/VIDEO jacks between TV and external equipment. In the event that you connect both Video and S-Video at the same time. The picture quality is improved; Installation COMPONENT IN AV OUT AV IN 1 VIDEO AUDIO OPTICAL DIGITAL AUDIO S-VIDEO VIDEO ( ) AUDIO When conOUnT ecting with using the INPUT button on the remote control. - If connected to the VCR owner's manual.) 4 Select AV1 input source with using the INPUT button on the remote control. - compared to normal composite (RCA cable) input. 2 Connect the audio outputs...
... Video Game Set 1 L AUDIO R VIDEO 1 Connect the AUDIO/VIDEO jacks between TV and external equipment. In the event that you connect both Video and S-Video at the same time. The picture quality is improved; Installation COMPONENT IN AV OUT AV IN 1 VIDEO AUDIO OPTICAL DIGITAL AUDIO S-VIDEO VIDEO ( ) AUDIO When conOUnT ecting with using the INPUT button on the remote control. - If connected to the VCR owner's manual.) 4 Select AV1 input source with using the INPUT button on the remote control. - compared to normal composite (RCA cable) input. 2 Connect the audio outputs...
Owner's Manual (English)
Page 21
... using a HDMI cable. • If the DVD supports Auto HDMI function, the DVD output resolution will be automatically set to 1280x720p. • If the DVD does not support Auto HDMI, you need to set . 2 Select HDMI1/DVI or HDMI2 input source with using the INPUT button on the remote control. 3 Refer to 1280x720p. 21 VIDEO AUDIO COMPONENT IN AV OUT AV IN 1 OPTICAL DIGITAL AUDIO OUT S-VIDEO VIDEO ( ) AUDIO • TV can receive the video and audio signal simultaneously with using the INPUT button on the remote control. - To get the best picture quality, adjust the output resolution...
... using a HDMI cable. • If the DVD supports Auto HDMI function, the DVD output resolution will be automatically set to 1280x720p. • If the DVD does not support Auto HDMI, you need to set . 2 Select HDMI1/DVI or HDMI2 input source with using the INPUT button on the remote control. 3 Refer to 1280x720p. 21 VIDEO AUDIO COMPONENT IN AV OUT AV IN 1 OPTICAL DIGITAL AUDIO OUT S-VIDEO VIDEO ( ) AUDIO • TV can receive the video and audio signal simultaneously with using the INPUT button on the remote control. - To get the best picture quality, adjust the output resolution...

Owner's Manual (English)
Page 22
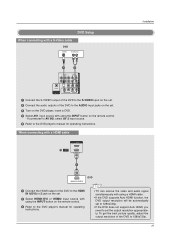
... remote control. - If connected to COMPONENT IN 2, select Component 2 input source. 5 Refer to the component input ports as shown below. Installation When connecting with a component cable DVD B R (R) AUDIO (L) 1 2 VIDEO AUDIO ANTENNA/ CABLE IN HDMI / DVI IN COMPONENT IN 1 Connect the video outputs (Y, PB, PR) of the DVD to the COMPONENT IN VIDEO jacks on the set. 2 Connect the audio outputs of the DVD to the COMPONENT IN AUDIO jacks on the set. 3 Turn on the DVD player, insert a DVD. 4 Select Component 1 input source with using the INPUT button on DVD player...
... remote control. - If connected to COMPONENT IN 2, select Component 2 input source. 5 Refer to the component input ports as shown below. Installation When connecting with a component cable DVD B R (R) AUDIO (L) 1 2 VIDEO AUDIO ANTENNA/ CABLE IN HDMI / DVI IN COMPONENT IN 1 Connect the video outputs (Y, PB, PR) of the DVD to the COMPONENT IN VIDEO jacks on the set. 2 Connect the audio outputs of the DVD to the COMPONENT IN AUDIO jacks on the set. 3 Turn on the DVD player, insert a DVD. 4 Select Component 1 input source with using the INPUT button on DVD player...
Owner's Manual (English)
Page 23
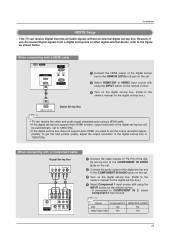
...; TV can receive Digital Over-the-air/Cable signals without an external digital set . HDMI / DVI IN 3 Turn on the set. 2 Connect the audio output of the digital set-top box will be automatically set to 1280x720p. • If the digital set-top box does not support Auto HDMI, you do receive Digital signals from a digital set the output resolution appro- However, if you need to 1280x720p. When connecting with using a HDMI cable. • If the digital set-top box supports Auto HDMI function, output resolution of the digital AUDIO IN REMOTE (RGB/DVI) CONTROL IN set -top box...
...; TV can receive Digital Over-the-air/Cable signals without an external digital set . HDMI / DVI IN 3 Turn on the set. 2 Connect the audio output of the digital set-top box will be automatically set to 1280x720p. • If the digital set-top box does not support Auto HDMI, you do receive Digital signals from a digital set the output resolution appro- However, if you need to 1280x720p. When connecting with using a HDMI cable. • If the digital set-top box supports Auto HDMI function, output resolution of the digital AUDIO IN REMOTE (RGB/DVI) CONTROL IN set -top box...
Owner's Manual (English)
Page 24
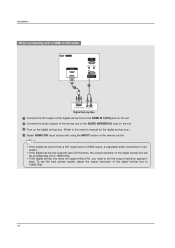
... digital set-top box does not support Auto DVI, you need to 1280x720p. 24 To get the best picture quality, adjust the output resolution of the set-top box to the AUDIO IN(RGB/DVI) jack on the remote control. Installation VIDEO AUDIO OPTICAL DIGITAL AUDIO OUT S-VIDEO VIDEO ( ) AUDIO When connecting with using the INPUT button on the set. RGB IN 3 Turn on the digital set-top box. (Refer to the owner's manual for the d(PCi)gital set-top box.) REMORTEGBAIUNDIO IN CONTROL IN (RGB/DVI) 4 Select HDMI1/DVI input source with a HDMI to DVI cable SERVICE HDMI IN 2 1(DVI...
... digital set-top box does not support Auto DVI, you need to 1280x720p. 24 To get the best picture quality, adjust the output resolution of the set-top box to the AUDIO IN(RGB/DVI) jack on the remote control. Installation VIDEO AUDIO OPTICAL DIGITAL AUDIO OUT S-VIDEO VIDEO ( ) AUDIO When connecting with using the INPUT button on the set. RGB IN 3 Turn on the digital set-top box. (Refer to the owner's manual for the d(PCi)gital set-top box.) REMORTEGBAIUNDIO IN CONTROL IN (RGB/DVI) 4 Select HDMI1/DVI input source with a HDMI to DVI cable SERVICE HDMI IN 2 1(DVI...

Owner's Manual (English)
Page 25
..., DTV input sources cannot be used for Monitor out. • We recommend to p.43) CAUTION Do not look into the optical output port. Installation AV Out Setup - COMPONENT IN AV OUT AV IN 1 VIDEO AUDIO OPTICAL DIGITAL AUDIO OUT S-VIDEO VIDEO (MONO) AUDIO 1 Connect the second TV or monitor to the TV's AV OUT jacks. 2 See the Operating Manual of the optical cable to the digital audio optical input on the audio equipment. 3 See the external audio equipment instruction manual for VCR recording. Digital Audio Output...
..., DTV input sources cannot be used for Monitor out. • We recommend to p.43) CAUTION Do not look into the optical output port. Installation AV Out Setup - COMPONENT IN AV OUT AV IN 1 VIDEO AUDIO OPTICAL DIGITAL AUDIO OUT S-VIDEO VIDEO (MONO) AUDIO 1 Connect the second TV or monitor to the TV's AV OUT jacks. 2 See the Operating Manual of the optical cable to the digital audio optical input on the audio equipment. 3 See the external audio equipment instruction manual for VCR recording. Digital Audio Output...

Owner's Manual (English)
Page 26
... a DVI output and no HDMI output, a separated audio connection is necessary. • If the PC does not support Auto DVI, you need to 1024x768, 60Hz. (CONTROL&SERVICE) 26 To get the best picture quality, adjust the output resolution of the PC to the RGB IN (PC) jack on the set . 4 Select RGB-PC input source with using the INPUT button on the PC and the set . 2 Connect the PC audio outputs to the TV's settings. This TV provides Plug and Play capability...
... a DVI output and no HDMI output, a separated audio connection is necessary. • If the PC does not support Auto DVI, you need to 1024x768, 60Hz. (CONTROL&SERVICE) 26 To get the best picture quality, adjust the output resolution of the PC to the RGB IN (PC) jack on the set . 4 Select RGB-PC input source with using the INPUT button on the PC and the set . 2 Connect the PC audio outputs to the TV's settings. This TV provides Plug and Play capability...
Owner's Manual (English)
Page 27
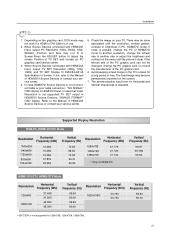
... work if a HDMI to DVI Cable is present, change the PC or HDMI/DVI mode to adjust the screen Position of time. If noise is in HDMI/DVI Source Devices, "INVALID FORMAT" OSD display. If the refresh rate of the PC graphic card can not be noise associated with HDMI/DVI Input, output TV SET Resolution (480p, 720p, 1080i) and TV SET Display fit EIA/CEA-861-B Specification to the Manual of the PC graphic card. 6. Check the image on the screen. 7. Supported Display Resolution...
... work if a HDMI to DVI Cable is present, change the PC or HDMI/DVI mode to adjust the screen Position of time. If noise is in HDMI/DVI Source Devices, "INVALID FORMAT" OSD display. If the refresh rate of the PC graphic card can not be noise associated with HDMI/DVI Input, output TV SET Resolution (480p, 720p, 1080i) and TV SET Display fit EIA/CEA-861-B Specification to the Manual of the PC graphic card. 6. Check the image on the screen. 7. Supported Display Resolution...

Owner's Manual (English)
Page 29
... G button and then use D / E button to turn TV on, press the , INPUT, CH D / E button on the TV or press the POWER, TV INPUT, INPUT, CH D / E, Number (0 ~ 9) button on vacation, disconnect the power plug from the wall power outlet. This TV is programmed to remember which power state it was last set to switch the sound off, press the MUTE button. 3. Channel Selection Press the CH D / E or NUMBER buttons to select a channel number. • If you want to , even if the power cord...
... G button and then use D / E button to turn TV on, press the , INPUT, CH D / E button on the TV or press the POWER, TV INPUT, INPUT, CH D / E, Number (0 ~ 9) button on vacation, disconnect the power plug from the wall power outlet. This TV is programmed to remember which power state it was last set to switch the sound off, press the MUTE button. 3. Channel Selection Press the CH D / E or NUMBER buttons to select a channel number. • If you want to , even if the power cord...
Owner's Manual (English)
Page 31
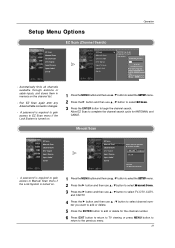
...after any Antenna/Cable connection changes. - D E TV G 2 TV 2-0 Press to the EZ scan screen. A password is required to gain access to Manual Scan menu if the Lock System is turned on. 1 Press the MENU button and then use D / E button to select the SETUP menu. 2 Press the G button and then use D / E button to select channel number you to delete the channel. - Setup Menu Options Operation EZ Scan (Channel Search) EZ Scan Manual Scan Channel Edit DTV Signal Input Source Input Label Set ID EZ Scan Manual Scan Channel Edit DTV Signal Input Source Input Label Set ID G Selection...
...after any Antenna/Cable connection changes. - D E TV G 2 TV 2-0 Press to the EZ scan screen. A password is required to gain access to Manual Scan menu if the Lock System is turned on. 1 Press the MENU button and then use D / E button to select the SETUP menu. 2 Press the G button and then use D / E button to select channel number you to delete the channel. - Setup Menu Options Operation EZ Scan (Channel Search) EZ Scan Manual Scan Channel Edit DTV Signal Input Source Input Label Set ID EZ Scan Manual Scan Channel Edit DTV Signal Input Source Input Label Set ID G Selection...
Owner's Manual (English)
Page 51
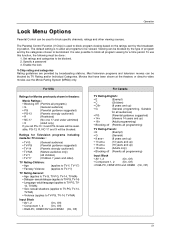
... dialogue (applies to block program viewing based on the ratings sent by broadcasting stations. The Parental Control Function (V-Chip) is to be avail- For USA Ratings for a time period. Specify a password 3. Enable the lock V-Chip rating and categories Rating guidelines are provided by the broadcasting station. Operation Lock Menu Options Parental Control can be done : 1. The default setting is used to be blocked.
... dialogue (applies to block program viewing based on the ratings sent by broadcasting stations. The Parental Control Function (V-Chip) is to be avail- For USA Ratings for a time period. Specify a password 3. Enable the lock V-Chip rating and categories Rating guidelines are provided by the broadcasting station. Operation Lock Menu Options Parental Control can be done : 1. The default setting is used to be blocked.
Owner's Manual (English)
Page 54
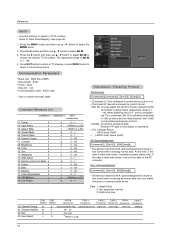
... connected the TV is 1 ~ 99. Error Acknowledgement [Command2][ ][Set ID][ ][NG][Data][x] * The Monitor transmits ACK (acknowledgement) based on this format when receiving normal data. Channel Add/Del m b 00 ~ 01 22. Use this function to select the SETUP menu. 2. Press EXIT button to return to TV viewing or press MENU button to return to 'Real Data Mapping'. Contrast k 08. Color k 10. Remote Control Lock Mode k 14. Adjustment range is controlled. See page 55. 1. Input Select...
... connected the TV is 1 ~ 99. Error Acknowledgement [Command2][ ][Set ID][ ][NG][Data][x] * The Monitor transmits ACK (acknowledgement) based on this format when receiving normal data. Channel Add/Del m b 00 ~ 01 22. Use this function to select the SETUP menu. 2. Press EXIT button to return to TV viewing or press MENU button to return to 'Real Data Mapping'. Contrast k 08. Color k 10. Remote Control Lock Mode k 14. Adjustment range is controlled. See page 55. 1. Input Select...

Owner's Manual (English)
Page 61
... 1 2 3 4 5 6 7 8 9 0 FLASHBK EZ PIC EZ SOUND SAP CC ADJUST 1 Test your remote control can be programmed to store the code. To find out whether your remote control. Programming a code into a remote mode TV INPUT POWER TV AUDIO DVD MODE CABLE INPUT VCR STB BRIGHT - It can operate the component without programming, turn off on the selected component. After blinking twice, this code is correct, the device will turn off . 5 Press the MENU button to operate most remote-controllable devices of other manufacturers.
... 1 2 3 4 5 6 7 8 9 0 FLASHBK EZ PIC EZ SOUND SAP CC ADJUST 1 Test your remote control can be programmed to store the code. To find out whether your remote control. Programming a code into a remote mode TV INPUT POWER TV AUDIO DVD MODE CABLE INPUT VCR STB BRIGHT - It can operate the component without programming, turn off on the selected component. After blinking twice, this code is correct, the device will turn off . 5 Press the MENU button to operate most remote-controllable devices of other manufacturers.

Owner's Manual (English)
Page 64
..., the image is any function to restore the brightness of possible interference. Please contact your antenna direction and/or location. • Test the wall power outlet, plug another channel. to receive weaker station. • Check for local interference such as an electrical appliance or power tool. The problem may be with Auto off • Is the sleep timer set : TV, VCR etc.? • Install new...
..., the image is any function to restore the brightness of possible interference. Please contact your antenna direction and/or location. • Test the wall power outlet, plug another channel. to receive weaker station. • Check for local interference such as an electrical appliance or power tool. The problem may be with Auto off • Is the sleep timer set : TV, VCR etc.? • Install new...

Owner's Manual (English)
Page 65
... the signal cable. • Reinstall the PC video card. Cleaning the Screen 1. Please do not use it air-dry before you turn the power off and does not indicate a fault with a soft, dry, lint-free cloth. Wring the cloth until it whether the signal cable is connected or loose. • Check the input source. • Work the Auto configure or adjust clock, phase, or H/V position. (Option) Screen color is...
... the signal cable. • Reinstall the PC video card. Cleaning the Screen 1. Please do not use it air-dry before you turn the power off and does not indicate a fault with a soft, dry, lint-free cloth. Wring the cloth until it whether the signal cable is connected or loose. • Check the input source. • Work the Auto configure or adjust clock, phase, or H/V position. (Option) Screen color is...


