
Owner's Manual (English)
Page 5
... PC Setup 29 29 29 29 30 31 31 32 33 33 34 35 35~36 37 38 39 40 41 41~42 43 43 Turning on the TV Volume Adjustment Channel Selection On Screen Menus Language Selection On Screen Menus Selection and Adjustment EZ Scan (Channel Search) Manual Scan ...Channel Edit DTV Signal Strength Input Source Input Label Auto Picture Control(EZ Picture) Color Temperature Control XD Advanced-Cinema 3:2 Mode / Black Level Video Reset Audio Language Auto Sound Control(EZ Sound) Manual Sound Control (EZ Sound-User option) Balance TV Speakers On/Off Setup Operation Contents 5
... PC Setup 29 29 29 29 30 31 31 32 33 33 34 35 35~36 37 38 39 40 41 41~42 43 43 Turning on the TV Volume Adjustment Channel Selection On Screen Menus Language Selection On Screen Menus Selection and Adjustment EZ Scan (Channel Search) Manual Scan ...Channel Edit DTV Signal Strength Input Source Input Label Auto Picture Control(EZ Picture) Color Temperature Control XD Advanced-Cinema 3:2 Mode / Black Level Video Reset Audio Language Auto Sound Control(EZ Sound) Manual Sound Control (EZ Sound-User option) Balance TV Speakers On/Off Setup Operation Contents 5

Owner's Manual (English)
Page 8
... switched on . This is switched on . 8 ENTER ENTER POWER INPUT Button Button MENU ENTER Button Button VOLUME (F,G)Buttons CHANNEL (E,D)Buttons This picture shown below may be somewhat different from your TV. 42PC3D/3DC/3DV, 50PC3D Remote Control Sensor Power/Standby Indicator • illuminates red in standby mode. Illuminates white when the set...
... switched on . This is switched on . 8 ENTER ENTER POWER INPUT Button Button MENU ENTER Button Button VOLUME (F,G)Buttons CHANNEL (E,D)Buttons This picture shown below may be somewhat different from your TV. 42PC3D/3DC/3DV, 50PC3D Remote Control Sensor Power/Standby Indicator • illuminates red in standby mode. Illuminates white when the set...

Owner's Manual (English)
Page 9
... a PC. 10 SERVICE 11 Power Cord Socket For operation with a DVI to the RS-232C port on DC power. S-VIDEO Input AV IN 2 Provides better picture quality than the video input. R AUDIO Input Connections are available for lis/MONO tening to 1(DVI) or 2. S-VIDEO VIDEO ( ) AUDIO 9 S-VIDEO VIDEO ...the monitor output from a PC to the appropriate input port. 2 AV OUT Connect a second TV or monitor. 3 AV (Audio/Video) IN 1 Connect audio/video output from an external device to this jack. This picture shown below may be somewhat different from a 11 video device. COMPONENT IN AV OUT AV ...
... a PC. 10 SERVICE 11 Power Cord Socket For operation with a DVI to the RS-232C port on DC power. S-VIDEO Input AV IN 2 Provides better picture quality than the video input. R AUDIO Input Connections are available for lis/MONO tening to 1(DVI) or 2. S-VIDEO VIDEO ( ) AUDIO 9 S-VIDEO VIDEO ...the monitor output from a PC to the appropriate input port. 2 AV OUT Connect a second TV or monitor. 3 AV (Audio/Video) IN 1 Connect audio/video output from an external device to this jack. This picture shown below may be somewhat different from a 11 video device. COMPONENT IN AV OUT AV ...

Owner's Manual (English)
Page 10
... Remote Control Sensor Power/Standby Indicator • illuminates red in standby mode. • illuminates green when the set is a simplified representation of front panel. - This picture shown below may be conveniently swivelled on . The TV can be somewhat different from your...
... Remote Control Sensor Power/Standby Indicator • illuminates red in standby mode. • illuminates green when the set is a simplified representation of front panel. - This picture shown below may be conveniently swivelled on . The TV can be somewhat different from your...

Owner's Manual (English)
Page 11
...RGB IN (PC) ( ) AUDIO Connect the monitor output from a PC to HDMI cable. 11 S-VIDEO Input Provides better picture quality than the video input. Caution: Never attempt to operate the TV on a PC. 10 SERVICE 11 Power Cord Socket For operation with a DVI to the appropriate input port. 2 AV OUT.../37/42LC2D, 32LC2DU) AV IN 1 S-VIDEO VIDEO ( ) AUDIO - Connect cable signals to these ports do not work. 8 Remote Control Port Connect your TV. AUDIO IN (RGB/DVI) Connect the monitor output from an S-VIDEO device. 4 ANTENNA/CABLE IN Connect over-the air signals to this jack. 5 DIGITAL ...
...RGB IN (PC) ( ) AUDIO Connect the monitor output from a PC to HDMI cable. 11 S-VIDEO Input Provides better picture quality than the video input. Caution: Never attempt to operate the TV on a PC. 10 SERVICE 11 Power Cord Socket For operation with a DVI to the appropriate input port. 2 AV OUT.../37/42LC2D, 32LC2DU) AV IN 1 S-VIDEO VIDEO ( ) AUDIO - Connect cable signals to these ports do not work. 8 Remote Control Port Connect your TV. AUDIO IN (RGB/DVI) Connect the monitor output from an S-VIDEO device. 4 ANTENNA/CABLE IN Connect over-the air signals to this jack. 5 DIGITAL ...

Owner's Manual (English)
Page 13
.... FLASHBK Returns to scroll the Favorite channels. VOLUME UP/DOWN Increases/decreases the sound level. EZ PIC G p.35 Selects a factory preset picture mode depending on or off. EZ SOUND G p.41 Selects the sound appropriate for multiple program channels such as 2-1, 2-2,etc. CC G ...closed caption: Off, CC1~4, Text1~4. Change the audio language in analog mode. ADJUST Adjusts screen position, size, and phase in PC mode. 13 Introduction TV INPUT POWER TV AUDIO DVD MODE CABLE INPUT VCR STB BRIGHT - MENU BRIGHT + ENTER EXIT TIMER RATIO INFO VOL MUTE FAV CH 1 2 3 4 5 6 7...
.... FLASHBK Returns to scroll the Favorite channels. VOLUME UP/DOWN Increases/decreases the sound level. EZ PIC G p.35 Selects a factory preset picture mode depending on or off. EZ SOUND G p.41 Selects the sound appropriate for multiple program channels such as 2-1, 2-2,etc. CC G ...closed caption: Off, CC1~4, Text1~4. Change the audio language in analog mode. ADJUST Adjusts screen position, size, and phase in PC mode. 13 Introduction TV INPUT POWER TV AUDIO DVD MODE CABLE INPUT VCR STB BRIGHT - MENU BRIGHT + ENTER EXIT TIMER RATIO INFO VOL MUTE FAV CH 1 2 3 4 5 6 7...

Owner's Manual (English)
Page 14
...cover. Caution: Please make sure that you set up to a wall so it cannot fall over if pushed backwards. I Use a remote control up the TV close to a wall so it cannot be attached to 7 meters distance and 30 degree (left/right) within the receiving unit scope. I Dispose of ...used batteries with the bolts (not provided as shown in the picture. * If your product has the bolts in a recycle bin to the holes in a forward direction, potentially causing injury or damaging the product. Ensure...
...cover. Caution: Please make sure that you set up to a wall so it cannot fall over if pushed backwards. I Use a remote control up the TV close to a wall so it cannot be attached to 7 meters distance and 30 degree (left/right) within the receiving unit scope. I Dispose of ...used batteries with the bolts (not provided as shown in the picture. * If your product has the bolts in a recycle bin to the holes in a forward direction, potentially causing injury or damaging the product. Ensure...

Owner's Manual (English)
Page 15
... possible, have a qualified electrician install a separate circuit breaker. Installation Installation DESKTOP PEDESTAL INSTALLATION For proper ventilation, allow a clearance of 4inches on each side from your TV. I This picture shown below may be somewhat different from the wall. 42PC3D/3DC/3DV, 50PC3D, 60PC1D/1DC 32/37/42LC2D, 32LC2DU 4 inches 4 inches 4 inches 4 inches 4 inches...
... possible, have a qualified electrician install a separate circuit breaker. Installation Installation DESKTOP PEDESTAL INSTALLATION For proper ventilation, allow a clearance of 4inches on each side from your TV. I This picture shown below may be somewhat different from the wall. 42PC3D/3DC/3DV, 50PC3D, 60PC1D/1DC 32/37/42LC2D, 32LC2DU 4 inches 4 inches 4 inches 4 inches 4 inches...

Owner's Manual (English)
Page 18
... Jack Turn clockwise to bend the bronze wire when connecting the antenna. Analog and DTV signals provided on cable Cable TV Wall Jack RF Coaxial Wire (75 ohm) Bronze Wire Be careful not to tighten. ANTENNA/ CABLE IN Turn clockwise to tighten.... your dealer for two TV's, install a "2-Way Signal Splitter" • in the connections. Multi-family Dwellings/Apartments (Connect to wall antenna socket) Wall Antenna Socket RF Coaxial Wire (75 ohm) ANTENNA/ CABLE IN VHF Antenna UHF Antenna Turn clockwise to tighten. For optimum picture quality, adjust antenna direction...
... Jack Turn clockwise to bend the bronze wire when connecting the antenna. Analog and DTV signals provided on cable Cable TV Wall Jack RF Coaxial Wire (75 ohm) Bronze Wire Be careful not to tighten. ANTENNA/ CABLE IN Turn clockwise to tighten.... your dealer for two TV's, install a "2-Way Signal Splitter" • in the connections. Multi-family Dwellings/Apartments (Connect to wall antenna socket) Wall Antenna Socket RF Coaxial Wire (75 ohm) ANTENNA/ CABLE IN VHF Antenna UHF Antenna Turn clockwise to tighten. For optimum picture quality, adjust antenna direction...

Owner's Manual (English)
Page 19
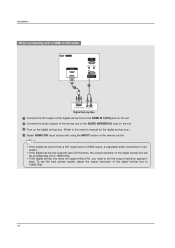
Installation VCR Setup - To avoid picture noise (interference), leave an adequate distance between TV and VCR. COMPONENT IN AV OUT AV IN 1 COMPONENT IN AV OUT AV IN 1 OPTICAL... AUDIO 19 COMPONENT IN AV OUT AV IN 1 COMPONENT IN AV OUT A Typically a frozen still picture from the VCR to the AUDIO L/MONO jack of the VCR. 3 Set VCR output switch to 3 or 4 and then tune...OUT 1 OPTICAL DIGITAL AUDIO ( ) VIDEOS-VIDEO VIDEOAUDIO AUDIO OUT 1 Connect the AUDIO/VIDEO jacks between the VCR and TV. - the fixed images on the sides of the screen may remain visible on the VCR. (Refer to AV IN2, ...
Installation VCR Setup - To avoid picture noise (interference), leave an adequate distance between TV and VCR. COMPONENT IN AV OUT AV IN 1 COMPONENT IN AV OUT AV IN 1 OPTICAL... AUDIO 19 COMPONENT IN AV OUT AV IN 1 COMPONENT IN AV OUT A Typically a frozen still picture from the VCR to the AUDIO L/MONO jack of the VCR. 3 Set VCR output switch to 3 or 4 and then tune...OUT 1 OPTICAL DIGITAL AUDIO ( ) VIDEOS-VIDEO VIDEOAUDIO AUDIO OUT 1 Connect the AUDIO/VIDEO jacks between the VCR and TV. - the fixed images on the sides of the screen may remain visible on the VCR. (Refer to AV IN2, ...
Owner's Manual (English)
Page 20
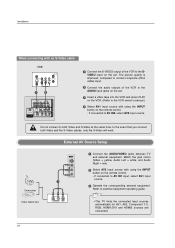
... Right = red). 2 Select AV2 input source with using the INPUT button on the VCR. (Refer to external equipment operating guide. • This TV finds the connected input sources automatically for AV1, AV2, Component 1-2, RGB, HDMI1/DVI and HDMI2 sources are connected. 20 Do not connect to AV IN1... source with using the INPUT button on the set . 3 Insert a video tape into the VCR and press PLAY on the remote control. - The picture quality is improved; Installation COMPONENT IN AV OUT AV IN 1 VIDEO AUDIO OPTICAL DIGITAL AUDIO S-VIDEO VIDEO ( ) AUDIO When conOUnT ecting with an ...
... Right = red). 2 Select AV2 input source with using the INPUT button on the VCR. (Refer to external equipment operating guide. • This TV finds the connected input sources automatically for AV1, AV2, Component 1-2, RGB, HDMI1/DVI and HDMI2 sources are connected. 20 Do not connect to AV IN1... source with using the INPUT button on the set . 3 Insert a video tape into the VCR and press PLAY on the remote control. - The picture quality is improved; Installation COMPONENT IN AV OUT AV IN 1 VIDEO AUDIO OPTICAL DIGITAL AUDIO S-VIDEO VIDEO ( ) AUDIO When conOUnT ecting with an ...
Owner's Manual (English)
Page 21
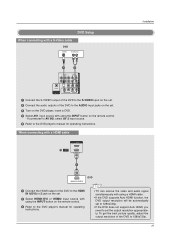
... COMPONENT IN AV OUT AV IN 1 OPTICAL DIGITAL AUDIO OUT S-VIDEO VIDEO ( ) AUDIO • TV can receive the video and audio signal simultaneously with using the INPUT button on the remote control. - To get the best picture quality, adjust the output resolution of the DVD to 1280x720p. 21 When connecting with a HDMI...
... COMPONENT IN AV OUT AV IN 1 OPTICAL DIGITAL AUDIO OUT S-VIDEO VIDEO ( ) AUDIO • TV can receive the video and audio signal simultaneously with using the INPUT button on the remote control. - To get the best picture quality, adjust the output resolution of the DVD to 1280x720p. 21 When connecting with a HDMI...

Owner's Manual (English)
Page 22
... ( ) AUDIO 22 COMPONENT IN AV OUT AV IN 1 • Component Input ports VIDEO AUDIO To get better picture quality, connect a DVD player to the DVD player's manual for operating instructions. Component ports on the TV Video output ports on the remote control. - If connected to COMPONENT IN 2, select Component 2 input source. 5 Refer...
... ( ) AUDIO 22 COMPONENT IN AV OUT AV IN 1 • Component Input ports VIDEO AUDIO To get better picture quality, connect a DVD player to the DVD player's manual for operating instructions. Component ports on the TV Video output ports on the remote control. - If connected to COMPONENT IN 2, select Component 2 input source. 5 Refer...
Owner's Manual (English)
Page 23
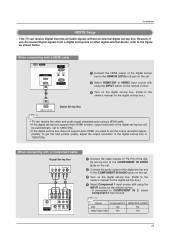
... (PC) AUDIO IN REMOTE (RGB/DVI) CONTROL IN 23 To get the best picture quality, adjust the output resolution of the digital set -top box. (Refer to set -top box. Installation HDSTB Setup... - This TV can receive the video and audio signal simultaneously using the INPUT button on the set -top box ... IN AV OUT AV IN 1 RGB IN (PC) AUDIO IN REMOTE (RGB/DVI) CONTROL IN • TV can receive Digital Over-the-air/Cable signals without an external digital set the output resolution appro- When connecting with...
... (PC) AUDIO IN REMOTE (RGB/DVI) CONTROL IN 23 To get the best picture quality, adjust the output resolution of the digital set -top box. (Refer to set -top box. Installation HDSTB Setup... - This TV can receive the video and audio signal simultaneously using the INPUT button on the set -top box ... IN AV OUT AV IN 1 RGB IN (PC) AUDIO IN REMOTE (RGB/DVI) CONTROL IN • TV can receive Digital Over-the-air/Cable signals without an external digital set the output resolution appro- When connecting with...
Owner's Manual (English)
Page 24
...; If the digital set-top box supports Auto DVI function, the output resolution of the digital set the output resolution appropriately. To get the best picture quality, adjust the output resolution of the digital set-top box will be automatically set to 1280x720p. • If the digital set-top box does...
...; If the digital set-top box supports Auto DVI function, the output resolution of the digital set the output resolution appropriately. To get the best picture quality, adjust the output resolution of the digital set-top box will be automatically set to 1280x720p. • If the digital set-top box does...

Owner's Manual (English)
Page 26
...) 2 1 1 Connect the RGB output of PC graphics card to set . 4 Select RGB-PC input source with using the INPUT button on the remote control. This TV provides Plug and Play capability, meaning that the PC adjusts automatically to the AUDIO IN(RGB/DVI) jack on the set. 3 Turn on the remote... control. To get the best picture quality, adjust the output resolution of the PC to the RGB IN (PC) jack on the set. 2 Connect the PC audio outputs to the...
...) 2 1 1 Connect the RGB output of PC graphics card to set . 4 Select RGB-PC input source with using the INPUT button on the remote control. This TV provides Plug and Play capability, meaning that the PC adjusts automatically to the AUDIO IN(RGB/DVI) jack on the set. 3 Turn on the remote... control. To get the best picture quality, adjust the output resolution of the PC to the RGB IN (PC) jack on the set. 2 Connect the PC audio outputs to the...
Owner's Manual (English)
Page 27
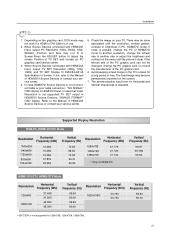
...Cable is separate. Check the image on the screen. 7. In case that Video Resolution is clear. There may become permanently imprinted on your TV. The synchronization input form for Horizontal and Vertical frequencies is in PC, HDMI/DVI mode. Depending on the graphics card, DOS mode may ...HDMI/DVI Source Devices is not supported to adjust the screen Position of time. Avoid keeping a fixed image on the menu until the picture is not supported TV SET output in HDMI/DVI Input. When Source Devices connected with HDMI/DVI Input, output PC Resolution (VGA, SVGA, XGA, WXGA...
...Cable is separate. Check the image on the screen. 7. In case that Video Resolution is clear. There may become permanently imprinted on your TV. The synchronization input form for Horizontal and Vertical frequencies is in PC, HDMI/DVI mode. Depending on the graphics card, DOS mode may ...HDMI/DVI Source Devices is not supported to adjust the screen Position of time. Avoid keeping a fixed image on the menu until the picture is not supported TV SET output in HDMI/DVI Input. When Source Devices connected with HDMI/DVI Input, output PC Resolution (VGA, SVGA, XGA, WXGA...

Owner's Manual (English)
Page 28
...ENTER button. * When you to remove any vertical bars or stripes visible on the screen background. Size This function is to adjust picture to left/right and up/down as you prefer. Phase This function allows you change . Resolution This function allows you select Resolution of... mode, SIZE is used . - And the horizontal screen size will also change the resolution, select the proper resolution in present input to see the best picture appearance. * Initializing (Reset to original factory values) 1 2 3 4 5 6 7 8 9 0 FLASHBK EZ PIC EZ SOUND SAP CC ADJUST ADJUST - After ...
...ENTER button. * When you to remove any vertical bars or stripes visible on the screen background. Size This function is to adjust picture to left/right and up/down as you prefer. Phase This function allows you change . Resolution This function allows you select Resolution of... mode, SIZE is used . - And the horizontal screen size will also change the resolution, select the proper resolution in present input to see the best picture appearance. * Initializing (Reset to original factory values) 1 2 3 4 5 6 7 8 9 0 FLASHBK EZ PIC EZ SOUND SAP CC ADJUST ADJUST - After ...

Owner's Manual (English)
Page 30
... Edit DTV Signal Input Source Input Label Set ID EZ Picture Color Temperature XD Advanced Video Reset Lock System Set Password Block Channel Movie Rating TV Rating-Children TV Rating-General Input Block Audio Language EZ Sound Balance TV Speaker Aspect Ratio Caption/Text Caption Option Language ISM Method ...Low Power Auto Clock Manual Clock Off Timer On Timer Sleep Timer Auto Off • Your TV's OSD (On Screen Display) may differ slightly from what is shown in this manual. 30 Press the G button and then use D / E / F / ...
... Edit DTV Signal Input Source Input Label Set ID EZ Picture Color Temperature XD Advanced Video Reset Lock System Set Password Block Channel Movie Rating TV Rating-Children TV Rating-General Input Block Audio Language EZ Sound Balance TV Speaker Aspect Ratio Caption/Text Caption Option Language ISM Method ...Low Power Auto Clock Manual Clock Off Timer On Timer Sleep Timer Auto Off • Your TV's OSD (On Screen Display) may differ slightly from what is shown in this manual. 30 Press the G button and then use D / E / F / ...

Owner's Manual (English)
Page 32
... the small window at the top-left corner of that channel number. 5 Press EXIT button to return to TV viewing or press MENU button to return to add or delete it. bers and a preview picture. 4 Use D / E / F / G button to select a channel and then use D / E button to the Favorite List. Press FAV button to...
... the small window at the top-left corner of that channel number. 5 Press EXIT button to return to TV viewing or press MENU button to return to add or delete it. bers and a preview picture. 4 Use D / E / F / G button to select a channel and then use D / E button to the Favorite List. Press FAV button to...


