

Owners Manual
Page 1
See the label attached on the bottom of the set and quote this manual carefully before operating your dealer when you require service. Record model number and serial number of the set . Model number : Serial number : LG DLP PROJECTOR DX540 OWNER'S MANUAL Retain it for future reference. Please read this information to your set.
See the label attached on the bottom of the set and quote this manual carefully before operating your dealer when you require service. Record model number and serial number of the set . Model number : Serial number : LG DLP PROJECTOR DX540 OWNER'S MANUAL Retain it for future reference. Please read this information to your set.
Owners Manual
Page 3
... 11 Installing and Composition Installation Instructions 12 Basic Operation of the Projector 13 Using Kensington Security System 14 Turning on the Projector 15 Turning off the Projector 15 Focus and Position of the Screen Image........16 Selecting source mode 16 Connection Connecting to a Desktop PC 17 Connecting to a Notebook PC 17 Connecting to a Video Source 17 Connecting to a DVD 18 Connecting to a D-TV Set-Top Box 18 Function Video Menu Options Adjusting Video 19 APC (Auto Picture Control 19 Color Temperature Control 20 Smart Picture...
... 11 Installing and Composition Installation Instructions 12 Basic Operation of the Projector 13 Using Kensington Security System 14 Turning on the Projector 15 Turning off the Projector 15 Focus and Position of the Screen Image........16 Selecting source mode 16 Connection Connecting to a Desktop PC 17 Connecting to a Notebook PC 17 Connecting to a Video Source 17 Connecting to a DVD 18 Connecting to a D-TV Set-Top Box 18 Function Video Menu Options Adjusting Video 19 APC (Auto Picture Control 19 Color Temperature Control 20 Smart Picture...
Owners Manual
Page 5
... into contact with an exact replacement part by plugging-in or unplugging the power plug to the unit! Do not turn the projector On/Off by an authorized service personnel. This may result in electric shock or fire. Do not remove any covers (except lens cover). Using WARNING Do not place anything containing liquid on the screen please switch it off and unplug it...
... into contact with an exact replacement part by plugging-in or unplugging the power plug to the unit! Do not turn the projector On/Off by an authorized service personnel. This may result in electric shock or fire. Do not remove any covers (except lens cover). Using WARNING Do not place anything containing liquid on the screen please switch it off and unplug it...
Owners Manual
Page 6
... Instructions Using WARNING Never touch the wall outlet when there is moist with a neutral detergent and water for removing dust or stains on the projection lens. It can cause mechanical failure. This may cause the batteries to be used for a long period. Don't look at laser beam directly as projector case, unplug the power and wipe it from the projector, switch it...
... Instructions Using WARNING Never touch the wall outlet when there is moist with a neutral detergent and water for removing dust or stains on the projection lens. It can cause mechanical failure. This may cause the batteries to be used for a long period. Don't look at laser beam directly as projector case, unplug the power and wipe it from the projector, switch it...

Owners Manual
Page 7
Focus ring Zoom ring Power button Control panel Names of the manufacturing process and does not always indicate a malfunction. This can be a normal result of parts Foot adjusting button Front remote control sensor Connecting Part DVI-D IN USB(SVC Only) RGB IN RGB OUT Rear remote control sensor RS-232C Video S-Video AC IN Kensington Security System Connector (Refer to page 14) 7 Names of parts Main Body * The projector is manufactured using high-precision technology. You may, however, see on the Projector screen tiny black points and/or bright points (red, blue, or green).
Focus ring Zoom ring Power button Control panel Names of the manufacturing process and does not always indicate a malfunction. This can be a normal result of parts Foot adjusting button Front remote control sensor Connecting Part DVI-D IN USB(SVC Only) RGB IN RGB OUT Rear remote control sensor RS-232C Video S-Video AC IN Kensington Security System Connector (Refer to page 14) 7 Names of parts Main Body * The projector is manufactured using high-precision technology. You may, however, see on the Projector screen tiny black points and/or bright points (red, blue, or green).
Owners Manual
Page 10
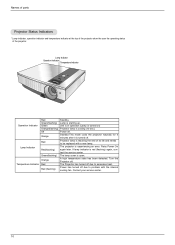
... Red Red(flashing) Green(flashing) Orange Red Red (flashing) Standby. If lamp indicator is starting up. A high temperature state has been detected. Turn the Projector off due to problem with a new lamp. Projector lamp is reaching the end of the projector. The Projector has turned off . Lamp is red (flashing) again, contact the service center. Standby-This mode cools the projector naturally for 4 minutes after it is open. Unit is in operation (Lamp is turned on) Projector lamp is experiencing an error. The projector is cooling (10 sec.) Power off. The lamp cover...
... Red Red(flashing) Green(flashing) Orange Red Red (flashing) Standby. If lamp indicator is starting up. A high temperature state has been detected. Turn the Projector off due to problem with a new lamp. Projector lamp is reaching the end of the projector. The Projector has turned off . Lamp is red (flashing) again, contact the service center. Standby-This mode cools the projector naturally for 4 minutes after it is open. Unit is in operation (Lamp is turned on) Projector lamp is experiencing an error. The projector is cooling (10 sec.) Power off. The lamp cover...
Owners Manual
Page 11
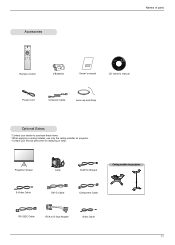
...of parts Accessories POWER MENU KEYSTONE SOURCE AUTO KEYSTONE OK BLANK LASER ARC TIMER STILL Remote Control 1.5V 1.5V 2 Batteries Owner's manual CD Owner's manual Power Cord Computer Cable Lens cap and Strap Optional Extras * Contact your service personnel for projector. * Contact your dealer to D-Sub Adapter Video Cable 11 Projection Screen Lamp SCART to RCA jack Ceiling installer for projector S-Video Cable DVI-D Cable Component Cable RS-232C Cable RCA to purchase these items. * When applying a ceiling installer, use only the ceiling installer for replacing...
...of parts Accessories POWER MENU KEYSTONE SOURCE AUTO KEYSTONE OK BLANK LASER ARC TIMER STILL Remote Control 1.5V 1.5V 2 Batteries Owner's manual CD Owner's manual Power Cord Computer Cable Lens cap and Strap Optional Extras * Contact your service personnel for projector. * Contact your dealer to D-Sub Adapter Video Cable 11 Projection Screen Lamp SCART to RCA jack Ceiling installer for projector S-Video Cable DVI-D Cable Component Cable RS-232C Cable RCA to purchase these items. * When applying a ceiling installer, use only the ceiling installer for replacing...

Owners Manual
Page 12
... conditions. Do not obstruct the slots and openings of liquid into the projector. To display DTV programs, it is a normal result of the manufacturing process and does not indicate a malfunction. G Do not place the projector on the projector Screen. It may , however, see tiny black points and/or bright points (red, blue, or green) that continuously appear on a carpet, rug...
... conditions. Do not obstruct the slots and openings of liquid into the projector. To display DTV programs, it is a normal result of the manufacturing process and does not indicate a malfunction. G Do not place the projector on the projector Screen. It may , however, see tiny black points and/or bright points (red, blue, or green) that continuously appear on a carpet, rug...

Owners Manual
Page 13
... so then the keystone adjustment may correct this (Refer to page 26.). 4.Connect the cables of the image. 3.Position the projector so that the lens is not set at a right angle, the screen image will be crooked. The distance between the projector and the screen determines the actual size of the projector to the screen. If the projector is set at a right angle to a wall power socket and other connected sources.
... so then the keystone adjustment may correct this (Refer to page 26.). 4.Connect the cables of the image. 3.Position the projector so that the lens is not set at a right angle, the screen image will be crooked. The distance between the projector and the screen determines the actual size of the projector to the screen. If the projector is set at a right angle to a wall power socket and other connected sources.
Owners Manual
Page 15
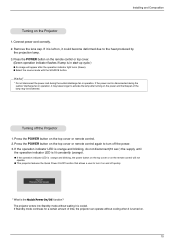
... cover or remote control again to the heat produced by the projection lamp. 3. Connect power cord correctly. 2. Press the POWER button on . 15 G This projector features the Quick Power On/Off function that allows a user to activate the lamp after the operation indicator light turns (Green). Installing and Composition Turning on the top cover or remote control. 2. Turning off ? G Select the source mode with the SOURCE button. * Do not disconnect the power cord during the suction/ discharge fan in start-up cycle.) G An image...
... cover or remote control again to the heat produced by the projection lamp. 3. Connect power cord correctly. 2. Press the POWER button on . 15 G This projector features the Quick Power On/Off function that allows a user to activate the lamp after the operation indicator light turns (Green). Installing and Composition Turning on the top cover or remote control. 2. Turning off ? G Select the source mode with the SOURCE button. * Do not disconnect the power cord during the suction/ discharge fan in start-up cycle.) G An image...
Owners Manual
Page 19
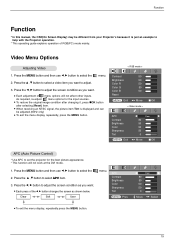
...) mode mainly. Clear Soft User menu. Function Function * In this manual, the OSD(On Screen Display) may be adjusted.(60Hz only) G To exit the menu display, repeatedly, press the MENU button. < RGB mode > Contrast 50 Brightness 50 Color R 50 Color G 50 Color B 50 Reset MENU Exit F G Move OK < Video mode > APC Contrast Brightness Color Sharpness Tint F Clear G 80 50 50 50 0 MENU Exit F G Move OK APC (Auto Picture Control) * Use APC to set the projector for the input sources.
...) mode mainly. Clear Soft User menu. Function Function * In this manual, the OSD(On Screen Display) may be adjusted.(60Hz only) G To exit the menu display, repeatedly, press the MENU button. < RGB mode > Contrast 50 Brightness 50 Color R 50 Color G 50 Color B 50 Reset MENU Exit F G Move OK < Video mode > APC Contrast Brightness Color Sharpness Tint F Clear G 80 50 50 50 0 MENU Exit F G Move OK APC (Auto Picture Control) * Use APC to set the projector for the input sources.

Owners Manual
Page 25
... G F 4 : 3 G F Off G Flip horizontal Flip vertical Sleep time Auto sleep Set ID F Off G F Off G F 1 G Presentation timer F Off G MENU Prev. G The Time alarm function and the Time keeper function cannot be set time is no signal. 1. When window below appears, select Time alarm or Time keeper item. 4. G Time alarm function : If you select specific time. When the set from 10 to select the menu. 2. Function Auto sleep Function * This function turns the projector off automatically...
... G F 4 : 3 G F Off G Flip horizontal Flip vertical Sleep time Auto sleep Set ID F Off G F Off G F 1 G Presentation timer F Off G MENU Prev. G The Time alarm function and the Time keeper function cannot be set time is no signal. 1. When window below appears, select Time alarm or Time keeper item. 4. G Time alarm function : If you select specific time. When the set from 10 to select the menu. 2. Function Auto sleep Function * This function turns the projector off automatically...
Owners Manual
Page 26
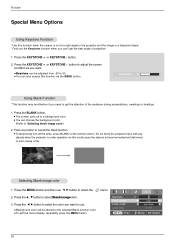
... briefings. 1. Selecting Blank image color 1. Keystone Blank Image Lamp mode Lamp time MENU Prev. 0 F Logo G F High Bright G 11 Hr D E Move F G Select 26 button to adjust the screen condition as this could cause the objects to cancel the blank function. Do not block the projection lens with any button to become heated and deformed or even cause a fire. G To exit the menu display, repeatedly press the MENU button. Keystone 0 Using Blank Function * This...
... briefings. 1. Selecting Blank image color 1. Keystone Blank Image Lamp mode Lamp time MENU Prev. 0 F Logo G F High Bright G 11 Hr D E Move F G Select 26 button to adjust the screen condition as this could cause the objects to cancel the blank function. Do not block the projection lens with any button to become heated and deformed or even cause a fire. G To exit the menu display, repeatedly press the MENU button. Keystone 0 Using Blank Function * This...

Owners Manual
Page 27
... F High Bright G 11 Hr lamp time. Keystone 0 Blank Image F Logo G GWhen projector lamp is displayed. Lamp time GThe lamp warning LED illuminates red continuously in the case of its life, the lamp indicator will release automatically after approximately 10 minutes. 27 MENU Exit F G Move OK G To exit the menu display, repeatedly, press the MENU button. Press the STILL button. * You can freeze the input image. 2. To exit STILL, press any button . * The STILL function will turn Lamp mode red. Press...
... F High Bright G 11 Hr lamp time. Keystone 0 Blank Image F Logo G GWhen projector lamp is displayed. Lamp time GThe lamp warning LED illuminates red continuously in the case of its life, the lamp indicator will release automatically after approximately 10 minutes. 27 MENU Exit F G Move OK G To exit the menu display, repeatedly, press the MENU button. Press the STILL button. * You can freeze the input image. 2. To exit STILL, press any button . * The STILL function will turn Lamp mode red. Press...

Owners Manual
Page 30
... button and then use F, G button to connect external control equipment • Connect the serial port of Set ID is not supplied with the specified ID number will operate from the remote control. Press the AOK button to select your desired number. D E Move F G Select How to select the menu. 2. Language ARC F English G F 4 : 3 G Overscan F 10% G Flip horizontal Flip vertical Sleep time F Off G Auto off F Off G Set ID F 1 G Presentation time F Off G MENU Prev. Press the MENU button and then use D , E button...
... button and then use F, G button to connect external control equipment • Connect the serial port of Set ID is not supplied with the specified ID number will operate from the remote control. Press the AOK button to select your desired number. D E Move F G Select How to select the menu. 2. Language ARC F English G F 4 : 3 G Overscan F 10% G Flip horizontal Flip vertical Sleep time F Off G Auto off F Off G Set ID F 1 G Presentation time F Off G MENU Prev. Press the MENU button and then use D , E button...

Owners Manual
Page 31
Screen Mute k 05. Tint k 09. Remote Control Lock / Key Lock k 12. Color k 08. OSD Select k 11. Key m Command2 a b c d g h i j k l m u w y z q u b c Data (Hexadecimal) 0 ~ 1 * 1 ~ 2 0 ~ 1 0 ~ 64 0 ~ 64 0 ~ 64 0 ~ 64 0 ~ 64 0 ~ 1 0 ~ 1 0 ~ 3 0 ~ 64 0 ~ 64 0 ~ 64 0 ~ 1 1 * Key code * Refer to the detailed information for data with [*] mark. ❑ Communication Protocol * Real data mapping 1 * Real data mapping 2 RS-232C 31 Contrast k 06. Brightness k 07. Red ADC gain adjustment j 14. Low Power j 17. Auto configuration j 18...
Screen Mute k 05. Tint k 09. Remote Control Lock / Key Lock k 12. Color k 08. OSD Select k 11. Key m Command2 a b c d g h i j k l m u w y z q u b c Data (Hexadecimal) 0 ~ 1 * 1 ~ 2 0 ~ 1 0 ~ 64 0 ~ 64 0 ~ 64 0 ~ 64 0 ~ 64 0 ~ 1 0 ~ 1 0 ~ 3 0 ~ 64 0 ~ 64 0 ~ 64 0 ~ 1 1 * Key code * Refer to the detailed information for data with [*] mark. ❑ Communication Protocol * Real data mapping 1 * Real data mapping 2 RS-232C 31 Contrast k 06. Brightness k 07. Red ADC gain adjustment j 14. Low Power j 17. Auto configuration j 18...

Owners Manual
Page 35
... lens surface gently. RCA to be replaced, contact your dealer. When cleaning any parts need to be warped or discolored. 35 Cleaning the Projector Case To clean the projector case, first unplug the power cable. To remove dirt or stains on the screen. * The projector supports DDC1/2B type as these can cause the casing to D-Sub Adapter O 2- Supported Monitor Display * The following table lists the display formats supported...
... lens surface gently. RCA to be replaced, contact your dealer. When cleaning any parts need to be warped or discolored. 35 Cleaning the Projector Case To clean the projector case, first unplug the power cable. To remove dirt or stains on the screen. * The projector supports DDC1/2B type as these can cause the casing to D-Sub Adapter O 2- Supported Monitor Display * The following table lists the display formats supported...

Owners Manual
Page 36
... the projector. You must replace the lamp when: G The projected image gets darker or starts to turn off power. - Do not place the lamp near any heat source. - G The message "Replace the lamp" appears on the screen when turning the projector on page 39. Keep the lamp unit out of reach of the Menu (page.27). To reduce the risk of the used lamp time in the CHECKING LAMP TIME section of children. Press the POWER button...
... the projector. You must replace the lamp when: G The projected image gets darker or starts to turn off power. - Do not place the lamp near any heat source. - G The message "Replace the lamp" appears on the screen when turning the projector on page 39. Keep the lamp unit out of reach of the Menu (page.27). To reduce the risk of the used lamp time in the CHECKING LAMP TIME section of children. Press the POWER button...
Owners Manual
Page 38
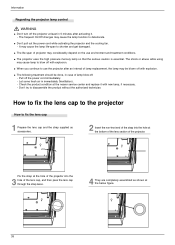
.../Off changes may be done, in immediately (Ventilation). - How to fix the lens cap to the projector How to shorten and get damaged. It may considerably depend on the use the projector after activating it with new lamp, if necessary. - G The projector uses the high pressure mercury lamp so that the serious caution is essential. Information Regarding the projector lamp control WARNING G Don't turn off the projector at...
.../Off changes may be done, in immediately (Ventilation). - How to fix the lens cap to the projector How to shorten and get damaged. It may considerably depend on the use the projector after activating it with new lamp, if necessary. - G The projector uses the high pressure mercury lamp so that the serious caution is essential. Information Regarding the projector lamp control WARNING G Don't turn off the projector at...
Owners Manual
Page 39
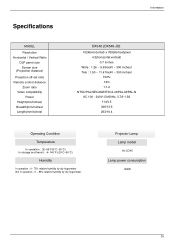
Specifications MODEL Resolution Horizontal / Vertical Ratio DLP panel size Screen size (Projection distance) Projection off-set ratio Remote control distance Zoom ratio Video compatibility Power Height(mm/inches) Breadth(mm/inches) Length(mm/inches) Information DX540 (DX540-JD) 1024...Operating Condition Temperature In operation : 32~95°F(0°C~35°C) In storage and transit : -4~140°F(-20°C~60°C) Humidity In operation : 0~ 75% relative humidity by dry hygrometer Not in operation : 0 ~ 85% relative humidity by dry hygrometer Projector Lamp Lamp model AJ-LDX5 Lamp power...
Specifications MODEL Resolution Horizontal / Vertical Ratio DLP panel size Screen size (Projection distance) Projection off-set ratio Remote control distance Zoom ratio Video compatibility Power Height(mm/inches) Breadth(mm/inches) Length(mm/inches) Information DX540 (DX540-JD) 1024...Operating Condition Temperature In operation : 32~95°F(0°C~35°C) In storage and transit : -4~140°F(-20°C~60°C) Humidity In operation : 0~ 75% relative humidity by dry hygrometer Not in operation : 0 ~ 85% relative humidity by dry hygrometer Projector Lamp Lamp model AJ-LDX5 Lamp power...


