

Service Manual
Page 1
http://biz.lgservice.com KIMCHI REFRIGERATOR SERVICE MANUAL CAUTION PLEASE READ CAREFULLY THE SAFETY PRECAUTIONS OF THIS MANUAL BEFORE CHECKING OR OPERATING THE REFRIGERATOR. MODEL : GR-K192AF
http://biz.lgservice.com KIMCHI REFRIGERATOR SERVICE MANUAL CAUTION PLEASE READ CAREFULLY THE SAFETY PRECAUTIONS OF THIS MANUAL BEFORE CHECKING OR OPERATING THE REFRIGERATOR. MODEL : GR-K192AF

Service Manual
Page 2
... to avoid spills. Circuit diagram ...8 5. Contents 1. Major repair method for disassembling the product 52 11. Assembly diagram and service parts list 53 - 2 - Always unplug the refrigerator before tilting it during repairs to prevent the house from getting dirty from the gas within the cycle.) 8. Safety regulations 1. Be especially careful for thin objects (glass sheet, book). 7. Product specification ...6 3. Do not allow water or moisture to ensure...
... to avoid spills. Circuit diagram ...8 5. Contents 1. Major repair method for disassembling the product 52 11. Assembly diagram and service parts list 53 - 2 - Always unplug the refrigerator before tilting it during repairs to prevent the house from getting dirty from the gas within the cycle.) 8. Safety regulations 1. Be especially careful for thin objects (glass sheet, book). 7. Product specification ...6 3. Do not allow water or moisture to ensure...

Service Manual
Page 3
... the instructions are classified into 'Warning' and 'Caution', as explained below. When replacing PCB parts, wait at least 3 minutes after unplugging. Make sure that the power plug is not pressed by the back of the refrigerator Power plug may be damaged and cause a fire or electric shock. w Caution Caution means a condition which hare intended to ensure safety while repairing or operating the...
... the instructions are classified into 'Warning' and 'Caution', as explained below. When replacing PCB parts, wait at least 3 minutes after unplugging. Make sure that the power plug is not pressed by the back of the refrigerator Power plug may be damaged and cause a fire or electric shock. w Caution Caution means a condition which hare intended to ensure safety while repairing or operating the...

Service Manual
Page 4
... food on the door and do not leave it where children play. If you think that requires precise temperature control can be grounded, when needed. in the refrigerator such as ether, benzene, alcohol, medicine, LP gas etc. Store an object that there is a possibility of the refrigerator. Items stored on top of electricity leakage by water or moisture...
... food on the door and do not leave it where children play. If you think that requires precise temperature control can be grounded, when needed. in the refrigerator such as ether, benzene, alcohol, medicine, LP gas etc. Store an object that there is a possibility of the refrigerator. Items stored on top of electricity leakage by water or moisture...

Service Manual
Page 5
... cause fire or electric shock. Safety warnings and cautions w Caution When using the refrigerator for resetting if you unplug the refrigerator. Make sure that the model name, voltage, current and temperature ratings are properly connected. It can cause an overload to crack, which can prevent problems such as tracking or short circuit. During repairs, remove all connectors are tight and wires are properly routed...
... cause fire or electric shock. Safety warnings and cautions w Caution When using the refrigerator for resetting if you unplug the refrigerator. Make sure that the model name, voltage, current and temperature ratings are properly connected. It can cause an overload to crack, which can prevent problems such as tracking or short circuit. During repairs, remove all connectors are tight and wires are properly routed...

Service Manual
Page 6
GR-K192AF Item Usable volume Volume Left compartment Right compartment External dimensions Width Depth Height Freeze cycle Total weight Motor power consumption Cooling method Store/Season Insulation material Fresh vegetable basket Kimchi refrigerator container Low temperature catalytic deodorizing system Compressor Evaporator Refrigerant (amount) Oil PTC OLP Fan motor for compressor cooling Left compartment seasoning heater Right compartment seasoning heater Capacitor (running) Capacitor (starting) Electrical part rating GR-K192AF SPEC 188.8Li 94.3Li 94.3Li 922mm 699mm...
GR-K192AF Item Usable volume Volume Left compartment Right compartment External dimensions Width Depth Height Freeze cycle Total weight Motor power consumption Cooling method Store/Season Insulation material Fresh vegetable basket Kimchi refrigerator container Low temperature catalytic deodorizing system Compressor Evaporator Refrigerant (amount) Oil PTC OLP Fan motor for compressor cooling Left compartment seasoning heater Right compartment seasoning heater Capacitor (running) Capacitor (starting) Electrical part rating GR-K192AF SPEC 188.8Li 94.3Li 94.3Li 922mm 699mm...

Service Manual
Page 12
... refrigerator performs the setting originally programmed except for Error status and Test mode. 2. s Summary chart of "Mid". (to whichever compartment that has had a satisfactory temperature most recently. Buzzer sound When you press a button on the front display, you will hear a varying buzzer sound depending on the temperature sensed in both compartments become satisfactory. The compressor runs or stops and the 3-way valve opens or...
... refrigerator performs the setting originally programmed except for Error status and Test mode. 2. s Summary chart of "Mid". (to whichever compartment that has had a satisfactory temperature most recently. Buzzer sound When you press a button on the front display, you will hear a varying buzzer sound depending on the temperature sensed in both compartments become satisfactory. The compressor runs or stops and the 3-way valve opens or...

Service Manual
Page 14
... store" button on the left 1 compartment sensor (R1). If an error occurs, the control panel button will default to support SVC in segment for the remaining seasoning time display of the right compartment, and all LEDs are turned off. The error codes are shown in case of an error that can affect the performance of an ambient temperature sensor error, the error code is not displayed and...
... store" button on the left 1 compartment sensor (R1). If an error occurs, the control panel button will default to support SVC in segment for the remaining seasoning time display of the right compartment, and all LEDs are turned off. The error codes are shown in case of an error that can affect the performance of an ambient temperature sensor error, the error code is not displayed and...

Service Manual
Page 15
... PCB operates the test mode. TEST3 Press the test switch once when Test 2 indicates it is completed. Test function 1. Mode Operation TEST1 Press the test switch once COMP fan motor VALVE ON Left compartment 20minute / Right compartment 20 minute Left and Right seasoning heater OFF DIAPLAY LED Error code display "11" Remarks This test checks the refrigeration system for errors in again to display the failure code. 6. ON Left compartment valve OPEN OFF Error code display "33" This test checks the refrigeration system...
... PCB operates the test mode. TEST3 Press the test switch once when Test 2 indicates it is completed. Test function 1. Mode Operation TEST1 Press the test switch once COMP fan motor VALVE ON Left compartment 20minute / Right compartment 20 minute Left and Right seasoning heater OFF DIAPLAY LED Error code display "11" Remarks This test checks the refrigeration system for errors in again to display the failure code. 6. ON Left compartment valve OPEN OFF Error code display "33" This test checks the refrigeration system...

Service Manual
Page 16
... status by resetting the various elements within the MICOM (IC1), such as RAM, whenever power is maintained in order to the logic elements of the noise attenuation part and the SMPS (Switch Mode Power Supply) part. Wait at the beginning of the microprocessor. 5-2-3. Circuit description 5-2-1. OSC1 must always use the original rated parts, because if the specification changes, the timing generated will not operate.) - 16...
... status by resetting the various elements within the MICOM (IC1), such as RAM, whenever power is maintained in order to the logic elements of the noise attenuation part and the SMPS (Switch Mode Power Supply) part. Wait at the beginning of the microprocessor. 5-2-3. Circuit description 5-2-1. OSC1 must always use the original rated parts, because if the specification changes, the timing generated will not operate.) - 16...

Service Manual
Page 20
...; -1.5 ˚C 2 KΩ -2.0 ˚C Cooler 470 Ω -2.5 ˚C u Temperature compensation table by adjustment of resistance value (difference against current temperature) Ex) If you change - 20 - Storing temperature compensation and over-cool/under-cool cut compensation circuit (1) Storing temperature compensation u This is the circuit to input the temperature compensation level required for adjusting storage temperature at the left compartment (RCL) from 10KΩ (current resistance...
...; -1.5 ˚C 2 KΩ -2.0 ˚C Cooler 470 Ω -2.5 ˚C u Temperature compensation table by adjustment of resistance value (difference against current temperature) Ex) If you change - 20 - Storing temperature compensation and over-cool/under-cool cut compensation circuit (1) Storing temperature compensation u This is the circuit to input the temperature compensation level required for adjusting storage temperature at the left compartment (RCL) from 10KΩ (current resistance...

Service Manual
Page 34
... of the compressor part • Adjust the surrounding pipe and seat rubber to maintain the level of the compressor • Remove contact Operating device noise u Contact sound from poor installation u The installation floor surface is not hard enough u The refrigerator is not leveled • Reinforce the floor hardness • Move the installation location • Use the adjustment screw in front of the refrigerator to measure the power consumption...
... of the compressor part • Adjust the surrounding pipe and seat rubber to maintain the level of the compressor • Remove contact Operating device noise u Contact sound from poor installation u The installation floor surface is not hard enough u The refrigerator is not leveled • Reinforce the floor hardness • Move the installation location • Use the adjustment screw in front of the refrigerator to measure the power consumption...

Service Manual
Page 35
... for the new R134a EA For R134a Prevent mixed refrigerant can cause the rubber to half or lower of operating the compressor. Model name: 40134A mineral oil and For the refrigerant piping (rubber type), using R134a refrigerant No. When measuring the refrigerant, do a soap water test. When repairing the refrigerator cycle piping, always exchange the drier. Major repair work standard for refrigerator using Manufacturer: US Robin Air ether oil...
... for the new R134a EA For R134a Prevent mixed refrigerant can cause the rubber to half or lower of operating the compressor. Model name: 40134A mineral oil and For the refrigerant piping (rubber type), using R134a refrigerant No. When measuring the refrigerant, do a soap water test. When repairing the refrigerator cycle piping, always exchange the drier. Major repair work standard for refrigerator using Manufacturer: US Robin Air ether oil...

Service Manual
Page 36
... than 60 minutes. - Use the compressor, drier, oil and refrigerant for the leakage parts - Connect the hose and vacuum pump of the manifold gauge to major repair work Work sequence Diagnose problem Major repair details Remove residual refrigerant - Use only the ones with no humidity. Major repair work space with proper wrapping and immediately assemble and weld the parts. - Bombe for leakage in a clean work should be penetrated and...
... than 60 minutes. - Use the compressor, drier, oil and refrigerant for the leakage parts - Connect the hose and vacuum pump of the manifold gauge to major repair work Work sequence Diagnose problem Major repair details Remove residual refrigerant - Use only the ones with no humidity. Major repair work space with proper wrapping and immediately assemble and weld the parts. - Bombe for leakage in a clean work should be penetrated and...

Service Manual
Page 37
... and secondly cut the 1. Removing residual refrigerant Caution 1) Use the parts and tools for R134a. 1) When removing the residual refrigerant always turn the refrigerator off and then wait for freezing cycle 8-3. Major repair method for more than 5 minutes. (If you work before waiting 5 minutes, the internal oil can leak out.) Evaporator Evaporator Low pressure side 2 Condenser Drier High pressure 3-Way side 1 Valve Hot Line Pipe 3. Using tools 2.
... and secondly cut the 1. Removing residual refrigerant Caution 1) Use the parts and tools for R134a. 1) When removing the residual refrigerant always turn the refrigerator off and then wait for freezing cycle 8-3. Major repair method for more than 5 minutes. (If you work before waiting 5 minutes, the internal oil can leak out.) Evaporator Evaporator Low pressure side 2 Condenser Drier High pressure 3-Way side 1 Valve Hot Line Pipe 3. Using tools 2.

Service Manual
Page 39
..., connect the power to the low pressure side. When sucking the refrigerant operate the compressor. (Inserting refrigerant is easier and surer.) Working order 1) After completing the vacuuming, check the refrigerant amount for freezing cycle Item 4. Major repair method for each model. 2) Using the vacuum pump, make the bombe vacuum. 3) Measure the refrigerant charging amount - Refrigerant charging Caution Evaporator Compressor 3 Condenser Drier High pressure 3-Way side Valve Hot Line Pipe...
..., connect the power to the low pressure side. When sucking the refrigerant operate the compressor. (Inserting refrigerant is easier and surer.) Working order 1) After completing the vacuuming, check the refrigerant amount for freezing cycle Item 4. Major repair method for each model. 2) Using the vacuum pump, make the bombe vacuum. 3) Measure the refrigerant charging amount - Refrigerant charging Caution Evaporator Compressor 3 Condenser Drier High pressure 3-Way side Valve Hot Line Pipe...

Service Manual
Page 40
... of handling gas. 2) Use a plate jig (or wet towel), if needed, to prevent any skin burn from wires during welding. 4) When doing the welding, make sure the suction tube does not be mixed with copper, test for leakage on the welding part. 6. Basic principle for freezing cycle Item 5. Charging the refrigerant Caution Evaporator Compressor Drier Bombe Condenser High pressure 3-Way side Valve Hot Line...
... of handling gas. 2) Use a plate jig (or wet towel), if needed, to prevent any skin burn from wires during welding. 4) When doing the welding, make sure the suction tube does not be mixed with copper, test for leakage on the welding part. 6. Basic principle for freezing cycle Item 5. Charging the refrigerant Caution Evaporator Compressor Drier Bombe Condenser High pressure 3-Way side Valve Hot Line...

Service Manual
Page 43
... of poor operation and leakage.) (Type without a join pipe) Body Right compartment Drier side Left compartment (green) - 43 - Caution for freezing cycle 8-8. Therefore always service the product in the 3-way valve: When the refrigerant leaked on the joint pipe (a, b, c part) connected to remove the moisture within the cycle. Major repair method for major repair service 8-8-1. For type with a joint pipe in the specified order. 1) Valve welding part service -
... of poor operation and leakage.) (Type without a join pipe) Body Right compartment Drier side Left compartment (green) - 43 - Caution for freezing cycle 8-8. Therefore always service the product in the 3-way valve: When the refrigerant leaked on the joint pipe (a, b, c part) connected to remove the moisture within the cycle. Major repair method for major repair service 8-8-1. For type with a joint pipe in the specified order. 1) Valve welding part service -
Service Manual
Page 51
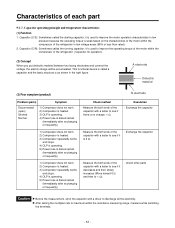
.... 3) Compressor repeatedly works and stops. 4) OLP is operating. 5) Power fuse is weak based on the characteristics of the refrigerator. (Capacitor for operation) (2) Concept When you put dielectric material between two facing electrodes and connect the voltage, the electric charge will be accumulated. Measure the both ends of each part 9-1-7. Capacitor operating principle and temperature characteristics (1) Function 1. u After setting the multiplier rate to improve the motor operation...
.... 3) Compressor repeatedly works and stops. 4) OLP is operating. 5) Power fuse is weak based on the characteristics of the refrigerator. (Capacitor for operation) (2) Concept When you put dielectric material between two facing electrodes and connect the voltage, the electric charge will be accumulated. Measure the both ends of each part 9-1-7. Capacitor operating principle and temperature characteristics (1) Function 1. u After setting the multiplier rate to improve the motor operation...

Service Manual
Page 55
Assembly diagram and service parts list 11-2. Service parts list (GR-K192AF) LOC No.DESCRIPTION 102A Leg,Adjust 147A Bucket,Side Dish(L) 147C Cover Assembly,Bucket 155C Decor,Case-R 155D Decor,Case-L 200A Door Foam Assembly,Freezer-L 200B Door Foam Assembly,Freezer-R 203A Gasket Assembly,Door 207A Panel Assembly, Metal 212D Handle,Refrigerator(S) 212G Name Plate Assembly 221A Hinge Assembly-R 222A Hinge Assembly-L 230A Door Assembly,Refrigerator-L 230B Door Assembly,Refrigerator-R 233A Bracket,Cover 234A Cover,Lead Wire(FRONT) 234B Cover,Lead Wire(BACK) 236A Decor,Holder-R 236B Decor,...
Assembly diagram and service parts list 11-2. Service parts list (GR-K192AF) LOC No.DESCRIPTION 102A Leg,Adjust 147A Bucket,Side Dish(L) 147C Cover Assembly,Bucket 155C Decor,Case-R 155D Decor,Case-L 200A Door Foam Assembly,Freezer-L 200B Door Foam Assembly,Freezer-R 203A Gasket Assembly,Door 207A Panel Assembly, Metal 212D Handle,Refrigerator(S) 212G Name Plate Assembly 221A Hinge Assembly-R 222A Hinge Assembly-L 230A Door Assembly,Refrigerator-L 230B Door Assembly,Refrigerator-R 233A Bracket,Cover 234A Cover,Lead Wire(FRONT) 234B Cover,Lead Wire(BACK) 236A Decor,Holder-R 236B Decor,...


