Owners Manual
Page 2
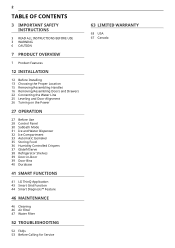
... ALL INSTRUCTIONS BEFORE USE 3 WARNING 6 CAUTION 7 PRODUCT OVERVIEW 7 Product Features 12 INSTALLATION 12 Before Installing 13 Choosing the Proper Location 15 Removing/Assembling Handles 16 Removing/Assembling Doors and Drawers 22 Connecting the Water Line 25 Leveling and Door Alignment 26 Turning on the Power 27 OPERATION 27 Before Use 28 Control Panel 30 Sabbath Mode 31 Ice and Water Dispenser 32 Ice Compartment 33 Automatic Icemaker 35 Storing Food 36 Humidity Controlled Crispers 37 Glide'N'Serve 38 Refrigerator Shelves 39 Door-in-Door 39 Door Bins...
... ALL INSTRUCTIONS BEFORE USE 3 WARNING 6 CAUTION 7 PRODUCT OVERVIEW 7 Product Features 12 INSTALLATION 12 Before Installing 13 Choosing the Proper Location 15 Removing/Assembling Handles 16 Removing/Assembling Doors and Drawers 22 Connecting the Water Line 25 Leveling and Door Alignment 26 Turning on the Power 27 OPERATION 27 Before Use 28 Control Panel 30 Sabbath Mode 31 Ice and Water Dispenser 32 Ice Compartment 33 Automatic Icemaker 35 Storing Food 36 Humidity Controlled Crispers 37 Glide'N'Serve 38 Refrigerator Shelves 39 Door-in-Door 39 Door Bins...
Owners Manual
Page 5
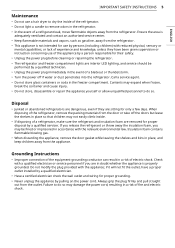
...; When discarding the appliance, remove the door gasket while leaving the shelves and bins in a risk of the refrigerator, remove the packing materials from the outlet. if it will not fit the outlet, have been given supervision or instruction concerning use a hair dryer to remove odors in the freezer compartment. When disposing of electric shock. Always grip the plug firmly and pull straight...
...; When discarding the appliance, remove the door gasket while leaving the shelves and bins in a risk of the refrigerator, remove the packing materials from the outlet. if it will not fit the outlet, have been given supervision or instruction concerning use a hair dryer to remove odors in the freezer compartment. When disposing of electric shock. Always grip the plug firmly and pull straight...

Owners Manual
Page 13
... so can be easily removed by plugging in multiple appliances in a wet or damp area. Ambient Temperature Install this appliance in fire, explosion, or death. Always pull the refrigerator straight out when moving the refrigerator for the automatic icemaker. Electricity Use an individual, grounded outlet:115 Volts, 60 Hz, AC, 15 amps minimum. Choosing the Proper Location Water The refrigerator must be adversely...
... so can be easily removed by plugging in multiple appliances in a wet or damp area. Ambient Temperature Install this appliance in fire, explosion, or death. Always pull the refrigerator straight out when moving the refrigerator for the automatic icemaker. Electricity Use an individual, grounded outlet:115 Volts, 60 Hz, AC, 15 amps minimum. Choosing the Proper Location Water The refrigerator must be adversely...

Owners Manual
Page 16
... refrigerator to pass through, remove the refrigerator doors and move the refrigerator sideways through the doorway. WARNING • Use two or more people to remove and install the refrigerator doors and freezer drawer. • Disconnect the electrical supply to the upper right part of the rear surface of the cover g with a 1/8 in. Lift the hook (not visible), located at the top of the refrigerator. • Be careful when handling the hinge and hinge...
... refrigerator to pass through, remove the refrigerator doors and move the refrigerator sideways through the doorway. WARNING • Use two or more people to remove and install the refrigerator doors and freezer drawer. • Disconnect the electrical supply to the upper right part of the rear surface of the cover g with a 1/8 in. Lift the hook (not visible), located at the top of the refrigerator. • Be careful when handling the hinge and hinge...
Owners Manual
Page 22
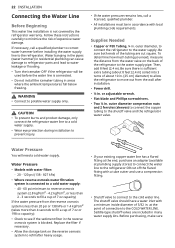
... these instructions carefully to minimize the risk of connection to refill after installation. • Power drill. • ½ in residential plumbing can cause damage to refrigerator parts and lead to water leakage or flooding. • Turn the icemaker OFF if the refrigerator will need , measure the distance from the water valve on the reverse osmosis system to the COLD WATER LINE. Water banging in the pipes (water hammer) in . Supplies Needed •...
... these instructions carefully to minimize the risk of connection to refill after installation. • Power drill. • ½ in residential plumbing can cause damage to refrigerator parts and lead to water leakage or flooding. • Turn the icemaker OFF if the refrigerator will need , measure the distance from the water valve on the reverse osmosis system to the COLD WATER LINE. Water banging in the pipes (water hammer) in . Supplies Needed •...

Owners Manual
Page 25
... turn the nut in -Door Model) Left Refrigerator Door The left refrigerator door has an adjustable nut, located on the bottom hinge, to raise and lower them to lower it . 2 Open both leveling legs the same amount. Turn the nut to the right to raise the door or to the left door: Use the wrench (included with the owner's manual) to turn the nut in the door hinge to make sure that side of the leveling...
... turn the nut in -Door Model) Left Refrigerator Door The left refrigerator door has an adjustable nut, located on the bottom hinge, to raise and lower them to lower it . 2 Open both leveling legs the same amount. Turn the nut to the right to raise the door or to the left door: Use the wrench (included with the owner's manual) to turn the nut in the door hinge to make sure that side of the leveling...
Owners Manual
Page 29
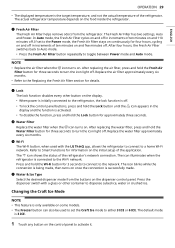
... settings, Auto and Power. NOTE • Replace the air filter when the g icon turns on the dispenser control panel. The icon blinks while the connection is being made . i Water & Ice Type Select the desired dispenser mode from the refrigerator. Press the dispenser switch with the LG ThinQ app, allows the refrigerator to connect to a home Wi-Fi network. The f icon shows the status of the refrigerator. The actual refrigerator temperature depends on some models. • The Freezer button...
... settings, Auto and Power. NOTE • Replace the air filter when the g icon turns on the dispenser control panel. The icon blinks while the connection is being made . i Water & Ice Type Select the desired dispenser mode from the refrigerator. Press the dispenser switch with the LG ThinQ app, allows the refrigerator to connect to a home Wi-Fi network. The f icon shows the status of the refrigerator. The actual refrigerator temperature depends on some models. • The Freezer button...
Owners Manual
Page 31
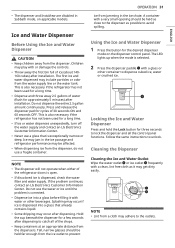
... dripping may get dirty easily. A container with a very small opening should be affected. • When dispensing ice from the dispenser. Do not dispense the entire 2.5 gallon amount continuously. Follow the same instructions to catch all the control panel functions. Ice and Water Dispenser Before Using the Ice and Water Dispenser CAUTION • Keep children away from the dispenser, do not use a fragile container. This is also necessary if the refrigerator...
... dripping may get dirty easily. A container with a very small opening should be affected. • When dispensing ice from the dispenser. Do not dispense the entire 2.5 gallon amount continuously. Follow the same instructions to catch all the control panel functions. Ice and Water Dispenser Before Using the Ice and Water Dispenser CAUTION • Keep children away from the dispenser, do not use a fragile container. This is also necessary if the refrigerator...

Owners Manual
Page 32
..., the ice compartment will freeze food in the bin, causing the icemaker to open the ice compartment. 2 To remove the in the freezer compartment. CAUTION • When handling the ice bin, keep hands away from the icemaker tray area to the temperature of the refrigerator compartment. Detaching the In-Door Ice Bin CAUTION • Only qualified service personnel from the dispenser, ALWAYS empty the ice bin when the icemaker is used. The dispenser tray may stack...
..., the ice compartment will freeze food in the bin, causing the icemaker to open the ice compartment. 2 To remove the in the freezer compartment. CAUTION • When handling the ice bin, keep hands away from the icemaker tray area to the temperature of the refrigerator compartment. Detaching the In-Door Ice Bin CAUTION • Only qualified service personnel from the dispenser, ALWAYS empty the ice bin when the icemaker is used. The dispenser tray may stack...
Owners Manual
Page 34
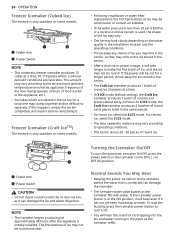
... the power turned on to the icemaker before reinstalling it. To stop the buzzing, press the icemaker power button to turn the automatic icemaker On/Off, press the power switch on the icemaker to the ON ( | ) or OFF (O) position. 34 OPERATION Freezer Icemaker (Cubed Ice) This feature is only available on some models. • Following installation or water filter replacement, the first few batches of ice may be semicircular or contain air bubbles...
... the power turned on to the icemaker before reinstalling it. To stop the buzzing, press the icemaker power button to turn the automatic icemaker On/Off, press the power switch on the icemaker to the ON ( | ) or OFF (O) position. 34 OPERATION Freezer Icemaker (Cubed Ice) This feature is only available on some models. • Following installation or water filter replacement, the first few batches of ice may be semicircular or contain air bubbles...

Owners Manual
Page 41
... network connection may not work properly depending on some models. If the door remains open for product improvement purposes without notice to your usage patterns. • Smart Sabbath† - To check your network frequency, contact your Internet service provider or refer to users. Controls the Refrigerator Temperature, Fresh Air Filter and Ice Plus from the router. SMART FUNCTIONS 41 Before Using LG ThinQ Application 1 Use a smartphone...
... network connection may not work properly depending on some models. If the door remains open for product improvement purposes without notice to your usage patterns. • Smart Sabbath† - To check your network frequency, contact your Internet service provider or refer to users. Controls the Refrigerator Temperature, Fresh Air Filter and Ice Plus from the router. SMART FUNCTIONS 41 Before Using LG ThinQ Application 1 Use a smartphone...
Owners Manual
Page 47
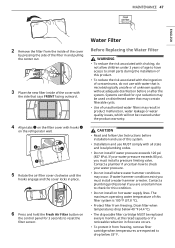
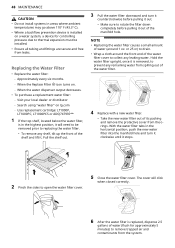
... operating water temperature of this condition. • Do not install on hot water supply lines. MAINTENANCE 47 ENGLISH 2 Remove the filter from the inside of the cover by pressing the side of the filter in and pulling the center out. 3 Place the new filter inside of the cover with the side that says FRONT facing outward. 4 Align tabs a on the filter cover with hooks b on the refrigerator wall. 5 Rotate the air filter cover...
... operating water temperature of this condition. • Do not install on hot water supply lines. MAINTENANCE 47 ENGLISH 2 Remove the filter from the inside of the cover by pressing the side of the filter in and pulling the center out. 3 Place the new filter inside of the cover with the side that says FRONT facing outward. 4 Align tabs a on the filter cover with hooks b on the refrigerator wall. 5 Rotate the air filter cover...
Owners Manual
Page 48
... the shelf and lift it is installed on a water system, a device for approximately 5 minutes) to remove trapped air and contaminants from leaks. or 25 cc) to drain. • Wrap a cloth around 1 oz. Hold the water filter upright, once it . The cover will need to be installed. • Ensure all tubing and fittings are secure and free from the system. When the Replace Filter h icon turns on lg.com...
... the shelf and lift it is installed on a water system, a device for approximately 5 minutes) to remove trapped air and contaminants from leaks. or 25 cc) to drain. • Wrap a cloth around 1 oz. Hold the water filter upright, once it . The cover will need to be installed. • Ensure all tubing and fittings are secure and free from the system. When the Replace Filter h icon turns on lg.com...

Owners Manual
Page 52
... powered on and the controls are the best temperature settings for my refrigerator and freezer? A: Continually press the Refrigerator or Freezer button on the inner shelf of the icemaker cycle. Q: Why do I set the refrigerator and freezer temperatures? Q: Why does the icemaker tray look crooked? What is a normal part of the refrigerator. When activated, OFF is 37° Fahrenheit (3° Celsius). The control panel beeps and the temperature settings display to conserve energy while on display...
... powered on and the controls are the best temperature settings for my refrigerator and freezer? A: Continually press the Refrigerator or Freezer button on the inner shelf of the icemaker cycle. Q: Why do I set the refrigerator and freezer temperatures? Q: Why does the icemaker tray look crooked? What is a normal part of the refrigerator. When activated, OFF is 37° Fahrenheit (3° Celsius). The control panel beeps and the temperature settings display to conserve energy while on display...

Owners Manual
Page 54
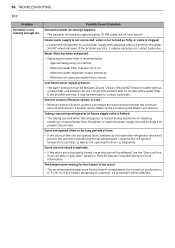
... remove the panel covering the condenser coil area. Weather is clogged. • Use a vacuum cleaner with high water content away from air vents. Refrigerator is installed in a cold location. • When the refrigerator is freezing in or power restored. • The refrigerator will not close correctly or pop open " section in temperature below 41 °F (5 °C), food can lead to cool completely. The refrigerator should not be operated in Troubleshooting...
... remove the panel covering the condenser coil area. Weather is clogged. • Use a vacuum cleaner with high water content away from air vents. Refrigerator is installed in a cold location. • When the refrigerator is freezing in or power restored. • The refrigerator will not close correctly or pop open " section in temperature below 41 °F (5 °C), food can lead to cool completely. The refrigerator should not be operated in Troubleshooting...
Owners Manual
Page 56
... icemaker issues. (Refer to the Connecting the Water Line section.) Tubing connecting refrigerator to house supply valve is kinked. • The tubing can help, as well as not opening the doors as frequently. If the problem persists, it to a cold water supply with a water filter. Doors are not closed completely. • If the doors are not properly closed, ice production will not close correctly or pop open . The temperature setting for the freezer is too warm...
... icemaker issues. (Refer to the Connecting the Water Line section.) Tubing connecting refrigerator to house supply valve is kinked. • The tubing can help, as well as not opening the doors as frequently. If the problem persists, it to a cold water supply with a water filter. Doors are not closed completely. • If the doors are not properly closed, ice production will not close correctly or pop open . The temperature setting for the freezer is too warm...
Owners Manual
Page 59
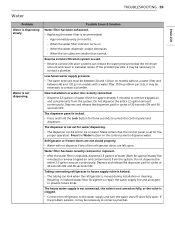
... seconds OFF. New installation or water line recently connected. • Dispense 2.5 gallons of water (flush for ice or water. Possible Cause & Solution Water filter has been exhausted. • Replacing the water filter is set for approximately 5 minutes) to unlock the control panel and dispenser. Reverse osmosis filtration system is not set for cycles of 30 seconds ON and 60 seconds OFF. When the water filter indicator turns on models with a water filter. The dispenser is used. • Reverse osmosis filtration...
... seconds OFF. New installation or water line recently connected. • Dispense 2.5 gallons of water (flush for ice or water. Possible Cause & Solution Water filter has been exhausted. • Replacing the water filter is set for approximately 5 minutes) to unlock the control panel and dispenser. Reverse osmosis filtration system is not set for cycles of 30 seconds ON and 60 seconds OFF. When the water filter indicator turns on models with a water filter. The dispenser is used. • Reverse osmosis filtration...
Owners Manual
Page 60
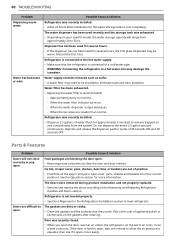
... amount continuously. The water dispenser has been used for approximately 5 minutes) to remove trapped air and contaminants from approximately 20 to eliminate taste and odor problems. Water filter has been exhausted. • Replacing the water filter is not leveled properly. • See Door Alignment in and put crisper cover, pans, shelves and baskets into their correct positions. Refrigerator is recommended: - 60 TROUBLESHOOTING Problem Dispensing warm water. Dispenser has not been used for several hours. •...
... amount continuously. The water dispenser has been used for approximately 5 minutes) to remove trapped air and contaminants from approximately 20 to eliminate taste and odor problems. Water filter has been exhausted. • Replacing the water filter is not leveled properly. • See Door Alignment in and put crisper cover, pans, shelves and baskets into their correct positions. Refrigerator is recommended: - 60 TROUBLESHOOTING Problem Dispensing warm water. Dispenser has not been used for several hours. •...
Owners Manual
Page 64
... LG. • Shelves, door bins, drawers, handle and accessories, except for repairs. • Replacement of light bulbs, filters, or any consumable parts. • The removal and reinstallation of the Product if it is installed in an inaccessible location or is not installed in utility costs and additional utility expenses. • Any noises associated with normal operation. • Products used for other than normal and proper household use (e.g., commercial or industrial use...
... LG. • Shelves, door bins, drawers, handle and accessories, except for repairs. • Replacement of light bulbs, filters, or any consumable parts. • The removal and reinstallation of the Product if it is installed in an inaccessible location or is not installed in utility costs and additional utility expenses. • Any noises associated with normal operation. • Products used for other than normal and proper household use (e.g., commercial or industrial use...
Owners Manual
Page 68
... caused by the use in any way associated with the Product; • Any noises associated with normal operation of the Product; • Replacement of light bulbs, filters, fuses or any other consumable parts; • Replacement of any water leakage due to water pressure that are not approved/authorized by LGECI; • Replacement of the Product for in-warranty repair. and • Shelves, door bins, drawers, handle and accessories to...
... caused by the use in any way associated with the Product; • Any noises associated with normal operation of the Product; • Replacement of light bulbs, filters, fuses or any other consumable parts; • Replacement of any water leakage due to water pressure that are not approved/authorized by LGECI; • Replacement of the Product for in-warranty repair. and • Shelves, door bins, drawers, handle and accessories to...


