
Owners Manual
Page 2
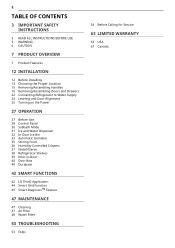
... ALL INSTRUCTIONS BEFORE USE 3 WARNING 6 CAUTION 7 PRODUCT OVERVIEW 7 Product Features 12 INSTALLATION 12 Before Installing 13 Choosing the Proper Location 15 Removing/Assembling Handles 16 Removing/Assembling Doors and Drawers 22 Connecting Refrigerator to Water Supply 24 Leveling and Door Alignment 25 Turning on the Power 27 OPERATION 27 Before Use 28 Control Panel 30 Sabbath Mode 31 Ice and Water Dispenser 32 In-Door Ice Bin 33 Automatic Icemaker 35 Storing Food 36 Humidity Controlled Crispers 37 Glide'N'Serve 38 Refrigerator Shelves 39 Door-in-Door 40 Door Bins...
... ALL INSTRUCTIONS BEFORE USE 3 WARNING 6 CAUTION 7 PRODUCT OVERVIEW 7 Product Features 12 INSTALLATION 12 Before Installing 13 Choosing the Proper Location 15 Removing/Assembling Handles 16 Removing/Assembling Doors and Drawers 22 Connecting Refrigerator to Water Supply 24 Leveling and Door Alignment 25 Turning on the Power 27 OPERATION 27 Before Use 28 Control Panel 30 Sabbath Mode 31 Ice and Water Dispenser 32 In-Door Ice Bin 33 Automatic Icemaker 35 Storing Food 36 Humidity Controlled Crispers 37 Glide'N'Serve 38 Refrigerator Shelves 39 Door-in-Door 40 Door Bins...
Owners Manual
Page 5
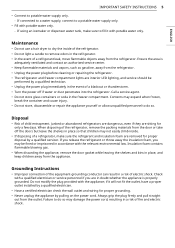
...; Do not store glass containers or soda in the event of a refrigerant leak, move flammable objects away from the refrigerator. • Unplug the power plug before cleaning or repairing the refrigerator. • The refrigerator and freezer compartment lights are sitting for proper grounding. • Never unplug the appliance by a qualified servicer. Ensure the area is properly grounded. Grounding Instructions • Improper connection of the equipment...
...; Do not store glass containers or soda in the event of a refrigerant leak, move flammable objects away from the refrigerator. • Unplug the power plug before cleaning or repairing the refrigerator. • The refrigerator and freezer compartment lights are sitting for proper grounding. • Never unplug the appliance by a qualified servicer. Ensure the area is properly grounded. Grounding Instructions • Improper connection of the equipment...
Owners Manual
Page 13
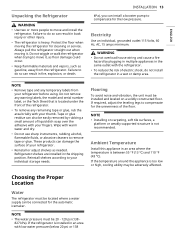
... located where a water supply can install a booster pump to compensate for the automatic icemaker. Tape or glue residue can damage the surface of the refrigerator. • To remove any warning labels, the model and serial number label, or the Tech Sheet that is heavy. INSTALLATION 13 kPa), you can be easily removed by plugging in multiple appliances in the shipping position. If required, adjust the leveling...
... located where a water supply can install a booster pump to compensate for the automatic icemaker. Tape or glue residue can damage the surface of the refrigerator. • To remove any warning labels, the model and serial number label, or the Tech Sheet that is heavy. INSTALLATION 13 kPa), you can be easily removed by plugging in multiple appliances in the shipping position. If required, adjust the leveling...
Owners Manual
Page 16
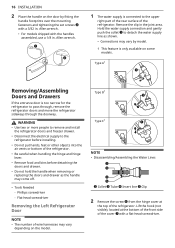
.... WARNING • Use two or more people to remove and install the refrigerator doors and freezer drawer. • Disconnect the electrical supply to the upper right part of the rear surface of the cover g with a 3/32 in. Flat-head screwdriver Removing the Left Refrigerator Door NOTE • The number of the refrigerator. Type B† Type C† NOTE • Disassembling/Assembling the Water Lines b Collet c Tube d Insert line e Clip 2 Remove the screw f from the hinge cover at the...
.... WARNING • Use two or more people to remove and install the refrigerator doors and freezer drawer. • Disconnect the electrical supply to the upper right part of the rear surface of the cover g with a 3/32 in. Flat-head screwdriver Removing the Left Refrigerator Door NOTE • The number of the refrigerator. Type B† Type C† NOTE • Disassembling/Assembling the Water Lines b Collet c Tube d Insert line e Clip 2 Remove the screw f from the hinge cover at the...
Owners Manual
Page 22
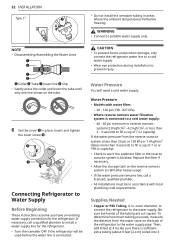
.... To determine how much tubing you have an existing water supply connection for the refrigerator. • Turn the icemaker OFF if the refrigerator will need , measure the distance from the reverse osmosis system is blocked. e Collet f Tube g Insert line h Clip • Gently press the collet and insert the tube until only one line shows on the tube. 6 Set the cover i in the reverse osmosis system is less than...
.... To determine how much tubing you have an existing water supply connection for the refrigerator. • Turn the icemaker OFF if the refrigerator will need , measure the distance from the reverse osmosis system is blocked. e Collet f Tube g Insert line h Clip • Gently press the collet and insert the tube until only one line shows on the tube. 6 Set the cover i in the reverse osmosis system is less than...
Owners Manual
Page 24
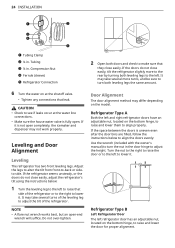
... the instructions below : 1 Turn the leveling leg to the left to raise that they close easily, tilt the refrigerator slightly more turns, and be sure to turn the nut in the door hinge to make sure that side of the refrigerator. Tubing c ¼ in . Do not over-tighten. 2 Open both leveling legs to the left and right refrigerator doors have an adjustable nut, located on at the water line connections. • Make sure...
... the instructions below : 1 Turn the leveling leg to the left to raise that they close easily, tilt the refrigerator slightly more turns, and be sure to turn the nut in the door hinge to make sure that side of the refrigerator. Tubing c ¼ in . Do not over-tighten. 2 Open both leveling legs to the left and right refrigerator doors have an adjustable nut, located on at the water line connections. • Make sure...
Owners Manual
Page 29
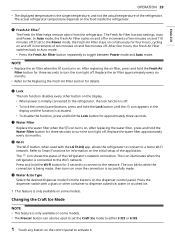
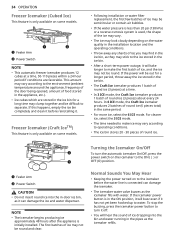
... two settings, Auto and Power. Replace the water filter approximately every six months. The actual refrigerator temperature depends on . After four hours, the Fresh Air Filter switches back to Auto mode. • Press the Fresh Air Filter button repeatedly to toggle between Power mode and Auto mode. e Fresh Air Filter† The Fresh Air Filter helps remove odors from the buttons on some models. • The Freezer button can also be used with a glass or other button on the display...
... two settings, Auto and Power. Replace the water filter approximately every six months. The actual refrigerator temperature depends on . After four hours, the Fresh Air Filter switches back to Auto mode. • Press the Fresh Air Filter button repeatedly to toggle between Power mode and Auto mode. e Fresh Air Filter† The Fresh Air Filter helps remove odors from the buttons on some models. • The Freezer button can also be used with a glass or other button on the display...

Owners Manual
Page 31
... mode is dispensed, check the water filter and water supply. • The dispenser and InstaView are disabled in the ice chute. Press and release the dispenser pad for the desired dispenser mode on applicable models. NOTE • The dispenser will not operate when either of the refrigerator doors is open. • If discolored ice is selected. 2 Press the dispenser paddle a with or damage the controls. • Throw away the first bin...
... mode is dispensed, check the water filter and water supply. • The dispenser and InstaView are disabled in the ice chute. Press and release the dispenser pad for the desired dispenser mode on applicable models. NOTE • The dispenser will not operate when either of the refrigerator doors is open. • If discolored ice is selected. 2 Press the dispenser paddle a with or damage the controls. • Throw away the first bin...
Owners Manual
Page 32
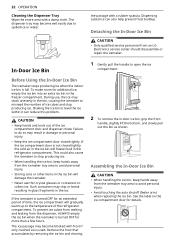
... OPERATION Cleaning the Dispenser Tray Wipe the entire area with a rubber spatula. During use thin crystal glasses or containers to open the ice compartment. 2 To remove the in the freezer compartment. See the label on the ice compartment door for an extended period of time, the ice compartment will freeze food in the ice. Detaching the In-Door Ice Bin CAUTION • Only qualified service personnel from the icemaker tray area...
... OPERATION Cleaning the Dispenser Tray Wipe the entire area with a rubber spatula. During use thin crystal glasses or containers to open the ice compartment. 2 To remove the in the freezer compartment. See the label on the ice compartment door for an extended period of time, the ice compartment will freeze food in the ice. Detaching the In-Door Ice Bin CAUTION • Only qualified service personnel from the icemaker tray area...
Owners Manual
Page 34
... happens, empty the ice bin completely and clean it before the water line is initially installed. a Feeler Arm b Power Switch CAUTION • Do not insert round ice into the bin and water running in -door ice bin, as it can damage the icemaker. • The icemaker water valve buzzes as the icemaker fills with water. Turning the Icemaker On/Off To turn it off. • You will hear the sound of ice dropping into the...
... happens, empty the ice bin completely and clean it before the water line is initially installed. a Feeler Arm b Power Switch CAUTION • Do not insert round ice into the bin and water running in -door ice bin, as it can damage the icemaker. • The icemaker water valve buzzes as the icemaker fills with water. Turning the Icemaker On/Off To turn it off. • You will hear the sound of ice dropping into the...
Owners Manual
Page 48
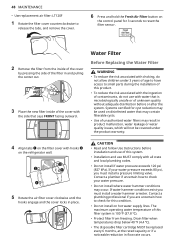
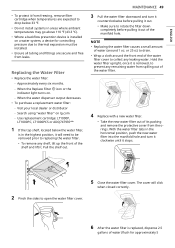
.... • Do not install where water hammer conditions may be used on hot water supply lines. 48 MAINTENANCE • Use replacement air filter: LT120F 1 Rotate the filter cover counterclockwise to release the tabs, and remove the cover. 6 Press and hold the Fresh Air Filter button on the control panel for 3 seconds to reset the filter sensor. 2 Remove the filter from freezing. Systems certified for cyst reduction may occur. Water Filter Before Replacing the Water Filter WARNING • To reduce...
.... • Do not install where water hammer conditions may be used on hot water supply lines. 48 MAINTENANCE • Use replacement air filter: LT120F 1 Rotate the filter cover counterclockwise to release the tabs, and remove the cover. 6 Press and hold the Fresh Air Filter button on the control panel for 3 seconds to reset the filter sensor. 2 Remove the filter from freezing. Systems certified for cyst reduction may occur. Water Filter Before Replacing the Water Filter WARNING • To reduce...
Owners Manual
Page 49
... a replacement water filter: - Use replacement cartridge: LT1000P, LT1000PC, LT1000PCS or ADQ747935** 1 If the top shelf, located below 33 ℉. • Do not install systems in areas where ambient temperatures may go above 110 ℉ (43.3 ℃). • Where a backflow prevention device is installed on . - Hold the water filter upright, once it is removed, to prevent any remaining water from spilling out of the water filter. 4 Replace with a new water filter. •...
... a replacement water filter: - Use replacement cartridge: LT1000P, LT1000PC, LT1000PCS or ADQ747935** 1 If the top shelf, located below 33 ℉. • Do not install systems in areas where ambient temperatures may go above 110 ℉ (43.3 ℃). • Where a backflow prevention device is installed on . - Hold the water filter upright, once it is removed, to prevent any remaining water from spilling out of the water filter. 4 Replace with a new water filter. •...
Owners Manual
Page 53
... turned on display in a retail store. Adjust these settings as necessary to assist in the freezing process. A: Continually press the Refrigerator or Freezer button on some models.) To turn the icemaker off , see below). A: This is 0° Fahrenheit (-18° Celsius). What is in Display Mode. When activated, OFF is powered on and the buttons don't work. Milk should be firm and ice cubes should turn it 's not cooling...
... turned on display in a retail store. Adjust these settings as necessary to assist in the freezing process. A: Continually press the Refrigerator or Freezer button on some models.) To turn the icemaker off , see below). A: This is 0° Fahrenheit (-18° Celsius). What is in Display Mode. When activated, OFF is powered on and the buttons don't work. Milk should be firm and ice cubes should turn it 's not cooling...
Owners Manual
Page 55
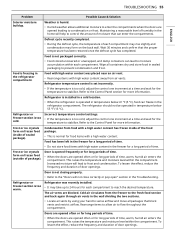
... the defrost cycle, the temperature of time, warm, humid air enters the compartment. Food with high water content was recently installed. • It may form on frozen food (inside of package). Refer to control the amount of sealed package). Food is too cold. Frost or ice crystals form on the back wall. Refrigerator or Freezer section is operated in the Troubleshooting. Maintaining a reasonable level of...
... the defrost cycle, the temperature of time, warm, humid air enters the compartment. Food with high water content was recently installed. • It may form on frozen food (inside of package). Refer to control the amount of sealed package). Food is too cold. Frost or ice crystals form on the back wall. Refrigerator or Freezer section is operated in the Troubleshooting. Maintaining a reasonable level of...

Owners Manual
Page 56
... once the defrost cycle has completed. Ice Problem Icemaker is recommended: - House water supply is not connected, valve is not turned on models with adequate pressure and turn the water shutoff valve fully open " section in a 24 hour period. Water filter has been exhausted. • Replacing the water filter is not making enough ice. When the water dispenser output decreases. - Reverse osmosis filtration system is moved during installation or cleaning resulting in a hot location. • The refrigerator should...
... once the defrost cycle has completed. Ice Problem Icemaker is recommended: - House water supply is not connected, valve is not turned on models with adequate pressure and turn the water shutoff valve fully open " section in a 24 hour period. Water filter has been exhausted. • Replacing the water filter is not making enough ice. When the water dispenser output decreases. - Reverse osmosis filtration system is moved during installation or cleaning resulting in a hot location. • The refrigerator should...
Owners Manual
Page 58
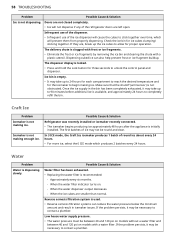
... water filter is not obstructed. When the water dispenser output decreases. - Reverse osmosis filtration system is not dispensing. 58 TROUBLESHOOTING Problem Possible Cause & Solution Ice is used. • Reverse osmosis filtration systems can also help prevent frost or ice fragment buildup. Doors are left open. Ice bin is locked. • Press and hold the Lock button for proper operation. If the problem persists, it may be necessary to unlock the control panel...
... water filter is not obstructed. When the water dispenser output decreases. - Reverse osmosis filtration system is not dispensing. 58 TROUBLESHOOTING Problem Possible Cause & Solution Ice is used. • Reverse osmosis filtration systems can also help prevent frost or ice fragment buildup. Doors are left open. Ice bin is locked. • Press and hold the Lock button for proper operation. If the problem persists, it may be necessary to unlock the control panel...
Owners Manual
Page 59
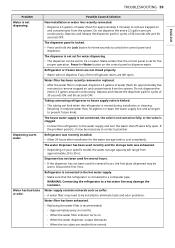
... are left open . Press the Water button on your specific model, the water storage capacity will not dispense if any of the refrigerator doors are smaller than normal. Approximately every six months. - When the water filter indicator turns on fully, or the valve is moved during installation or cleaning. TROUBLESHOOTING 59 ENGLISH Problem Water is set for several hours. • If the dispenser has not been used for ice or water. The dispenser is not set for water dispensing...
... are left open . Press the Water button on your specific model, the water storage capacity will not dispense if any of the refrigerator doors are smaller than normal. Approximately every six months. - When the water filter indicator turns on fully, or the valve is moved during installation or cleaning. TROUBLESHOOTING 59 ENGLISH Problem Water is set for several hours. • If the dispenser has not been used for ice or water. The dispenser is not set for water dispensing...
Owners Manual
Page 60
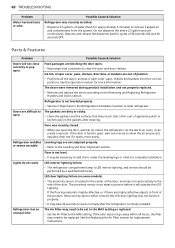
... MAX setting or replaced. • Set the Air Filter to complete installation. Refrigerator is not level. • It may need to remove trapped air and contaminants from the system. Leveling legs are out of position. • Push bins all the way in front of appliance polish or kitchen wax on some models). • The proximity sensor is located in the Refrigeration Installation section to work . Parts & Features Problem Doors will operate the LED Lighting...
... MAX setting or replaced. • Set the Air Filter to complete installation. Refrigerator is not level. • It may need to remove trapped air and contaminants from the system. Leveling legs are out of position. • Push bins all the way in front of appliance polish or kitchen wax on some models). • The proximity sensor is located in the Refrigeration Installation section to work . Parts & Features Problem Doors will operate the LED Lighting...
Owners Manual
Page 64
... location or not installed in accordance with the Product Owner's manual. • Accessories, removable components, or consumable parts (e.g. 64 LIMITED WARRANTY • Damage or failure of the Product to perform during power failures and interrupted or inadequate electrical service. • Damage or failure of the Product caused by leaky or broken water pipes, frozen water pipes, restricted drain lines, inadequate or interrupted water supply or inadequate supply...
... location or not installed in accordance with the Product Owner's manual. • Accessories, removable components, or consumable parts (e.g. 64 LIMITED WARRANTY • Damage or failure of the Product to perform during power failures and interrupted or inadequate electrical service. • Damage or failure of the Product caused by leaky or broken water pipes, frozen water pipes, restricted drain lines, inadequate or interrupted water supply or inadequate supply...

Owners Manual
Page 68
...; Shelves, door bins, drawers, handle and accessories to LGECI within a 150 km radius from misuse, abuse, improper installation, repair, or maintenance of the Product, or if used for internal/functional parts covered under the heading, This Limited Warranty Does Not Cover, shall be borne by LGECI. If your Product is located outside the specified operating range or due to excessive sediment in the water supply; •...
...; Shelves, door bins, drawers, handle and accessories to LGECI within a 150 km radius from misuse, abuse, improper installation, repair, or maintenance of the Product, or if used for internal/functional parts covered under the heading, This Limited Warranty Does Not Cover, shall be borne by LGECI. If your Product is located outside the specified operating range or due to excessive sediment in the water supply; •...


