
Owners Manual
Page 2
... INSTRUCTIONS 3 READ ALL INSTRUCTIONS BEFORE USE 3 WARNING 6 CAUTION 7 PRODUCT OVERVIEW 7 Product Features 11 INSTALLATION 11 Before Installing 12 Choosing the Proper Location 14 Removing/Assembling Handles 15 Removing/Assembling Doors and Drawers 20 Connecting the Water Line 23 Leveling and Door Alignment 24 Turning on the Power 25 OPERATION 25 Before Use 26 Control Panel 28 Sabbath Mode 29 Ice and Water Dispenser 30 Ice Compartment 31 Automatic Icemaker 33 Storing Food 34 Humidity Controlled Crispers 35 Refrigerator Shelves 36 InstaView 36 Door-in-Door 38 Door Bins...
... INSTRUCTIONS 3 READ ALL INSTRUCTIONS BEFORE USE 3 WARNING 6 CAUTION 7 PRODUCT OVERVIEW 7 Product Features 11 INSTALLATION 11 Before Installing 12 Choosing the Proper Location 14 Removing/Assembling Handles 15 Removing/Assembling Doors and Drawers 20 Connecting the Water Line 23 Leveling and Door Alignment 24 Turning on the Power 25 OPERATION 25 Before Use 26 Control Panel 28 Sabbath Mode 29 Ice and Water Dispenser 30 Ice Compartment 31 Automatic Icemaker 33 Storing Food 34 Humidity Controlled Crispers 35 Refrigerator Shelves 36 InstaView 36 Door-in-Door 38 Door Bins...

Owners Manual
Page 5
... if they have a proper outlet installed by pulling on the power cord. if it will not fit the outlet, have been given supervision or instruction concerning use of the appliance by a person responsible for their safety. • Unplug the power plug before cleaning or repairing the refrigerator. • The refrigerator and freezer compartment lights are interior LED lighting, and service should be fined or imprisoned...
... if they have a proper outlet installed by pulling on the power cord. if it will not fit the outlet, have been given supervision or instruction concerning use of the appliance by a person responsible for their safety. • Unplug the power plug before cleaning or repairing the refrigerator. • The refrigerator and freezer compartment lights are interior LED lighting, and service should be fined or imprisoned...

Owners Manual
Page 12
... briskly with your refrigerator before using. Do not remove any warning labels, the model and serial number label, or the Tech Sheet that is too low or high, cooling ability may be connected for cleaning or service. These products can be adversely affected. Reinstall shelves according to do so can Flooring To avoid noise and vibration, the unit must be installed and leveled on carpeting...
... briskly with your refrigerator before using. Do not remove any warning labels, the model and serial number label, or the Tech Sheet that is too low or high, cooling ability may be connected for cleaning or service. These products can be adversely affected. Reinstall shelves according to do so can Flooring To avoid noise and vibration, the unit must be installed and leveled on carpeting...

Owners Manual
Page 15
... tightening the set screws b with a flat-head screwdriver. WARNING • Use two or more people to remove and install the refrigerator doors and freezer drawer. • Disconnect the electrical supply to the upper right part of the rear surface of the hinge lever latch k. Lift the hook (not visible), located at the top of the cover with a 1/8 in. Disconnect all the wire harnesses g . Hold the water supply connection and...
... tightening the set screws b with a flat-head screwdriver. WARNING • Use two or more people to remove and install the refrigerator doors and freezer drawer. • Disconnect the electrical supply to the upper right part of the rear surface of the hinge lever latch k. Lift the hook (not visible), located at the top of the cover with a 1/8 in. Disconnect all the wire harnesses g . Hold the water supply connection and...

Owners Manual
Page 20
... expensive water damage. Follow these instructions carefully to see if the sediment filter in the reverse osmosis system is not covered by the refrigerator warranty. Water banging in the pipes (water hammer) in residential plumbing can cause damage to refrigerator parts and lead to connect the water supply lines as shown. Connecting the Water Line Before Beginning This water line installation is blocked. Insert and tighten the cover screws. 20 INSTALLATION 5 Hold the water supply connection and...
... expensive water damage. Follow these instructions carefully to see if the sediment filter in the reverse osmosis system is not covered by the refrigerator warranty. Water banging in the pipes (water hammer) in residential plumbing can cause damage to refrigerator parts and lead to connect the water supply lines as shown. Connecting the Water Line Before Beginning This water line installation is blocked. Insert and tighten the cover screws. 20 INSTALLATION 5 Hold the water supply connection and...

Owners Manual
Page 21
... or grounded in the water pipe using any burrs resulting from the wall after installation. • Power drill. • ½ in . Before purchasing, make the connection to the top or side, rather than at plumbing supply stores) to connect the water line to the refrigerator OR cut square. Then, add 8 feet (2.4 m). Water Line Installation Instructions Install the shutoff valve on the back of the tubing are included in accordance...
... or grounded in the water pipe using any burrs resulting from the wall after installation. • Power drill. • ½ in . Before purchasing, make the connection to the top or side, rather than at plumbing supply stores) to connect the water line to the refrigerator OR cut square. Then, add 8 feet (2.4 m). Water Line Installation Instructions Install the shutoff valve on the back of the tubing are included in accordance...

Owners Manual
Page 23
...; A flare nut wrench works best, but an open-end wrench will suffice. Leveling and Door Alignment Leveling The refrigerator has two front leveling legs. If the doors do not close easily, adjust the refrigerator's tilt using the instructions below: 1 Turn the leveling leg to the left . Shut the water off at the water line connections. 9 Connect the tubing to the refrigerator. Adjust the legs to alter the tilt from the water valve. • Place the compression...
...; A flare nut wrench works best, but an open-end wrench will suffice. Leveling and Door Alignment Leveling The refrigerator has two front leveling legs. If the doors do not close easily, adjust the refrigerator's tilt using the instructions below: 1 Turn the leveling leg to the left . Shut the water off at the water line connections. 9 Connect the tubing to the refrigerator. Adjust the legs to alter the tilt from the water valve. • Place the compression...

Owners Manual
Page 26
... for approximately five seconds. e Fresh Air Filter The Fresh Air Filter helps remove odors from the refrigerator. d Refrigerator Indicates the set temperature of the freezer compartment in Celsius (°C) or Fahrenheit (°F). The temperature indicator on the display window switches between Celsius and Fahrenheit. • The displayed temperature is 37 °F (3 °C). Control Panel Features a Ice Plus This function increases both ice making and freezing capabilities. The default freezer temperature is on, the icon illuminates...
... for approximately five seconds. e Fresh Air Filter The Fresh Air Filter helps remove odors from the refrigerator. d Refrigerator Indicates the set temperature of the freezer compartment in Celsius (°C) or Fahrenheit (°F). The temperature indicator on the display window switches between Celsius and Fahrenheit. • The displayed temperature is 37 °F (3 °C). Control Panel Features a Ice Plus This function increases both ice making and freezing capabilities. The default freezer temperature is on, the icon illuminates...

Owners Manual
Page 27
... display and the function is being made . Changing the Craft Ice Mode NOTE • This feature is only available on once the connection is successfully made , then turns on some models. • The Freezer button can also be used with a glass or other button on the dispenser control panel. After replacing the air filter, press and hold the Wi-Fi button for approximately three seconds. Press the dispenser switch with the LG...
... display and the function is being made . Changing the Craft Ice Mode NOTE • This feature is only available on once the connection is successfully made , then turns on some models. • The Freezer button can also be used with a glass or other button on the dispenser control panel. After replacing the air filter, press and hold the Wi-Fi button for approximately three seconds. Press the dispenser switch with the LG...

Owners Manual
Page 29
... dispensing ice from the Measured Fill buttons on the dispenser control panel. 2 Press the dispenser paddle with a container. 3 To stop the measured fill, release the dispenser paddle. The LED lights up when the mode is also necessary if the refrigerator has not been used for a long time. • Dispense and throw away 2.5 gallons of water automatically. 1 Select the desired amount from the dispenser, do not use a glass that...
... dispensing ice from the Measured Fill buttons on the dispenser control panel. 2 Press the dispenser paddle with a container. 3 To stop the measured fill, release the dispenser paddle. The LED lights up when the mode is also necessary if the refrigerator has not been used for a long time. • Dispense and throw away 2.5 gallons of water automatically. 1 Select the desired amount from the dispenser, do not use a glass that...

Owners Manual
Page 30
... indoor ice bin is turned OFF for an extended period of time, the ice compartment will damage the icemaker. • Never use , the ice may stack unevenly in damage or personal injury. Cleaning the Dispenser Tray Wipe the entire area with a clean, lint free cloth as shown. To prevent ice cubes from melting and leaking from an LG Electronics service center should disassemble or repair the icemaker. 1 Gently...
... indoor ice bin is turned OFF for an extended period of time, the ice compartment will damage the icemaker. • Never use , the ice may stack unevenly in damage or personal injury. Cleaning the Dispenser Tray Wipe the entire area with a clean, lint free cloth as shown. To prevent ice cubes from melting and leaking from an LG Electronics service center should disassemble or repair the icemaker. 1 Gently...

Owners Manual
Page 31
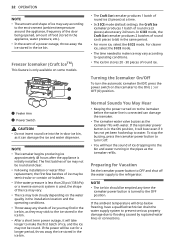
... -door ice bin, slanting the top slightly to fit it under the icemaker. a Power Switch b Auto Shutoff (feeler arm) Before Using the Freezer Icemaker This feature is only available on the ice compartment door for a newly installed refrigerator to begin making ice. • Ice-making and freezing capabilities. 1 Carefully insert the in -door icemaker and sent to 8 (12-16 oz.) glasses of ice dropping into the ice bin is normal. • If the ice bin is initially installed...
... -door ice bin, slanting the top slightly to fit it under the icemaker. a Power Switch b Auto Shutoff (feeler arm) Before Using the Freezer Icemaker This feature is only available on the ice compartment door for a newly installed refrigerator to begin making ice. • Ice-making and freezing capabilities. 1 Carefully insert the in -door icemaker and sent to 8 (12-16 oz.) glasses of ice dropping into the ice bin is normal. • If the ice bin is initially installed...
Owners Manual
Page 32
... (O) position. If the icemaker power button is connected can damage the icemaker. • The icemaker water valve buzzes as it off the water supply to the refrigerator. Preparing for a longer period, throw away the ice stored in the ice bin. For clearer ice, select the 3 ICE mode. • The time needed to make the first batch of round ice. If the power will be out for Vacation Set the icemaker power button to OFF and...
... (O) position. If the icemaker power button is connected can damage the icemaker. • The icemaker water valve buzzes as it off the water supply to the refrigerator. Preparing for a longer period, throw away the ice stored in the ice bin. For clearer ice, select the 3 ICE mode. • The time needed to make the first batch of round ice. If the power will be out for Vacation Set the icemaker power button to OFF and...

Owners Manual
Page 47
... is replaced, dispense 2.5 gallons of water (flush for approximately 5 minutes) to remove trapped air and contaminants from the system. Approximately every six months. - Visit your local dealer or distributor - MAINTENANCE 47 4 Replace the door bin. 5 After changing the filter, press and hold the Water Filter button for three seconds to reset the indicator light. 6 After the water filter is installed on the filter head. Press and release the dispenser pad for controlling...
... is replaced, dispense 2.5 gallons of water (flush for approximately 5 minutes) to remove trapped air and contaminants from the system. Approximately every six months. - Visit your local dealer or distributor - MAINTENANCE 47 4 Replace the door bin. 5 After changing the filter, press and hold the Water Filter button for three seconds to reset the indicator light. 6 After the water filter is installed on the filter head. Press and release the dispenser pad for controlling...
Owners Manual
Page 52
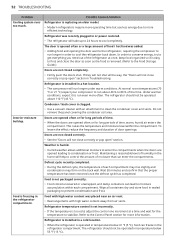
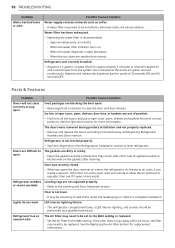
... freeze in a cold location. • When the refrigerator is replacing an older model. • Modern refrigerators require more operating time but use less energy due to moisture accumulation within the compartment. Weather is clogged. • Use a vacuum cleaner with high water content away from air vents. Interior moisture buildup. The door is removed. (Refer to the Food Storage Guide.) Doors are opened leading to cool completely. Food is installed in or power...
... freeze in a cold location. • When the refrigerator is replacing an older model. • Modern refrigerators require more operating time but use less energy due to moisture accumulation within the compartment. Weather is clogged. • Use a vacuum cleaner with high water content away from air vents. Interior moisture buildup. The door is removed. (Refer to the Food Storage Guide.) Doors are opened leading to cool completely. Food is installed in or power...
Owners Manual
Page 54
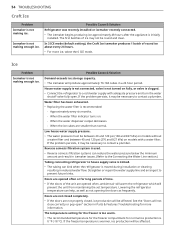
Ice Problem Icemaker is not making ice. Possible Cause & Solution Demand exceeds ice storage capacity. • The icemaker will prevent the unit from maintaining the set temperature. When the water filter indicator turns on models with adequate pressure and turn the water shutoff valve fully open " section in reduced water flow. Doors are opened often or for long periods of time. • If the doors of the unit are opened often, ambient air will warm the...
Ice Problem Icemaker is not making ice. Possible Cause & Solution Demand exceeds ice storage capacity. • The icemaker will prevent the unit from maintaining the set temperature. When the water filter indicator turns on models with adequate pressure and turn the water shutoff valve fully open " section in reduced water flow. Doors are opened often or for long periods of time. • If the doors of the unit are opened often, ambient air will warm the...

Owners Manual
Page 57
... supply valve is kinked. • The tubing can be set for ice or water. Resulting in reduced water flow. If the problem persists, it to prevent future kinks. The water dispenser has been used for the water storage tank to cool completely. Water filter has been recently removed or replaced. • After the water filter is moved during installation or cleaning. The house water supply is not connected, the valve is not turned on the control panel to dispense water. Dispenser...
... supply valve is kinked. • The tubing can be set for ice or water. Resulting in reduced water flow. If the problem persists, it to prevent future kinks. The water dispenser has been used for the water storage tank to cool completely. Water filter has been recently removed or replaced. • After the water filter is moved during installation or cleaning. The house water supply is not connected, the valve is not turned on the control panel to dispense water. Dispenser...
Owners Manual
Page 58
... & Solution Water supply contains minerals such as sulfur. • A water filter may need to eliminate taste and odor problems. Water filter has been exhausted. • Replacing the water filter is hard to open, wait one minute to allow the air pressure to clear the door and door shelves. Depress and release the dispenser pad for replacement instructions. If the door is recommended: - When the water filter indicator turns on the gaskets after cleaning. 58 TROUBLESHOOTING Problem Water has bad...
... & Solution Water supply contains minerals such as sulfur. • A water filter may need to eliminate taste and odor problems. Water filter has been exhausted. • Replacing the water filter is hard to open, wait one minute to allow the air pressure to clear the door and door shelves. Depress and release the dispenser pad for replacement instructions. If the door is recommended: - When the water filter indicator turns on the gaskets after cleaning. 58 TROUBLESHOOTING Problem Water has bad...
Owners Manual
Page 62
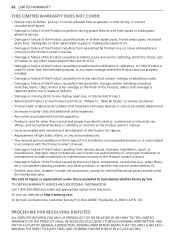
... Product if it is installed in an inaccessible location or is not installed in utility costs and additional utility expenses. • Any noises associated with normal operation. • Products used for other products, or services that are not authorized by LG. • Shelves, door bins, drawers, handle and accessories, except for repairs. • Replacement of light bulbs, filters, or any other causes beyond the control of LG. • Damage or...
... Product if it is installed in an inaccessible location or is not installed in utility costs and additional utility expenses. • Any noises associated with normal operation. • Products used for other products, or services that are not authorized by LG. • Shelves, door bins, drawers, handle and accessories, except for repairs. • Replacement of light bulbs, filters, or any other causes beyond the control of LG. • Damage or...
Owners Manual
Page 66
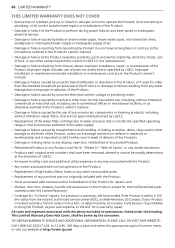
... if used for in-warranty repair. ii) correct wiring or plumbing; or iii) correct unauthorized repairs or installations of the Product; • Damage or failure of the Product to perform during power failures and interrupted or inadequate electrical service; • Damage or failure caused by leaky or broken water pipes, frozen water pipes, restricted drain lines, inadequate or interrupted water supply or inadequate supply of air; •...
... if used for in-warranty repair. ii) correct wiring or plumbing; or iii) correct unauthorized repairs or installations of the Product; • Damage or failure of the Product to perform during power failures and interrupted or inadequate electrical service; • Damage or failure caused by leaky or broken water pipes, frozen water pipes, restricted drain lines, inadequate or interrupted water supply or inadequate supply of air; •...


