

Owners Manual
Page 4
... Aspect 20 • Progressive Scan 21 • Power Save Mode 21 • Factory Setting 21 Language Settings 21 • Display Menu 21 • Disc Menu / Audio / Subtitle 21 Audio Settings 22 • Dolby Digital / DTS / MPEG 22 • Sampling Freq. (Frequency 22 • DRC (Dynamic Range Control 22 • Vocal 22 Lock (Parental Control) Settings 23 • Rating 23 • Set Password 23 • Area Code 23 Recording Settings 24 • Disc Record Mode 24 • VCR Record Mode 24 • DV Record Audio 24 • Auto Chapter 24 Disc Settings...
... Aspect 20 • Progressive Scan 21 • Power Save Mode 21 • Factory Setting 21 Language Settings 21 • Display Menu 21 • Disc Menu / Audio / Subtitle 21 Audio Settings 22 • Dolby Digital / DTS / MPEG 22 • Sampling Freq. (Frequency 22 • DRC (Dynamic Range Control 22 • Vocal 22 Lock (Parental Control) Settings 23 • Rating 23 • Set Password 23 • Area Code 23 Recording Settings 24 • Disc Record Mode 24 • VCR Record Mode 24 • DV Record Audio 24 • Auto Chapter 24 Disc Settings...
Owners Manual
Page 5
... 53 Overwriting Recording 54 Viewing Title List menu displayed on other DVD Recorders or Players 54 Playing Your Recordings on Other DVD Players (Finalizing a Disc 54 REFERENCE Controlling Your TV with the Supplied Remote 55 Language Code List 56 Area Codes List 56 Troubleshooting 57-59 Reset the Recorder 59 Specifications 60-61 EDITING Title List and Chapter List Menu Overview .47 VR Mode: Original and Playlist Editing . . . .48 Titles, Chapters and Parts 48 Is editing a DVD like editing a video tape...
... 53 Overwriting Recording 54 Viewing Title List menu displayed on other DVD Recorders or Players 54 Playing Your Recordings on Other DVD Players (Finalizing a Disc 54 REFERENCE Controlling Your TV with the Supplied Remote 55 Language Code List 56 Area Codes List 56 Troubleshooting 57-59 Reset the Recorder 59 Specifications 60-61 EDITING Title List and Chapter List Menu Overview .47 VR Mode: Original and Playlist Editing . . . .48 Titles, Chapters and Parts 48 Is editing a DVD like editing a video tape...

Owners Manual
Page 8
... DivX files. Notes on the TV screen. This unit can play because of the settings of the unit may not be available or other discs, the message "Incorrect region code. Playable Discs DVD (8 cm / 12 cm disc) Discs such as movies that can be purchased or rented Video CD (VCD) (8 cm / 12 cm disc) VIDEO CDs or CD-Rs/CD-RWs in VIDEO CD/Super VIDEO CD format Audio...
... DivX files. Notes on the TV screen. This unit can play because of the settings of the unit may not be available or other discs, the message "Incorrect region code. Playable Discs DVD (8 cm / 12 cm disc) Discs such as movies that can be purchased or rented Video CD (VCD) (8 cm / 12 cm disc) VIDEO CDs or CD-Rs/CD-RWs in VIDEO CD/Super VIDEO CD format Audio...

Owners Manual
Page 9
... discs formatted in VR mode or DVD-RAM discs, and CPRM recordings can only be played on video recording • You cannot record copy-protected video using a DVD-RW disc in which you cannot then make a copy of certain U.S. Notice for Recordable Media. IN CASE OF 525 PROGRESSIVE SCAN PICTURE PROBLEMS, IT IS RECOMMENDED THAT THE USER SWITCH THE CONNECTION TO THE 'STANDARD DEFINITION' OUTPUT. Copyright • Recording equipment should be recorded using this copyright protection technology must be displayed...
... discs formatted in VR mode or DVD-RAM discs, and CPRM recordings can only be played on video recording • You cannot record copy-protected video using a DVD-RW disc in which you cannot then make a copy of certain U.S. Notice for Recordable Media. IN CASE OF 525 PROGRESSIVE SCAN PICTURE PROBLEMS, IT IS RECOMMENDED THAT THE USER SWITCH THE CONNECTION TO THE 'STANDARD DEFINITION' OUTPUT. Copyright • Recording equipment should be recorded using this copyright protection technology must be displayed...
Owners Manual
Page 14
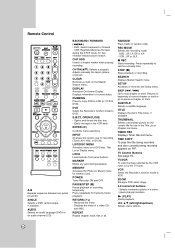
... playing/ recording. CLEAR Removes a mark on a DVD disc, Title List or Playlist menu. ENTER ( ) Confirms menu selections. POWER Turns Recorder ON and OFF. STOP (x) Stops playback or recording. THUMBNAIL Selects a thumbnail picture for the current title for memory card. Inputs channel numbers. EJECT, OPEN/CLOSE - Returns to previous chapter or track. TV/VCR To view channels selected by the VCR tuner or by -frame playback. LOCK Locks/unlocks front panel buttons. MARKER Marks any point during the STOP mode, for recording (Tuner, AV1, AV2, or DV IN). REC MODE Selects...
... playing/ recording. CLEAR Removes a mark on a DVD disc, Title List or Playlist menu. ENTER ( ) Confirms menu selections. POWER Turns Recorder ON and OFF. STOP (x) Stops playback or recording. THUMBNAIL Selects a thumbnail picture for the current title for memory card. Inputs channel numbers. EJECT, OPEN/CLOSE - Returns to previous chapter or track. TV/VCR To view channels selected by the VCR tuner or by -frame playback. LOCK Locks/unlocks front panel buttons. MARKER Marks any point during the STOP mode, for recording (Tuner, AV1, AV2, or DV IN). REC MODE Selects...

Owners Manual
Page 16
... ANTENNA INPUT VIDEO INPUT AUDIO INPUT L R OR OR R V A1 Rear of Recorder b 16 Reaarr ooffRReeccoordredrer S C A2 S-VIDEO INPUT Pr Pb Y COMPONENT/PROGRESSIVE SCAN VIDEO INPUT R L AUDIO INPUT Rear of the TV and identify the antenna cable. b Cable TV: If your cable connection has no converter or descrambler, unscrew the cable from your TV Make one program while viewing another. • If you cannot record one of the following connections, depending on your Recorder. To view or record a CATV channel 1. Connections to the Recorder output channel...
... ANTENNA INPUT VIDEO INPUT AUDIO INPUT L R OR OR R V A1 Rear of Recorder b 16 Reaarr ooffRReeccoordredrer S C A2 S-VIDEO INPUT Pr Pb Y COMPONENT/PROGRESSIVE SCAN VIDEO INPUT R L AUDIO INPUT Rear of the TV and identify the antenna cable. b Cable TV: If your cable connection has no converter or descrambler, unscrew the cable from your TV Make one program while viewing another. • If you cannot record one of the following connections, depending on your Recorder. To view or record a CATV channel 1. Connections to the Recorder output channel...

Owners Manual
Page 17
... the setup menu. O A X OPTICAL DIGITAL INPUT Amplifier (Receiver) L R AUDIO INPUT COAXIAL DIGITAL INPUT Manufactured under license from Dolby Laboratories. Tune the TV to this connection, set the Recorder's RF output channel 1. Video connection Connect the DVD/VCR VIDEO OUT jack on the Recorder to the video in jack on the TV using the supplied 75-ohm Coaxial Cable (R). "Dolby", "Pro Logic", and the double-D symbol are trademarks of Recorder Component Video / Progressive Scan connection If your TV does not accept the Progressive Scan format, the picture...
... the setup menu. O A X OPTICAL DIGITAL INPUT Amplifier (Receiver) L R AUDIO INPUT COAXIAL DIGITAL INPUT Manufactured under license from Dolby Laboratories. Tune the TV to this connection, set the Recorder's RF output channel 1. Video connection Connect the DVD/VCR VIDEO OUT jack on the Recorder to the video in jack on the TV using the supplied 75-ohm Coaxial Cable (R). "Dolby", "Pro Logic", and the double-D symbol are trademarks of Recorder Component Video / Progressive Scan connection If your TV does not accept the Progressive Scan format, the picture...

Owners Manual
Page 20
... connected. Displays theatrical images with masking bars above and below the picture. 4:3 Pan Scan: Select when a standard 4:3 TV is connected. When Timezone is turned off . 16:9 Wide: Select when a 16:9 wide TV is set to Auto, the Recorder will use XDS information to set up /down): Changes the setting at the factory. Use v / V to exit the menu. Note : The Auto Clock Feature enables the Recorder to determine the proper setting. 3. Use v / V or number buttons to select a channel...
... connected. Displays theatrical images with masking bars above and below the picture. 4:3 Pan Scan: Select when a standard 4:3 TV is connected. When Timezone is turned off . 16:9 Wide: Select when a 16:9 wide TV is set to Auto, the Recorder will use XDS information to set up /down): Changes the setting at the factory. Use v / V to exit the menu. Note : The Auto Clock Feature enables the Recorder to determine the proper setting. 3. Use v / V or number buttons to select a channel...

Owners Manual
Page 21
..., press STOP (x) and hold it for Disc Subtitle) : Turn off Subtitle. Some options cannot be visible on a conventional analog TV or monitor. The Initialize menu will only be reset (Rating, Password, Area Code). 21 Press B to the language code list in the Recorder. Language Settings Display Menu Select a language for connection to a TV or monitor that is entered, an image will appear. 3. Progressive Scan Progressive Scan Video provides the highest quality pictures with a progressive scan signal. [OFF] : Using the COMPONENT/PROGRESSIVE SCAN VIDEO OUT...
..., press STOP (x) and hold it for Disc Subtitle) : Turn off Subtitle. Some options cannot be visible on a conventional analog TV or monitor. The Initialize menu will only be reset (Rating, Password, Area Code). 21 Press B to the language code list in the Recorder. Language Settings Display Menu Select a language for connection to a TV or monitor that is entered, an image will appear. 3. Progressive Scan Progressive Scan Video provides the highest quality pictures with a progressive scan signal. [OFF] : Using the COMPONENT/PROGRESSIVE SCAN VIDEO OUT...
Owners Manual
Page 23
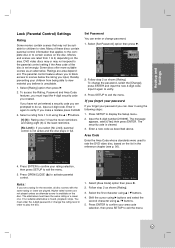
... it using the v / V buttons. [1]-[8] : Rating one . Input it again to display the Setup menu. 2. Press SETUP to verify. 3. The security code is found, playback stops. Enter a new code as shown [Rating]. 3. Follow step 2 as described above. Press ENTER to confirm your children from being able to view material you must enter the 4-digit password or change the rating level in order to play the disc. 1. Hookup and Settings Lock (Parental Control) Settings...
... it using the v / V buttons. [1]-[8] : Rating one . Input it again to display the Setup menu. 2. Press SETUP to verify. 3. The security code is found, playback stops. Enter a new code as shown [Rating]. 3. Follow step 2 as described above. Press ENTER to confirm your children from being able to view material you must enter the 4-digit password or change the rating level in order to play the disc. 1. Hookup and Settings Lock (Parental Control) Settings...

Owners Manual
Page 24
... Record Audio You need to set this interval to the front panel DV IN jack. One is used . On the Audio 2 setting, the overdubbed sound is recorded at fixed intervals. XP (Excellent quality), SP (Standard quality), LP (Low quality), EP (Extend quality). Auto Chapter During recording, chapter markers are added automatically at the time of DVD+RW/DVD-RAM, use b / B to format the disc. Use v / V to exit the menu. Select [VR Mode] or [Video Mode...
... Record Audio You need to set this interval to the front panel DV IN jack. One is used . On the Audio 2 setting, the overdubbed sound is recorded at fixed intervals. XP (Excellent quality), SP (Standard quality), LP (Low quality), EP (Extend quality). Auto Chapter During recording, chapter markers are added automatically at the time of DVD+RW/DVD-RAM, use b / B to format the disc. Use v / V to exit the menu. Select [VR Mode] or [Video Mode...
Owners Manual
Page 25
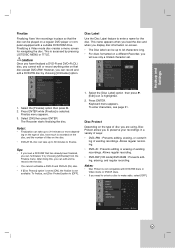
Finalizing a Video mode disc creates a menu screen for the disc. This is selected. This name appears when you load the disc and when you need to unlock a disc to make edits, select [OFF]. 25 Press ENTER while [Finalize] is accessed by pressing LIST/DISC MENU or TITLE. Select the [Disc Label] option then press B. [Edit] icon is recorded on the disc, and the number of titles on a regular DVD player or computer equipped with DVD-RW discs in...
Finalizing a Video mode disc creates a menu screen for the disc. This is selected. This name appears when you load the disc and when you need to unlock a disc to make edits, select [OFF]. 25 Press ENTER while [Finalize] is accessed by pressing LIST/DISC MENU or TITLE. Select the [Disc Label] option then press B. [Edit] icon is recorded on the disc, and the number of titles on a regular DVD player or computer equipped with DVD-RW discs in...
Owners Manual
Page 26
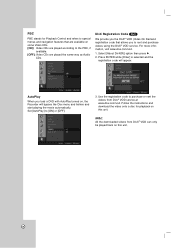
... and purchase videos using the DivX® VOD service. Select [About DivX(R)] option then press B. 2. Press ENTER while [Enter] is selected and the registration code will bypass the Disc menu and trailers and start playing the movie automatically. Use the registration code to the PBC, if available. [OFF]: Video CDs are played the same way as Audio CDs. Follow the instructions and download the video onto a disc for Playback Control and refers...
... and purchase videos using the DivX® VOD service. Select [About DivX(R)] option then press B. 2. Press ENTER while [Enter] is selected and the registration code will bypass the Disc menu and trailers and start playing the movie automatically. Use the registration code to the PBC, if available. [OFF]: Video CDs are played the same way as Audio CDs. Follow the instructions and download the video onto a disc for Playback Control and refers...

Owners Manual
Page 27
Indicates the record mode, free space, and elapsed time progress bar. The items displayed differ depending on -screen. You can be changed using the menu. 1. Indicates channel number and audio input signal received by changing to Mono. • When an external input is pressed for 7 seconds, the on -screen. • If SAP is selected, but there is no button is selected, the audio channel can select an item by pressing b / B. Example: DVD-RW in VR mode is displayed, action...
Indicates the record mode, free space, and elapsed time progress bar. The items displayed differ depending on -screen. You can be changed using the menu. 1. Indicates channel number and audio input signal received by changing to Mono. • When an external input is pressed for 7 seconds, the on -screen. • If SAP is selected, but there is no button is selected, the audio channel can select an item by pressing b / B. Example: DVD-RW in VR mode is displayed, action...

Owners Manual
Page 29
... view immediately after recording or if you want to return to select a title number. Press DISPLAY until the real-time counter is an abbreviation for Video CD) icon. Load your Recorder. You may also be available on each menu screen. Moving to another title: Press DISPLAY twice then use b / B. Continue to open the disc tray. Follow the instructions on the Setup menu. Begin recording or playing a tape. 2. S-VHS Quasi Playback (SQPB) • This Recorder...
... view immediately after recording or if you want to return to select a title number. Press DISPLAY until the real-time counter is an abbreviation for Video CD) icon. Load your Recorder. You may also be available on each menu screen. Moving to another title: Press DISPLAY twice then use b / B. Continue to open the disc tray. Follow the instructions on the Setup menu. Begin recording or playing a tape. 2. S-VHS Quasi Playback (SQPB) • This Recorder...

Owners Manual
Page 40
... displayed times for recording and time remaining may not always add up on the disc. Disc types and recording formats, modes, and settings This recorder can affect playback and/or recording performance. If the disc format is Video Recording format, then the recording mode is Video Recording (VR) format or Video format. Please take up to update the new title and editing when removing the disc from malfunction of this . • When using a DVD-RW disc, make sure you change Recording format, if required. (Reinitializing the disc...
... displayed times for recording and time remaining may not always add up on the disc. Disc types and recording formats, modes, and settings This recorder can affect playback and/or recording performance. If the disc format is Video Recording format, then the recording mode is Video Recording (VR) format or Video format. Please take up to update the new title and editing when removing the disc from malfunction of this . • When using a DVD-RW disc, make sure you change Recording format, if required. (Reinitializing the disc...

Owners Manual
Page 45
... of time, see [Instant Timer Recording] on front panel. 3. Press z REC once to stop recording. Set a recording mode as you press STOP (x) or the disc is full. • To record for a fixed length of the Recorder's external inputs. 1. DVD: XP, SP, LP or EP. See page 24. • If your source is connected properly to change VCR mode and perform the VCR playback or recording. Press INPUT repeatedly to select the external input to record from . • AV1: Audio/Video Input...
... of time, see [Instant Timer Recording] on front panel. 3. Press z REC once to stop recording. Set a recording mode as you press STOP (x) or the disc is full. • To record for a fixed length of the Recorder's external inputs. 1. DVD: XP, SP, LP or EP. See page 24. • If your source is connected properly to change VCR mode and perform the VCR playback or recording. Press INPUT repeatedly to select the external input to record from . • AV1: Audio/Video Input...

Owners Manual
Page 54
... the disc. • DVD+R DL disc can remove the Title List menu by pressing LIST/DISC MENU or TITLE. Press LIST/DISC MENU to record (TV channel, AV1-2, DV). 2. Finalizing a Video mode disc creates a menu screen for a protected title. • If the overwrite is longer than 10 seconds, the next title is not available for navigating the disc. Insert DVD+R or DVD+RW disc recorded already. Select input source you want to display the Title List menu. 2. To play finalized discs recorded...
... the disc. • DVD+R DL disc can remove the Title List menu by pressing LIST/DISC MENU or TITLE. Press LIST/DISC MENU to record (TV channel, AV1-2, DV). 2. Finalizing a Video mode disc creates a menu screen for a protected title. • If the overwrite is longer than 10 seconds, the next title is not available for navigating the disc. Insert DVD+R or DVD+RW disc recorded already. Select input source you want to display the Title List menu. 2. To play finalized discs recorded...

Owners Manual
Page 57
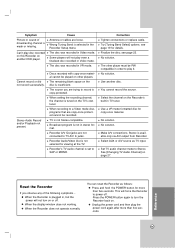
.... Connect the component directly to the correct position. The power of a problem before contacting service. Select the appropriate video input mode on the TV so the picture from the Recorder appears on page 20. Check the connection. Connect the audio cable into the wall outlet securely. Turn on the equipment connected with the audio cable is not set to [ON] on another VCR. Set the AUDIO options to your TV can support 525p Progressive scan picture or set Progressive scan to receive Recorder signal output...
.... Connect the component directly to the correct position. The power of a problem before contacting service. Select the appropriate video input mode on the TV so the picture from the Recorder appears on page 20. Check the connection. Connect the audio cable into the wall outlet securely. Turn on the equipment connected with the audio cable is not set to [ON] on another VCR. Set the AUDIO options to your TV can support 525p Progressive scan picture or set Progressive scan to receive Recorder signal output...
Owners Manual
Page 59
... the Recorder is selected in Video mode. Some players will not play even a finalized disc recorded in order to a Video mode disc, programs that are loose. TV is not in , but the power will force the Recorder to turn on another disc. Use a VR mode formatted disc for viewing at the TV. Press the POWER button again to power off . When the Recorder does not operate normally. You can reset the Recorder as TV input. Stereo Audio Record and/or Playback not...
... the Recorder is selected in Video mode. Some players will not play even a finalized disc recorded in order to a Video mode disc, programs that are loose. TV is not in , but the power will force the Recorder to turn on another disc. Use a VR mode formatted disc for viewing at the TV. Press the POWER button again to power off . When the Recorder does not operate normally. You can reset the Recorder as TV input. Stereo Audio Record and/or Playback not...


