
User Manual
Page 6
... easily accessible after plugging into one end of thunder and lightning, never touch the power cord and signal cable because it is not fixed completely, a fire can cause electric shock. Safety Precautions Electrical Power Related Precautions Warning Make sure to connect the power cable to a single outlet. You may be electrocuted or injured. Use the rated voltage only. - Do not connect several extension cords, electrical appliances...
... easily accessible after plugging into one end of thunder and lightning, never touch the power cord and signal cable because it is not fixed completely, a fire can cause electric shock. Safety Precautions Electrical Power Related Precautions Warning Make sure to connect the power cable to a single outlet. You may be electrocuted or injured. Use the rated voltage only. - Do not connect several extension cords, electrical appliances...

User Manual
Page 8
Only on some models. Connecting the Speakers - Mount the product onto the speaker by using a screw as shown in all model. Cable tie * This feature is not available in all model. 7 When the speaker is not available in the following connect the speaker cable. After installing your speakers, use holders and cable ties to organize the speaker cables. Cable holder Remove the paper. * This feature is installed. *Connect the input terminal with a proper color match.
Only on some models. Connecting the Speakers - Mount the product onto the speaker by using a screw as shown in all model. Cable tie * This feature is not available in all model. 7 When the speaker is not available in the following connect the speaker cable. After installing your speakers, use holders and cable ties to organize the speaker cables. Cable holder Remove the paper. * This feature is installed. *Connect the input terminal with a proper color match.

User Manual
Page 9
... the analog signal only) There is not a function which is supported There is not a function which is supported • Exit Button • Volume Button Volume up and down direction adjustment. • Mute button 123 456 789 0 • Power On/Off Button • Input Select Button (See next page) • ARC button Aspect Ratio Correction. Using the Remote Control Name of the Remote Control Buttons • AV Button • Sleep Button When watching AV, RGB PC,HDMI/DVI...
... the analog signal only) There is not a function which is supported There is not a function which is supported • Exit Button • Volume Button Volume up and down direction adjustment. • Mute button 123 456 789 0 • Power On/Off Button • Input Select Button (See next page) • ARC button Aspect Ratio Correction. Using the Remote Control Name of the Remote Control Buttons • AV Button • Sleep Button When watching AV, RGB PC,HDMI/DVI...
User Manual
Page 10
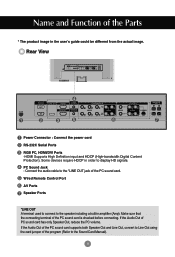
... View AV IN/OUT Power Connector : Connect the power cord RS-232C Serial Ports RGB PC, HDMI/DVI Ports -HDMI Supports High Definition input and HDCP (High-bandwidth Digital Content Protection). Wired Remote Control Port AV Ports Speaker Ports *LINE OUT A terminal used to connect to display HD signals. PC Sound Jack : Connect the audio cable to the Sound Card Manual). 9 Name and Function of the Parts * The product image in amplifier (Amp). Some devices require HDCP in order to the speaker including a built-in the user's guide...
... View AV IN/OUT Power Connector : Connect the power cord RS-232C Serial Ports RGB PC, HDMI/DVI Ports -HDMI Supports High Definition input and HDCP (High-bandwidth Digital Content Protection). Wired Remote Control Port AV Ports Speaker Ports *LINE OUT A terminal used to connect to display HD signals. PC Sound Jack : Connect the audio cable to the Sound Card Manual). 9 Name and Function of the Parts * The product image in amplifier (Amp). Some devices require HDCP in order to the speaker including a built-in the user's guide...

User Manual
Page 12
.... 2 Turn on the back of the product. SOURCE AUTO/SET A When connecting with a HDMI to DVI signal input cable. • Select HDMI/DVI : HDMI to DVI Digital signal. Input AV Component1 Component2 RGB PC HDMI/DVI Input AV Component1 Component2 RGB PC HDMI/DVI Note • How to connect to each computer. B When connecting with a D-Sub signal input cable. • Select RGB PC : 15-pin D-Sub analog signal. Press the INPUT button on the remote control to a grounded power outlet or power strip (three prong connector.) 11 Press the INPUT button...
.... 2 Turn on the back of the product. SOURCE AUTO/SET A When connecting with a HDMI to DVI signal input cable. • Select HDMI/DVI : HDMI to DVI Digital signal. Input AV Component1 Component2 RGB PC HDMI/DVI Input AV Component1 Component2 RGB PC HDMI/DVI Note • How to connect to each computer. B When connecting with a D-Sub signal input cable. • Select RGB PC : 15-pin D-Sub analog signal. Press the INPUT button on the remote control to a grounded power outlet or power strip (three prong connector.) 11 Press the INPUT button...

User Manual
Page 16
... connecting with S-Video cable, S-Video input has a priority. 15 Connecting to select the input signal. B When connecting with an BNC cable. • Select AV. INPUT SET Or, press the SOURCE button on the remote control to External Devices Video Input Connect the video cable as shown in the below figure and then connect the power cord (See page 10). SOURCE AUTO/SET A When connecting with an S-Video cable. • Select AV. A When connecting with a BNC cable. • Connect the input terminal with a proper color match...
... connecting with S-Video cable, S-Video input has a priority. 15 Connecting to select the input signal. B When connecting with an BNC cable. • Select AV. INPUT SET Or, press the SOURCE button on the remote control to External Devices Video Input Connect the video cable as shown in the below figure and then connect the power cord (See page 10). SOURCE AUTO/SET A When connecting with an S-Video cable. • Select AV. A When connecting with a BNC cable. • Connect the input terminal with a proper color match...

User Manual
Page 17
... Component 2 Input AV Component1 Component2 RGB PC HDMI/DVI Input AV Component1 Component2 RGB PC HDMI/DVI 16 INPUT SET Or, press the SOURCE button on the remote control to display HD signals. - Some devices may require HDCP in the below figure and then, connect the power cord (See page 10). • Connect the input terminal with a proper color match. Connecting to External Devices Component Input (480i/480p/576i/576p/720p/1080i) Connect the video/audio cable as...
... Component 2 Input AV Component1 Component2 RGB PC HDMI/DVI Input AV Component1 Component2 RGB PC HDMI/DVI 16 INPUT SET Or, press the SOURCE button on the remote control to display HD signals. - Some devices may require HDCP in the below figure and then, connect the power cord (See page 10). • Connect the input terminal with a proper color match. Connecting to External Devices Component Input (480i/480p/576i/576p/720p/1080i) Connect the video/audio cable as...

User Manual
Page 18
... an input signal. INPUT SET Or, press the SOURCE button on the remote control to select the input signal. Connect the video/audio cable as shown in order to DVI signal input cable. SOURCE AUTO/SET When connecting with a HDMI signal input cable. • Select HDMI/DVI Input AV Component1 Component2 RGB PC HDMI/DVI 17 When connecting with a HDMI to display HD signals. Product Product HDMI to External Devices HDMI Input (480p/576p/720p/1080i/1080p) -HDMI Supports High Definition input and HDCP (High-bandwidth Digital Content Protection). Press the INPUT button on...
... an input signal. INPUT SET Or, press the SOURCE button on the remote control to select the input signal. Connect the video/audio cable as shown in order to DVI signal input cable. SOURCE AUTO/SET When connecting with a HDMI signal input cable. • Select HDMI/DVI Input AV Component1 Component2 RGB PC HDMI/DVI 17 When connecting with a HDMI to display HD signals. Product Product HDMI to External Devices HDMI Input (480p/576p/720p/1080i/1080p) -HDMI Supports High Definition input and HDCP (High-bandwidth Digital Content Protection). Press the INPUT button on...
User Manual
Page 21
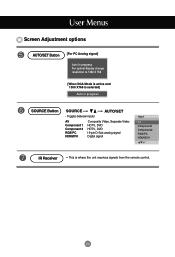
User Menus Screen Adjustment options AUTO/SET Button [For PC Analog signal] [When XGA Mode is active and 1360 X768 is where the unit receives signals from the remote control. 20 Toggles between inputs AUTO/SET AV Component 1 Component 2 RGB PC HDMI/DVI Composite Video, Separate Video HDTV, DVD HDTV, DVD 15-pin D-Sub analog signal Digital signal Input AV Component1 Component2 RGB PC HDMI/DVI IR Receiver • This is selected] SOURCE Button SOURCE -
User Menus Screen Adjustment options AUTO/SET Button [For PC Analog signal] [When XGA Mode is active and 1360 X768 is where the unit receives signals from the remote control. 20 Toggles between inputs AUTO/SET AV Component 1 Component 2 RGB PC HDMI/DVI Composite Video, Separate Video HDTV, DVD HDTV, DVD 15-pin D-Sub analog signal Digital signal Input AV Component1 Component2 RGB PC HDMI/DVI IR Receiver • This is selected] SOURCE Button SOURCE -
User Manual
Page 26
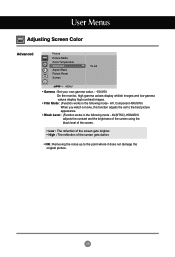
... best picture appearance. • Black Level : (Function works in the following mode - AV, Component 480i/576i) When you watch a movie, this function adjusts the set MENU • Gamma : Set your own gamma value. : -50/0/50 On the monitor, high gamma values display whitish images and low gamma values display high contrast images. • Film Mode : (Function works in the following mode - User Menus Adjusting Screen Color Advanced Picture Picture Mode Color Temperature Advanced Aspect Ratio Picture Reset Screen To set...
... best picture appearance. • Black Level : (Function works in the following mode - AV, Component 480i/576i) When you watch a movie, this function adjusts the set MENU • Gamma : Set your own gamma value. : -50/0/50 On the monitor, high gamma values display whitish images and low gamma values display high contrast images. • Film Mode : (Function works in the following mode - User Menus Adjusting Screen Color Advanced Picture Picture Mode Color Temperature Advanced Aspect Ratio Picture Reset Screen To set...

User Manual
Page 28
..., HDMI/DVI DTV.) Clock : To minimize any horizontal noise and clear or sharpen the image of the screen. H-Position : Moving the screen position horizontally. to the default factory settings. The horizontal screen size will also change. This function is available for analog signals only. XGA Mode (RGB-PC only). : For more improved or better picture quality, select the same mode corresponding to remove any vertical bars or stripes visible on the screen background. XGA Mode Reset To set MENU MENU Auto...
..., HDMI/DVI DTV.) Clock : To minimize any horizontal noise and clear or sharpen the image of the screen. H-Position : Moving the screen position horizontally. to the default factory settings. The horizontal screen size will also change. This function is available for analog signals only. XGA Mode (RGB-PC only). : For more improved or better picture quality, select the same mode corresponding to remove any vertical bars or stripes visible on the screen background. XGA Mode Reset To set MENU MENU Auto...

User Manual
Page 29
... watching. Note When connected to balance sound from others,it helps users listen to human voices better. • Standard : The most Volume appropriate level. User Menus Adjusting the audio function Sound Mode The best sound tone quality will be selected automatically depending on the video type that you want to use the user-defined audio settings. To use your computer and the 'Sound Mode' setting in the audio menu is Clear Voice, Standard...
... watching. Note When connected to balance sound from others,it helps users listen to human voices better. • Standard : The most Volume appropriate level. User Menus Adjusting the audio function Sound Mode The best sound tone quality will be selected automatically depending on the video type that you want to use the user-defined audio settings. To use your computer and the 'Sound Mode' setting in the audio menu is Clear Voice, Standard...
User Manual
Page 30
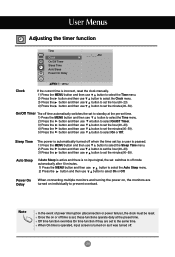
... Auto Sleep Power On Delay _ _ : _ _ AM MENU Clock If the current time is incorrect, reset the clock manually. 1) Press the MENU button and then use button to select the Time menu. 2) Press the button and then use button to select the Clock menu. 3) Press the button and then use button to set the hour(00~23). 4) Press the button and then use button to set switches to off mode automatically after 10 minutes. 1) Press the MENU button...
... Auto Sleep Power On Delay _ _ : _ _ AM MENU Clock If the current time is incorrect, reset the clock manually. 1) Press the MENU button and then use button to select the Time menu. 2) Press the button and then use button to select the Clock menu. 3) Press the button and then use button to set the hour(00~23). 4) Press the button and then use button to set switches to off mode automatically after 10 minutes. 1) Press the MENU button...

User Manual
Page 31
...' position. Logo Light Use this function to set up so that it , do the following : • Push the MENU button on normal if you don't foresee image burn in a ghost image remaining even when you change the image. The monitor can be set the power indicator on the screen for prolonged periods could result in being a problem. White wash : White wash fills the screen with the remote control. DPM Select A user...
...' position. Logo Light Use this function to set up so that it , do the following : • Push the MENU button on normal if you don't foresee image burn in a ghost image remaining even when you change the image. The monitor can be set the power indicator on the screen for prolonged periods could result in being a problem. White wash : White wash fills the screen with the remote control. DPM Select A user...

User Manual
Page 32
... a function that can be displayed with several products to 0 view screen. 0 < > < > 1 Off • Tile Mode Tile mode and choose Tile alignment and set location. * Only after pressing the SET button the adjustments made to the settings will be saved. - Must be connected to RS-232C or RGB Out Tile mode Option Language Key Lock ISM Method Power Indicator Logo Light DPM Select Tile Mode Factory Reset MENU Tile Mode H-Size V-Size H-Position V-Position Reset Tile ID Natural It...
... a function that can be displayed with several products to 0 view screen. 0 < > < > 1 Off • Tile Mode Tile mode and choose Tile alignment and set location. * Only after pressing the SET button the adjustments made to the settings will be saved. - Must be connected to RS-232C or RGB Out Tile mode Option Language Key Lock ISM Method Power Indicator Logo Light DPM Select Tile Mode Factory Reset MENU Tile Mode H-Size V-Size H-Position V-Position Reset Tile ID Natural It...

User Manual
Page 36
... to the Specifications in the remote Control to check the input signal. 'Unknown Product' message appears when the product is supported by referring to the video card user manual. 'Key Lock On' message appears. the screen appears extremely dark. • Backlight may need service. You can be changed tens of image display per second. Adjust the frequency range by the horizontal interval, the number of horizontal lines displayed every second can set this function in power saving mode, move the...
... to the Specifications in the remote Control to check the input signal. 'Unknown Product' message appears when the product is supported by referring to the video card user manual. 'Key Lock On' message appears. the screen appears extremely dark. • Backlight may need service. You can be changed tens of image display per second. Adjust the frequency range by the horizontal interval, the number of horizontal lines displayed every second can set this function in power saving mode, move the...

User Manual
Page 37
... an optimal screen status that fits into the current mode. Connect the signal cable that fits into the current mode. Display - Press the "AUTO" button in the remote control to the recommended resolution in the remote control to the signal port. Use the screen-saver function. 36 Troubleshooting The screen image looks abnormal. G The screen is displayed abnormally. • The proper input signal is turned off. • If you use the Position OSD menu. • See if the video card resolution and frequency are supported by...
... an optimal screen status that fits into the current mode. Connect the signal cable that fits into the current mode. Display - Press the "AUTO" button in the remote control to the recommended resolution in the remote control to the signal port. Use the screen-saver function. 36 Troubleshooting The screen image looks abnormal. G The screen is displayed abnormally. • The proper input signal is turned off. • If you use the Position OSD menu. • See if the video card resolution and frequency are supported by...

Brochure
Page 1
... using LG's IP card solution for bezel width HIGH BRIGHTNESS 500 cd/m2 CONTRAST RATIO 3000:1 (DCR) HDMI™/DVI WITH HDCP SUPER IPS 178° Viewing Angle OSD and REMOTE CONTROL LOCK RS-232C CONTROL NEW! www.LGcommercial.com INFORMATION DISPLAY FOR SERIAL NUMBER VIEWING ANGLE and LIFE EXPECTANCY Enhanced in Portrait Mode (M4212C-BA) SPLIT ZOOM (self video wall) New! adjusts for Digital Signage applications. Contact [email protected] for more information. lcd monitor...
... using LG's IP card solution for bezel width HIGH BRIGHTNESS 500 cd/m2 CONTRAST RATIO 3000:1 (DCR) HDMI™/DVI WITH HDCP SUPER IPS 178° Viewing Angle OSD and REMOTE CONTROL LOCK RS-232C CONTROL NEW! www.LGcommercial.com INFORMATION DISPLAY FOR SERIAL NUMBER VIEWING ANGLE and LIFE EXPECTANCY Enhanced in Portrait Mode (M4212C-BA) SPLIT ZOOM (self video wall) New! adjusts for Digital Signage applications. Contact [email protected] for more information. lcd monitor...

Brochure
Page 2
... CLEARER Dramatization S P L I T Z O O M SELF VIDEO WALL Display to multiple screens by linking displays using a 15-pin D-Sub signal cable Dramatization M4712C-BA 3 x3 Matrix (5 x 5 Max) M4212C-BA 5 x 5 Matrix VIEWING ANGLE and LIFE EXPECTANCY Enhanced in Portrait Mode Stand ST4210K (optional) (fits M4212C-BA) HIDDEN SPEAKERS SP0000K (optional) Dimensions (WxHxD) 1.61"x12.92"x2.17" Weight 1.65 lbs. each 10 Watts Dramatization Dramatization Dramatization HIDDEN SPEAKERS SP0000K (optional) 1.61" 12...
... CLEARER Dramatization S P L I T Z O O M SELF VIDEO WALL Display to multiple screens by linking displays using a 15-pin D-Sub signal cable Dramatization M4712C-BA 3 x3 Matrix (5 x 5 Max) M4212C-BA 5 x 5 Matrix VIEWING ANGLE and LIFE EXPECTANCY Enhanced in Portrait Mode Stand ST4210K (optional) (fits M4212C-BA) HIDDEN SPEAKERS SP0000K (optional) Dimensions (WxHxD) 1.61"x12.92"x2.17" Weight 1.65 lbs. each 10 Watts Dramatization Dramatization Dramatization HIDDEN SPEAKERS SP0000K (optional) 1.61" 12...

Brochure
Page 3
...lcd monitor specifications M4712C-BA 47" class (46.9" diagonal) M4212C-BA 42" class (42.0" diagonal) PANEL LCD Panel Type Display Area Aspect Ratio Native Resolution Pixels (H x V x 3) Brightness Contrast Ratio Viewing Angle (H x V) Color Depth Response Time Surface Treatment MTBF VIDEO Max Input Resolution Recommended Resolution H-Scanning Frequency V-Scanning Frequency Pixel Frequency Sync Compatability Video Input Picture mode Color temperature REAR INPUTS Component Video PC Input via 15-Pin Sub "D" Composite Video Input/Output Audio Output Audio Inputs HDTV Formats PC Formats HDMI/DVI...
...lcd monitor specifications M4712C-BA 47" class (46.9" diagonal) M4212C-BA 42" class (42.0" diagonal) PANEL LCD Panel Type Display Area Aspect Ratio Native Resolution Pixels (H x V x 3) Brightness Contrast Ratio Viewing Angle (H x V) Color Depth Response Time Surface Treatment MTBF VIDEO Max Input Resolution Recommended Resolution H-Scanning Frequency V-Scanning Frequency Pixel Frequency Sync Compatability Video Input Picture mode Color temperature REAR INPUTS Component Video PC Input via 15-Pin Sub "D" Composite Video Input/Output Audio Output Audio Inputs HDTV Formats PC Formats HDMI/DVI...


