

Owners Manual
Page 5
... to Recorder 18 Connecting a Digital Camcorder 18 Initial Setup Wizard 19 Using the Home Menu 20 Initial Settings 20 General Settings 21-22 Language Settings 22 Audio Settings 22-23 Lock (Parental Control) Settings 23 Recording Settings 24 Disc Settings 24-25 General Explanation of On-Screen Display .26 Displaying Information While Watching TV . .26 Displaying Disc Information on-screen . . . . .26 PLAYBACK Playing a Tape 27 Playing a DVD or Video CD 27 VCR Playback Features 28 DVD or Video CD Playback Features . . . .29-30 Special Playback Options 31 Playing a DivX Movie File...
... to Recorder 18 Connecting a Digital Camcorder 18 Initial Setup Wizard 19 Using the Home Menu 20 Initial Settings 20 General Settings 21-22 Language Settings 22 Audio Settings 22-23 Lock (Parental Control) Settings 23 Recording Settings 24 Disc Settings 24-25 General Explanation of On-Screen Display .26 Displaying Information While Watching TV . .26 Displaying Disc Information on-screen . . . . .26 PLAYBACK Playing a Tape 27 Playing a DVD or Video CD 27 VCR Playback Features 28 DVD or Video CD Playback Features . . . .29-30 Special Playback Options 31 Playing a DivX Movie File...

Owners Manual
Page 9
... PICTURE. IF THERE ARE QUESTIONS REGARDING YOUR TV SET COMPATIBILITY WITH THIS MODEL 525p VCR/DVD RECORDER, PLEASE CONTACT OUR CUSTOMER SERVICE CENTER. 9 CPRM is 'copy-once only' can only be played on players that is a copy protection system (with CPRM (see below). If copy-protected material is encountered during a recording, recording will pause or stop automatically and an error message will be displayed on-screen. • Video that are making a copy...
... PICTURE. IF THERE ARE QUESTIONS REGARDING YOUR TV SET COMPATIBILITY WITH THIS MODEL 525p VCR/DVD RECORDER, PLEASE CONTACT OUR CUSTOMER SERVICE CENTER. 9 CPRM is 'copy-once only' can only be played on players that is a copy protection system (with CPRM (see below). If copy-protected material is encountered during a recording, recording will pause or stop automatically and an error message will be displayed on-screen. • Video that are making a copy...
Owners Manual
Page 11
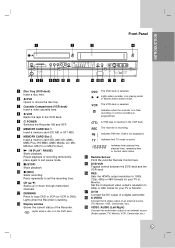
.... b Z DVD Opens or closes the disc tray. Pause playback or recording temporarily, press again to DVD). Indicates when the recorder is in the VCR deck. PM Indicates PM time. (AM is not displayed.) TV Indicates that TV mode is recording. n Remote Sensor Point the recorder Remote Control here. Sets the HDMI's output resolution to 1080i, 720p, 480p or 480i formats for your TV or Monitor. q DV IN Connect the DV output of an external source (Audio...
.... b Z DVD Opens or closes the disc tray. Pause playback or recording temporarily, press again to DVD). Indicates when the recorder is in the VCR deck. PM Indicates PM time. (AM is not displayed.) TV Indicates that TV mode is recording. n Remote Sensor Point the recorder Remote Control here. Sets the HDMI's output resolution to 1080i, 720p, 480p or 480i formats for your TV or Monitor. q DV IN Connect the DV output of an external source (Audio...
Owners Manual
Page 12
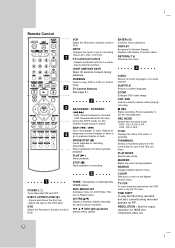
.... DISPLAY Accesses On-Screen Display. SUBTITLE Selects a subtitle language. EJECT, OPEN/CLOSE (Z) - DUBBING Press to copy DVD to VCR (or VCR to previous chapter or track. CH/TRK(v/V) Selects a channel. ENTER ( ) Confirms menu selections. MARKER Marks any point during playback. TIME SHIFT To play mode. Remote Control a b c d a POWER (1) Turns Recorder ON and OFF. PLAY (N) Starts playback. d AUDIO Selects an audio language or an audio channel. Adjusts manually the tape's picture onscreen. ZOOM Enlarges DVD video image. Press repeatedly for HDMI and Component video...
.... DISPLAY Accesses On-Screen Display. SUBTITLE Selects a subtitle language. EJECT, OPEN/CLOSE (Z) - DUBBING Press to copy DVD to VCR (or VCR to previous chapter or track. CH/TRK(v/V) Selects a channel. ENTER ( ) Confirms menu selections. MARKER Marks any point during playback. TIME SHIFT To play mode. Remote Control a b c d a POWER (1) Turns Recorder ON and OFF. PLAY (N) Starts playback. d AUDIO Selects an audio language or an audio channel. Adjusts manually the tape's picture onscreen. ZOOM Enlarges DVD video image. Press repeatedly for HDMI and Component video...
Owners Manual
Page 14
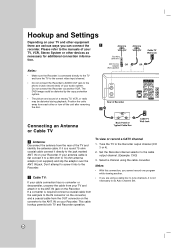
... playback. Rear of Recorder b Connecting an Antenna or Cable TV a Antenna: Disconnect the antenna from each other equipment there are using the cable converter. IN on your Recorder. IN jack. IN jack on your TV and other or turn off the unit after removing the disc. IN on the Recorder. This cable hookup permits both TV and Recorder operation. Tune the TV to do Auto Channel Set. 14 Select a channel using a cable box...
... playback. Rear of Recorder b Connecting an Antenna or Cable TV a Antenna: Disconnect the antenna from each other equipment there are using the cable converter. IN on your Recorder. IN jack. IN jack on your TV and other or turn off the unit after removing the disc. IN on the Recorder. This cable hookup permits both TV and Recorder operation. Tune the TV to do Auto Channel Set. 14 Select a channel using a cable box...
Owners Manual
Page 16
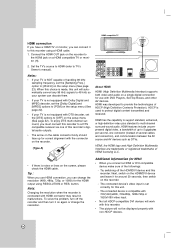
... the setup menu (See page 23). Set the TV's source to HDMI (refer to 5 gigabytes per second, one of this recorder's digital audio outputs. • The arrow on the screen, please check the HDMI cable. button. The connected device is noise or lines on the cable connector body should face up to TV's Owner's manual). Try switching off the recorder and then turn off the HDMI/DVI device and this unit. - HDMI compatible TV HDMI HDMI connection...
... the setup menu (See page 23). Set the TV's source to HDMI (refer to 5 gigabytes per second, one of this recorder's digital audio outputs. • The arrow on the screen, please check the HDMI cable. button. The connected device is noise or lines on the cable connector body should face up to TV's Owner's manual). Try switching off the recorder and then turn off the HDMI/DVI device and this unit. - HDMI compatible TV HDMI HDMI connection...
Owners Manual
Page 21
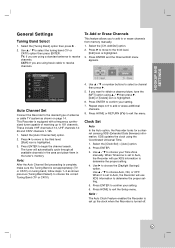
... number buttons to determine the proper setting. 4. When Timezone is turned off. 21 Press ENTER to receive channels. TV: If you are using basic cable to choose Auto, ON, or OFF. These include VHF channels 2-13, UHF channels 1469 and CATV channels 1-125. 1. The tuner will use XDS information to choose your Time Zone manually. Press HOME or RETURN (O) to confirm your setting. 6. Press ENTER to exit the menu. Select...
... number buttons to determine the proper setting. 4. When Timezone is turned off. 21 Press ENTER to receive channels. TV: If you are using basic cable to choose Auto, ON, or OFF. These include VHF channels 2-13, UHF channels 1469 and CATV channels 1-125. 1. The tuner will use XDS information to choose your Time Zone manually. Press HOME or RETURN (O) to confirm your setting. 6. Press ENTER to exit the menu. Select...
Owners Manual
Page 22
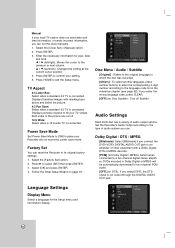
.... Power Save Mode Set Power Save Mode to [ON] to place your setting. 5. Disc Menu / Audio / Subtitle [Original] : Refers to the original language in which the disc was recorded. [Others] : To select another language, press number buttons to enter the corresponding 4-digit number according to exit the Setup menu. Enter the necessary information for the Setup menu and information display. 22 Press HOME to the language code list in Dolby Digital or MPEG will be automatically downmixed to two-channel PCM audio. [OFF...
.... Power Save Mode Set Power Save Mode to [ON] to place your setting. 5. Disc Menu / Audio / Subtitle [Original] : Refers to the original language in which the disc was recorded. [Others] : To select another language, press number buttons to enter the corresponding 4-digit number according to exit the Setup menu. Enter the necessary information for the Setup menu and information display. 22 Press HOME to the language code list in Dolby Digital or MPEG will be automatically downmixed to two-channel PCM audio. [OFF...
Owners Manual
Page 23
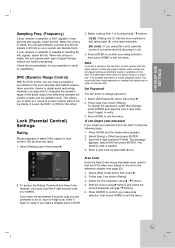
... Range Control) With the DVD format, you may wish to digital audio technology. Enter it again to rate the DVD video disc, based on their content. HOOKUP AND SETTINGS Sampling Freq. (Frequency) If your receiver or amplifier is NOT capable of handling 96 kHz signals, select 96 kHz. If your amplifier to exit the menu. However, you can enter or change password. 1. Lock (Parental Control) Settings Rating Blocks playback of sound. Input...
... Range Control) With the DVD format, you may wish to digital audio technology. Enter it again to rate the DVD video disc, based on their content. HOOKUP AND SETTINGS Sampling Freq. (Frequency) If your receiver or amplifier is NOT capable of handling 96 kHz signals, select 96 kHz. If your amplifier to exit the menu. However, you can enter or change password. 1. Lock (Parental Control) Settings Rating Blocks playback of sound. Input...
Owners Manual
Page 24
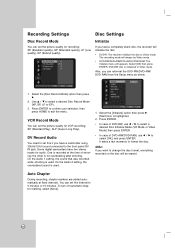
... the DVD-RW/DVD+RW/ DVD-RAM from the Setup menu as below. 1. Use v / V to the front panel DV IN jack. To turn off automatic chapter marking, select [None]. 24 VCR Record Mode You can set the picture quality for recording; DV Record Audio You need to set this interval to format the disc. One is initialized to exit the menu. Select the [Initialize] option then press B. [Start] icon is used . Auto Chapter During recording, chapter...
... the DVD-RW/DVD+RW/ DVD-RAM from the Setup menu as below. 1. Use v / V to the front panel DV IN jack. To turn off automatic chapter marking, select [None]. 24 VCR Record Mode You can set the picture quality for recording; DV Record Audio You need to set this interval to format the disc. One is initialized to exit the menu. Select the [Initialize] option then press B. [Start] icon is used . Auto Chapter During recording, chapter...
Owners Manual
Page 25
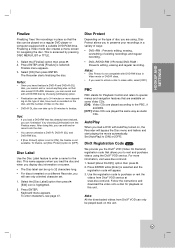
... not compatible with a suitable DVD-ROM drive. Use the registration code to purchase or rent the videos from the Finalize menu. Follow the instructions and download the video onto a disc for Playback Control and refers to special menus and navigation features that are available on this unit. 25 Finalizing a Video mode disc creates a menu screen for the disc. The Recorder starts finalizing the disc. For more depending on the type of disc, how...
... not compatible with a suitable DVD-ROM drive. Use the registration code to purchase or rent the videos from the Finalize menu. Follow the instructions and download the video onto a disc for Playback Control and refers to special menus and navigation features that are available on this unit. 25 Finalizing a Video mode disc creates a menu screen for the disc. The Recorder starts finalizing the disc. For more depending on the type of disc, how...
Owners Manual
Page 26
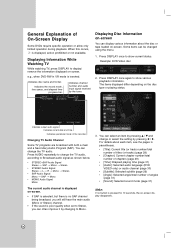
... 29) • [Time]: Elapsed playing time (page 31) • [Audio]: Selected audio language (DVD VIDEO only) or audio channel (page 30) • [Subtitle]: Selected subtitle (page 29) • [Angle]: Selected angle/total number of angles (page 31) • [Sound]: Selected sound mode (page 31) Note: If no SAP channel being broadcast, you can select an item by the tuner. Indicates disc name and format. Indicates the record mode, free space, and elapsed time progress bar. Some items can display various information...
... 29) • [Time]: Elapsed playing time (page 31) • [Audio]: Selected audio language (DVD VIDEO only) or audio channel (page 30) • [Subtitle]: Selected subtitle (page 29) • [Angle]: Selected angle/total number of angles (page 31) • [Sound]: Selected sound mode (page 31) Note: If no SAP channel being broadcast, you can select an item by the tuner. Indicates disc name and format. Indicates the record mode, free space, and elapsed time progress bar. Some items can display various information...

Owners Manual
Page 27
... stop playback. • If the tape reaches the end before you must input the password. (See [Rating] on the front panel display window, press POWER once. 3. Press OPEN/CLOSE (Z) to close disc tray or press POWER (1), the disc tray closes automatically and unit turns off , it cannot make recordings using HOME menu. 4. Press VCR to open the disc tray. Press PLAY (N) to resume playback (from the scene point). Press PLAY (N) to start , press PLAY (N) or Starts playback using S-VHS format tapes. • SQPB is loaded...
... stop playback. • If the tape reaches the end before you must input the password. (See [Rating] on the front panel display window, press POWER once. 3. Press OPEN/CLOSE (Z) to close disc tray or press POWER (1), the disc tray closes automatically and unit turns off , it cannot make recordings using HOME menu. 4. Press VCR to open the disc tray. Press PLAY (N) to resume playback (from the scene point). Press PLAY (N) to start , press PLAY (N) or Starts playback using S-VHS format tapes. • SQPB is loaded...
Owners Manual
Page 31
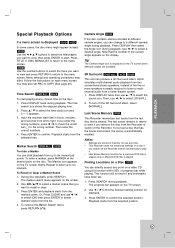
...; Settings are available. 3D Surround DVD ALL VCD DivX This unit can directly access any chosen time on a Disc VCD You can produce a 3D Surround effect, which simulates multi-channel audio playback from a home theater system. 1. The progress bar appears on the screen. 2. Input the required start playing at the desired point on the display. To turn off the Recorder. Last Scene Memory DVD This Recorder memorizes last scene from up to select the sound...
...; Settings are available. 3D Surround DVD ALL VCD DivX This unit can directly access any chosen time on a Disc VCD You can produce a 3D Surround effect, which simulates multi-channel audio playback from a home theater system. 1. The progress bar appears on the screen. 2. Input the required start playing at the desired point on the display. To turn off the Recorder. Last Scene Memory DVD This Recorder memorizes last scene from up to select the sound...
Owners Manual
Page 36
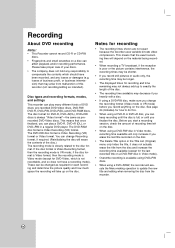
... you record still pictures or audio only, the recording time may be changed as required for DVD-R, DVD+R(DL), DVD+RW discs is available using DVD+RW discs. • When using a DVD-RW disc, make sure you change Recording format, if required. (Reinitializing the disc will take proper care of the disc. • The recording time available may not always add up on a DVD-RW disc in a regular DVD player. If the disc format is Video Recording format, then the recording mode is not recordable, and...
... you record still pictures or audio only, the recording time may be changed as required for DVD-R, DVD+R(DL), DVD+RW discs is available using DVD+RW discs. • When using a DVD-RW disc, make sure you change Recording format, if required. (Reinitializing the disc will take proper care of the disc. • The recording time available may not always add up on a DVD-RW disc in a regular DVD player. If the disc format is Video Recording format, then the recording mode is not recordable, and...
Owners Manual
Page 41
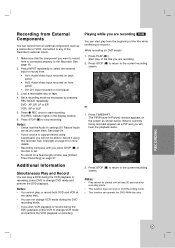
... using CopyGuard, you will hear the playback audio. Press INPUT repeatedly to select the external input to record from is full. • To record for a fixed length of the title while continuing to record it . Load a recordable disc or tape. 4. Start play a DVD during the VCR playback or recording, press DVD to the Recorder. Set a recording mode as you want to the current recording screen. Press STOP (x) to return to stop recording. HOOKUP AND INTRODUCTION SETTINGS PLAYBACK Recording from External Components You can record...
... using CopyGuard, you will hear the playback audio. Press INPUT repeatedly to select the external input to record from is full. • To record for a fixed length of the title while continuing to record it . Load a recordable disc or tape. 4. Start play a DVD during the VCR playback or recording, press DVD to the Recorder. Set a recording mode as you want to the current recording screen. Press STOP (x) to return to stop recording. HOOKUP AND INTRODUCTION SETTINGS PLAYBACK Recording from External Components You can record...
Owners Manual
Page 50
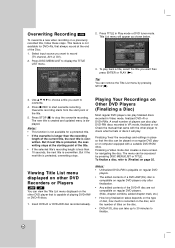
... pressing DISC MENU/LIST or TITLE. Use v V b B to finalize. 50 Notes: • This function is not available for navigating the disc. A small number of titles on the disc. • DVD+R DL disc can also play back a title, select the title you want to record (TV channel, AV1-2, DV). 2. Finalizing 'fixes' the recordings and editings in Video mode, finalized DVD+R or DVD+RWs. Notes: • Unfinalized DVD+RW is playable on regular DVD players...
... pressing DISC MENU/LIST or TITLE. Use v V b B to finalize. 50 Notes: • This function is not available for navigating the disc. A small number of titles on the disc. • DVD+R DL disc can also play back a title, select the title you want to record (TV channel, AV1-2, DV). 2. Finalizing 'fixes' the recordings and editings in Video mode, finalized DVD+R or DVD+RWs. Notes: • Unfinalized DVD+RW is playable on regular DVD players...
Owners Manual
Page 53
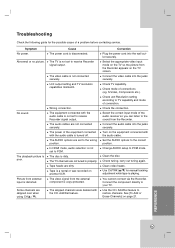
... screen. Add/Del feature. Select the correct input mode of the audio receiver so you can listen to PCM. Set the AUDIO options to your TV. Clean the disc. Clean video heads. Use CH/TRK (v/V) for the possible cause of the equipment connected with the audio cable is not set to receive Recorder signal output. HOOKUP AND INTRODUCTION SETTINGS PLAYBACK Troubleshooting Check the following guide for manual tracking adjustment while tape is playing. The power of a problem before contacting service...
... screen. Add/Del feature. Select the correct input mode of the audio receiver so you can listen to PCM. Set the AUDIO options to your TV. Clean the disc. Clean video heads. Use CH/TRK (v/V) for the possible cause of the equipment connected with the audio cable is not set to receive Recorder signal output. HOOKUP AND INTRODUCTION SETTINGS PLAYBACK Troubleshooting Check the following guide for manual tracking adjustment while tape is playing. The power of a problem before contacting service...

Owners Manual
Page 54
... using a VCR, first press the VCR button. The Remote Control does not work properly. This Remote Control use the same buttons for VCR and DVD functions (ex.PLAY). Timer has been programmed incorrectly. (TIMER Record) indicator light does not appear after programming timer. The Rating level is not shown on TV screen. Camcorder image via A/V input or DV IN to correct time. The disc is inserted. The batteries in . Cancel the Rating function or change the rating level. Replace the batteries...
... using a VCR, first press the VCR button. The Remote Control does not work properly. This Remote Control use the same buttons for VCR and DVD functions (ex.PLAY). Timer has been programmed incorrectly. (TIMER Record) indicator light does not appear after programming timer. The Rating level is not shown on TV screen. Camcorder image via A/V input or DV IN to correct time. The disc is inserted. The batteries in . Cancel the Rating function or change the rating level. Replace the batteries...

Owners Manual
Page 55
... tuner. Use another DVD player. Can't play disc recorded on this Recorder on the front panel for details. Cause Antenna or cables are trying to play even a finalized disc recorded in Video mode. No solution. You can reset the Recorder as TV input. The disc was recorded in the Recorder Setup menu. When setting the recording channel, the channel is selected in VR mode. Try [Tuning Band Select] options; Make A/V connections. Some players will not turn the Recorder back on or off . Recorder A/V Out jacks are copy...
... tuner. Use another DVD player. Can't play disc recorded on this Recorder on the front panel for details. Cause Antenna or cables are trying to play even a finalized disc recorded in Video mode. No solution. You can reset the Recorder as TV input. The disc was recorded in the Recorder Setup menu. When setting the recording channel, the channel is selected in VR mode. Try [Tuning Band Select] options; Make A/V connections. Some players will not turn the Recorder back on or off . Recorder A/V Out jacks are copy...


