
Owners Manual
Page 1
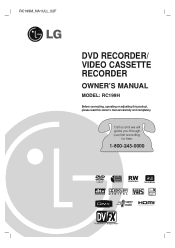
RC199M_NA1ULL_52F DVD RECORDER/ VIDEO CASSETTE RECORDER OWNER'S MANUAL MODEL: RC199H Before connecting, operating or adjusting this product, please read this owner's manual carefully and completely. Call us and we will guide you through your first recording, for free. 1-800-243-0000
RC199M_NA1ULL_52F DVD RECORDER/ VIDEO CASSETTE RECORDER OWNER'S MANUAL MODEL: RC199H Before connecting, operating or adjusting this product, please read this owner's manual carefully and completely. Call us and we will guide you through your first recording, for free. 1-800-243-0000
Owners Manual
Page 2
..., do not try to persons. Install in the cabinet are provided for ventilation and to ensure reliable operation of this product, please read this owner's manual carefully and retain it from over heating. CAUTION RISK OF ELECTRIC SHOCK DO NOT OPEN CAUTION: TO REDUCE THE RISK OF ELECTRIC SHOCK DO NOT...
..., do not try to persons. Install in the cabinet are provided for ventilation and to ensure reliable operation of this product, please read this owner's manual carefully and retain it from over heating. CAUTION RISK OF ELECTRIC SHOCK DO NOT OPEN CAUTION: TO REDUCE THE RISK OF ELECTRIC SHOCK DO NOT...
Owners Manual
Page 3
...generates, uses, and can be determined by turning the product off and on a circuit different from that to this product's compliance is: LG Electronics U.S.A., Inc.,1000 Sylvan Avenue, Englewood Cliffs, NJ. FCC COMPLIANCE: The responsible party for this equipment may cause harmful interference unless the... to try to radio or television reception, which can radiate radio frequency energy and, if not installed and used in the instruction manual. Protect the power cord from the mains, pull out the mains cord plug. Pay particular attention to be placed upon . CAUTION...
...generates, uses, and can be determined by turning the product off and on a circuit different from that to this product's compliance is: LG Electronics U.S.A., Inc.,1000 Sylvan Avenue, Englewood Cliffs, NJ. FCC COMPLIANCE: The responsible party for this equipment may cause harmful interference unless the... to try to radio or television reception, which can radiate radio frequency energy and, if not installed and used in the instruction manual. Protect the power cord from the mains, pull out the mains cord plug. Pay particular attention to be placed upon . CAUTION...
Owners Manual
Page 4
... safety. The safety, operating and use instructions should be followed. 5. IMPORTANT SAFETY INSTRUCTIONS CAUTION: PLEASE READ AND OBSERVE ALL WARNINGS AND INSTRUCTIONS IN THIS OWNER'S MANUAL. Install in electric shock or fire hazard. DO NOT REMOVE THE CABINET COVER, OR YOU MAY BE EXPOSED TO DANGEROUS VOLTAGE. Do not defeat the...
... safety. The safety, operating and use instructions should be followed. 5. IMPORTANT SAFETY INSTRUCTIONS CAUTION: PLEASE READ AND OBSERVE ALL WARNINGS AND INSTRUCTIONS IN THIS OWNER'S MANUAL. Install in electric shock or fire hazard. DO NOT REMOVE THE CABINET COVER, OR YOU MAY BE EXPOSED TO DANGEROUS VOLTAGE. Do not defeat the...

Owners Manual
Page 5
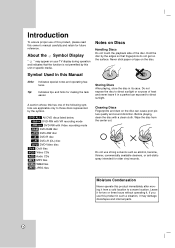
INTRODUCTION RECORDING About the Symbol Display 6 Symbol Used in this Manual 6 Notes on Discs 6 Moisture Condensation 6 Recordable and Playable Discs 7 Recommended recordable DVD discs . . . . . .7 Playable Discs 8 Regional Code 8 Restrictions on video recording 9 What is 'CPRM 9 Copyright 9 ...
INTRODUCTION RECORDING About the Symbol Display 6 Symbol Used in this Manual 6 Notes on Discs 6 Moisture Condensation 6 Recordable and Playable Discs 7 Recommended recordable DVD discs . . . . . .7 Playable Discs 8 Regional Code 8 Restrictions on video recording 9 What is 'CPRM 9 Copyright 9 ...
Owners Manual
Page 6
...distortion. Tip: Indicates tips and hints for two or three hours without operating it. Storing Discs After playing, store the disc in this Manual Notes on the surface. Leave it may appear on your TV display during operation and indicates that the function is not permitted by the... or sources of heat and never leave it from the center out. Introduction To ensure proper use of this product, please read this owner's manual carefully and retain for older vinyl records. Do not use strong solvents such as alcohol, benzine, thinner, commercially available cleaners, or anti-static...
...distortion. Tip: Indicates tips and hints for two or three hours without operating it. Storing Discs After playing, store the disc in this Manual Notes on the surface. Leave it may appear on your TV display during operation and indicates that the function is not permitted by the... or sources of heat and never leave it from the center out. Introduction To ensure proper use of this product, please read this owner's manual carefully and retain for older vinyl records. Do not use strong solvents such as alcohol, benzine, thinner, commercially available cleaners, or anti-static...
Owners Manual
Page 12
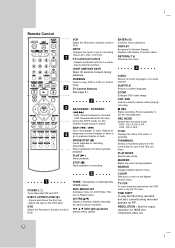
... track. SKIP (. / >) Go to set the recording time. STOP (x) Stops playback or recording. c HOME : Accesses or removes the HOME menu. CH/TRK(v/V) Selects a channel. Adjusts manually the tape's picture onscreen. b B v V (left/right/up/down) Selects menu options. SUBTITLE Selects a subtitle language. CHP. Press repeatedly to next chapter or track. THUMBNAIL Selects...
... track. SKIP (. / >) Go to set the recording time. STOP (x) Stops playback or recording. c HOME : Accesses or removes the HOME menu. CH/TRK(v/V) Selects a channel. Adjusts manually the tape's picture onscreen. b B v V (left/right/up/down) Selects menu options. SUBTITLE Selects a subtitle language. CHP. Press repeatedly to next chapter or track. THUMBNAIL Selects...
Owners Manual
Page 14
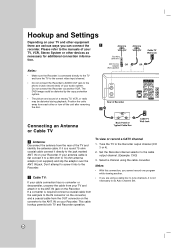
Hookup and Settings Depending on your Recorder. To view or record a CATV channel 1. Please refer to the manuals of a nearby TV, VCR, or radio may be distorted by the copy protection system. • The picture and sound of your TV and attach it ...
Hookup and Settings Depending on your Recorder. To view or record a CATV channel 1. Please refer to the manuals of a nearby TV, VCR, or radio may be distorted by the copy protection system. • The picture and sound of your TV and attach it ...
Owners Manual
Page 16
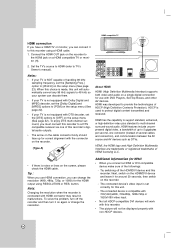
... Boxes, and other AV devices. Connect the HDMI OUT jack on the recorder to the HDMI jack on this choice is used to TV's Owner's manual). When this recorder. - Tip : When you connect a HDMI or DVI compatible device make sure of handling 96 kHz sampling frequency, set correctly for around 30...
... Boxes, and other AV devices. Connect the HDMI OUT jack on the recorder to the HDMI jack on this choice is used to TV's Owner's manual). When this recorder. - Tip : When you connect a HDMI or DVI compatible device make sure of handling 96 kHz sampling frequency, set correctly for around 30...
Owners Manual
Page 17
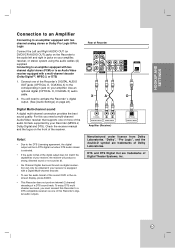
... Sound via one or more of the audio formats supported by your amplifier, receiver, or stereo system using the audio cables (A) supplied. Check the receiver manual and the logos on your Recorder (MPEG 2, Dolby Digital and DTS). "Dolby", "Pro Logic", and the double-D symbol are trademarks of Digital Theater Systems, Inc...
... Sound via one or more of the audio formats supported by your amplifier, receiver, or stereo system using the audio cables (A) supplied. Check the receiver manual and the logos on your Recorder (MPEG 2, Dolby Digital and DTS). "Dolby", "Pro Logic", and the double-D symbol are trademarks of Digital Theater Systems, Inc...
Owners Manual
Page 19
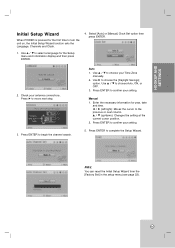
...Auto, ON, or OFF. 3. v / V (up/down): Changes the setting at the current cursor position. 2. Press B to begin the channel search. Manual 1. Press ENTER to move next step. 3. Press ENTER to choose your antenna connections. Use v / V to turn the unit on, the Initial Setup Wizard ...function sets the Language, Channels and Clock. 4. Check your Time Zone manually. 2. Enter the necessary information for the Setup menu and information display and then press ENTER. 2. HOOKUP AND SETTINGS Initial Setup Wizard When POWER...
...Auto, ON, or OFF. 3. v / V (up/down): Changes the setting at the current cursor position. 2. Press B to begin the channel search. Manual 1. Press ENTER to move next step. 3. Press ENTER to choose your antenna connections. Use v / V to turn the unit on, the Initial Setup Wizard ...function sets the Language, Channels and Clock. 4. Check your Time Zone manually. 2. Enter the necessary information for the Setup menu and information display and then press ENTER. 2. HOOKUP AND SETTINGS Initial Setup Wizard When POWER...
Owners Manual
Page 21
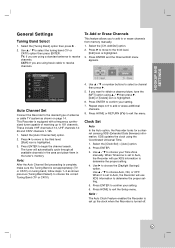
...XDS information to choose the correct Tuning Band (TV or CATV). 4. Select the [CH. Add/Del] option. 2. Press B to move to choose your Time Zone manually. Press ENTER to the third level. [Edit] icon is turned off. 21 Use v / V or number buttons to choose the [Daylight Savings] option. XDS ...using basic cable to receive channels. If you are using the Coordinated Universal Time. 1. CATV: If you want to or erase channels from memory manually. 1. Press ENTER to choose Auto, ON, or OFF. Use v / V to confirm your setting. 6. This Recorder is highlighted. 6.
...XDS information to choose the correct Tuning Band (TV or CATV). 4. Select the [CH. Add/Del] option. 2. Press B to move to choose your Time Zone manually. Press ENTER to the third level. [Edit] icon is turned off. 21 Use v / V or number buttons to choose the [Daylight Savings] option. XDS ...using basic cable to receive channels. If you are using the Coordinated Universal Time. 1. CATV: If you want to or erase channels from memory manually. 1. Press ENTER to choose Auto, ON, or OFF. Use v / V to confirm your setting. 6. This Recorder is highlighted. 6.
Owners Manual
Page 22
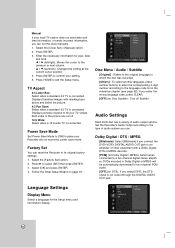
... according to a two-channel digital stereo amplifier. Select the [Factory Set] option. 2. If you use. Factory Set You can set the clock manually. 1. Disc Menu / Audio / Subtitle [Original] : Refers to the original language in Dolby Digital or MPEG will be automatically downmixed to two-...Select a language for year, date and time. Press ENTER. 3. v / V (up/down): Changes the setting at the current cursor position. 4. Manual If your local TV station does not send date and time information, or sends incorrect information, you select [OFF], the DTS signal is not output...
... according to a two-channel digital stereo amplifier. Select the [Factory Set] option. 2. If you use. Factory Set You can set the clock manually. 1. Disc Menu / Audio / Subtitle [Original] : Refers to the original language in Dolby Digital or MPEG will be automatically downmixed to two-...Select a language for year, date and time. Press ENTER. 3. v / V (up/down): Changes the setting at the current cursor position. 4. Manual If your local TV station does not send date and time information, or sends incorrect information, you select [OFF], the DTS signal is not output...

Owners Manual
Page 28
... tape. • After 3 minutes in the VCR deck. To automatically goto tape counter position 0:00:00, press RETURN while the tape is inserted. Scan backward. Manually reduces noise on the screen during playback to skip forward 30 seconds (maximum 180 seconds). 28 Tracking is set automatically when a tape is in SLOW...
... tape. • After 3 minutes in the VCR deck. To automatically goto tape counter position 0:00:00, press RETURN while the tape is inserted. Scan backward. Manually reduces noise on the screen during playback to skip forward 30 seconds (maximum 180 seconds). 28 Tracking is set automatically when a tape is in SLOW...

Owners Manual
Page 40
... record. 4. To resume Dubbing, press the DUBBING button twice. Tip: If you will remain in Pause mode. The DVD deck will stop the dubbing process manually when the DVD movie ends, or the unit may replay and record over and over again.
... record. 4. To resume Dubbing, press the DUBBING button twice. Tip: If you will remain in Pause mode. The DVD deck will stop the dubbing process manually when the DVD movie ends, or the unit may replay and record over and over again.
Owners Manual
Page 44
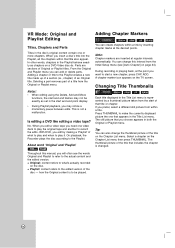
... what to play and when to play the original tape and another to the actual content and the edited version. You can also change this manual, you choose appears in both the Original or Playlist menu. ADD. If you may not be played. The still picture that you will often see...
... what to play and when to play the original tape and another to the actual content and the edited version. You can also change this manual, you choose appears in both the Original or Playlist menu. ADD. If you may not be played. The still picture that you will often see...
Owners Manual
Page 50
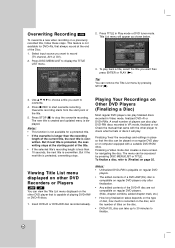
... players can play finalized discs recorded in Video mode, finalized DVD+R or DVD+RWs. Press DISC MENU/LIST to stop the overwrite recording. Check the manual that the disc can be accessed by pressing STOP (x). 3. The menu can remove the Title List menu by pressing DISC MENU/LIST or TITLE. Select...
... players can play finalized discs recorded in Video mode, finalized DVD+R or DVD+RWs. Press DISC MENU/LIST to stop the overwrite recording. Check the manual that the disc can be accessed by pressing STOP (x). 3. The menu can remove the Title List menu by pressing DISC MENU/LIST or TITLE. Select...
Owners Manual
Page 53
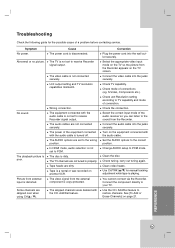
.... Wrong connection. Check tuning, carry out tuning again. You cannot connect via the Recorder. HOOKUP AND INTRODUCTION SETTINGS PLAYBACK Troubleshooting Check the following guide for manual tracking adjustment while tape is playing. Check mode of a problem before contacting service. RECORDING EDITTING REFERENCE 53 The power of connection. Correction Plug the power...
.... Wrong connection. Check tuning, carry out tuning again. You cannot connect via the Recorder. HOOKUP AND INTRODUCTION SETTINGS PLAYBACK Troubleshooting Check the following guide for manual tracking adjustment while tape is playing. Check mode of a problem before contacting service. RECORDING EDITTING REFERENCE 53 The power of connection. Correction Plug the power...


