
Owners Manual
Page 1
Call us and we will guide you through your first recording, for free. 1-800-243-0000 RC199M_NA1ULL_52F DVD RECORDER/ VIDEO CASSETTE RECORDER OWNER'S MANUAL MODEL: RC199H Before connecting, operating or adjusting this product, please read this owner's manual carefully and completely.
Call us and we will guide you through your first recording, for free. 1-800-243-0000 RC199M_NA1ULL_52F DVD RECORDER/ VIDEO CASSETTE RECORDER OWNER'S MANUAL MODEL: RC199H Before connecting, operating or adjusting this product, please read this owner's manual carefully and completely.

Owners Manual
Page 5
...TV . . . . . .14 Connections to your TV 15-16 Connection to an Amplifier 17 Accessory Audio/Video (A/V) Connections to Recorder 18 Connecting a Digital Camcorder 18 Initial Setup Wizard 19 Using the Home Menu 20 Initial Settings 20 General Settings 21-22 Language Settings 22... Audio Settings 22-23 Lock (Parental Control) Settings 23 Recording Settings 24 Disc Settings 24-25 General Explanation of On-Screen Display .26 Displaying Information While Watching TV . .26 Displaying Disc Information on...
...TV . . . . . .14 Connections to your TV 15-16 Connection to an Amplifier 17 Accessory Audio/Video (A/V) Connections to Recorder 18 Connecting a Digital Camcorder 18 Initial Setup Wizard 19 Using the Home Menu 20 Initial Settings 20 General Settings 21-22 Language Settings 22... Audio Settings 22-23 Lock (Parental Control) Settings 23 Recording Settings 24 Disc Settings 24-25 General Explanation of On-Screen Display .26 Displaying Information While Watching TV . .26 Displaying Disc Information on...
Owners Manual
Page 6
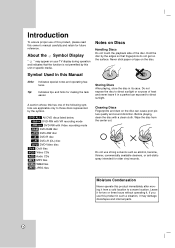
... to those discs represented by this unit or specific media. Moisture Condensation Never operate this owner's manual carefully and retain for older vinyl records. Never stick paper or tape on Discs Handling Discs Do not touch the playback side of this product, please read this product immediately ... special notes and operating features. About the Symbol Display " " may damage discs/tapes and internal parts. 6 Before playing, clean the disc with Video recording mode RAM DVD-RAM disc +RW DVD+RW disc -R DVD-R disc +R DVD+R (DL) disc DVD DVD-Video disc DivX DivX files VCD Video ...
... to those discs represented by this unit or specific media. Moisture Condensation Never operate this owner's manual carefully and retain for older vinyl records. Never stick paper or tape on Discs Handling Discs Do not touch the playback side of this product, please read this product immediately ... special notes and operating features. About the Symbol Display " " may damage discs/tapes and internal parts. 6 Before playing, clean the disc with Video recording mode RAM DVD-RAM disc +RW DVD+RW disc -R DVD-R disc +R DVD+R (DL) disc DVD DVD-Video disc DivX DivX files VCD Video ...
Owners Manual
Page 7
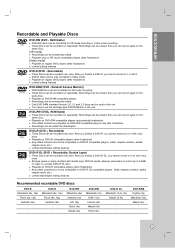
...edited contents are not be only formatted to 8.5GB of video on the same Disc. After you finalize a DVD-R, you cannot record on regular DVD players (after finalization) Limited editing features DVD-RAM (DVD - Playable on regular DVD players (after finalization) ... (DVD - DVD+RW (DVD+ ReWritable) These Discs can record again on a single DVD+R DL disc. RECORDING EDITTING REFERENCE 7 These Discs can be recorded on repeatedly. Recordings can be extensively edited. Recordings can be recorded on repeatedly. You cannot use the cartridge-type DVD-RAM disc ...
...edited contents are not be only formatted to 8.5GB of video on the same Disc. After you finalize a DVD-R, you cannot record on regular DVD players (after finalization) Limited editing features DVD-RAM (DVD - Playable on regular DVD players (after finalization) ... (DVD - DVD+RW (DVD+ ReWritable) These Discs can record again on a single DVD+R DL disc. RECORDING EDITTING REFERENCE 7 These Discs can be recorded on repeatedly. Recordings can be extensively edited. Recordings can be recorded on repeatedly. You cannot use the cartridge-type DVD-RAM disc ...

Owners Manual
Page 8
...discs cannot be sought from the copyright owner. This number must match your unit's regional code or the disc cannot play. • If you record a disc using a personal computer, even if it is required in order to download MP3 / WMA files and music from the Internet. Doing so...has a regional code printed on Regional Codes • Most DVD discs have a globe with one or more detailed information.) • This recorder requires discs and recordings to meet certain technical standards in order to grant such permission. Notes on the rear of a disc. • Do not use irregularly ...
...discs cannot be sought from the copyright owner. This number must match your unit's regional code or the disc cannot play. • If you record a disc using a personal computer, even if it is required in order to download MP3 / WMA files and music from the Internet. Doing so...has a regional code printed on Regional Codes • Most DVD discs have a globe with one or more detailed information.) • This recorder requires discs and recordings to meet certain technical standards in order to grant such permission. Notes on the rear of a disc. • Do not use irregularly ...

Owners Manual
Page 9
...CPRM is a copy protection system (with CPRM (see below). patents and other intellectual property rights owned by method claims of those recordings. What is prohibited. Reverse engineering or disassembly is 'CPRM'? Copy-protected video includes DVD-Video discs and some satellite broadcasts. If ...copy-protected material is CPRM compatible, which you cannot then make a copy of certain U.S. This Recorder is encountered during a recording, recording will pause or stop automatically and an error message will be made on DVD-RW discs formatted in which means ...
...CPRM is a copy protection system (with CPRM (see below). patents and other intellectual property rights owned by method claims of those recordings. What is prohibited. Reverse engineering or disassembly is 'CPRM'? Copy-protected video includes DVD-Video discs and some satellite broadcasts. If ...copy-protected material is CPRM compatible, which you cannot then make a copy of certain U.S. This Recorder is encountered during a recording, recording will pause or stop automatically and an error message will be made on DVD-RW discs formatted in which means ...
Owners Manual
Page 10
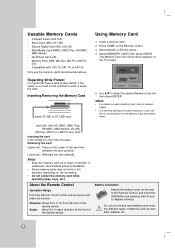
..., MMC, MMC Plus, RS MMC, MMC Mobile, xD, MS, MS Duo, MS Pro or MS Pro Duo card Inserting the card Insert straight-in this recorder, depending on the formatting. • Do not extract the memory card while operating (play, copy, etc.). Notes: • For details on the Memory Card slot...
..., MMC, MMC Plus, RS MMC, MMC Mobile, xD, MS, MS Duo, MS Pro or MS Pro Duo card Inserting the card Insert straight-in this recorder, depending on the formatting. • Do not extract the memory card while operating (play, copy, etc.). Notes: • For details on the Memory Card slot...
Owners Manual
Page 11
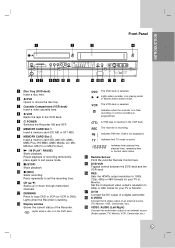
...total playing time, elapsed time, remaining time or current deck status. Sets the HDMI's output resolution to set the recording time. h N / X (PLAY / PAUSE) Starts playback. j z (REC) Starts recording. m Display window Shows the current status of an external source (Audio system, TV/ Monitor, VCR, Camcorder, ... digital camcorder. INTRODUCTION a b c Front Panel d e fg hij k l m n op q r s a Disc Tray (DVD deck) Insert a disc here. e 1 POWER Switches the Recorder ON and OFF. l DUBBING Press to copy DVD to VCR (or VCR to exit pause mode. PM Indicates PM time. (AM is not displayed.) TV...
...total playing time, elapsed time, remaining time or current deck status. Sets the HDMI's output resolution to set the recording time. h N / X (PLAY / PAUSE) Starts playback. j z (REC) Starts recording. m Display window Shows the current status of an external source (Audio system, TV/ Monitor, VCR, Camcorder, ... digital camcorder. INTRODUCTION a b c Front Panel d e fg hij k l m n op q r s a Disc Tray (DVD deck) Insert a disc here. e 1 POWER Switches the Recorder ON and OFF. l DUBBING Press to copy DVD to VCR (or VCR to exit pause mode. PM Indicates PM time. (AM is not displayed.) TV...
Owners Manual
Page 12
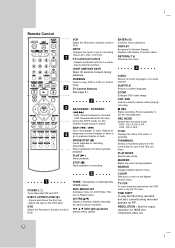
... during playback. TV Control Buttons See page 51. Displays information of current chapter or track or go to DVD. DVD Select the Recorder's function mode to previous chapter or track. DUBBING Press to copy DVD to VCR (or VCR to next chapter or track. TITLE...the Marker Search menu. Adjusts manually the tape's picture onscreen. SUBTITLE Selects a subtitle language. ADD Inserts a chapter marker when playing/ recording. z REC Starts recording. THUMBNAIL Selects a thumbnail picture for the current title for use for HDMI and Component video out. 12 PLAY MODE Selects play the ...
... during playback. TV Control Buttons See page 51. Displays information of current chapter or track or go to DVD. DVD Select the Recorder's function mode to previous chapter or track. DUBBING Press to copy DVD to VCR (or VCR to next chapter or track. TITLE...the Marker Search menu. Adjusts manually the tape's picture onscreen. SUBTITLE Selects a subtitle language. ADD Inserts a chapter marker when playing/ recording. z REC Starts recording. THUMBNAIL Selects a thumbnail picture for the current title for use for HDMI and Component video out. 12 PLAY MODE Selects play the ...
Owners Manual
Page 14
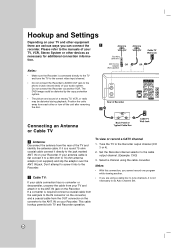
... cable connection has no converter or descrambler, unscrew the cable from the OUT connector on the converter to the ANT. Tune the TV to the Recorder. Position the units away from the rear of the TV and identify the antenna cable. If your TV and attach it to the ANT. Don... directly to the cable output channel. (Example: CH3) 3. The DVD image could be distorted by the copy protection system. • The picture and sound of Recorder b Connecting an Antenna or Cable TV a Antenna: Disconnect the antenna from each other or turn off the unit after removing the disc. IN jack on...
... cable connection has no converter or descrambler, unscrew the cable from the OUT connector on the converter to the ANT. Tune the TV to the Recorder. Position the units away from the rear of the TV and identify the antenna cable. If your TV and attach it to the ANT. Don... directly to the cable output channel. (Example: CH3) 3. The DVD image could be distorted by the copy protection system. • The picture and sound of Recorder b Connecting an Antenna or Cable TV a Antenna: Disconnect the antenna from each other or turn off the unit after removing the disc. IN jack on...
Owners Manual
Page 15
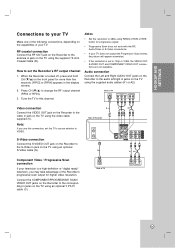
...Video / Progressive Scan connection If your television is a high-definition or "digital ready" television, you use this channel. S Rear of Recorder R Rear of the Recorder's progressive scan output for higher video resolution. Rear of TV S-VIDEO INPUT COMPONENT/PROGRESSIVE SCAN VIDEO INPUT AUDIO INPUT Pr Pb Y R ...L Video connection Connect the VIDEO OUT jack on the Recorder to the video in jack on the front panel for progressive signal. • Progressive Scan does not work with the RF, Audio/...
...Video / Progressive Scan connection If your television is a high-definition or "digital ready" television, you use this channel. S Rear of Recorder R Rear of the Recorder's progressive scan output for higher video resolution. Rear of TV S-VIDEO INPUT COMPONENT/PROGRESSIVE SCAN VIDEO INPUT AUDIO INPUT Pr Pb Y R ...L Video connection Connect the VIDEO OUT jack on the Recorder to the video in jack on the front panel for progressive signal. • Progressive Scan does not work with the RF, Audio/...
Owners Manual
Page 16
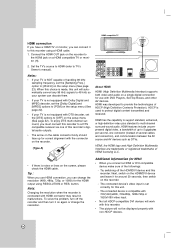
...page 22). • If your TV is used to [OFF] on the setup menu (See page 22). Note: Changing the resolution when the recorder is set the [DTS] options to protect digital content transmitted and received. To solve the problem, turn it on again or change the resolution ... plus standard to multi-channel surround-sound audio, HDMI features include uncompressed digital video, a bandwidth of up to provide the technologies of this recorder's digital audio outputs. • The arrow on the cable connector body should face up for correct alignment with DTS decoder, set correctly for...
...page 22). • If your TV is used to [OFF] on the setup menu (See page 22). Note: Changing the resolution when the recorder is set the [DTS] options to protect digital content transmitted and received. To solve the problem, turn it on again or change the resolution ... plus standard to multi-channel surround-sound audio, HDMI features include uncompressed digital video, a bandwidth of up to provide the technologies of this recorder's digital audio outputs. • The arrow on the cable connector body should face up for correct alignment with DTS decoder, set correctly for...
Owners Manual
Page 17
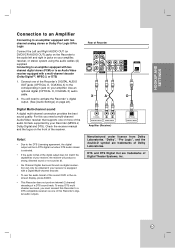
...strong, distorted sound or no sound at all. • Six Channel Digital Surround Sound via one of a DTS sound track. For this Recorder's digital audio outputs. "Dolby", "Pro Logic", and the double-D symbol are trademarks of Dolby Laboratories. Connecting to an amplifier equipped with...not match the capabilities of your receiver, the receiver will need a multi-channel Audio/Video receiver that supports one or more of Recorder X A O COAXIAL DIGITAL INPUT L R AUDIO INPUT Amplifier (Receiver) OPTICAL DIGITAL INPUT Manufactured under license from Dolby Laboratories. Rear of...
...strong, distorted sound or no sound at all. • Six Channel Digital Surround Sound via one of a DTS sound track. For this Recorder's digital audio outputs. "Dolby", "Pro Logic", and the double-D symbol are trademarks of Dolby Laboratories. Connecting to an amplifier equipped with...not match the capabilities of your receiver, the receiver will need a multi-channel Audio/Video receiver that supports one or more of Recorder X A O COAXIAL DIGITAL INPUT L R AUDIO INPUT Amplifier (Receiver) OPTICAL DIGITAL INPUT Manufactured under license from Dolby Laboratories. Rear of...
Owners Manual
Page 18
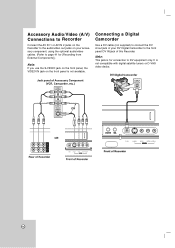
It is not available. DV IN/OUT 18 Note: This jack is for [Recording from External Components].) Note: If you use the S-VIDEO jack on the front panel, the VIDEO IN jack on your DV Digital Camcorder to the .../video cables. (Refer to page 41 for connection to connect the DV in/out jack of this Recorder. Accessory Audio/Video (A/V) Connections to Recorder Connect the AV IN 1 or AV IN 2 jacks on the Recorder to the audio/video out jacks on the front panel is not compatible with digital satellite tuners or...
It is not available. DV IN/OUT 18 Note: This jack is for [Recording from External Components].) Note: If you use the S-VIDEO jack on the front panel, the VIDEO IN jack on your DV Digital Camcorder to the .../video cables. (Refer to page 41 for connection to connect the DV in/out jack of this Recorder. Accessory Audio/Video (A/V) Connections to Recorder Connect the AV IN 1 or AV IN 2 jacks on the Recorder to the audio/video out jacks on the front panel is not compatible with digital satellite tuners or...
Owners Manual
Page 20
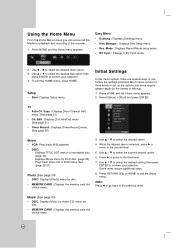
...the desired option. 4. Music (See page 33) • DISC: Displays Music (or Audio CD) menu for DivX disc. (page 32) - Mode : Displays Record Mode setup menu. • DV Input : Change to customize the settings provided. Initial Settings In this menu system, there are several ways to DV Input... menu for disc. • MEMORY CARD : Displays the memory card slot choice menu. 20 Add/Del] menu. (See page 21) • Timer Record : Displays [Timer Record] menu. (See page 38) Movie • VCR: Plays back VHS cassette. • DISC: - Photo (See page 34) • DISC: ...
...the desired option. 4. Music (See page 33) • DISC: Displays Music (or Audio CD) menu for DivX disc. (page 32) - Mode : Displays Record Mode setup menu. • DV Input : Change to customize the settings provided. Initial Settings In this menu system, there are several ways to DV Input... menu for disc. • MEMORY CARD : Displays the memory card slot choice menu. 20 Add/Del] menu. (See page 21) • Timer Record : Displays [Timer Record] menu. (See page 38) Movie • VCR: Plays back VHS cassette. • DISC: - Photo (See page 34) • DISC: ...
Owners Manual
Page 21
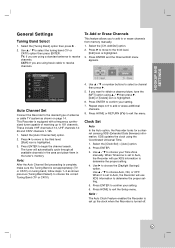
...Universal Time. 1. Repeat steps 4-6 to select the tuning band (TV or CATV) option then press ENTER. Add/Del] option. 2. This Recorder is highlighted. 6. Note: After the Auto Channel Set proceeding is complete, make sure the Tuning Band is set up to determine the proper setting... erase additional channels. 8. TV: If you want to obtain a clearer picture, tune the [MFT] option using a standard antenna to Auto, the Recorder will automatically cycle through all available channels in the area and place them in the tuner's memory. Press B to move to choose your setting. 6....
...Universal Time. 1. Repeat steps 4-6 to select the tuning band (TV or CATV) option then press ENTER. Add/Del] option. 2. This Recorder is highlighted. 6. Note: After the Auto Channel Set proceeding is complete, make sure the Tuning Band is set up to determine the proper setting... erase additional channels. 8. TV: If you want to obtain a clearer picture, tune the [MFT] option using a standard antenna to Auto, the Recorder will automatically cycle through all available channels in the area and place them in the tuner's memory. Press B to move to choose your setting. 6....
Owners Manual
Page 22
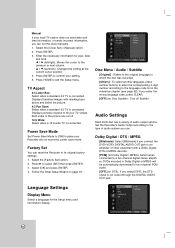
.... 1. Select the [Factory Set] option. 2. Disc Menu / Audio / Subtitle [Original] : Refers to the original language in which the disc was recorded. [Others] : To select another language, press number buttons to enter the corresponding 4-digit number according to its original factory settings. 1. Dolby Digital / DTS...Clock Set] > [Manual] option. 2. v / V (up/down): Changes the setting at the current cursor position. 4. Press B to fill your Recorder into an economic power save mode. Press ENTER to exit the Setup menu. Press HOME to confirm your local TV station does not send date...
.... 1. Select the [Factory Set] option. 2. Disc Menu / Audio / Subtitle [Original] : Refers to the original language in which the disc was recorded. [Others] : To select another language, press number buttons to enter the corresponding 4-digit number according to its original factory settings. 1. Dolby Digital / DTS...Clock Set] > [Manual] option. 2. v / V (up/down): Changes the setting at the current cursor position. 4. Press B to fill your Recorder into an economic power save mode. Press ENTER to exit the Setup menu. Press HOME to confirm your local TV station does not send date...
Owners Manual
Page 23
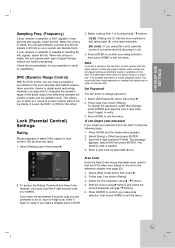
...] and press ENTER. 3. To access the Rating, Password and Area Code features, you must have not yet entered a security code you set a rating for the recorder, all discs are played. Press ENTER to confirm your amplifier to do so. Lock (Parental Control) Settings Rating Blocks playback of sound. Higher rated scenes...
...] and press ENTER. 3. To access the Rating, Password and Area Code features, you must have not yet entered a security code you set a rating for the recorder, all discs are played. Press ENTER to confirm your amplifier to do so. Lock (Parental Control) Settings Rating Blocks playback of sound. Higher rated scenes...
Owners Manual
Page 24
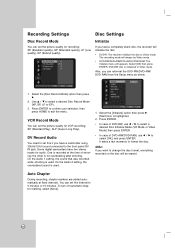
... the disc will be Video mode. • DVD-RW/DVD+RW/DVD+R(DL)/DVD-RAM: The Initialize menu will initialize the disc. • DVD-R: The recorder initialize the disc to format the disc. To turn off automatic chapter marking, select [None]. 24 XP (Excellent quality), SP (Standard quality), LP (Low quality... reformat the DVD-RW/DVD+RW/ DVD-RAM from the Setup menu as below. 1. Also, you have two stereo tracks for overdubbing after shooting. DV Record Audio You need to set this if you can set this interval to select a desired Disc Initialize Mode (VR Mode or Video Mode) then press...
... the disc will be Video mode. • DVD-RW/DVD+RW/DVD+R(DL)/DVD-RAM: The Initialize menu will initialize the disc. • DVD-R: The recorder initialize the disc to format the disc. To turn off automatic chapter marking, select [None]. 24 XP (Excellent quality), SP (Standard quality), LP (Low quality... reformat the DVD-RW/DVD+RW/ DVD-RAM from the Setup menu as below. 1. Also, you have two stereo tracks for overdubbing after shooting. DV Record Audio You need to set this if you can set this interval to select a desired Disc Initialize Mode (VR Mode or Video Mode) then press...
Owners Manual
Page 25
...allows you load a DVD with a suitable DVD-ROM drive. Select the [Finalize] option then press B. 2. Select [OK] then press ENTER. The Recorder starts finalizing the disc. After doing this, you can edit and rerecord onto the disc. • You cannot unfinalize a DVD-R, DVD+R (DL) ... see page 47. Press ENTER while [Finalize] is highlighted. 2. Finalize menu appears. 3. Keyboard menu appears. Disc Protect Depending on a different Recorder, you are played the same way as Audio CDs. Press ENTER while [Enter] is accessed by choosing [Unfinalize] option. • Finalization can...
...allows you load a DVD with a suitable DVD-ROM drive. Select the [Finalize] option then press B. 2. Select [OK] then press ENTER. The Recorder starts finalizing the disc. After doing this, you can edit and rerecord onto the disc. • You cannot unfinalize a DVD-R, DVD+R (DL) ... see page 47. Press ENTER while [Finalize] is highlighted. 2. Finalize menu appears. 3. Keyboard menu appears. Disc Protect Depending on a different Recorder, you are played the same way as Audio CDs. Press ENTER while [Enter] is accessed by choosing [Unfinalize] option. • Finalization can...
