User Guide
Page 5
... rated lamp life. SAVE THIS USER'S GUIDE FOR FUTURE REFERENCE . Never replace the lamp assembly or any electronic components unless the projector is subsequently used. 5. Read this appliance. INTRODUCTION Caution TO PREVENT SHOCK, DO NOT OPEN THE CABINET. NO USER -SERVICEABLE PARTS INSIDE. The normal operation procedures are to turn the power button off, and, after a 90-second cooling process, turn the Main Power Switch off the Main Power Switch. REFER SERVICING...
... rated lamp life. SAVE THIS USER'S GUIDE FOR FUTURE REFERENCE . Never replace the lamp assembly or any electronic components unless the projector is subsequently used. 5. Read this appliance. INTRODUCTION Caution TO PREVENT SHOCK, DO NOT OPEN THE CABINET. NO USER -SERVICEABLE PARTS INSIDE. The normal operation procedures are to turn the power button off, and, after a 90-second cooling process, turn the Main Power Switch off the Main Power Switch. REFER SERVICING...
User Guide
Page 6
... not look straight at the projector lens during operation. This projector is designed to operate safely within a bandwidth of 100 to radio or television reception, which the receiver is connected. - EEC STATEMENT This machine was tested against the 89/336/EEC (European Economic Community) for help. Caution • Always open the lens shutter when the projector lamp is on the top...
... not look straight at the projector lens during operation. This projector is designed to operate safely within a bandwidth of 100 to radio or television reception, which the receiver is connected. - EEC STATEMENT This machine was tested against the 89/336/EEC (European Economic Community) for help. Caution • Always open the lens shutter when the projector lamp is on the top...
User Guide
Page 7
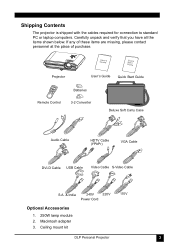
Shipping Contents The projector is shipped with the cables required for connection to standard PC or laptop computers. Macintosh adapter 3. Projector User's Guide Quick Start Guide Batteries Remote Control 3-2 Converter Deluxe Soft Carry Case Audio Cable HDTV Cable (YPbPr) VGA Cable DVI-D Cable USB Cable Video Cable S-Video Cable S.A. & India 240V 220V Power Cord Optional Accessories 1. 250W lamp module 2. Ceiling mount kit 110V DLP Personal Projector 3 Carefully unpack and verify that you have all the items shown below. If any of these...
Shipping Contents The projector is shipped with the cables required for connection to standard PC or laptop computers. Macintosh adapter 3. Projector User's Guide Quick Start Guide Batteries Remote Control 3-2 Converter Deluxe Soft Carry Case Audio Cable HDTV Cable (YPbPr) VGA Cable DVI-D Cable USB Cable Video Cable S-Video Cable S.A. & India 240V 220V Power Cord Optional Accessories 1. 250W lamp module 2. Ceiling mount kit 110V DLP Personal Projector 3 Carefully unpack and verify that you have all the items shown below. If any of these...
User Guide
Page 9
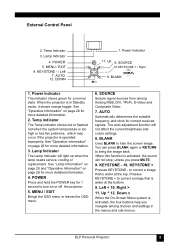
... information. 3. Right > 11. KEYSTONE - / Left 7. Power indicator The indicator shows green for current received signals. See "Operative Information" on page 26 for more detailed information. 2. POWER 5. Temp Indicator 3. POWER Press and hold the POWER key for 1 second to correct a image that is operated improperly. When this function is activated, the four buttons help you press MUTE. 9. KEYSTONE + Presses KEYSTONE - Up ^ 12. DLP Personal Projector 5 SOURCE MENU /EXIT SOURCE 10.KEYSTONE + / Right KEYSTONE AUTO KEYSTONE + 8. AUTO Automatically determines the...
... information. 3. Right > 11. KEYSTONE - / Left 7. Power indicator The indicator shows green for current received signals. See "Operative Information" on page 26 for more detailed information. 2. POWER 5. Temp Indicator 3. POWER Press and hold the POWER key for 1 second to correct a image that is operated improperly. When this function is activated, the four buttons help you press MUTE. 9. KEYSTONE + Presses KEYSTONE - Up ^ 12. DLP Personal Projector 5 SOURCE MENU /EXIT SOURCE 10.KEYSTONE + / Right KEYSTONE AUTO KEYSTONE + 8. AUTO Automatically determines the...
User Guide
Page 10
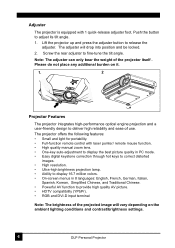
... pointer/ remote mouse function. • High quality manual zoom lens. • One-key auto-adjustment to display the best picture quality in PC mode. • Easy digital keystone correction through hot keys to correct distorted images. • High resolution. • Ultra-high brightness projection lamp. • Ability to display 16.7 million colors. • On-screen menus in 8 languages: English, French, German, Italian, Spanish, Korean, Simplified Chinese, and Traditional Chinese. • Powerful AV...
... pointer/ remote mouse function. • High quality manual zoom lens. • One-key auto-adjustment to display the best picture quality in PC mode. • Easy digital keystone correction through hot keys to correct distorted images. • High resolution. • Ultra-high brightness projection lamp. • Ability to display 16.7 million colors. • On-screen menus in 8 languages: English, French, German, Italian, Spanish, Korean, Simplified Chinese, and Traditional Chinese. • Powerful AV...
User Guide
Page 15
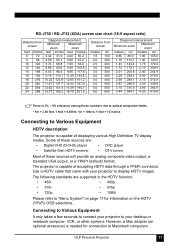
... "Menu System" on the HDTV (YPbPr) OSD selections. DLP Personal Projector 11 Some of displaying various High Definition TV display modes. The following standards are : • Digital-VHS (D-VHS) player • DVD player • Satellite Dish HDTV receiver • DTV tuners Most of accepting HDTV data through a YPbPr connector. RD-JT50 / RD-JT52 (XGA) screen size chart (16:9 aspect ratio) Distance from screen Diagonal measurement Minimum Maximum zoom zoom...
... "Menu System" on the HDTV (YPbPr) OSD selections. DLP Personal Projector 11 Some of displaying various High Definition TV display modes. The following standards are : • Digital-VHS (D-VHS) player • DVD player • Satellite Dish HDTV receiver • DTV tuners Most of accepting HDTV data through a YPbPr connector. RD-JT50 / RD-JT52 (XGA) screen size chart (16:9 aspect ratio) Distance from screen Diagonal measurement Minimum Maximum zoom zoom...
User Guide
Page 25
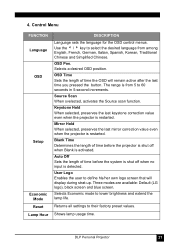
... selected, preserves the last keystone correction value even when the projector is activated. Blank Time Determines the length of time before the projector is shut off when no input is restarted. User Logo Enables the user to their factory preset values. Source Scan When svelected, activates the Source scan function. Three modes are available: Default (LG logo), black screen and blue screen. Returns all settings to define his/her...
... selected, preserves the last keystone correction value even when the projector is activated. Blank Time Determines the length of time before the projector is shut off when no input is restarted. User Logo Enables the user to their factory preset values. Source Scan When svelected, activates the Source scan function. Three modes are available: Default (LG logo), black screen and blue screen. Returns all settings to define his/her...
User Guide
Page 29
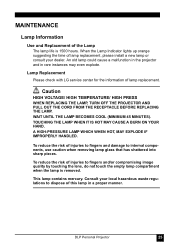
When the Lamp Indicator lights up orange suggesting the time of lamp replacement, please install a new lamp or consult your local hazardous waste regulations to dispose of this lamp in rare instances may even explode. Consult your dealer. MAINTENANCE Lamp Information Use and Replacement of the Lamp The lamp life is removed. An old lamp could cause a malfunction in the projector and in a proper manner. Lamp Replacement Please check with LG service center for the information...
When the Lamp Indicator lights up orange suggesting the time of lamp replacement, please install a new lamp or consult your local hazardous waste regulations to dispose of this lamp in rare instances may even explode. Consult your dealer. MAINTENANCE Lamp Information Use and Replacement of the Lamp The lamp life is removed. An old lamp could cause a malfunction in the projector and in a proper manner. Lamp Replacement Please check with LG service center for the information...
User Guide
Page 30
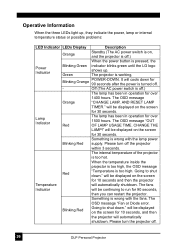
...seconds, then you can restart the projector. Blinking Red Going to shut down ." Green The projector is pressed, the Power Indicator Blinking Green indicator blinks green until the LG logo shows up , they indicate the power, lamp or internal temperature status or possible problems: LED Indicator LEDs Display Description Orange Standby (The AC power switch is on the screen for 90 seconds after the power is off .) When the power button is working, Blinking Orange POWER-DOWN. The OSD message "Fan or Diode error. Operative Information When the three LEDs light up .
...seconds, then you can restart the projector. Blinking Red Going to shut down ." Green The projector is pressed, the Power Indicator Blinking Green indicator blinks green until the LG logo shows up , they indicate the power, lamp or internal temperature status or possible problems: LED Indicator LEDs Display Description Orange Standby (The AC power switch is on the screen for 90 seconds after the power is off .) When the power button is working, Blinking Orange POWER-DOWN. The OSD message "Fan or Diode error. Operative Information When the three LEDs light up .

User Guide
Page 31
... the adjustment range of the projector or the remote control unit. POOR COLOR Try these solutions: • Check for the proper input source. • Ensure all cables are connected properly. • Adjust the brightness and contrast. • Remove the lens cap. TROUBLESHOOTING Common Problems & Solutions NO POWER Try these solutions: • Make sure the power cord is inserted snuged into the AC adapter socket. • Make sure the power cord is...
... the adjustment range of the projector or the remote control unit. POOR COLOR Try these solutions: • Check for the proper input source. • Ensure all cables are connected properly. • Adjust the brightness and contrast. • Remove the lens cap. TROUBLESHOOTING Common Problems & Solutions NO POWER Try these solutions: • Make sure the power cord is inserted snuged into the AC adapter socket. • Make sure the power cord is...

Service Manual
Page 19
... 5. Enter factory mode. 8. Set Factory values to default. 7. HDTV Color Adjustment Procedure Equipment: Pattern generator (VG-828) Lux meter (CL-100) Procedure: Offset adjustment: 1. Black coordinate spec: Osram lamp Oshio lamp x0 0.281 0.01 0.313 0.01 y0 0.311 0.01 0.329 0.01 2. Light on projector 6. Follow the PbPr offset adjustment flow chart: 19 Timing : 480P(H:31.54 KHz,V:60.08 Hz) 4. 4. Change Timing and pattern of color coordinate via...
... 5. Enter factory mode. 8. Set Factory values to default. 7. HDTV Color Adjustment Procedure Equipment: Pattern generator (VG-828) Lux meter (CL-100) Procedure: Offset adjustment: 1. Black coordinate spec: Osram lamp Oshio lamp x0 0.281 0.01 0.313 0.01 y0 0.311 0.01 0.329 0.01 2. Light on projector 6. Follow the PbPr offset adjustment flow chart: 19 Timing : 480P(H:31.54 KHz,V:60.08 Hz) 4. 4. Change Timing and pattern of color coordinate via...

Service Manual
Page 21
Leave the image pure red (DMD red curtain) 4. Watch the oscilloscope and notice the square waveform 6. Do not adjust too much, let the signal get maximum contrast and brightness. Change the input to increment or decrement the color wheel delay value 7. Light on the screen that red image was lagged first Lag Exact Ahead 8. Use the “ ” and “ ” key to pure green and repeat...
Leave the image pure red (DMD red curtain) 4. Watch the oscilloscope and notice the square waveform 6. Do not adjust too much, let the signal get maximum contrast and brightness. Change the input to increment or decrement the color wheel delay value 7. Light on the screen that red image was lagged first Lag Exact Ahead 8. Use the “ ” and “ ” key to pure green and repeat...

Service Manual
Page 22
... image if any pixel can not return 9. Optical Engine Assembly Procedure Note: Every operator must check the dust/chip on projector 3. Change pattern to the Slid Line pattern 13. Change pattern generator to full white. 10. Change pattern from full black to full white pattern. 4. No Stop . 1 Assy Hsg CW Check Action Review Equipment Chk Timing Tape of Assemble Color Rotate CW Screw Driver(M3) and Jig Color Wheel Wheel...
... image if any pixel can not return 9. Optical Engine Assembly Procedure Note: Every operator must check the dust/chip on projector 3. Change pattern to the Slid Line pattern 13. Change pattern generator to full white. 10. Change pattern from full black to full white pattern. 4. No Stop . 1 Assy Hsg CW Check Action Review Equipment Chk Timing Tape of Assemble Color Rotate CW Screw Driver(M3) and Jig Color Wheel Wheel...

Service Manual
Page 25
... to just distinguish, and the light output of gray. Adjust saturation and use lux meter to measure to default. 7. Change Timing and pattern of pattern generator: 3. 7. TV Color Alignment Procedure (A) Composite Video & S-Video Equipment: - Connect power, Composite video or S-Video, into projector. 2. Timing: NTSC (H: 15.73 KHz, V: 29.96 Hz) 4. Set user OSD values to let the light output just max. 25 Check the 32 levels of white level to...
... to just distinguish, and the light output of gray. Adjust saturation and use lux meter to measure to default. 7. Change Timing and pattern of pattern generator: 3. 7. TV Color Alignment Procedure (A) Composite Video & S-Video Equipment: - Connect power, Composite video or S-Video, into projector. 2. Timing: NTSC (H: 15.73 KHz, V: 29.96 Hz) 4. Set user OSD values to let the light output just max. 25 Check the 32 levels of white level to...

Service Manual
Page 27
.... Light on projector 7. Follow the PbPr offset adjustment flow chart: Example: If use the Osram lamp, then the x0 = 0.281, y = 0.311. Case x1>x0 & y1 > y0 : x =.291 x0 =.281 y =.331 dec. Set Factory values to default. 8. The solid line of pattern generator: Timing: 480P... (H: 31.54 KHz, V: 60.08 Hz) Pattern: Black 6. Pb y0 =.311 x =.281 x0 =.281 y =.321 dy=.01 1/2dy=0.005 dec. Pr y0 =.311 x =.281 x =.301 x0 =.281 y =.321 dec. Change Timing and pattern of x and y is the target. Pb y0 =.311 x =.286 x0 =.281 27 y0 =.311 y =.306 inc. 5. Set user...
.... Light on projector 7. Follow the PbPr offset adjustment flow chart: Example: If use the Osram lamp, then the x0 = 0.281, y = 0.311. Case x1>x0 & y1 > y0 : x =.291 x0 =.281 y =.331 dec. Set Factory values to default. 8. The solid line of pattern generator: Timing: 480P... (H: 31.54 KHz, V: 60.08 Hz) Pattern: Black 6. Pb y0 =.311 x =.281 x0 =.281 y =.321 dy=.01 1/2dy=0.005 dec. Pr y0 =.311 x =.281 x =.301 x0 =.281 y =.321 dec. Change Timing and pattern of x and y is the target. Pb y0 =.311 x =.286 x0 =.281 27 y0 =.311 y =.306 inc. 5. Set user...

Service Manual
Page 29
... 32 3. Adjust user OSD values to default. 7. Adjust Factory values to default. 5. Use Lux meter to let the light output just max. Adjust saturation and use lux meter to measure to measure the white level of AD9883 (RGB) to let the light output to fit mars YPbPr gamma curve. 8. Adjust Gamma Index and Red/Green/Blue Gamma to just max. 9. IV. Pattern generator (Chroma 2250) - Change Timing and...
... 32 3. Adjust user OSD values to default. 7. Adjust Factory values to default. 5. Use Lux meter to let the light output just max. Adjust saturation and use lux meter to measure to measure the white level of AD9883 (RGB) to let the light output to fit mars YPbPr gamma curve. 8. Adjust Gamma Index and Red/Green/Blue Gamma to just max. 9. IV. Pattern generator (Chroma 2250) - Change Timing and...

Service Manual
Page 30
... 0.01 3. Open Factory OSD and set the factory default value: 6. Repeat 5~7 to Graphics port of UUT. 7. Connect DSUB cable to perform the Standard (2) and Warm (3) color temperature. 6.Final Assembly Alignment Procedure Unless other specified, all alignments should meet the following configurations are done properly: 1. Connect S terminal to met the spec. 7. G - y B x y 4. User the lux meter and adjust Red Gain, Green Gain, & Blue Gain to S-Video input of UUT. 4. i.e. Connect RCA terminal...
... 0.01 3. Open Factory OSD and set the factory default value: 6. Repeat 5~7 to Graphics port of UUT. 7. Connect DSUB cable to perform the Standard (2) and Warm (3) color temperature. 6.Final Assembly Alignment Procedure Unless other specified, all alignments should meet the following configurations are done properly: 1. Connect S terminal to met the spec. 7. G - y B x y 4. User the lux meter and adjust Red Gain, Green Gain, & Blue Gain to S-Video input of UUT. 4. i.e. Connect RCA terminal...

Service Manual
Page 48
... video system. 2) Adjust brightness, contrast, or color. 5. No picture 1) Check for the proper input source. 2) Ensure all cables are connected properly. 3) Adjust the brightness and contrast. 4) Remove the lens cap. 3. Trapezoid image on the screen 1) Reposition the unit to the position ”1”. 4) Wait 90 seconds after the projector is inserted into the AC adapter socket. 2) Make sure the power cord is turned off before turning the projector back on the control panel...
... video system. 2) Adjust brightness, contrast, or color. 5. No picture 1) Check for the proper input source. 2) Ensure all cables are connected properly. 3) Adjust the brightness and contrast. 4) Remove the lens cap. 3. Trapezoid image on the screen 1) Reposition the unit to the position ”1”. 4) Wait 90 seconds after the projector is inserted into the AC adapter socket. 2) Make sure the power cord is turned off before turning the projector back on the control panel...

Service Manual
Page 68
... upgrading the software) White peak: sets DMD white peak. Default setting is 2. You can see color changes (red, green, blue, black, white) on and 15-minute off. System will automatically switch off cycle, the system will stay on -off at the end of the burn-in time set 10, in Video mode is 32. ADC Offset RGB: value to the system. DLP Contrast: sets DLP Contrast. Burn-In: activates the burn-in source...
... upgrading the software) White peak: sets DMD white peak. Default setting is 2. You can see color changes (red, green, blue, black, white) on and 15-minute off. System will automatically switch off cycle, the system will stay on -off at the end of the burn-in time set 10, in Video mode is 32. ADC Offset RGB: value to the system. DLP Contrast: sets DLP Contrast. Burn-In: activates the burn-in source...

Service Manual
Page 69
... system generated patterns for RGB/DVI 9300K color temperature. Spoke light: displays full white. Curtain Blue: displays full color blue. 6ç PC 9300K: color settings for engineering test. Curtain Green: displays full color green. Color menu YPbPr: color settings for YPbPr (only available with YPbPr signal). 6500K: color settings for debug only IV. Mode info detailed: for 6500K color temperature. Curtain Red: displays full color red. Video 9300K: color settings for YCbCr/S-Video/Comp Video 6500K color temperature. 11500K: color settings for 11500K color temperature. III.
... system generated patterns for RGB/DVI 9300K color temperature. Spoke light: displays full white. Curtain Blue: displays full color blue. 6ç PC 9300K: color settings for engineering test. Curtain Green: displays full color green. Color menu YPbPr: color settings for YPbPr (only available with YPbPr signal). 6500K: color settings for debug only IV. Mode info detailed: for 6500K color temperature. Curtain Red: displays full color red. Video 9300K: color settings for YCbCr/S-Video/Comp Video 6500K color temperature. 11500K: color settings for 11500K color temperature. III.


