
User Guide
Page 1
High Brightness 2. One Touch Auto-Adjustment Function 6. RGB and DVI-D Input Terminal 5. Please read this user's guide for future reference. OUTLINE This DLPTM Projector can display various computer signals and NTSC/PAL/SECAM video signals. High Resolution 3. Compact Size, Feather Weight for purchasing the DLPTM Projector. Easy Keystone Adjustment DLP PROJECTOR USER'S GUIDE Thank you for Portability 4. Save this user's guide to ensure correct use of the device. FEATURES 1.
High Brightness 2. One Touch Auto-Adjustment Function 6. RGB and DVI-D Input Terminal 5. Please read this user's guide for future reference. OUTLINE This DLPTM Projector can display various computer signals and NTSC/PAL/SECAM video signals. High Resolution 3. Compact Size, Feather Weight for purchasing the DLPTM Projector. Easy Keystone Adjustment DLP PROJECTOR USER'S GUIDE Thank you for Portability 4. Save this user's guide to ensure correct use of the device. FEATURES 1.

User Guide
Page 3
... Lamp Information 25 Use and Replacement of Contents Introduction 1 Safety Instructions 1 FCC Statement 2 EEC STATEMENT 2 Shipping Contents 3 Optional Accessories 3 Projector Description 4 Projector 4 External Control Panel 5 Adjuster 6 Projector Features 6 Remote Control Description 7 Installing or Replacing Batteries ("AAA" type 9 Installation 10 Display Size 10 Connecting to Various Equipment 11 Operation... Menu System 17 1. Table of the Lamp 25 Lamp Replacement 25 Operative Information 26 Troubleshooting 27 Common Problems & Solutions 27 DLP Personal Projector iii
... Lamp Information 25 Use and Replacement of Contents Introduction 1 Safety Instructions 1 FCC Statement 2 EEC STATEMENT 2 Shipping Contents 3 Optional Accessories 3 Projector Description 4 Projector 4 External Control Panel 5 Adjuster 6 Projector Features 6 Remote Control Description 7 Installing or Replacing Batteries ("AAA" type 9 Installation 10 Display Size 10 Connecting to Various Equipment 11 Operation... Menu System 17 1. Table of the Lamp 25 Lamp Replacement 25 Operative Information 26 Troubleshooting 27 Common Problems & Solutions 27 DLP Personal Projector iii

User Guide
Page 4
Status Messages 28 Specifications 29 Projector Specifications 29 Timing Chart 30 Suppoted timing for Analog RGB and DVI inputs 30 Supported timing for YPbPr input 30 Supported timing for Video and S-Video inputs 31 Dimensions 32 iv DLP Personal Projector
Status Messages 28 Specifications 29 Projector Specifications 29 Timing Chart 30 Suppoted timing for Analog RGB and DVI inputs 30 Supported timing for YPbPr input 30 Supported timing for Video and S-Video inputs 31 Dimensions 32 iv DLP Personal Projector
User Guide
Page 5
... on rare occasions. 3. To avoid the lamp being damaged, never turn off in the back of the projector during operation. DLP Personal Projector 1 Allow the projector to cool for future reference. 2. Excessive operation of electric shock, do not disassemble this user's guide before... you operate your projector and save it to removing the lamp assembly for operation. 8. Incorrect reassembly can cause electric...
... on rare occasions. 3. To avoid the lamp being damaged, never turn off in the back of the projector during operation. DLP Personal Projector 1 Allow the projector to cool for future reference. 2. Excessive operation of electric shock, do not disassemble this user's guide before... you operate your projector and save it to removing the lamp assembly for operation. 8. Incorrect reassembly can cause electric...
User Guide
Page 6
...frequency energy and, if not installed and used in conjuction with the instructions, may damage your personal projector. Caution • Always open the lens shutter when the projector lamp is on , the user is encouraged to try to correct the interference by turning the equipment ... the equipment into an outlet on the top of + 10 volts occur. However, there is connected. - In these requirements. 2 DLP Personal Projector EEC STATEMENT This machine was tested against the 89/336/EEC (European Economic Community) for help. Reorient or relocate the receiving antenna. ...
...frequency energy and, if not installed and used in conjuction with the instructions, may damage your personal projector. Caution • Always open the lens shutter when the projector lamp is on , the user is encouraged to try to correct the interference by turning the equipment ... the equipment into an outlet on the top of + 10 volts occur. However, there is connected. - In these requirements. 2 DLP Personal Projector EEC STATEMENT This machine was tested against the 89/336/EEC (European Economic Community) for help. Reorient or relocate the receiving antenna. ...
User Guide
Page 7
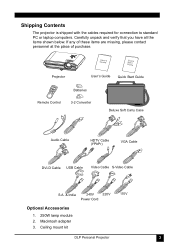
If any of these items are missing, please contact personnel at the place of purchase. Ceiling mount kit 110V DLP Personal Projector 3 Macintosh adapter 3. Projector User's Guide Quick Start Guide Batteries Remote Control 3-2 Converter Deluxe Soft Carry Case Audio Cable HDTV Cable (YPbPr) VGA Cable DVI-D Cable USB... 240V 220V Power Cord Optional Accessories 1. 250W lamp module 2. Carefully unpack and verify that you have all the items shown below. Shipping Contents The projector is shipped with the cables required for connection to standard PC or laptop computers.
If any of these items are missing, please contact personnel at the place of purchase. Ceiling mount kit 110V DLP Personal Projector 3 Macintosh adapter 3. Projector User's Guide Quick Start Guide Batteries Remote Control 3-2 Converter Deluxe Soft Carry Case Audio Cable HDTV Cable (YPbPr) VGA Cable DVI-D Cable USB... 240V 220V Power Cord Optional Accessories 1. 250W lamp module 2. Carefully unpack and verify that you have all the items shown below. Shipping Contents The projector is shipped with the cables required for connection to standard PC or laptop computers.

User Guide
Page 8
Projector Description Projector RGB (PC / Mac) / YPbPr signal input Video connector Audio input USB mouse connector Video Audio USB S-Video RS-232 S-Video connector RS232 control port IR remote sensor D-SUB IN DVI-D AC IN Main power switch AC power cord inlet DVI-D signal input Kensington lock Rear adjuster foot Projection lens adjuster External control panel (See "External Control Panel" on page 5 for more detailed information.) Ventilation grill Front adjuster foot Projection lens IR remote sensor Lamp door Rear adjuster foot 4 DLP Personal Projector Speaker
Projector Description Projector RGB (PC / Mac) / YPbPr signal input Video connector Audio input USB mouse connector Video Audio USB S-Video RS-232 S-Video connector RS232 control port IR remote sensor D-SUB IN DVI-D AC IN Main power switch AC power cord inlet DVI-D signal input Kensington lock Rear adjuster foot Projection lens adjuster External control panel (See "External Control Panel" on page 5 for more detailed information.) Ventilation grill Front adjuster foot Projection lens IR remote sensor Lamp door Rear adjuster foot 4 DLP Personal Projector Speaker
User Guide
Page 9
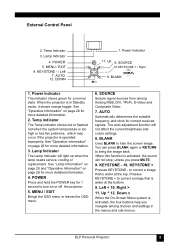
...when the lamp needs service, cooling or replacement. KEYSTONE + Presses KEYSTONE - Right > 11. POWER 5. DOWN 1. See "Operative Information" on or off the projector. 5. MENU / EXIT Brings the OSD menu or leaves the OSD menu. 6. KEYSTONE - 10. Up ^ 12. Down v When the On-Screen Menu ...image that is activated, the sound will not stop, unless you navigate among Analog RGB, DVI, YPbPr, S-Video and Composite Video. 7. DLP Personal Projector 5 SOURCE Selects signal sources from among choices and settings in Standby mode, it shows orange toggle. Left < 10. When the...
...when the lamp needs service, cooling or replacement. KEYSTONE + Presses KEYSTONE - Right > 11. POWER 5. DOWN 1. See "Operative Information" on or off the projector. 5. MENU / EXIT Brings the OSD menu or leaves the OSD menu. 6. KEYSTONE - 10. Up ^ 12. Down v When the On-Screen Menu ...image that is activated, the sound will not stop, unless you navigate among Analog RGB, DVI, YPbPr, S-Video and Composite Video. 7. DLP Personal Projector 5 SOURCE Selects signal sources from among choices and settings in Standby mode, it shows orange toggle. Left < 10. When the...
User Guide
Page 10
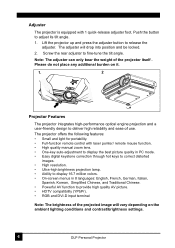
... remote control with 1 quick-release adjuster foot. Screw the rear adjuster to release the adjuster. Adjuster The projector is equipped with laser pointer/ remote mouse function. • High quality manual zoom lens. • One...image will drop into position and be locked. 2. Lift the projector up and press the adjuster button to fine-tune the tilt angle. The adjuster will vary depending on ...to adjust its tilt angle. 1. Push the button to deliver high reliability and ease of the projector itself . Note: The adjuster can only bear the weight of use. Please do not place any...
... remote control with 1 quick-release adjuster foot. Screw the rear adjuster to release the adjuster. Adjuster The projector is equipped with laser pointer/ remote mouse function. • High quality manual zoom lens. • One...image will drop into position and be locked. 2. Lift the projector up and press the adjuster button to fine-tune the tilt angle. The adjuster will vary depending on ...to adjust its tilt angle. 1. Push the button to deliver high reliability and ease of the projector itself . Note: The adjuster can only bear the weight of use. Please do not place any...

User Guide
Page 11
.... Remote Control Description The remote control sensors are located in the front/ back of time, the buttons function as a mouse. For the rest of the projector. DLP Personal Projector 7 PIP SIZE RATIO 1. 3 LEFT / KEYSTONE - ,4 RIGHT / KEYSTONE + Whe the OSD menu is connected to the...
.... Remote Control Description The remote control sensors are located in the front/ back of time, the buttons function as a mouse. For the rest of the projector. DLP Personal Projector 7 PIP SIZE RATIO 1. 3 LEFT / KEYSTONE - ,4 RIGHT / KEYSTONE + Whe the OSD menu is connected to the...

User Guide
Page 12
...and choose the position and size of the PIP image. 6. button is pressed again, the picture is further reduced until it is lower than the projector provides, you prefer: 4:3,16:9 or native input source resolution in combination with FREEZE. ) 4. PIP SOURCE, PIP POS., PIP SIZE By pressing ... RGB or DVI mode (when the input source's resolution is restored to the last state from "ZOOM", "BLANK", "FREEZE" or "PIP". 8 DLP Personal Projector 3. RETURN Back to its original size. To stop the freeze function, press the FREEZE button, RETURN button or SOURCE button (when the input source...
...and choose the position and size of the PIP image. 6. button is pressed again, the picture is further reduced until it is lower than the projector provides, you prefer: 4:3,16:9 or native input source resolution in combination with FREEZE. ) 4. PIP SOURCE, PIP POS., PIP SIZE By pressing ... RGB or DVI mode (when the input source's resolution is restored to the last state from "ZOOM", "BLANK", "FREEZE" or "PIP". 8 DLP Personal Projector 3. RETURN Back to its original size. To stop the freeze function, press the FREEZE button, RETURN button or SOURCE button (when the input source...

User Guide
Page 13
DLP Personal Projector 9 Replace only with the same or equivalent type recommended by the diagram inside the compartment. 3 Position the lid over the compartment and snap it back into place. Dispose of an explosion if batteries are incorrectly replaced. There may be danger of used batteries according to the manufacturer's instructions. Caution Avoid excessive heat and humidity. Installing or Replacing Batteries ("AAA" type) 1 Push and open the battery compartment lid in the direction shown. 2 Install batteries as indicated by the manufacturer.
DLP Personal Projector 9 Replace only with the same or equivalent type recommended by the diagram inside the compartment. 3 Position the lid over the compartment and snap it back into place. Dispose of an explosion if batteries are incorrectly replaced. There may be danger of used batteries according to the manufacturer's instructions. Caution Avoid excessive heat and humidity. Installing or Replacing Batteries ("AAA" type) 1 Push and open the battery compartment lid in the direction shown. 2 Install batteries as indicated by the manufacturer.

User Guide
Page 14
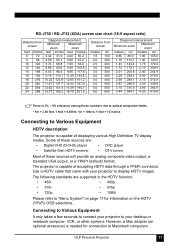
RD-JT50 / RD-JT52 display size chart (4:3 aspect ratio) Distance from screen feet inches 6 72 8 96 10 120 12 144 14 168 16 192 ....2 14.94 179.2 18.29 219.5 Distance from the screen according to the desired picture size (see the table below). INSTALLATION Display Size Place the projector at the required distance from screen meters cm 1.5 150 2.0 200 2.5 250 3.0 300 3.5 350 4.0 400 4.5 450 5.0 500 5.5 550 6.0 600 Diagonal measurement ... 1.14 1.52 1.91 2.29 2.67 3.05 3.43 3.81 4.19 4.57 cm 114.3 152.4 190.5 228.6 266.7 304.8 342.9 381.0 419.1 457.2 10 DLP Personal Projector
RD-JT50 / RD-JT52 display size chart (4:3 aspect ratio) Distance from screen feet inches 6 72 8 96 10 120 12 144 14 168 16 192 ....2 14.94 179.2 18.29 219.5 Distance from the screen according to the desired picture size (see the table below). INSTALLATION Display Size Place the projector at the required distance from screen meters cm 1.5 150 2.0 200 2.5 250 3.0 300 3.5 350 4.0 400 4.5 450 5.0 500 5.5 550 6.0 600 Diagonal measurement ... 1.14 1.52 1.91 2.29 2.67 3.05 3.43 3.81 4.19 4.57 cm 114.3 152.4 190.5 228.6 266.7 304.8 342.9 381.0 419.1 457.2 10 DLP Personal Projector
User Guide
Page 15
RD-JT50 / RD-JT52 (XGA) screen size chart (16:9 aspect ratio) Distance from screen Diagonal ...= 3.28 feet, 1 feet = 0.305m, 1m = 100cm, 1 feet = 12 inches Connecting to Various Equipment HDTV description The projector is capable of these sources are supported in the HDTV function: • 480i • 480p • 576i • 576p •...sources will provide an analog composite video output, a standard VGA output, or a YPbPr (default) format. DLP Personal Projector 11 The following standards are : • Digital-VHS (D-VHS) player • DVD player • Satellite...
RD-JT50 / RD-JT52 (XGA) screen size chart (16:9 aspect ratio) Distance from screen Diagonal ...= 3.28 feet, 1 feet = 0.305m, 1m = 100cm, 1 feet = 12 inches Connecting to Various Equipment HDTV description The projector is capable of these sources are supported in the HDTV function: • 480i • 480p • 576i • 576p •...sources will provide an analog composite video output, a standard VGA output, or a YPbPr (default) format. DLP Personal Projector 11 The following standards are : • Digital-VHS (D-VHS) player • DVD player • Satellite...

User Guide
Page 16
Notebook/ Computer (Macintosh computer is only supported with mouse functions. 2. Connecting to Various Equipment It only takes a few seconds to connect your projector to your desktop or notebook computer, VCR, or other systems. However, a Mac adapter (an optional accessory) is not needed unless you have a remote control with ... IN DVD Player YPbPr S-Video RS-232 DVI-D AC IN 3. S-video device S-Video D-SUB IN Video Audio USB S-Video RS-232 DVI-D AC IN 12 DLP Personal Projector DVD player or HDTV signal can only support D-SUB IN.
Notebook/ Computer (Macintosh computer is only supported with mouse functions. 2. Connecting to Various Equipment It only takes a few seconds to connect your projector to your desktop or notebook computer, VCR, or other systems. However, a Mac adapter (an optional accessory) is not needed unless you have a remote control with ... IN DVD Player YPbPr S-Video RS-232 DVI-D AC IN 3. S-video device S-Video D-SUB IN Video Audio USB S-Video RS-232 DVI-D AC IN 12 DLP Personal Projector DVD player or HDTV signal can only support D-SUB IN.

User Guide
Page 18
OPERATION Start Up 1. SOURCE KEYSTONE + AUTO BLANK (When the power is turned off, there is turned on . (220V) 3. Turn the Main Power Switch on . Plug the power cord into a wall socket. (110V) 2. Projector Remote Control POWER MENU /EXIT KEYSTONE - The Power Indicator flashes green and stays green when the power is a 90-second cooling period before the projector can be re-started.) 4. Press and hold POWER to start the unit. Switch on all connected equipment. 14 DLP Personal Projector
OPERATION Start Up 1. SOURCE KEYSTONE + AUTO BLANK (When the power is turned off, there is turned on . (220V) 3. Turn the Main Power Switch on . Plug the power cord into a wall socket. (110V) 2. Projector Remote Control POWER MENU /EXIT KEYSTONE - The Power Indicator flashes green and stays green when the power is a 90-second cooling period before the projector can be re-started.) 4. Press and hold POWER to start the unit. Switch on all connected equipment. 14 DLP Personal Projector

User Guide
Page 19
The built-in Analog RGB mode. Press 3 to correct keystoning at the bottom of the image. Projector Remote control POWER MENU /EXIT KEYSTONE - Projector POWER MENU /EXIT KEYSTONE - Press 4 to correct keystoning at the top of the image. SOURCE KEYSTONE + AUTO ...the picture quality. To do this , press KEYSTONE 3/ 4 (hot key) on the remote control. SOURCE KEYSTONE + AUTO BLANK DLP Personal Projector 15 Digital Keystone Correction Keystoning refers to the situation where the projected image is available only in Intelligent Auto Adjustment function will re-adjust ...
The built-in Analog RGB mode. Press 3 to correct keystoning at the bottom of the image. Projector Remote control POWER MENU /EXIT KEYSTONE - Projector POWER MENU /EXIT KEYSTONE - Press 4 to correct keystoning at the top of the image. SOURCE KEYSTONE + AUTO ...the picture quality. To do this , press KEYSTONE 3/ 4 (hot key) on the remote control. SOURCE KEYSTONE + AUTO BLANK DLP Personal Projector 15 Digital Keystone Correction Keystoning refers to the situation where the projected image is available only in Intelligent Auto Adjustment function will re-adjust ...

User Guide
Page 20
... image back. Because Analog RGB and YPbPr inputs share the same terminal in the back of the projector or the remote control. Projector Remote control POWER MENU /EXIT KEYSTONE - SOURCE KEYSTONE + AUTO BLANK BLANK 16 DLP Personal Projector Projector Remote control POWER MENU /EXIT KEYSTONE - SOURCE KEYSTONE + AUTO BLANK Blank Uses BLANK to hide the...
... image back. Because Analog RGB and YPbPr inputs share the same terminal in the back of the projector or the remote control. Projector Remote control POWER MENU /EXIT KEYSTONE - SOURCE KEYSTONE + AUTO BLANK BLANK 16 DLP Personal Projector Projector Remote control POWER MENU /EXIT KEYSTONE - SOURCE KEYSTONE + AUTO BLANK Blank Uses BLANK to hide the...
User Guide
Page 21
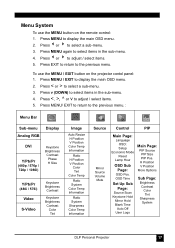
... Source Volume Mute Main Page: Language OSD: Setup Economic Mode Reset Lamp Hour OSD Sub Page: OSD Pos. To use the MENU button on the projector contol panel: 1. Press MENU/ EXIT to return to select a sub-menu. 3. Press EXIT to return to select items in the sub-menu....to the previous menu. Press MENU to display the main OSD menu. 2. H Position V Position More Options Sub Page: Brightness Contrast Color Tint Sharpness System DLP Personal Projector 17 Press MENU / EXIT to display the main OSD menu. 2. Press < or > to adjust / select items. 5. OSD Time Set Up Sub Page...
... Source Volume Mute Main Page: Language OSD: Setup Economic Mode Reset Lamp Hour OSD Sub Page: OSD Pos. To use the MENU button on the projector contol panel: 1. Press MENU/ EXIT to return to select a sub-menu. 3. Press EXIT to return to select items in the sub-menu....to the previous menu. Press MENU to display the main OSD menu. 2. H Position V Position More Options Sub Page: Brightness Contrast Color Tint Sharpness System DLP Personal Projector 17 Press MENU / EXIT to display the main OSD menu. 2. Press < or > to adjust / select items. 5. OSD Time Set Up Sub Page...
Service Manual
Page 1
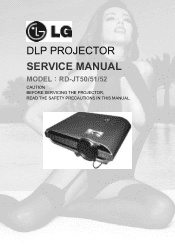
DLP PROJECTOR SERVICE MANUAL MODEL RD-JT50/51/52 CAUTION BEFORE SERVICING THE PROJECTOR, READ THE SAFETY PRECAUTIONS IN THIS MANUAL.
DLP PROJECTOR SERVICE MANUAL MODEL RD-JT50/51/52 CAUTION BEFORE SERVICING THE PROJECTOR, READ THE SAFETY PRECAUTIONS IN THIS MANUAL.


